
A goal in your automation is something you want your contacts to achieve, such as signing up for a membership site, purchasing a product, or visiting your landing page.
When building an automation in Ontraport, you’ll often first consider what its goals are and then build the automation around those. You can also set up other actions, filters or goals to happen after a goal is achieved; goals aren’t necessarily the final end point of an automation.
Check out the video about triggers and goals to learn more.
Using Goals in your automations
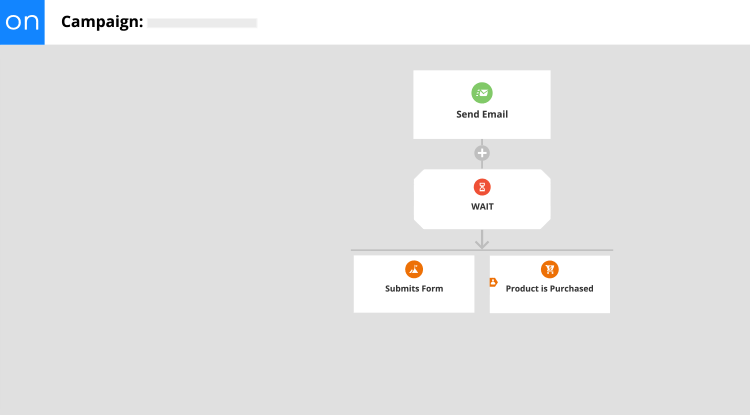
Goals can appear anywhere below a trigger on an automation map. You can add a goal by clicking the "What Happens Next?" element below any existing element or trigger, then selecting "Goal" from the Filters tab. Once the goal element is on the automation map, click into it and then click Add Goal and determine what you want the goal to be.
You have many options, broken into four categories: CRM, external events, sales and sites/pages. Here we’ve further broken them down into categories to help you find the best goal for your specific use case.
You’ll notice that the list of goals is very similar to the list of triggers. You’ll use triggers when you want to start a completely new automation and add contacts to that automation based on qualifying actions. Goals allow you to create new automation paths based on the same qualifying actions but can be within a large automation, allowing you to easily track your efforts all in one map when in Performance Mode.
Customer Relationship Management (CRM)
Contacts
These goals relate to the information in your contacts’ records
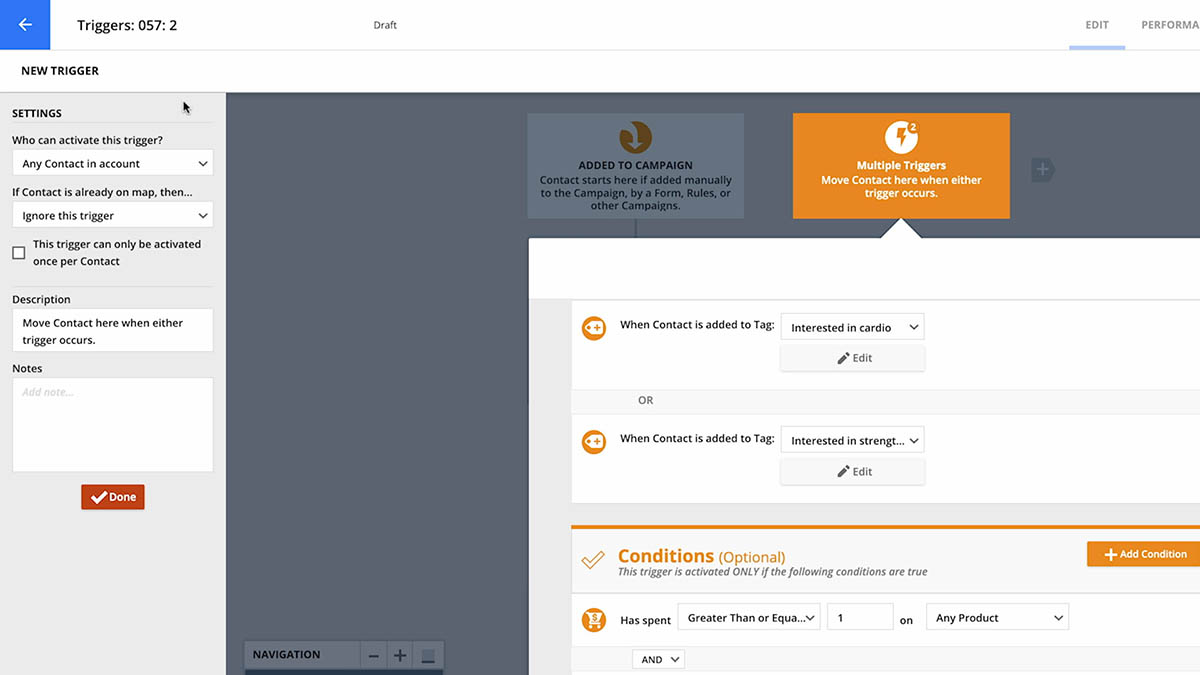
A contact is tagged/untagged
Tags are the way you label contacts for segmentation. If you want your automation to just be for a certain segment of your audience, you’ll use these tag-related goals.
For example, if you want to only include contacts who’ve received your “customer” tag, you would use “When contact is added to tag” as your goal to ensure those contacts are added to this automation.
- When contact is added to tag
- When contact is removed from tag
A contact record is updated
- Contact submits a form: If you’d like to include all contacts who fill out a specific form, regardless of specific form fields and information was provided, you’ll use this.
- A field is updated: Similar to the tag-related goals, you would use this if you’d like to include contacts who have a certain field value, such as if their location is New York or their purchase date field is filled in.
Dates
These goals are based on dates within contacts’ records. You might use this if you send out special promotions for birthdays or holidays or if you automate follow-up after credit card dates expire.
- Today matches contact’s date field: This goal is automatically achieved on a date that matches a field in their contact record, such as their birthday or their card expiration date.
- Today is relative to contact’s date field: This goal is automatically achieved before or after a date in their contact record. You could use this goal to add contacts to an automation path starting x days before their birthday or x days after their card expiration date.
- Today is specific date: This is automatically achieved by all contacts on your automation on the set date you choose. You could use this if you’re running a specific promotion that ends on a specific date.
Automations
These goals are achieved when contacts’ position on any automation in your account changes. You would use these if you want to keep contacts from progressing in one automation until they display a specified activity in a different automation. For example, if contacts are on an automation to receive subscription-based content and their credit card expires, they may be paused on that automation and sent to this new one, asking them to update their card.
- Contact is paused on automation
- Contact is unpaused on automation
- Contact is added/removed from automation
Tasks
Tasks in Ontraport are manual actions that need to be taken by someone on your team, such as making a phone call, printing documents for records, or sending gifts.
- Task is completed: If you’d like to set up follow-up automation after an assignee completes a task in your automation, you’ll use this goal.
Purchases
These goals move contacts based on their purchase of product that must be shipped. The goals are automatically achieved when contacts are added or removed from a fulfillment list so they can receive appropriate updates about the status of their order.
- When contact is added to fulfillment list
- When contact is removed from fulfillment list
External Events
These goals are achieved when a contact interacts with your emails or SMS texts.
A contact reacts to an email
- Opens email
- Clicks an email link
A contact gets in touch with you
- Sends you an email
- SMS Received from contact
Sales
These goals are achieved when a contact makes a purchase or payment-related action or visits your landing pages.
Purchases
- Purchases product
Payments
- Open order is charged or updated
- Credit card is charged or declined
- Gets a refund on a product
Page visits
- Visits a landing page
- Visits a PURL
Sites/Pages
These goals are achieved when a contact interacts with your pages or websites outside of Ontraport or within a membership site that uses an integration such as PilotPress.
Page visits
- Contact visits URL
- Clicks tracked link
Membership site access
- Is given access to WordPress membership level
- Loses access to WordPress membership level
Goal settings
Changing the settings on your goals allows you to further refine who can achieve the goal.
- Who can achieve this goal? This setting allows you to specify that the goal applies only to:
- Any contact on this map
- Only contacts on previous waits
- Contacts on any upstream element
- Any contact in account
- If contact is already on map, then…
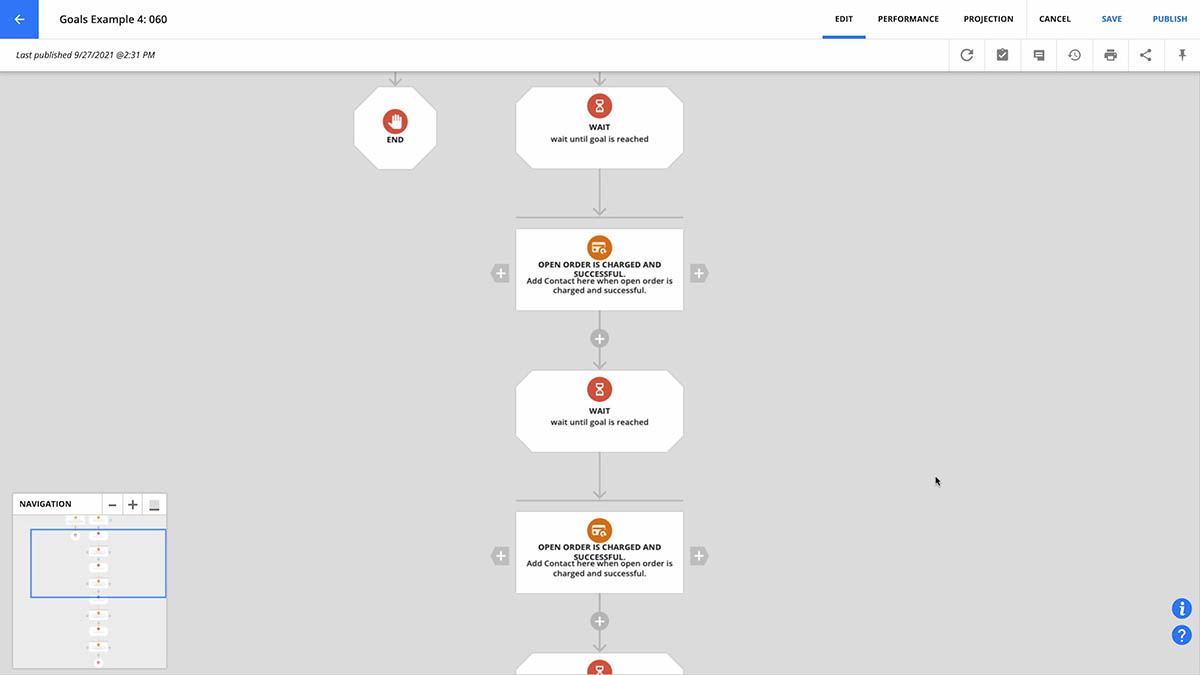
- Move here when achieved: Move contacts to this goal and remove them from wherever else they were on the map. This setting for contacts already on the automation allows you to have them jump immediately to the goal and skip any intermediate steps. For example, you may have a goal of “Purchases Product X” and a nurturing automation of 10 email elements above the goal. Contacts who are on the fourth email and purchase “Product X” from your website can jump directly to the goal and won’t be sent the remaining six emails encouraging them to buy something they already bought.
- Add here again when achieved: Add the contact again here and also leave wherever else they are on the map.
- Ignore this goal: Leave them where they are and ignore this goal.
- This goal can only be activated once per contact. Select the checkbox to prevent a contact from achieving the goal (and therefore receiving any follow-up automation) more than once. For example, you might send someone a personal coupon to encourage a second purchase but want to send that coupon only once.
Wait settings
Every goal comes with customizable wait settings, and the default setting is “Continue immediately when the attached goal is achieved.” You can also edit the settings to account for contacts who don’t achieve your goal (For example, if they don’t purchase a product, open your emails, click on your email links, visit your landing pages, log in to your membership site, etc.). This is often called the “path of least action.”
Here’s how to update your settings for the path of least action:
- Load your automation map, and click Edit.
- Click the wait element above your goal.
- Click the “Wait here until” dropdown and select a setting that fits your needs, such as waiting one week, by selecting “Some time passes” and adding “7 days” in the “How much time?” field.
- Click Done.
- Once your settings are saved, you’ll see a new line of automation to the left of your wait.
- Click “What happens next?” to start building your path of least action.
- Complete your path with an end, exit or go to element.

 .
.