
One of my favorite things about the platform is that there’s not always only one way of doing things; it’s flexible enough to adapt to your own marketing philosophy and meet your needs no matter what the strategy is.
Here are some of the best practices we’ve learned for transitioning your company’s marketing to Ontraport’s Campaign Builder.
1. Decide where each map will begin and end before you start building
Although it’s tempting to get your hands on a campaign and start building by instinct, you might end up building yourself into a corner if you start out without a plan for where your campaign map will begin and end.
For example, we initially tried beginning our ebook campaigns with a trigger based on the ebook opt-in form. When people finished filling out the form to get their free ebook, they’d be added to the map, but we soon realized that starting the map there skipped key information about what leads did before completing the form. We wanted to know how many people who visited the page filled out the form, so we updated our map with a trigger based on when a visitor lands on the opt-in page.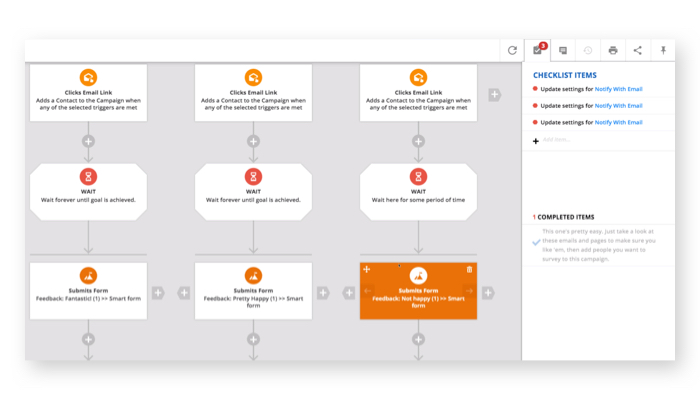
You should also put some thought into where your map will end. It can be tempting to build your map so that contacts travel all the way from being a new lead to becoming a loyal customer on one map. This isn’t necessarily wrong; theoretically, you could have only one map for your entire business. However, having a giant, complex map may prove to be more difficult to maintain over time. Nesting campaigns — or combining numerous campaigns for the bigger-picture view on one simple map — allows you to keep all your communications with leads and customers neatly organized so that you can easily optimize them on a regular basis. This leads us to our next best practice.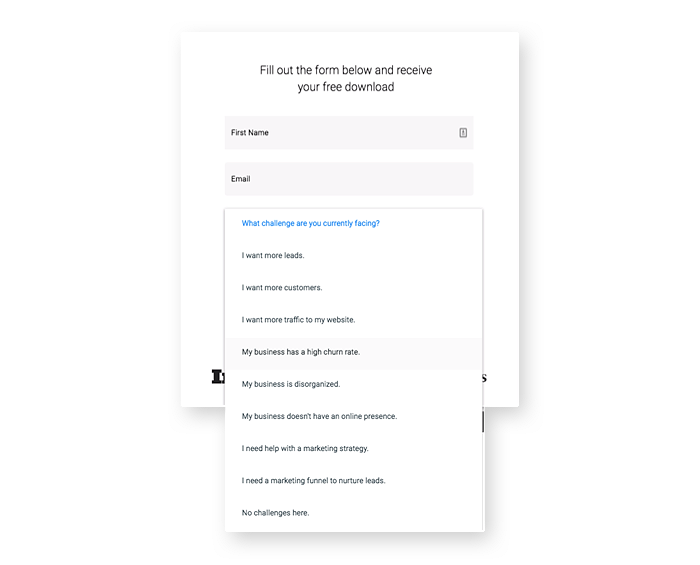
2. Identify processes that need smaller, standalone maps
It might be beneficial to separate processes into smaller maps. Here’s a good rule of thumb: If something can be repeated multiple times, do a map just for that process.
Let’s say you have a process for following up with people who attempt to make a purchase but whose credit cards are declined. This process can happen any number of times, but it doesn’t affect the way they continue moving through your other maps. You still want them to receive offer emails for the product they attempted to buy. This process is a good example of something that can be on a campaign map by itself.
While you can build this on top of an existing map, there are a few benefits of separating them. For one thing, by adding contacts to another map, you can avoid adding them in a second place on your first map. Even though contacts can be on two points of one map simultaneously, this might create confusion, and you’ll need to make sure that contacts do not repeat steps that should happen only once. Another benefit of having this process on a separate map is that you can have multiple maps adding people to the campaigns. For example, say you have one campaign for selling product A and another for selling product B. Both campaigns can have a step that adds people to the same Credit Card Failure Campaign so that you don’t have to build it twice, in two places.
3. Leverage reporting maps whenever possible to capture data in one place, even if you want to nest campaigns
On each map, you can view reports such as Contact Flow, Goal Conversion, Customer Lifetime Value and more that reveal how all the components of one campaign affect each other and how they contribute to the overall goal. This means that if you have some processes spread across multiple maps, or campaign nesting, you may not be able to get insight into how an element on one map is affecting an element on another.
Reporting maps solve this. A reporting map is a campaign that has no actions on it, only triggers, filters and goals. This means a contact can travel through your reporting map and any of your other campaigns simultaneously. They don’t need to receive any additional emails, have tags changed, or have fields updated. They just need to activate triggers and goals for you to see how elements from different campaigns are having an effect on a contact’s experience.
4.Think of your campaigns as dynamic customer journeys, not a predetermined series of steps
Moving away from seeing your marketing campaigns as a static sequence of pre-determined events is a real paradigm shift. Campaign Builder unlocks dynamic customer journeys that were very complicated to create with other methods of marketing.
With traditional marketing automation software, the way contacts progress through a campaign is linear. Rules are used to dictate what should happen to contacts within the sequence, but it’s difficult to change what happens when contacts take the action you want them to. Ontraport’s Campaign Builder creates opportunities for contacts to move in a dynamic, non-linear fashion. Goals inside campaigns can move your contacts to the next step, changing a contact’s path the second they take a desired action.
For example, you can simply create a goal that is achieved when the product is purchased, and move contacts to that point on the map.
Because of the addition of goals, you can have always-on automation that applies only to the people you specify and moves them dynamically through a series of steps based on their behavior and engagement.
5. Divide up maps according to team functions and responsibilities
If you have multiple managers or team members who are responsible for different aspects of your business, an easy way to structure your campaigns is around each team or manager’s responsibilities. That way, you can delegate oversight for each campaign to one person or team.
This has the added advantage of preventing confusion or inefficient building patterns that can occur when two or more builders are using one map with different priorities. Unless these two builders are completely in sync and communicating effectively, you can end up with inconsistencies and mistakes built into your campaigns.
Additionally, this allows you to quickly view the KPIs each team is responsible for separately and make changes to their processes to improve them without throwing a wrench into another team’s process.
6. Don’t wait to execute on your campaign until you have everything figured out
You may be hesitant to build your own campaign and publish it — but don’t doubt yourself! Having an imperfect campaign that is actually running and getting results is better than waiting around until you develop a perfect campaign. In fact, there is no such thing as a perfect campaign. Even if there were, you wouldn’t know that the campaign was perfect before launching it. Running actual contacts through your campaign is the only way to gather data and feedback you can use to make it better, so the most important thing is to get your campaign out there fast so you can start optimizing it.
7. There’s always more than one way to map your campaign
One of the best things about Campaign Builder is how flexible it is. There will always be multiple ways you can build what you need, and there’s not always a clear cut answer as to which way is best. Sometimes it just depends on your preferences.
For example, we recently built a campaign for an award that involves a two-step application. At each step, the contact submits a form and gets a tag. When they submit step one, they receive the “Step 1” tag, and when they submit step two, the “Step 1” tag is removed and they are tagged as an “Award Applicant.”
When we originally built this, we started with two triggers at the top of the map. One was the step one form, and the other was the step two form. When step two was triggered, first the “Step 1” tag was removed and then the “Award Applicant” tag was applied. This worked fine and did everything we needed.
However, we ended up changing the map to have only one trigger, step one. We turned the step two form into a goal. After contacts fill out step one, the tag is applied, then contacts remain on a wait element until step two is filled out. The tags are changed when the application is completed, and then applicants receive an email from us. This gives us some additional reporting options because it lets us see the conversion rate from step one to step two. This is also a good way to build it; the difference was just a matter of preference.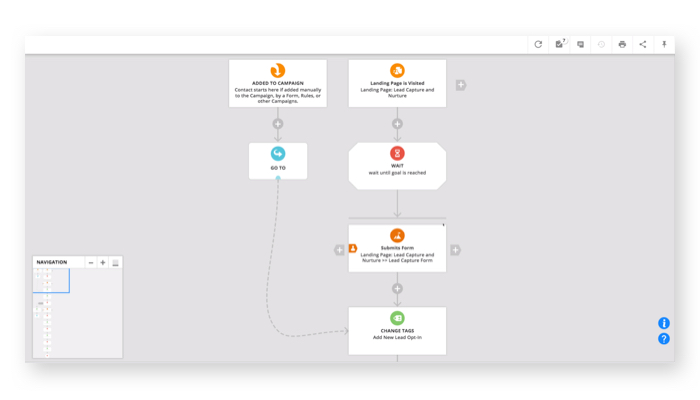
8. Don’t forget to use all the segmentation tools at your disposal
One of the cool things about Campaign Builder is that it makes segmentation a breeze. Contacts’ next steps can be decided based on where they are on the map and how they interact with it. However, it’s important to remember that maps aren’t the only way to control each contact’s experience. You should still make the most of tags and custom fields to divide your contacts into segments for messaging and reporting. Tags and fields also come in handy when used to move contacts around the map with conditions, as well as for limiting when goals and triggers are achieved.
Using the same tags and fields across multiple campaign maps allows you to create groups of contacts across campaigns. You can even use these tags and custom fields to add contacts to new reporting maps for better stats on their engagement across the entire segment, regardless of which other campaigns they’re on.
For example, we use a custom field based on a dropdown menu where we ask each of our new contacts to select an option that represents their biggest challenge at the moment. We use this data to customize their experience by filtering them on our campaign maps in different directions based on this field value.
If contacts select “Sales Conversions” as their top challenge, we use a condition filter to move them onto a campaign with more information about that topic.
9. Know when to use a filter versus a goal
It can be tricky to decide whether to use filters or goals to change a contact’s path on your campaign.
Here’s an example of a scenario where you might be undecided at first: After contacts receive a series of emails, you want to move them down one of two paths. If they have purchased Product A, then you want them to go down path A. If they have not, then you want them to go down path B. You could do this with:
- A condition filter that moves them onto path A on the condition that they have purchased the product and path B if they have not.
OR - A goal that is achieved when a contact on the map purchases product A. You can even limit that goal so that it may only be achieved by a contact on the previous wait step. Contacts who do not achieve the goal would continue to move down path B while contacts who do would be moved to path A.
How should you decide which element to use?
To choose the right one, keep this in mind about filters: they only happen at ONE point in time. In contrast, goals can be activated at any time.
In the example above, let’s say that contacts buy product A after receiving only two of the five emails. If you use a condition filter, they will not be sent down the “purchased” path until they reach that filter. If the filter was placed after the fifth email, they would wait and receive the final three emails and only then be moved onto the “purchased” path.
However, if you use a goal in this scenario, whenever contacts purchase product A they will be immediately moved onto the “purchased” path. Goals are almost always a better option because of their flexibility, not to mention the additional performance reporting that they offer.
The main factor to keep in mind is that condition filters are time-bound, which means they’ll only sort each contact once, at a fixed point on the map. If you want contacts to change paths whenever they take a specific action, then use a goal.
10. Think about when to use “re-drops”
“Re-drop” isn’t an official term in Ontraport, but it’s the term our marketing team uses to refer to instances when a contact is added to another point on the same map. This happens in cases when a contact is interacting with different parts of your business at the same time.
Let’s break it down. The way that a contact moves through a campaign map is a bit like the way players move in the classic kid’s board game Chutes and Ladders. The rules are simple: each player uses a spinner to see how many spaces forward they can move that turn. The goal is to reach square 100 first. If they land on a ladder space, they get to jump ahead on the map to a space above. If they land on a chute, they slide down to a space lower on the map.
In this game, all the individual pawns will move in different paths at different times. The board is akin to the campaign map, and the pawns are similar to individual contacts in your account.
How does a re-drop work? Let’s say there was a rule in the traditional game (which there isn’t) that says that when you reach the ladder on square 28, you get an additional pawn. You’re still just one player, but now you have two pawns that can each be in different places. Maybe pawn one goes up the ladder to square 84 while pawn two continues moving forward to square 29.
In essence, this is what happens when you re-drop a contact onto a map in a second location. You can make this happen when adjusting your goal settings. For the setting, “If contact is already on map, then …”, you’d choose the option, “Add here again when achieved.” That way, contacts will continue to travel through the next steps of the map where they already were (like the pawn from the example who keeps moving to square 29), AND they will also move forward to the steps immediately after the goal (like the pawn who moved up the ladder to square 84). You could leave someone on an offer funnel for product A, while re-dropping them onto a post-purchase funnel for product B when they purchase it.
Re-drops can also happen because of triggers. If a contact in your account activates two triggers on the same campaign, and you have the setting for “If contact is already on map, then …” set to “Add here again when triggered,” then your contact will be re-dropped. This opens up some interesting marketing possibilities.
For example, if you want to put all of your lead magnets together on one campaign (which is what we do), re-dropping contacts in two locations is necessary to make sure that a contact receives the appropriate delivery emails with download links if they download two different ebooks.
How do you figure out if you should move contacts off of their previous location on the campaign or leave them in two spots? It depends on if you want them to stop receiving communication and move through the next steps for their previous location on the map. This is an important consideration for removing marketing messages that are no longer relevant.
If contacts purchase a product, they should stop receiving email offers for that same product. That’s a good example of a case where a “re-drop” would not be necessary; you want to move the contacts off of the current path they’re on and onto a new one.
On the other hand, say that contacts who subscribe to your weekly newsletter campaign buy a product. You don’t want them to stop receiving your newsletter, but you do want to move them onto a follow-up funnel for the product they purchased. Assuming that follow-up funnel is on the same campaign, this would be an appropriate scenario to make use of a “re-drop.”