Wouldn’t it be helpful to know which ones were highly engaged and which weren’t? Those who are highly engaged are more likely to ultimately buy your product or service, so why not speed up the sales cycle for those leads and let the others continue along the nurturing path until they’re ready?
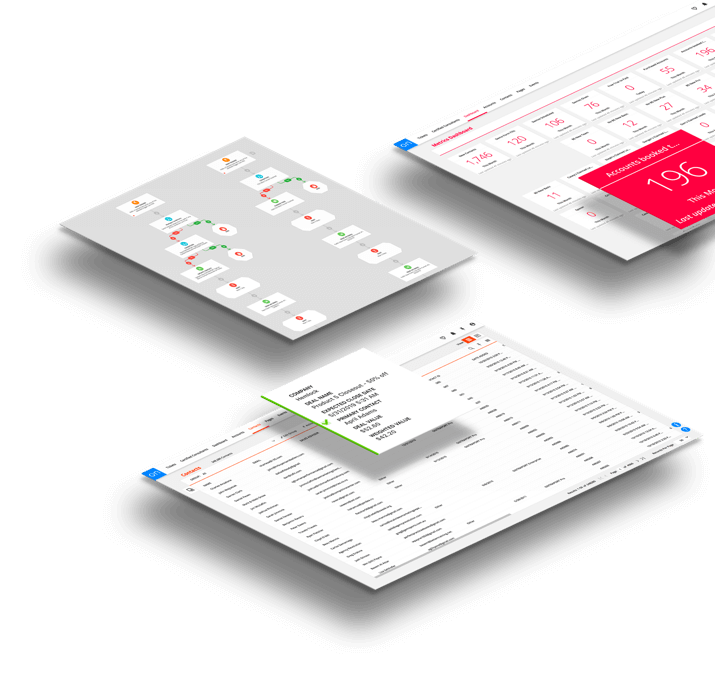
While you’re able to see overall engagement rates throughout your funnel, to understand an individual’s level of engagement within your campaigns, you need lead scoring.
Lead scoring assigns point values to contacts based on their actions within your campaigns or other attributes they’ve provided to you about themselves, such as their geographic location or job title. For example, you can assign 15 points for a visit to your sales page, 10 points for opening your email, and 5 points for visiting a blog article. The more a contact engages with your assets, the higher the point value they’ll have — giving a clear signal to your sales team that they’re highly interested in what you’re offering. The scores also degrade based on inactivity each day, so lead scores reflect real-time engagement levels as leads’ interest levels wane and bounce back, as is often the case.
Sales reps can view a list of leads, based on score, to find the hottest leads at any given time and follow up appropriately. The sooner a rep reaches out to someone who’s in the midst of engaging with your brand, the higher the likelihood of a sale; otherwise, people tend to move on, get distracted or find a competitor. In addition to using lead scoring to uncover these super-highly engaged leads, you can also set threshold scores that, when reached, automatically prompt a certain follow-up task such as a sales call.
Lead scoring is an effective way to ensure you’re reaching those who are most likely to buy, when they’re most likely to buy, leading naturally to an increase in overall sales and revenue for your business. To get started with lead scoring, here are the steps for setting up your own lead scoring system in your Ontraport account:
1. Identify Your Qualifying Criteria
To come up with an effective lead scoring system, it’s important to pinpoint where your hottest leads are coming from and what criteria they have in common. You can find out by talking to your sales team and looking at all your previous sales.
Attributes Vs. Behaviors
When looking for your qualifying criteria, there are two different types of information you’ll want to consider: attributes and behaviors.
- Attributes, also known as demographics, are the information leads provide to you when they fill out a form. Attributes can be their job title, geographic location, age, the size of their company or any other details that you’ve discovered make them more likely to purchase from you.
- Behavioral information tells you all the tracked actions leads take — such as visiting your website, clicking a link from an SMS message, or opening an email — after becoming part of your Ontraport database.
Make a list of the top three behaviors and three attributes that are most common among your existing customers. Once you have your list, you can use that information to find more people like them through lead scoring.
Selecting Your Score Conditions in Ontraport
First, access lead scoring in your account by going to contacts > settings > lead scoring in the top menu. Then use the “lead score conditions” dropdown menu to select which attributes and behaviors you want to award points for. Because there are so many customizable options available, you can get as creative as you want with them.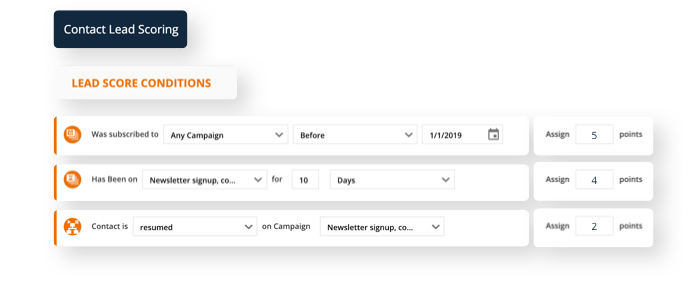
To add attributes to your lead scoring system, select one of the following three customizable conditions:
- Field is this value: for adding information from contact records, SMS merge fields, shared fields, transactions, credit cards, partner data, system information and coupons
- Contact has tag: so that you can add points to entire segments or groups of contacts
- Contact doesn’t have tag
To add behavioral information to your lead scoring system, you can select from a variety of conditions, including:
- Marketing campaigns: date added, amount of time on campaign
- Fulfillment lists: subscribed or not subscribed
- Email: opens or link clicks
- Sales: amount spent on a product, amount of product ordered, subscribed to product
- Sites/pages: has visited a WordPress site or landing page a certain number of times, does or doesn’t have access to WordPress membership level
Once you’ve added the attributes and behaviors you want on your lead scoring system, you can prioritize them by their level of importance.
2. Rank Your Criteria and Assign Values
If you’ve ever followed a cooking recipe, you know that even the simplest batch of chocolate chip cookies can be ruined if the recipe doesn’t specify ingredient amounts. After all, nobody wants a cookie made with too much baking soda and not enough sugar.![]()
The same thing applies to your lead score values: If you rank a lead who subscribed to your email list as high as a lead who frequents your sales page, your sales team is sure to be disappointed when they call a lukewarm lead who’s not ready to buy. In other words, the person who just joined your email list is likely less ready to buy than the person who has been regularly visiting your sales page, so don’t ascribe them the same value. To avoid confusion, sort your list of scoring criteria from most to least important.
When assigning scores to attributes, look at each of your data fields, identify which ones are the best indicators that you’re dealing with a hot lead, then assign points to that value according to how important a factor it is. For example, if you sell surfboards and know that people from California are more likely to buy them, you can assign a higher point value when California is selected as the person’s home state. Or, you may sell life coaching services and know that people in their 30s are more likely to use your services, so you assign a higher value to the 30-39 age range.
For behavioral information, assign larger numbers to tracked actions that indicate stronger buying interest and lower numbers to actions that indicate less interest.
When you’re satisfied with each score value, be sure to click Save in your Ontraport account.
3. Set a Score Threshold
Before your sales team gets started calling any lead with points, set a threshold number that reasonably estimates when a lead is ready to buy. Depending on how many points you assign to each action, your threshold could be a score of 10, 50 or even 100. It doesn’t matter what the number is, as long as it indicates when a lead is hot enough to call.
To find the score threshold that works best for your business, try looking back at previous sales records. Do you see a purchasing trend with people who visit your sales page more than three times and open your offer emails? If so, make your score threshold the sum of those two actions.
Or have you noticed that people who opt in to your email list under a specific segment convert almost immediately? If so, make that your threshold. The score threshold you set will be the number you’ll later add to any campaigns triggered by lead score and the number that tells you when to call a hot lead.
Finding out the threshold that represents your average hot lead also gives you the ability to spot the standout individuals who are engaging with your brand so much that they’re sure to convert if called.
4. Set Your Score Degradation Percentage
When it comes to leads, new activity is more valuable than old activity. That is, a person who visits your website and clicks on your links today is more likely to buy from you now than someone who took those actions three months ago. You can set up score degradation to automatically decrease (or degrade) a contact’s lead score by a percentage every day. For example, you can set the total score of a lead to degrade 3% daily so it is easier to see the actively participating leads.
To figure out the right degradation rate for your lead score, use the info you have about the average time it takes from when contacts enter your database to when they become customers. Use a higher degradation rate if it takes less time, on average, for a lead to become a customer. This way their score will degrade quickly so that you can focus on the newer leads that you know are more likely to buy. Use a lower degradation rate if you know that, on average, it takes your leads a long time to become customers.
Because score degradation is meant to bury leads whose actions have gotten outdated, it only affects behavior scores, not attributes.
Going back to the surfboard sample, let’s say you’ve awarded points to leads who live in California. Assuming they don’t move out of state, these leads will always keep those points, because their demographic information automatically makes them more likely to purchase your product.
5. Put Your Lead Scoring System to Use
Now that your lead scoring system is set up, it’s time to put it to use with the rest of your Ontraport account. There are a few ways you could do this:
Sort Your Contact List by Lead
Want to give your sales team the ability to see the hottest leads in your contact list at any given time? In your Ontraport account, go to your contact list and add a column for lead score. Then, click on the Score column to sort your list from highest to lowest score.
Add Leads to Your Follow-up Campaigns
Once leads’ scores have broken your set threshold, you can also automatically add them to sales follow-up campaigns. In any campaign, you can add leads based on score with triggers. In trigger settings in the left sidebar, select “Any contact in account” and “If contact is already on map, then ignore this trigger.” Then, in the description, name your trigger something you’ll be able to easily find later. In this example, the trigger is called “Add leads with a score above 25.”
To specify how your trigger will be activated, click the orange “add trigger” button, select “a field is updated” and set that field to “score.”
Next, you’ll want to add a condition so that the trigger is only activated if the condition is true. To do this, click the “Add condition” button, select “Field is this value” and add “Score” as your field. Because this field is recognized by Ontraport as a numeric value, you can choose the condition “Greater than or equal to” and add your score threshold.
When you’re finished, click “done” and save your campaign.
Add Leads to a Lead Scoring Campaign
Want your lead scoring system to trigger a sales task when contacts meet your score threshold? You can easily set this up with the “Simple Lead Scoring” pre-built map in Ontraport’s Campaign Marketplace, available for free to Ontraport users.
Once you’ve opened the campaign template in your own account, all you have to do is set your score threshold and publish your campaign.
6. Continuously Self-Assess and Improve
You may notice over time that leads who download your free lead magnets or open your weekly emails aren’t as hot as you thought. Sales reps are calling, but people aren’t buying as often as their scores implied. To keep your scoring process fluid, as you notice scores that are inaccurate, make changes as needed. The more you adjust your system to reflect reality, the more effective it’ll be.
Make a note on your calendar to review your scoring process monthly or quarterly to make sure your process never goes out-of-date.
Final Thoughts
Now that you have a lead scoring system set up in your Ontraport account, your sales team will have the tools they need to identify your hottest leads at any given time.
Have you used lead scoring in your business? Share how it’s made a difference in the comments below.