Connect a payment gateway to safely handle your customers’ payments and send them to your merchant account for processing. Ontraport integrates with over 15 of the top-ranked and most trusted payment gateways, including PayPal, Stripe and Authorize.net, so you can choose the one that’s best for you.
Note: Ontraport only offers support for built-in integrations. For assistance with an outside integration, please reach out to their support team using the contact information provided below.
Check out the video about integrating payment gateways to learn more.
Table of Contents
Set up your payment gateway
Integrate your gateway with Ontraport
Set your default gateway
Configure your currency in Ontraport
Create a Dummy gateway
Gateway specific setup
• Authorize.net and Authorize.net CIM
• Currencies available with Authorize.net
• Elavon
• Eway
• Eway Rapid
• Network Merchants Inc.
• Payflow Pro
• Currencies available with Payflow Pro
• PayJunction
• PayLeap
• Paypal Payments Pro
• PayPal Standard
• PayPal Standard limitations
• PayPal Legacy
• PayPal Legacy limitations
• Quickbooks Payment Services
• Stripe and Stripe Token
• Steps in Stripe
• Steps in Ontraport
• Stripe Instant Payout
• Currencies available with Stripe
• USA ePay
Set up your payment gateway
Back to top
The first step in integrating with a payment gateway is to configure how your gateway accepts payments, ensuring a seamless integration with Ontraport.
Log in to your payment gateway account and set it up to accept payments first. Each gateway has its setup process, but to use Ontraport’s automation tools for payment plans, subscriptions, upsells, and free trials, you’ll need to complete these steps first.
- Disable CVV or CVS checking, or set it to “not required.”
- It is illegal to store the three digit CVV/CVS code, so payment forms that will charge the card again at a later date will not work if they require the unstored CVV/CVS code.
- Disable any address or zip code verification, or set it to “not required.”
- This is optional but recommended because these checks often cause transactions to fail unnecessarily.
- Check to make sure the gateway is working and processing transactions correctly and in the correct currency for your Ontraport account.
Integrate your gateway with Ontraport
Back to top
Once you’ve configured your payment gateway to these recommended settings for optimal performance, you can add it to Ontraport.
- Navigate to Sales → Settings → Gateways, then click New Gateway.
- In the top left corner, name your gateway. This is only for internal use and cannot be seen by contacts.
- In the dropdown menu, select the payment gateway you are using.
- Enter the integration details from your payment gateway. The exact info depends on the gateway you’re using, but it typically includes things like API keys, client secrets or account IDs.
Set your default gateway
Back to top
This is the gateway that is automatically selected when you manually charge a transaction or set up a sales form.
- Go to Sales → Settings → Gateways to view your saved gateways.
- Select your preferred gateway and click Make default.
Configure your currency in Ontraport
- Once you’ve integrated your payment gateway, go to your
.png) → Administration. Click Data → Localization.
→ Administration. Click Data → Localization. - Select your currency from the dropdown menu.
- Choose how you want the currency symbol to appear.
- Select the number format in the dropdown box.
- Verify that the gateway and currency setting work correctly by processing a live transaction on a valid credit card and verify the charge is reflected correctly in your payment gateway and bank.
Create a Dummy gateway
Back to topTo make sure your order forms are ready to take payments, you’ll want to first set up a dummy gateway in Ontraport. The dummy gateway is used to test your order forms and automation related to purchases. Testing ensures that everything will run as intended before you start charging real credit cards. Here’s how:
- Navigate to Sales → Settings → Gateways, then click New gateway.
- In the top left corner, name your gateway. This is not shown to contacts, so we suggest naming it “Dummy Gateway.”
- Then click Dummy Gateway in the dropdown menu.
- You can test your dummy gateway for both successful and failed payments using the following credit card numbers:
- For successful payments: 4111-1111-1111-1111 and any CVV and future expiration date you choose.
- For failed payments: 4111-1111-1111-1103
Gateway specific setup
Back to top
Each gateway has its own information you need to collect from your payment gateway account to get integrated.
Authorize.net and Authorize.net CIM (Customer Information Manager)
Back to top
Ontraport offers two integrations with Authorize.net.
- The standard integration
- Authorize.net CIM
Authorize.net CIM is an upgrade to their standard gateway, which allows you to securely store customer profiles, including billing, shipping and payment info.
To integrate with either version, you need to collect the following information from your Authorize.net account:
- API Login ID
- Transaction Key
Follow these steps provided by Authorize.net to create your API Login ID and Transaction key. Then, follow the steps at the top of this article to integrate with Ontraport.
Follow these steps to enable payment plans to work in Ontraport:
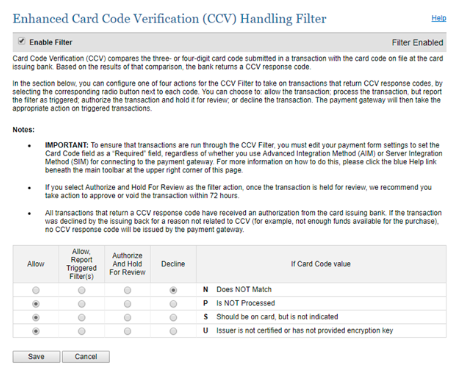
- Log in to Authorize.net and go to Home → Settings → Card Code Verification.
- Click the Enable Filter checkbox.
- In the table at the bottom, select Decline for “N Does NOT Match.” This allows Ontraport to check the CCV number entered by your customer on an order form.
- In the same table, select Allow for the other three settings. These allow subsequent payments to be made without your customer re-entering their card information.
- Recommended: Click Home → Settings → Address Verification Service and uncheck the Enable Filter checkbox at the top to eliminate a false rejection rate.
Currencies available with Authorize.net
- Australian Dollar (AUD)
- Canadian Dollar (CAD)
- Czech Koruna (CZD)
- Danish Krone (DKK)
- Euro (EUR)
- Hong Kong Dollar (HKD)
- Hungarian Forint (HUF)
- Israeli New Sheqel (ILS)
- Japanese Yen (JPY)
- Mexican Peso (MXN)
- Norwegian Krone (NOK)
- New Zealand Dollar (NZD)
- Philippine Peso (PHP)
- Polish Zloty (PLN)
- Pound Sterling (GBP)
- Romanian New Leu (RON)
- Singapore Dollar (SGD)
- Swedish Krona (SEK)
- Swiss Franc (CHF)
- Taiwan New Dollar (TWD)
- Thai Baht (THB)
- U.S. Dollar (USD)
For assistance integrating Authorize.net with Ontraport, contact their support here.
Elavon
To get integrated with Elavon, you need to collect the following information from your Elavon account:
- Merchant ID
- User ID
- Pin
Your API credentials will be provided to you when you create an account. Use your authentication information to follow the steps at the top of this article to set up your integration with Ontraport and Elavon.
For assistance integrating Elavon with Ontraport, contact their support here.
Eway
Back to top
To integrate with Eway you need to collect your Customer ID and Refund Password from your Eway account.
- Follow these steps provided by Eway to find your Customer ID, and this article to generate a Refund Password.
- Then, follow the steps at the top of this article to set up your integration with Ontraport and Eway.
Eway can support any currency you configure with your merchant bank.
For assistance integrating Eway with Ontraport, contact their support here.
Eway Rapid
To integrate with Eway Rapid, you need to collect the following information from your Eway Rapid account:
- API key
- API Password
Follow these steps provided by Eway to find your API Key and password. Then follow the steps at the top of this article to set up your integration with Ontraport and Eway Rapid.
Eway can support any currency you configure with your merchant bank.
For assistance integrating Eway with Ontraport, contact their support here.
Network Merchants Inc
To integrate with Network Merchants Inc. you need the following information from your Network Merchants account:
- Username
- Password
Follow the steps at the top of this article to set up your integration.
For assistance integrating Network Merchants Inc. with Ontraport, contact their support here.
Payflow Pro
To integrate with Payflow Pro, you need to collect the following information from your Payflow Pro account:
- User
- Vendor ID (AKA Merchant Login)
- Partner
- Password
Follow these steps provided by PayPal to locate your API credentials, then follow the steps at the top of this article to set up your integration.
Currencies available with Payflow Pro
- Australian Dollars (AUD)
- Brazilian Reais (BRL)
- British Pounds (GBP)
- Canadian Dollars (CAD)
- Czech Koruny (CZK)
- Danish Kroner (DKK)
- Euros (EUR)
- Hong Kong Dollars (HKD)
- Hungarian Forints (HUF)
- Israeli New Shekels (ILS)
- Japanese Yen (JPY)
- Mexican Pesos (MXN)
- New Taiwan Dollars (TWD)
- New Zealand Dollars (NZD)
- Norwegian Kroner (NOK)
- Philippine Pesos (PHP)
- Polish Zlotys (PLN)
- Singapore Dollars (SGD)
- Swedish Kronor (SEK)
- Swiss Franc (CHF)
- Thai Baht (THB)
- U.S. Dollars (USD)
Pro Tip: Because Payflow Pro requires user credentials for the gateway, for security reasons, we recommend creating a new user for each one of the services you integrate.
For assistance integrating Payflow Pro with Ontraport, contact their support here.
PayJunction
To integrate with PayJunction you need to collect the following information from your PayJunction account:
- API Login
- Password
Follow these steps provided by PayJunction to generate API credentials, then follow the steps at the top of this article to set up your integration.
For assistance integrating PayJunction with Ontraport, contact their support here.
Payleap
To integrate with PayLeap, you need to collect the following information from your PayJunction account:
- Username (AKA API Login ID)
- Password (AKA API Transaction Key)
Follow these steps provided by PayLeap to generate API credentials, then follow the steps at the top of the article to set up your integration.
For assistance integrating Payleap with Ontraport, contact their support here.
PayPal Payments Pro
With this gateway, customers who complete an Ontraport order form will remain on the page until redirected to the thank you page.
Note: This payment gateway only processes credit card payments. If you want to use a “Pay with PayPal” button on your order forms, check out the “Standard PayPal” option below.
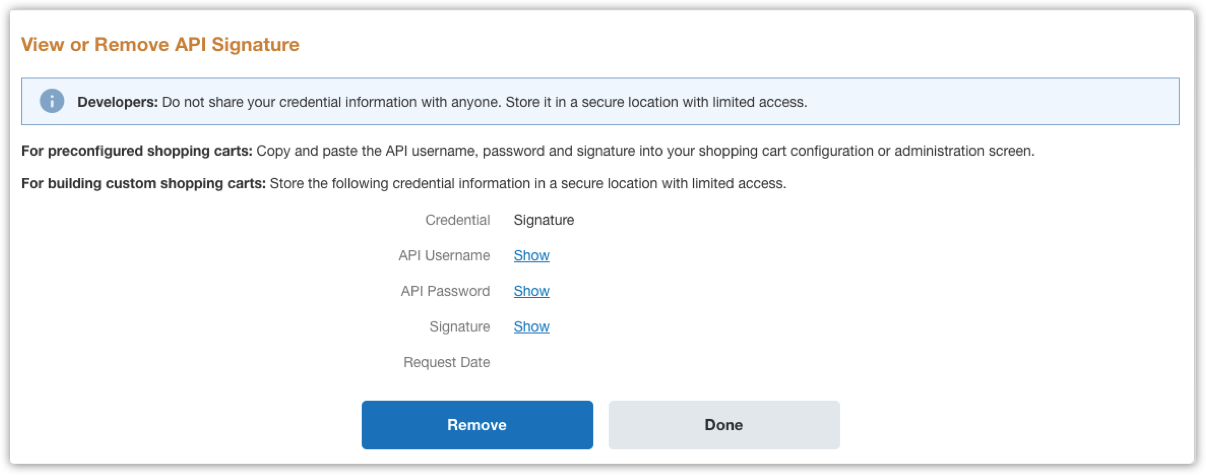
To integrate with PayPal Payments Pro you need to collect the following information from your PayJunction account:
- API Username
- API Password
- Signature
Follow these steps provided by PayPal to request an API signature, then follow the steps at the top of this article to get integrated.
You can view available currencies here. For assistance integrating PayPal Payments Pro with Ontraport, contact their support here.
PayPal Standard
Back to top
This payment gateway allows your customers to purchase your products using PayPal. There are four possible payment options your clients will see based on their country, device type and funding sources:
- PayPal
- Venmo
- Pay Later
- Debit or Credit Card
To integrate with PayPal Standard you need to collect the following information from your PayPal account:
- Client ID
- Secret Key
Follow these steps provided by PayPal to Generate your credentials, then follow the steps at the top of the article to get integrated.
PayPal Standard limitations
Back to top
You cannot:
- Process trial periods, payment plans, subscription payments or upsells through Ontraport.
- Create manual transactions within Ontraport and bill them through the PayPal gateway.
- Issue payments to PayPal purchasers within Ontraport.
- Accept eCheck payments.
- Use an Ontraform as your order form’s thank you page.
PayPal Payments Pro doesn’t have these limitations, but it is also more costly with monthly fees.
For assistance integrating PayPal Standard with Ontraport, contact their support here.
PayPal Legacy
We recommend using the PayPal Standard gateway over this legacy gateway. PayPal standard uses an improved integration and allows you to offer advanced checkout options such as Venmo and PayPal Pay Later. |
With this gateway, after your customers fill out the order form and click Pay by PayPal, they will be redirected to PayPal to complete the transaction and then returned to the thank you page.
To integrate with PayPal Legacy you need to provide your email address to Ontraport and follow the steps below to set up your Instant Payment Notifications (IPN).
- Follow the steps for setting up Instant Payment Notifications (IPN) on PayPal.
- To connect to Ontraport, use https://forms.ontraport.com/v2.4/ipn_processor.php as your notification URL.
- Follow these steps to allow your customers to return to your site automatically after purchase. Update the following settings:
- Auto Return: On
- Return URL: https://forms.ontraport.com/v2.4/paypal_redirect.php
- Payment Data Transfer: On
- Then follow the steps at the top of this article to get integrated.

If you want your PayPal gateway to take international payments, follow these steps to accept and convert other currencies.
Pro Tip: PayPal charges a currency exchange fee. If you don’t want to incur these fees, we recommend charging in your account’s currency only.
PayPal Legacy limitations
Back to top
You cannot:
- Process trial periods, payment plans, subscription payments or upsells through Ontraport.
- Create manual transactions within Ontraport and bill them through the PayPal gateway.
- Issue payments to PayPal purchasers within Ontraport.
- Accept eCheck payments.
- Use an Ontraform as your order form’s thank you page.
- Refund payments through Ontraport.
- The PayPal Legacy gateway only allows refunds through PayPal itself. This means you will use the “Refunded” action to mark your transaction as refunded. Then you’ll process the actual refund through PayPal.
PayPal Payments Pro doesn’t have these limitations, but it is also more costly with monthly fees.
For assistance integrating PayPal Legacy with Ontraport, contact their support here.
QuickBooks Payment Services
- Follow the steps at the top of this article to add your gateway to Ontraport.
- Click Connect to Quick Books and sign in with the QuickBooks connect form.
- Choose to connect with Ontraport.
For assistance integrating QuickBooks with Ontraport, log in and contact support.
Stripe and Stripe Token
To process your Ontraport payments using your Stripe gateway, set up your Stripe account first. Once you’ve configured your Stripe account, you can log in to Ontraport and get connected.
When using Stripe, you can utilize the Stripe Payment Element on your order forms. The Stripe Payment Element allows you to include a single element in the Page editor, giving customers more ways to pay.
The Stripe gateway allows you to use the multi-currency support feature when logging transactions or setting up order forms.
What’s the difference between Stripe and Stripe Token?
Stripe | Stripe Token |
The Stripe gateway stores credit cards in Ontraport and sends them to Stripe for each charge. Each customer will appear as a guest customer in Stripe. | The Stripe Token gateway creates customers and associated cards in the Stripe dashboard. Then Stripe gives your Ontraport account a customer and card token to use for future purchases instead of the raw credit card number. |
Steps in Stripe
- Sign up and configure Stripe to take payments.
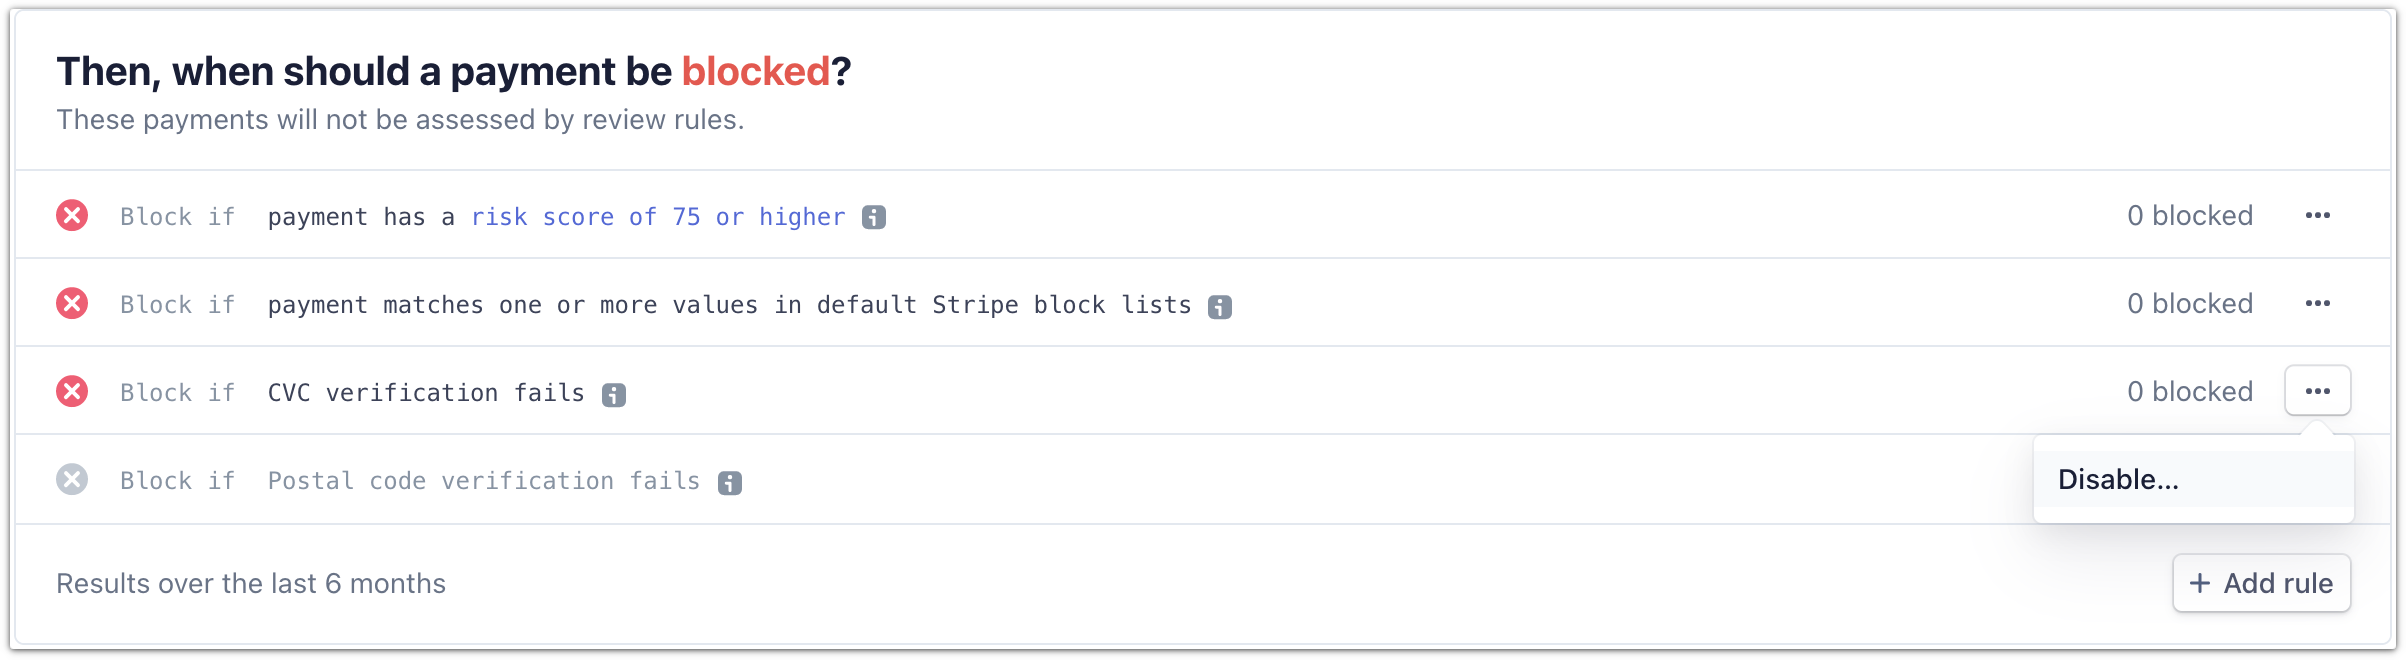
- Log in to your Stripe account and click Payments to view your payments and transactions screen.

- Click More → Radar → Rules.
Make sure “Block if CVC verification fails” and “Block if postal code verification fails” are set to Disabled. You can disable them by clicking the three dots on the right side then clicking Disable.
For assistance customizing your Stripe settings, contact their support here.
Steps in Ontraport
- Log into your Ontraport account and go to Sales → Settings → Gateways.
- Or click here to jump to your payment gateway collection.
- Click New Gateway.
- Name your gateway in the top left corner.
- Select “Stripe” or “Stripe Token” from the dropdown.
- Click Stripe Connect and follow the on-screen prompts.

- When you’ve completed all the steps in the pop-up, you’ll see that your Stripe gateway has a “Connected” status.
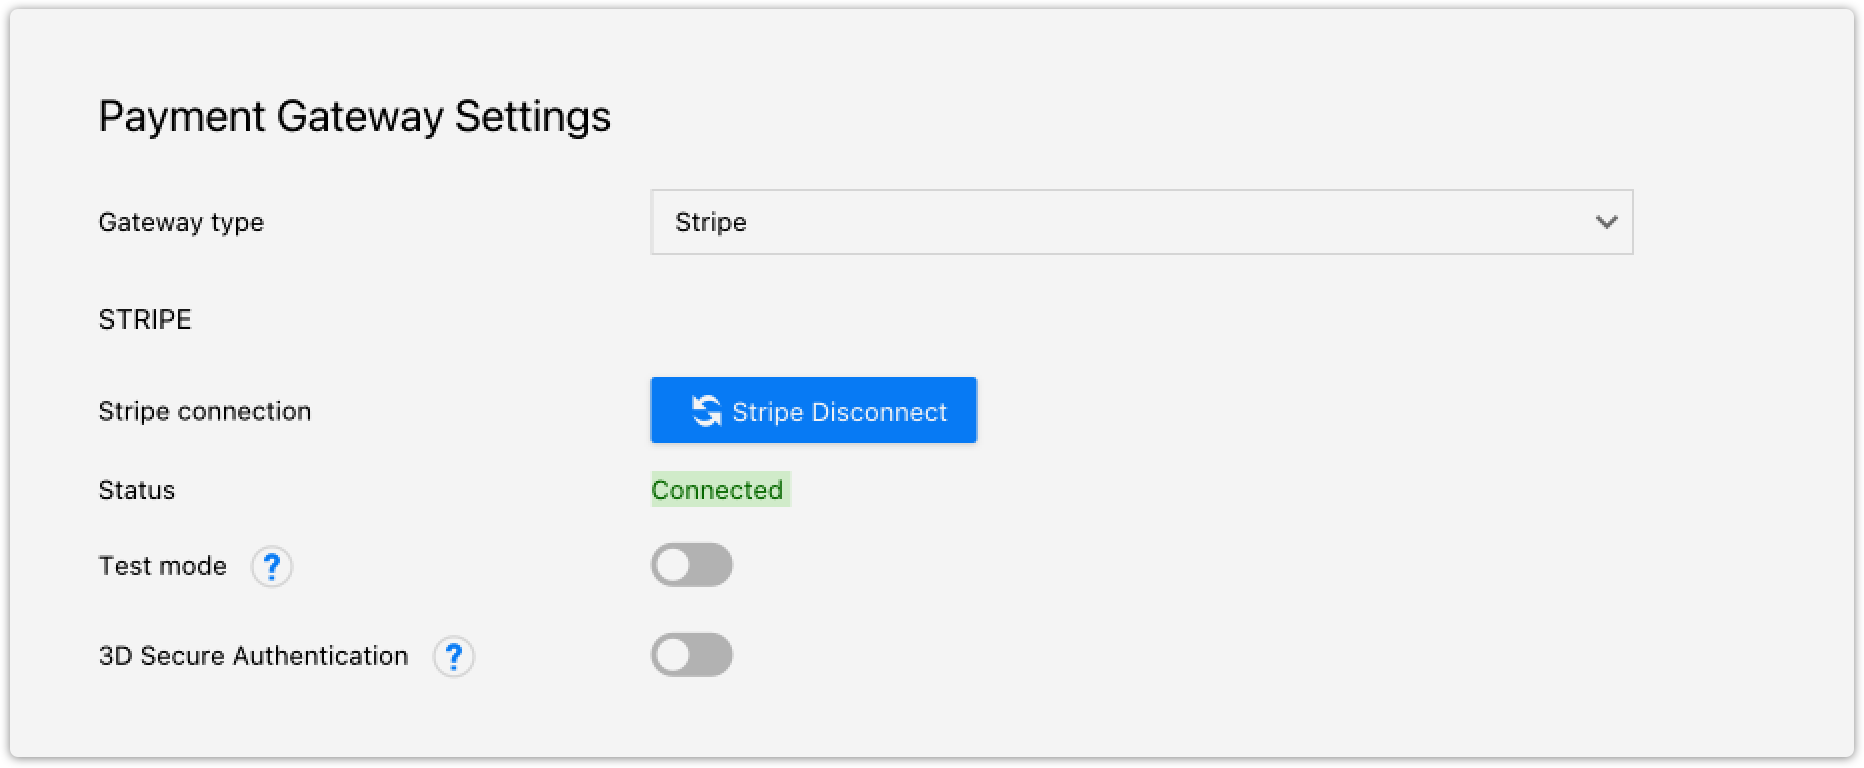
- (Optional) Toggle test mode and/or 3D Secure Authentication
.png) to enable those features.
to enable those features. - Click Save.
Note, you must set up your test mode connection separately from your basic setup. The steps to get connected are the same as above, except you’ll toggle “Test Mode” on.
If you don’t set up your test mode connection separately, your Stripe connection status will be “Disconnected.”
Read more about testing Stripe Connect here.
Stripe Instant Payout
Back to top
Stripe Instant Payouts offers an alternative to Stripe’s normal payout schedule. While standard payouts rely on specific banking days, you can request an Instant Payout on any day or at any time, including weekends and holidays, and funds will typically appear in your bank account within 30 minutes. Instant Payouts are subject to Stripe fees.
To use this feature, your Stripe account must be eligible for Instant Payouts. If your account is not eligible, the Stripe Instant Payout widget will not appear in Ontraport.
- Check eligibility: You can verify if your account is eligible bychecking your Stripe Dashboard here.
- Requirements: For more information on what makes an account eligible, check out Stripe’s eligibility guide.
- Troubleshooting: If you believe you should be eligible but cannot access the feature, Stripe Support is the best resource to troubleshoot and resolve eligibility issues.
If you are eligible for Instant Payouts, then follow these steps in Ontraport:
- Go to Sales → Settings → Gateways.
- Click on your Stripe payment gateway to open its settings.
- View your available balance in the instant payout widget at the bottom of your settings.
- Click Payout instantly and follow Stripe’s wizard to enter the amount to pay out and select the bank account to deposit your funds.
Currencies available with Stripe
- View the available currencies here.
For assistance integrating Stripe or Stripe Token with Ontraport, contact our Support team here.
USA ePay
To integrate with USA ePay you need to collect the following information from your USA ePay account:
- Source key
- Source pin
Follow these steps provided by USA ePay to add a new source, then follow the steps at the top of the article to get integrated.
For assistance integrating USA ePay with Ontraport, contact their support here.