Inbox is a central hub for managing one-on-one conversations with leads and clients. Rather than multiple team members managing scattered messages across email, SMS and other channels, Inbox brings it all together so everyone has full visibility and can ensure follow-up happens. It’s especially valuable for sales and customer service teams to streamline operations.
The added benefits of using Inbox in Ontraport is that it’s connected to your CRM, automations, and AI, allowing you to:
- Easily view context and contact history to provide relevant and helpful responses
- Automate responses and follow-up messages or tasks
- Use AI to interpret and reply to messages to speed up response times
Inbox is available to all account levels with an Inbox Plan.
Check out this overview by the CEO and Founder, Landon Ray to learn more:
Table of contents
Channels
Inboxes
How do conversations get created?
How to use Inbox for your business
How to manage conversations
Setup and settings
Automate customer experience processes
There are a couple concepts to get familiar with before you start using the Inbox.
Channels
Channels are the ways that your leads and customers can reach you, such as email or SMS.
Each channel should be used for a specific purpose and have one inbound email address or SMS number. For example, support@yourcompany.com would be one channel, billing@yourcompany might be another, and a phone number where people can text you would be another.
Inboxes
Back to top
Inboxes are how you organize your conversations. Think of each Inbox in your account as a queue. Team members will monitor and respond to messages in different kinds of inboxes.
You’ll want to create separate inboxes for each team. Support tickets are one Inbox, Billing tickets might be another, Sales inquiries another, and so on.
Conversations can easily move between teams, like from support to sales, and automation helps scale follow-ups and one-on-one outreach. And multiple channels can funnel into one inbox. For example, your channels support@yourcompany.com, billing@yourcompany.com and your SMS number can all send messages to your Support Inbox.
How do conversations get created?
Back to top
There are four ways that conversations are created:
- Inbound messages - New inbound messages are routed to an Inbox based on Channel settings.
- Example: Both the email support@yourcompany.com and SMS channel (800) 555-1212 are both routed to the Support Tickets Inbox.
- Form submissions - Add a form to your website that allows customers to contact you.
- Manually - You can start new conversations from Inbox.
- Via API - Create conversations from third-party apps and other Ontraport objects.
How to use Inbox for your business
There are many use cases for Ontraport’s Inbox feature, but it all comes down to making it easy for leads and customers to reach out to your team and for your team to respond.
Customer support
Inbox helps your support team keep all customer conversations organized in one place so nothing gets lost in private inboxes or when someone is unavailable. With complete visibility into each customer’s interaction history across channels, as well as easy visibility into their account in your CRM, your team can work together efficiently and provide informed, fast support.
Here are our step-by-step recommendations for creating a support system for Inbox.
- Set up Inbox prerequisites.
- Create a Support inbox.
- Create an email channel.
- Set up signatures for your team.
- Set up forwarding for role addresses.
- Create a basic support system.
Sales conversions
Inbox gives your sales team a dedicated space to manage inbound lead inquiries and ongoing sales conversations. With clear visibility into each lead’s interaction history, reps can respond quickly and personally.
Here are our step-by-step recommendations for creating a sales system for Inbox.
Billing
Inbox organizes all billing-related conversations into a dedicated inbox, making it easy for your team to stay on top of payment questions and issues. Messages can be routed automatically or moved from other inboxes for proper handling. This keeps billing communication organized, reduces delays and ensures your team can prioritize urgent matters.
Here are our step-by-step recommendations for creating a billing system for Inbox.
- Set up Inbox prerequisites.
- Create a Support Channel described above if you’d like your Support team to transition tickets to the billing team instead of allowing customers to contact them directly.
- Create a Billing Inbox.
Content delivery
Inbox simplifies content delivery by turning email or SMS replies into automated triggers. Simply ask the recipient to respond with a specific hashtag or keyword to register for an event or get a free download, and you can make the next step happen through Inbox automations and AI.This approach improves engagement, boosts deliverability, and lets you scale content delivery.
How to manage conversations
Back to top
Check out this video by the CEO and Founder, Landon Ray on how to manage conversations.
View your conversations
On the left, you’ll see all of your conversations. Unread ones appear in bold. In the middle, you’ll see the message thread. On the right, you’ll see details about the contact and conversation, like which inbox it’s in, the channel it came through, and who it’s assigned to.
Switch between inboxes
You can move between different inboxes, like support, sales, or billing, and switch views to see unassigned or all conversations.
Assign and manage conversations
New conversations are unassigned by default. The first person to reply is assigned automatically, but you can change the assignee anytime. You can also mark conversations as unread, move them to a different inbox, mark them as spam, or close them. If a customer replies to a closed conversation within a specific timeframe, it reopens automatically.
Send messages and update records
Send replies at the bottom of the conversation window. You can edit contact details and add notes so your team stays informed.
Set up and settings
Back to top
Use this section to deep dive into Inbox settings.
Check out this video for a walkthrough of the feature:
Inbox prerequisites
Create separate inboxes for your team (Optional)
Create an SMS channel
Create an email channel
• Set up signatures for your team (Optional)
Navigate the Inbox collection
• Navigate your conversations
• Enable notifications
• Access conversations from the contact log
Inbox settings
Start a new conversation
• SMS editor
• Email editor
• From form submissions
• Receive new conversations and replies
• Merge in conversation history
Inbox prerequisites
Back to top of section
To get started with Inbox, you need to add an Inbox plan to your account.
Each user that you want to access the Inbox feature needs to have an inbox license. You can choose from different plans and select the users you want to license.
- Log into your account as the owner.
- Go to
.png) → Account.
→ Account. - Locate the plan setting section and click Add plan next to Inbox.
- Choose your plan, then add the users you’d like to give Inbox access.
- Click Add plan.
- Or click Start free trial if you are adding a trial.
Create separate inboxes for your team (Optional)
Back to top of section
It’s not necessary to create separate inboxes for your teams, as you can create channels for each team and use the default shared one. The benefit of separate inboxes is that you can choose different default assignees for each team.
Here’s how:
- Go to Inbox → Settings → Inboxes → New inbox.
- Name your inbox.
- Select the user you’d like to be the default assignee, or choose unassigned.
- Click Save in the top right corner.
The next step is to create channels. You can set up multiple channels for a single inbox, and you can route conversations created on specific channels to specific inboxes or the default.
Both channel types let you set up contact forms that create new conversations upon form submission and include full conversation histories when the ticket is closed.
Create an SMS channel
Back to top of section
SMS channels offer real-time personalized communication. They are ideal for answering quick questions because all contacts need to do to chat with your team is text your SMS number. Use SMS channels for appointment scheduling and follow-ups, account management, high-touch support for premium customers, and more.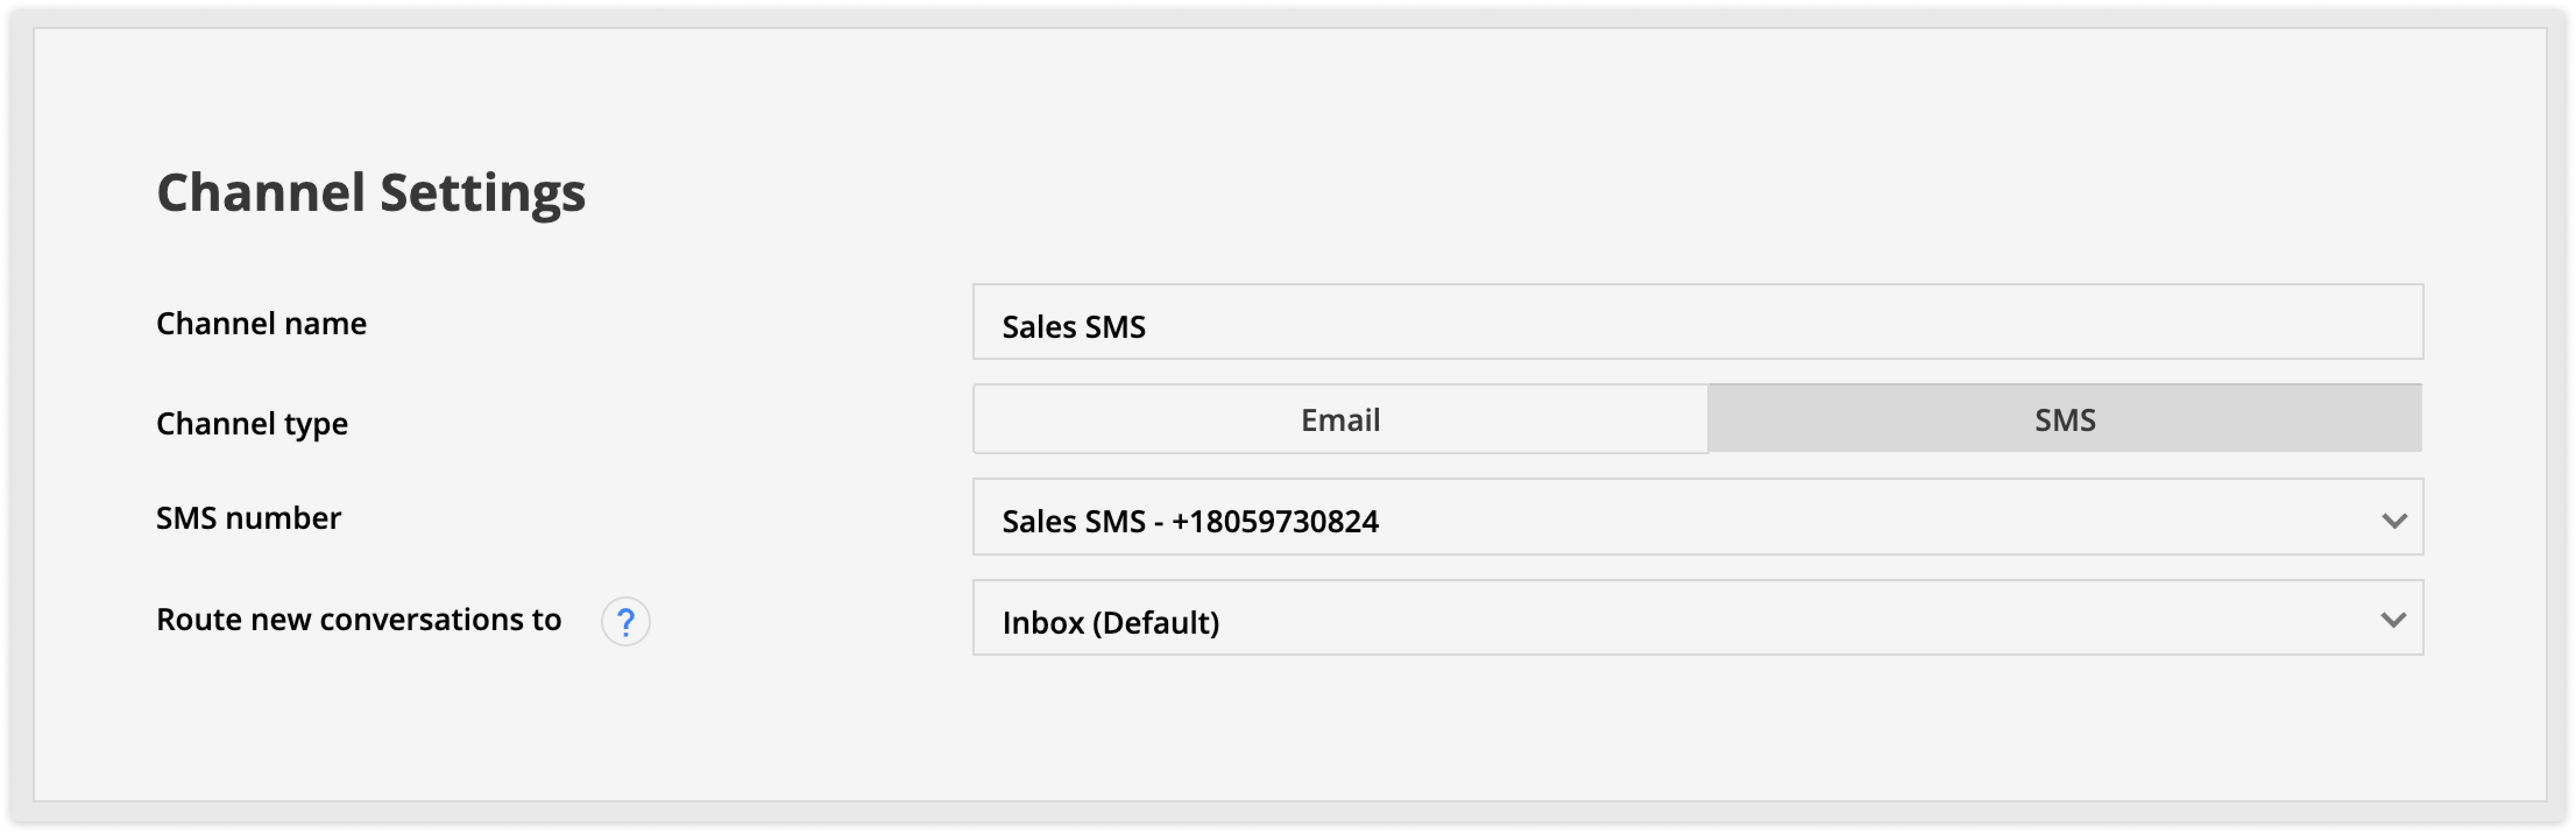
- Go to your Inbox → Settings → Channels.
- Fill in the following settings:
- Channel name: Name your channel.
- Channel type: Select SMS in the Channel type setting.
- SMS number: Select your SMS number.
- Route new conversations to: Choose a default inbox to route your messages to.
- Click Save in the top right corner.
Create an email channel
Back to top of section
When you add an Inbox plan, we create a default email channel so you can start messaging right away. You can edit its settings anytime, or follow the steps below to create new email channels.
Email channels are generally used for standard helpdesk ticketing systems, and they help you organize and track customers efficiently. Email channels allow for more detailed and complex messages compared to SMS. You can CC all essential parties, attach files and images, and format your message.
Set up signatures for your team (Optional)
Back to top of section
We recommend setting up an email signature before creating an email channel. By default, there is already a basic signature set up for you, but it’s always best to add your own branding.
Email signatures are optional but highly recommended because they ensure all email messages sent by your team contain cohesive signatures. The signatures are automatically added to messages so your team doesn't have to worry about adding them to each message.
You can also set up email signatures at any time. If you skip this step, you can always create a signature and edit your channel settings to enable it.
- Go to Inbox → Settings → Email signature.
- Draft your email signature.
- Use merge fields to dynamically add in your reps information.
- Click Save.
You'll connect this email signature to your channel in the next section.
Create an email channel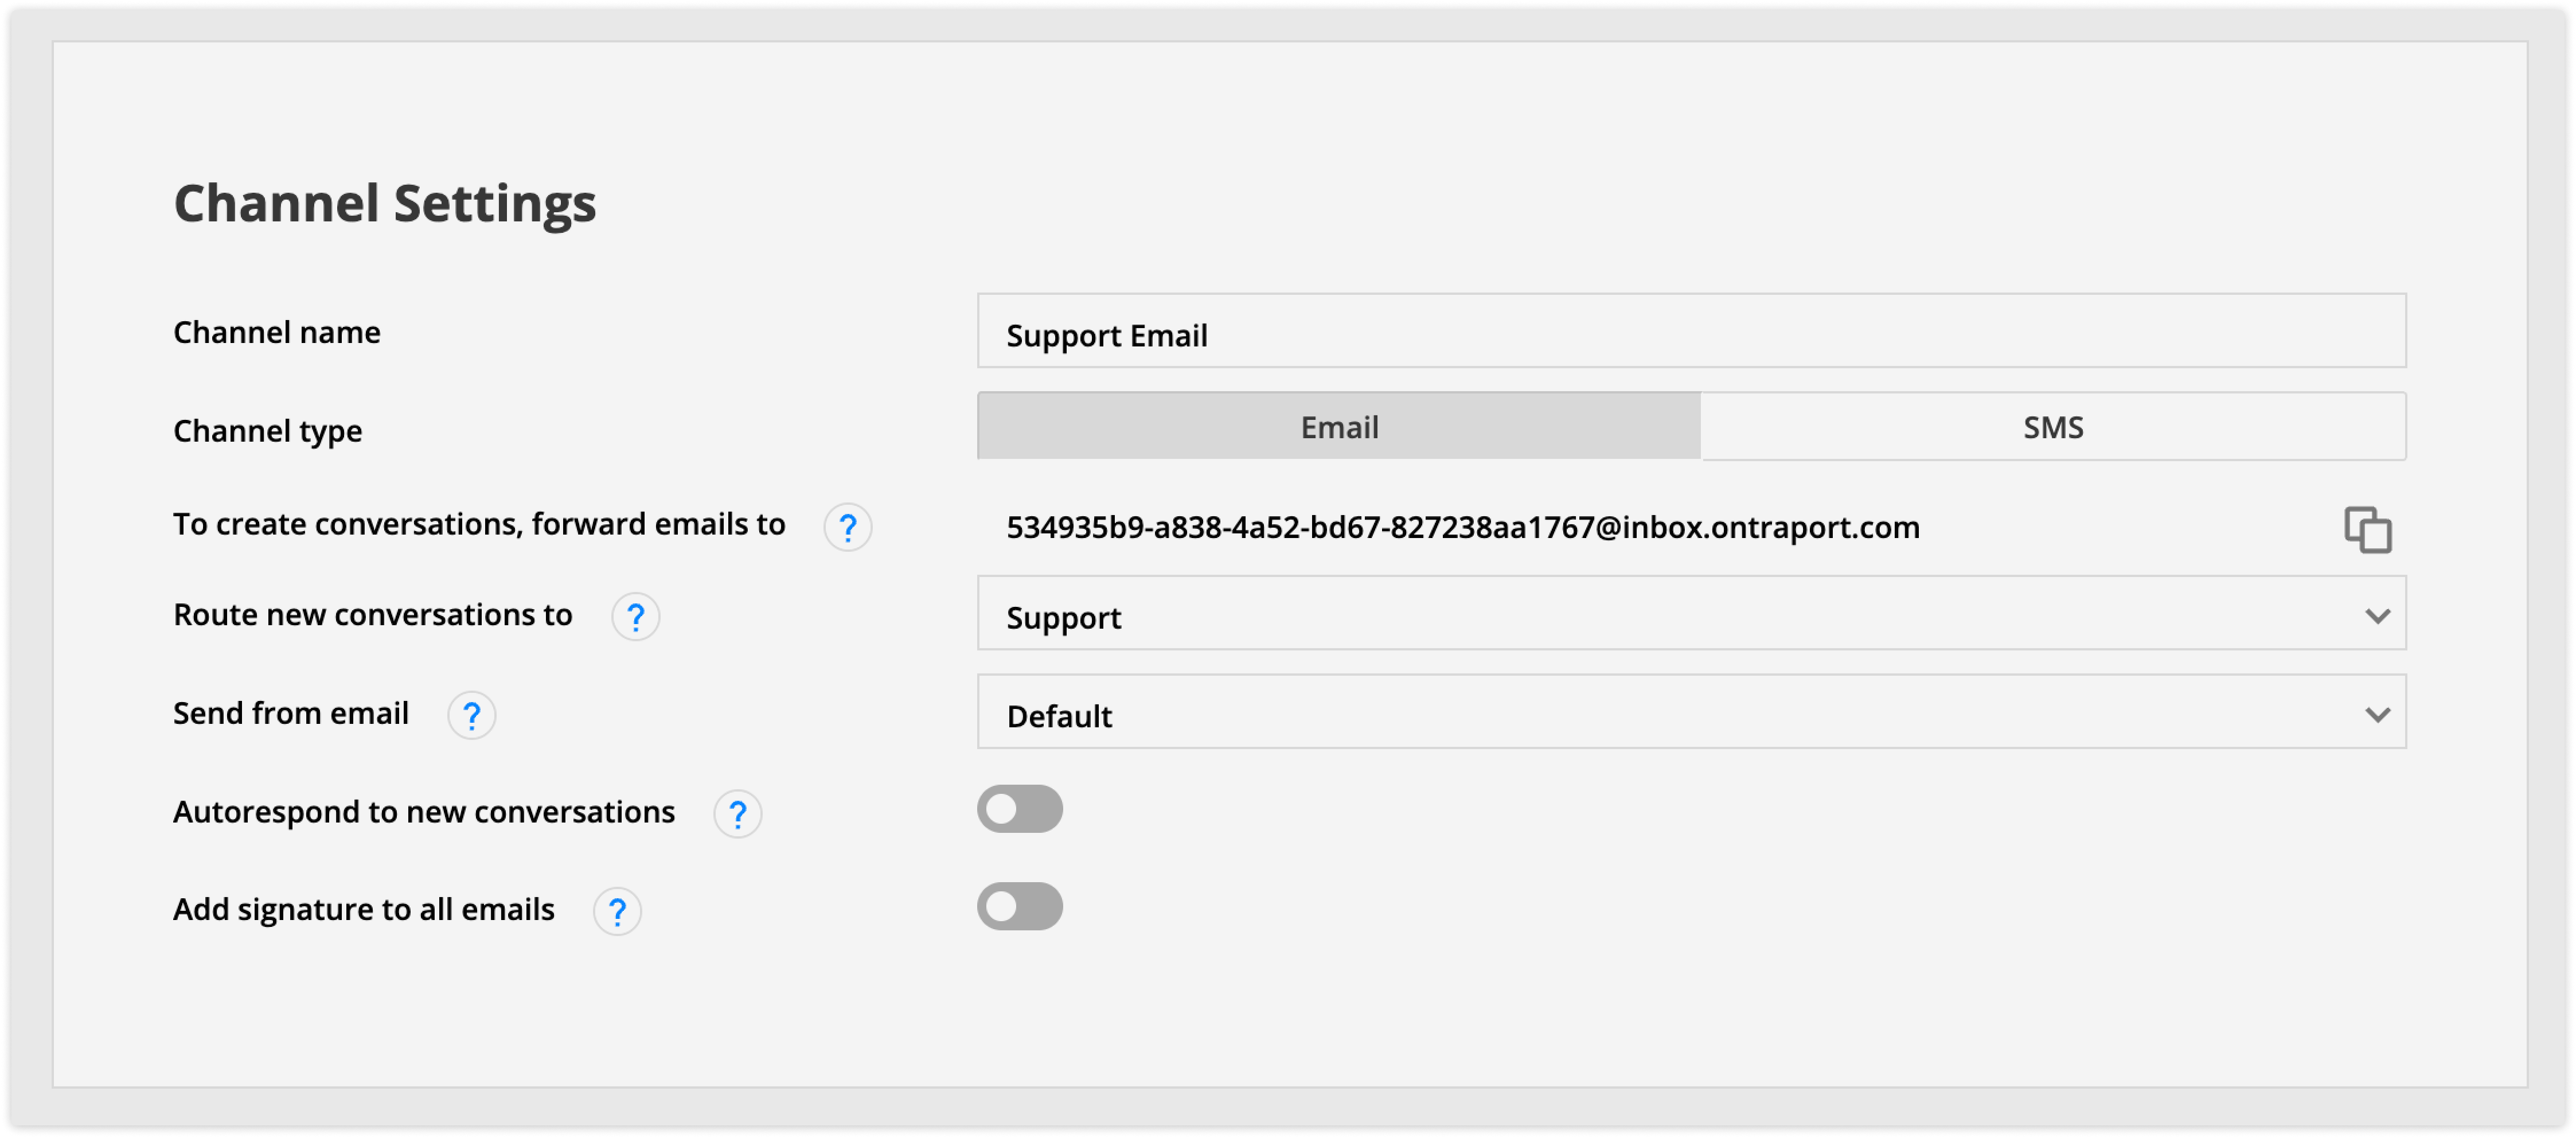
- Go to your Inbox → Settings → Channels.
- Fill in the following settings:
- Channel name: Name your channel.
- Channel type: Choose Email.
- To create conversations, forward emails to: This setting is for reference. When emails are forwarded to this address, it will add the message in the same conversation thread in the inbox.
- Check out the Forwarding for role addresses section below to learn more about how to use this address.
- Route new conversations to: Choose the inbox that your conversations should be added to.
- Send email from: Choose the send from address you’d like to use when you sent messages.
- Autorespond to new conversations: To enable an autoresponder toggle this setting on and select the email you want to send.
- Add signature to all emails: Toggle this option to add an email signature to all of your inbox emails. You must first add an email signature to your account.
- Click Save in the top right corner.
Forwarding for role addresses
When you set up your email channels, you’ll get an address for email forwarding. With that address and a little setup in your inbox, you can ensure that all emails sent to support@yourdomain.com go to your support queue and the ones sent to sales@yourdomian.com go to your sales team.
When it comes to setting up email forwarding, you have two options. You can either own or purchase role email addresses for your domain, or you can use Google Groups for your role addresses. The choice depends on your specific needs and preferences.
Check out this article to learn how to set up forwarding for your role addresses.
Set up team inboxes
Back to top of section
Inboxes allow you to route and store similar conversations together. For example, you can set up an inbox for your support tickets, a separate one for sales, and a third for your internal team. Think of the buckets of conversation types you’ll need for your business and follow the steps below to create inboxes for each of them.
Your account has a default inbox, so if you only need to manage one type of conversation, you don’t need to create multiple inboxes.
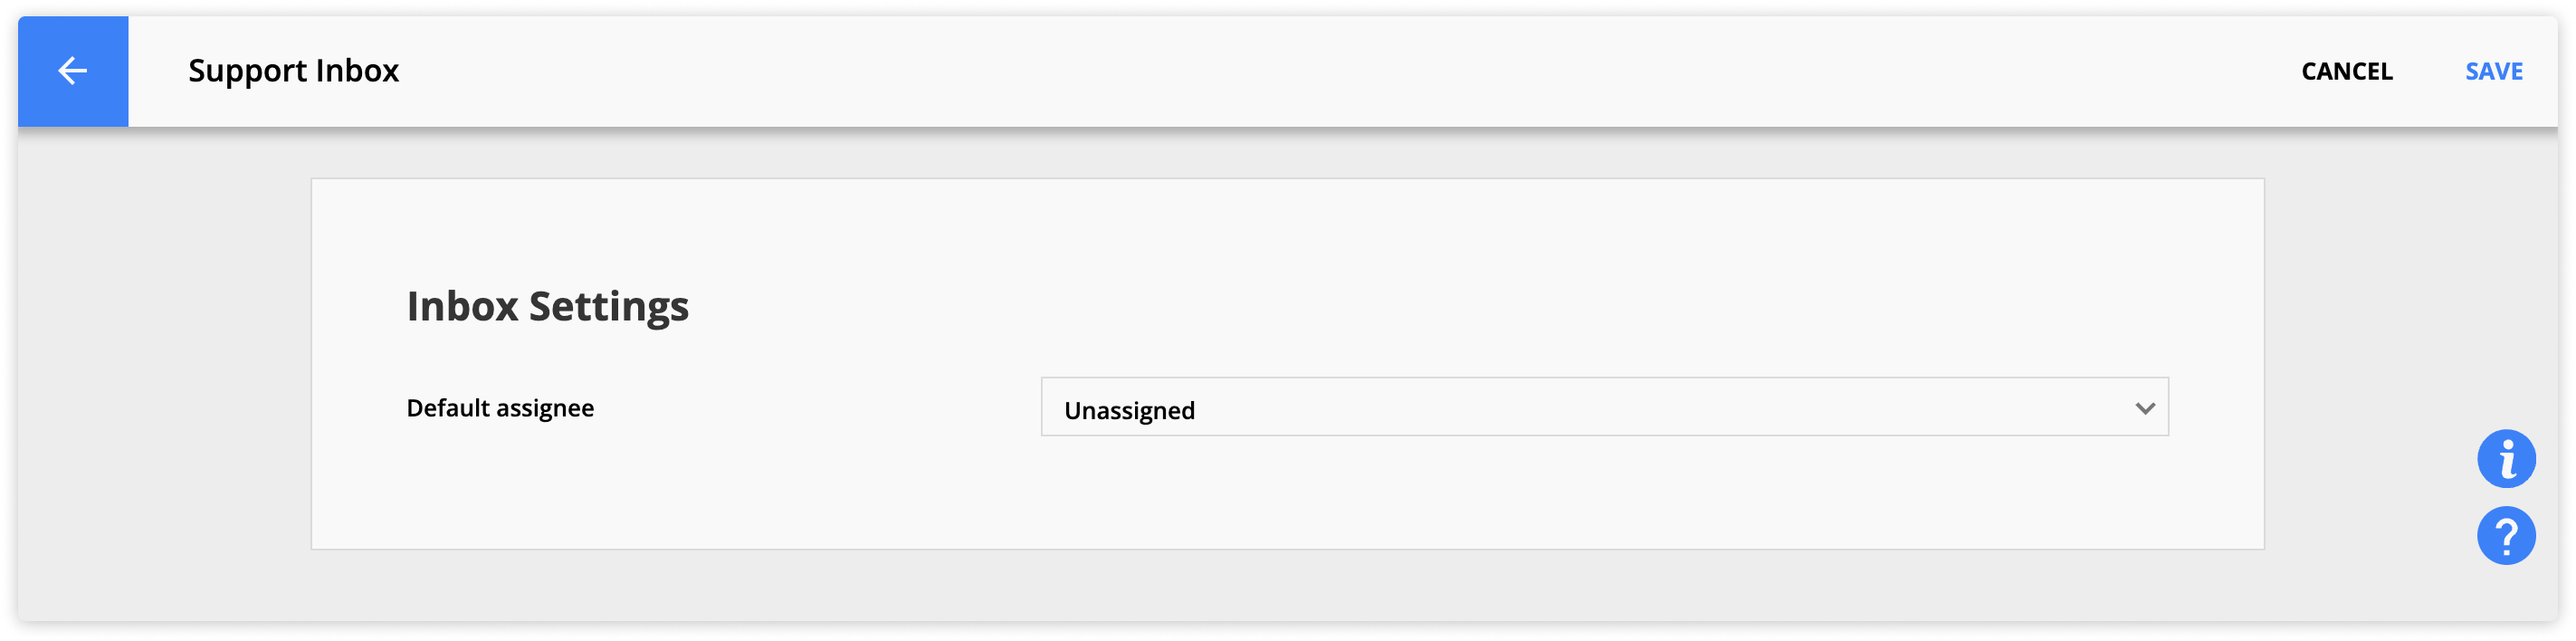
- Go to Inbox → Settings → Inboxes → New inbox.
- Name your inbox.
- Choose the default assignee.
- Choose “unassigned” if your inbox is managed by a team, and you’d like to be able to distribute the tickets according to availability and expertise.
- Click Save.
Navigate the Inbox collection
Back to top of section
To access your account’s Inbox, click on Inbox from your main navigation bar. You can view your existing conversations and create new ones.
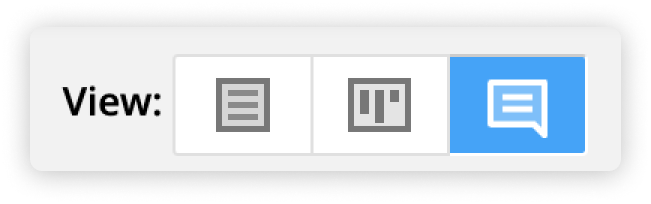
You have three view options for your Inbox:
- Inbox view - The standard option
- List view - Use to view your conversations in a table
- Card view - Use if you want to view and sort your conversations as cards
The rest of this section focuses on the Inbox view. The list and card views function like other objects in your account.
Navigate your conversations
Back to top of section
Conversations are the communication threads between your team and your contacts. The Inbox view shows the conversations screen which contains three sections.
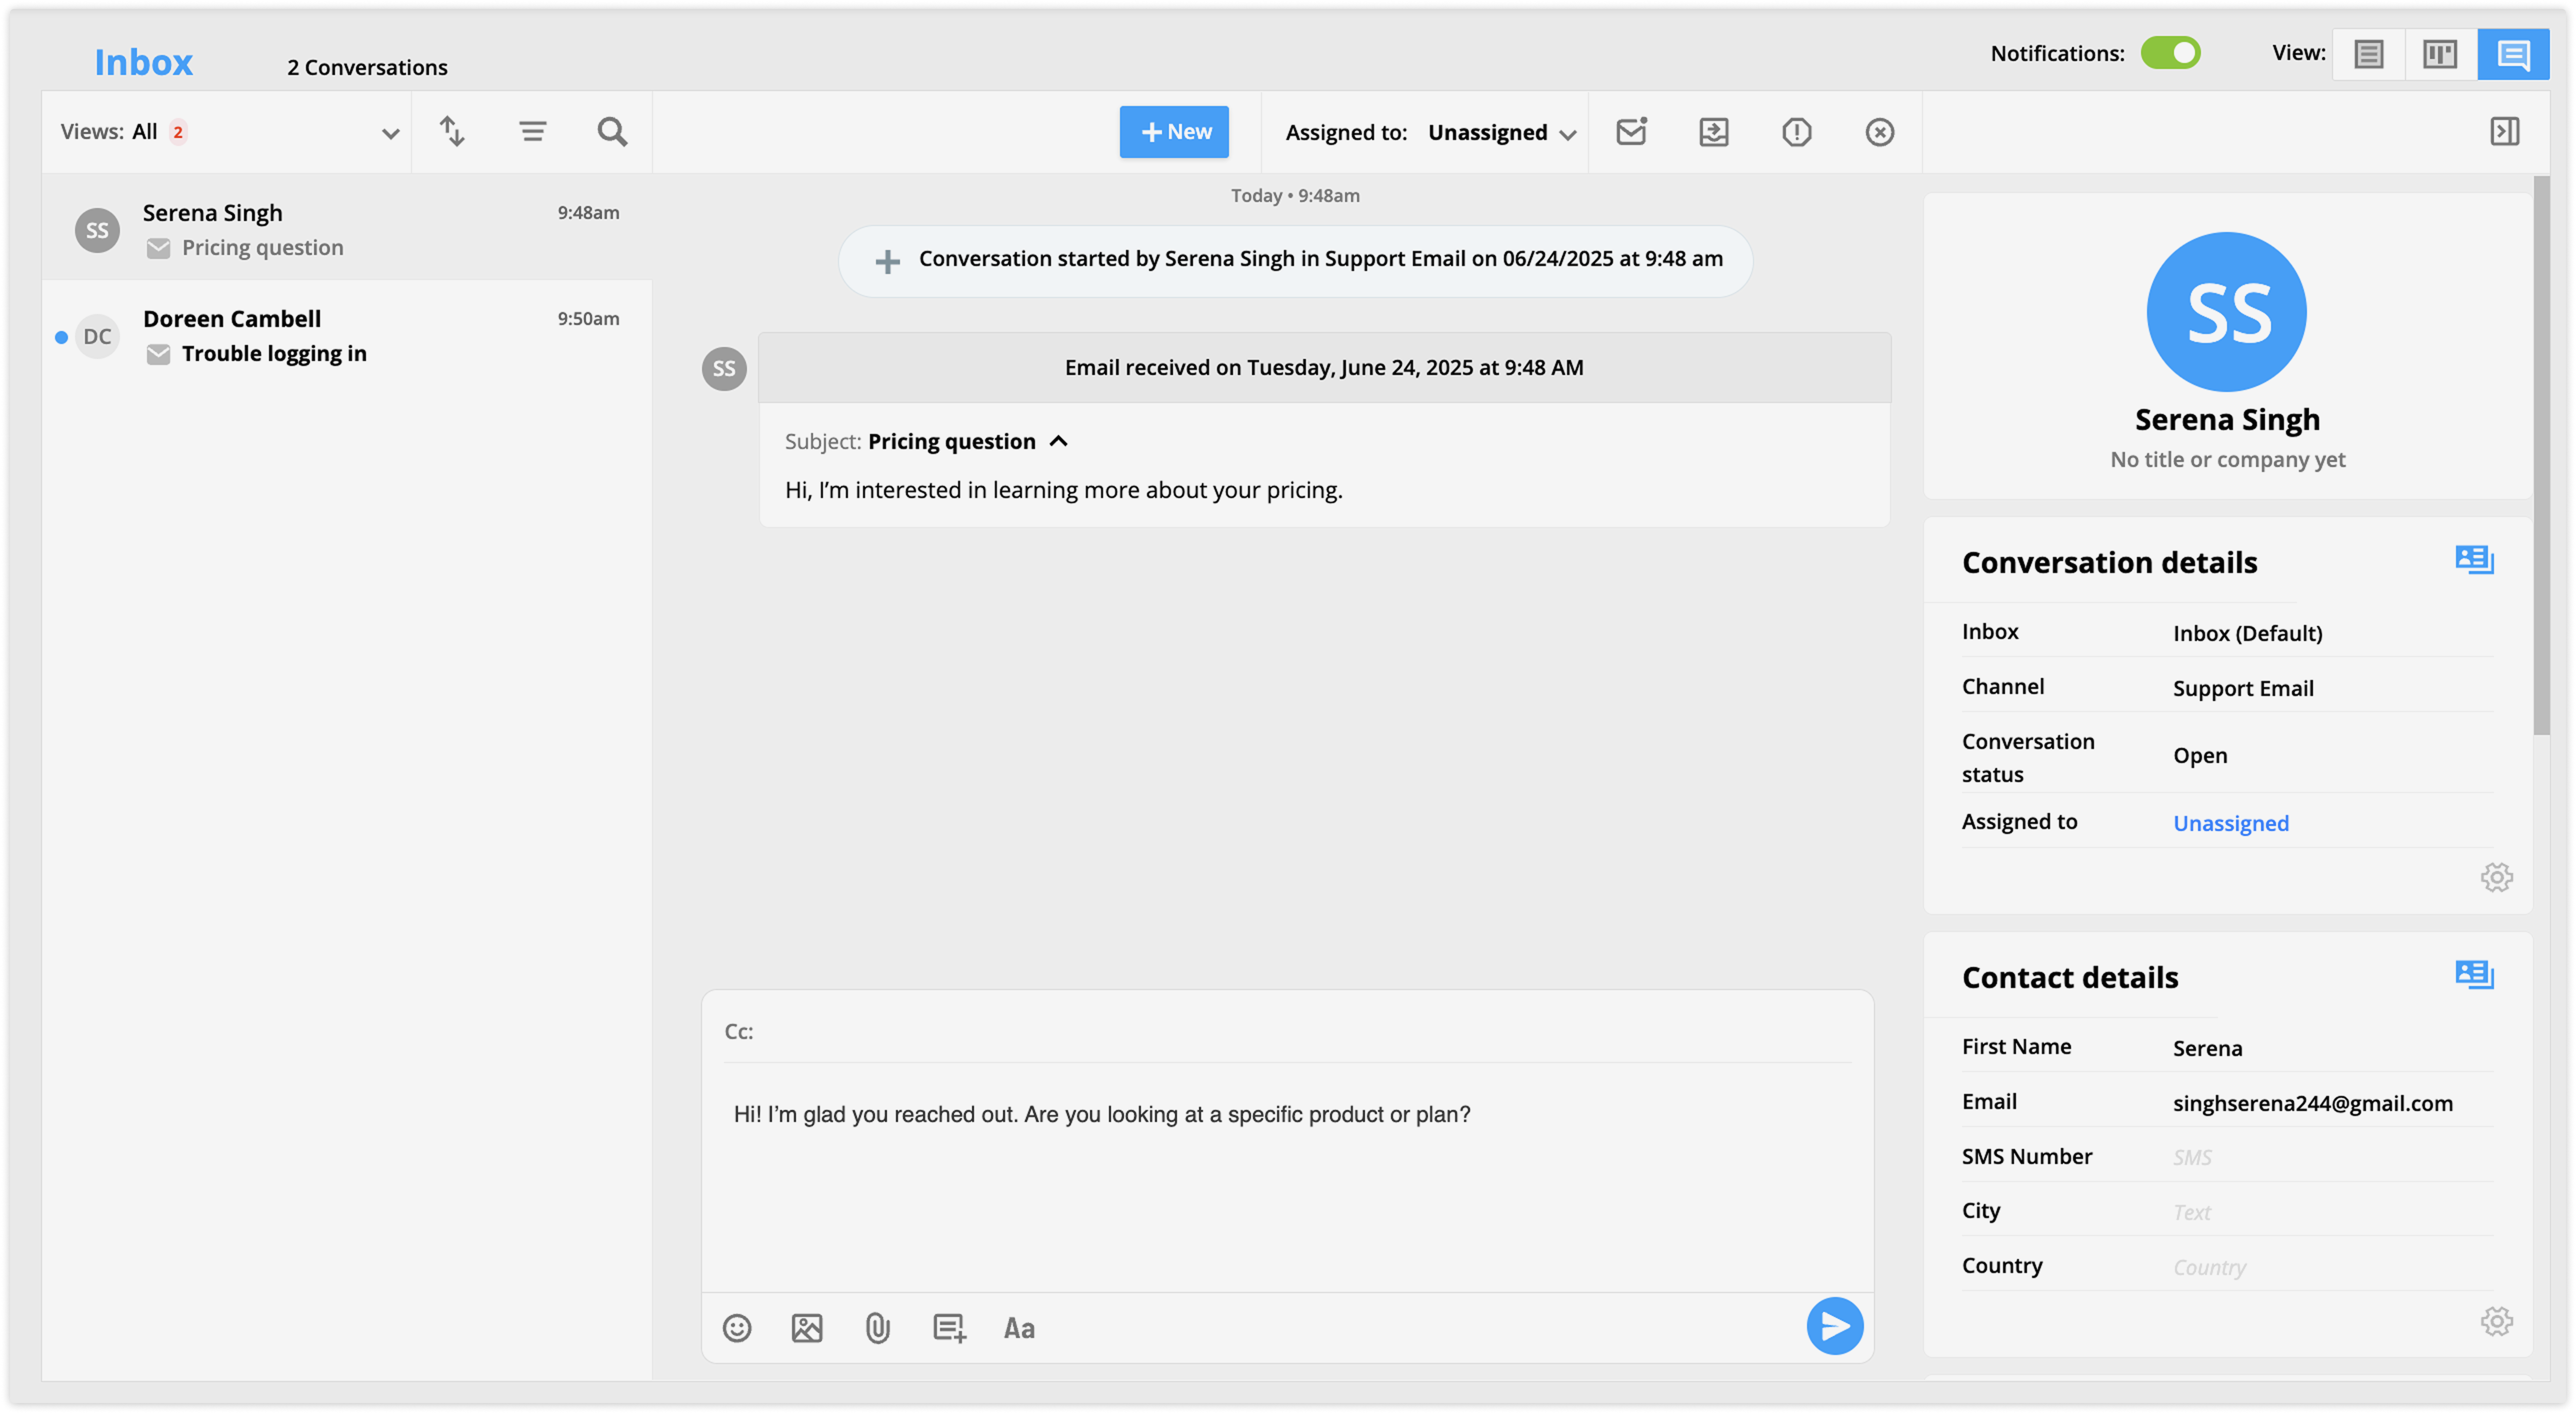
Here’s an SMS example: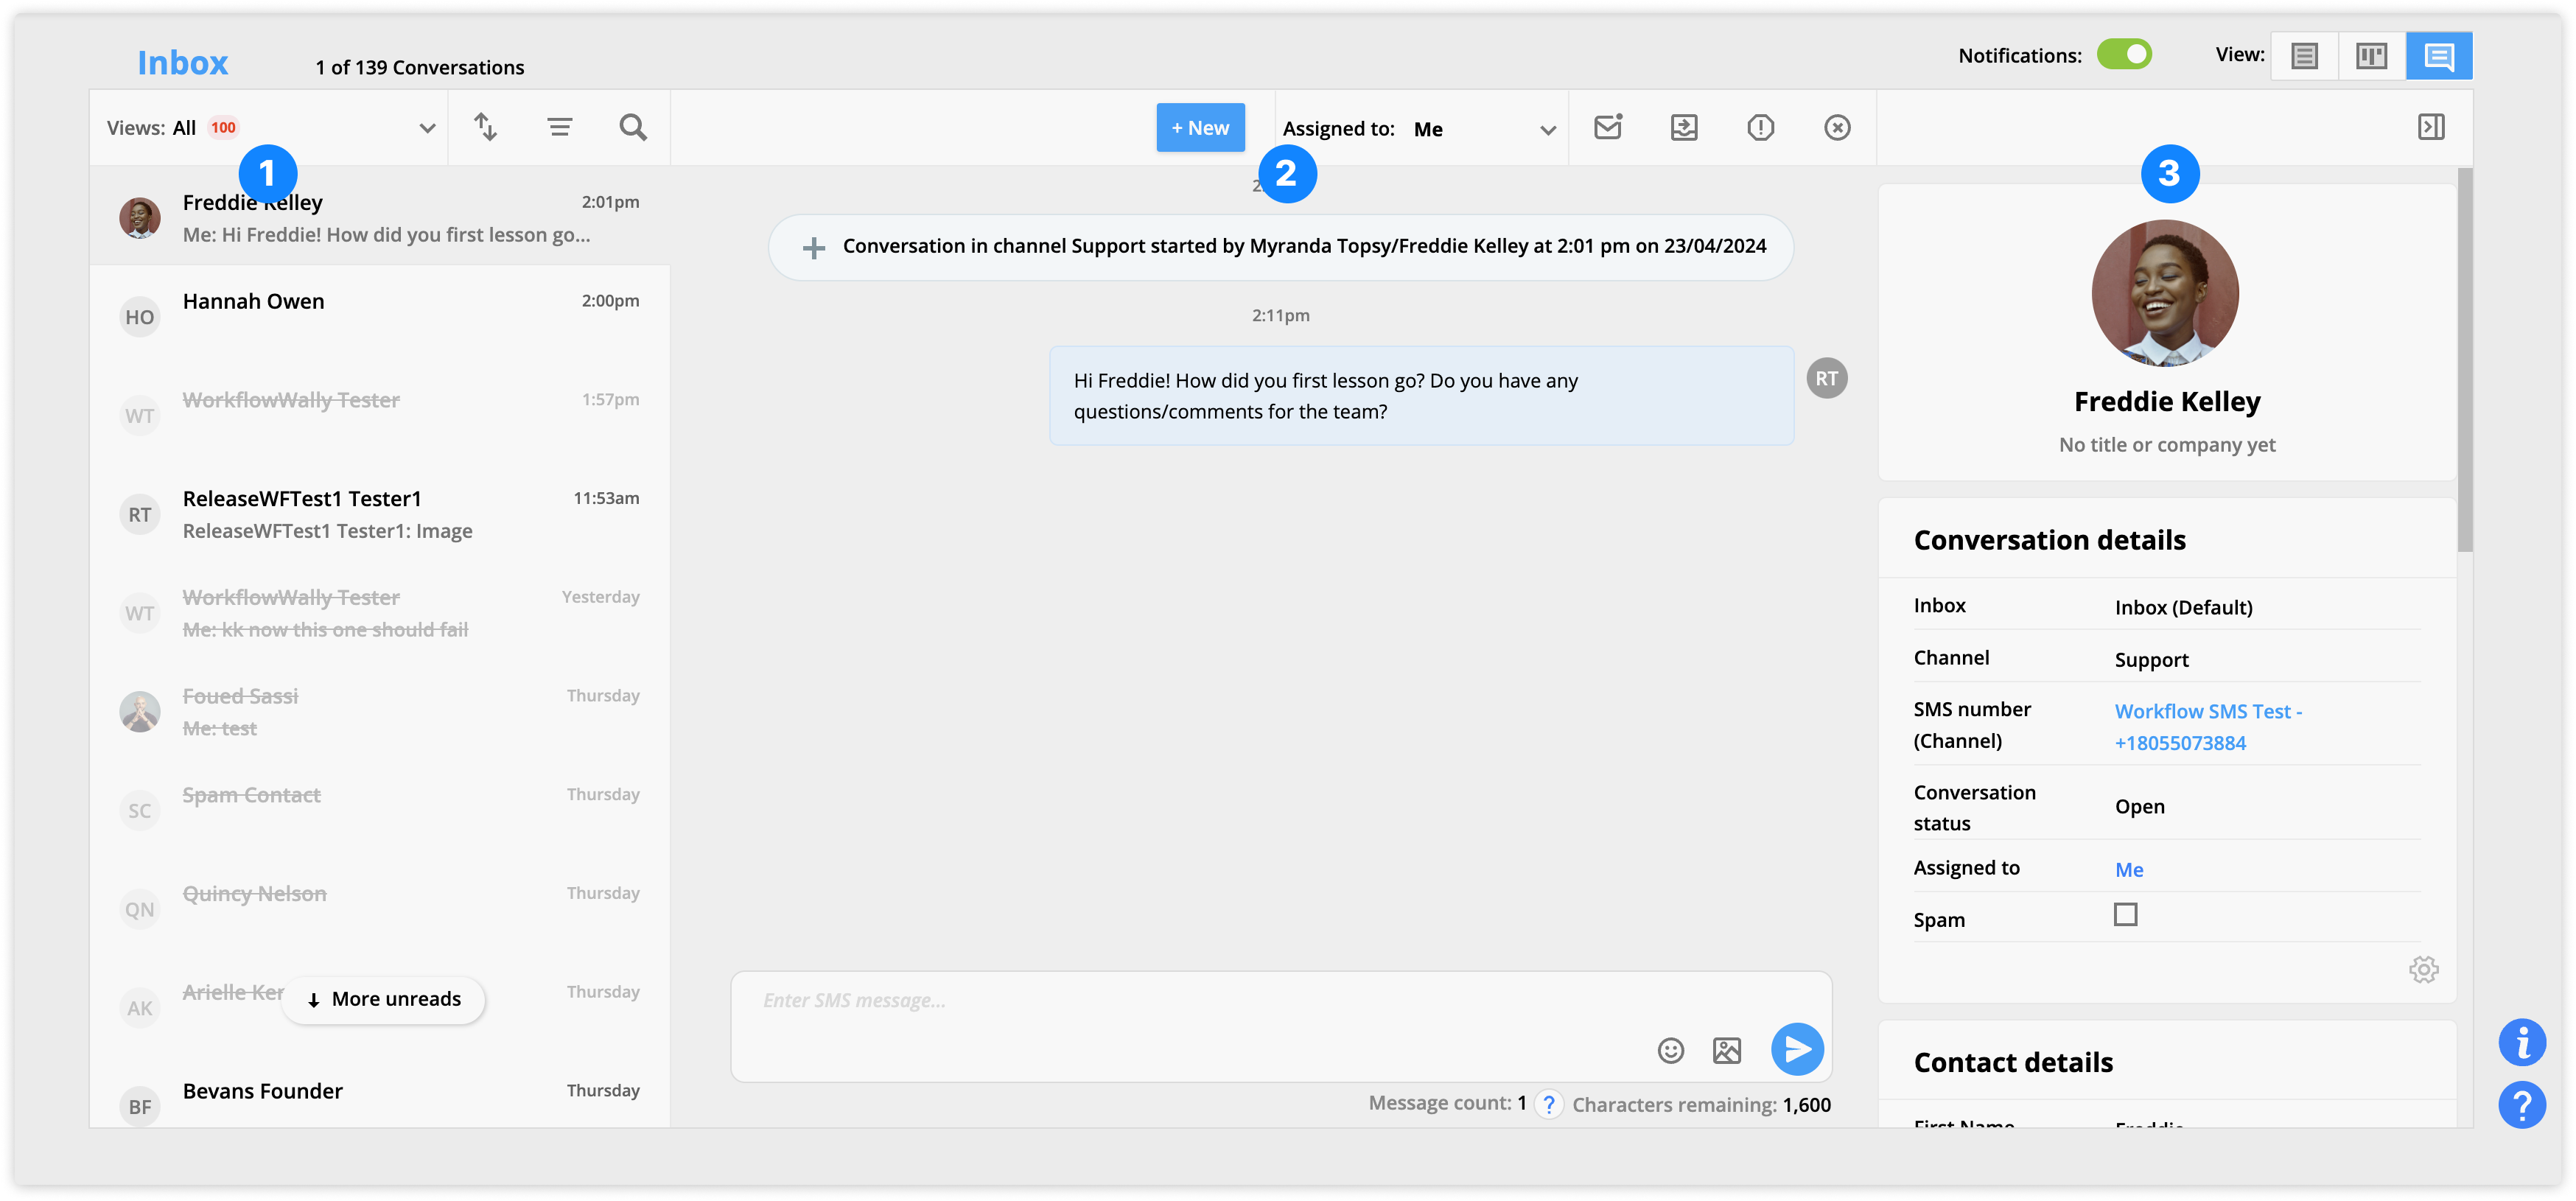
And here’s an email example: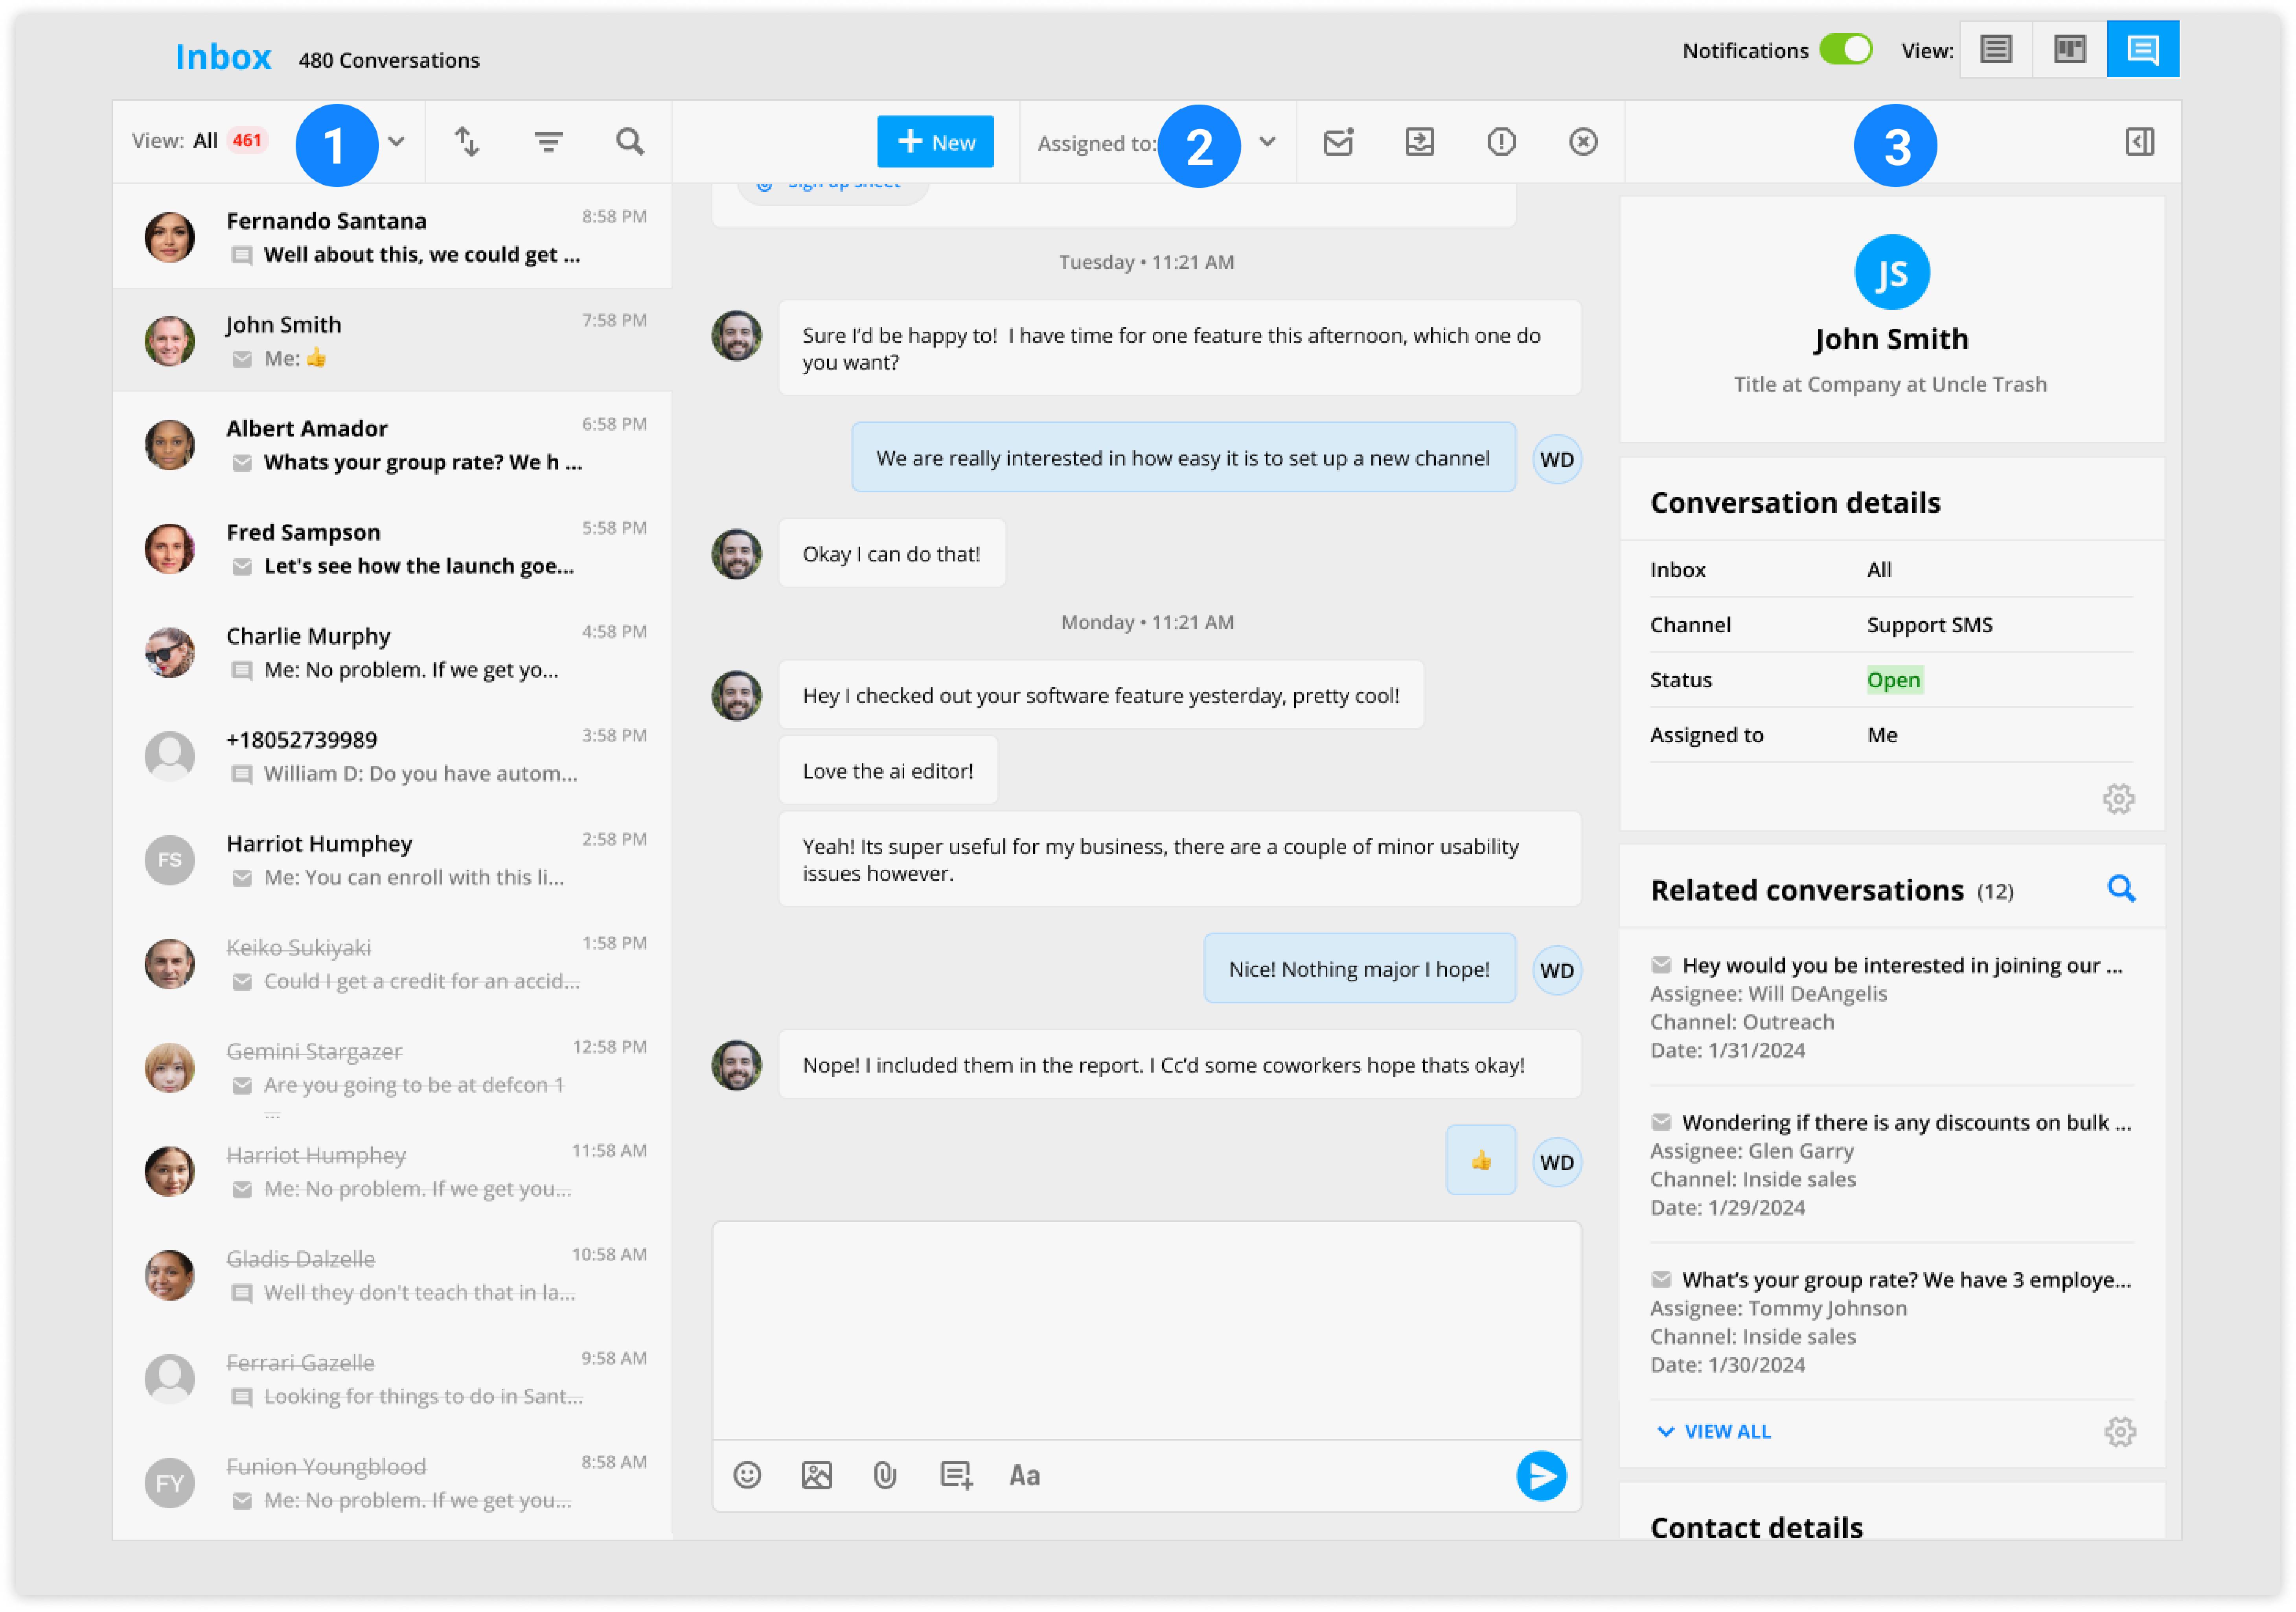
1. Left panel
This is where you can view a list of your conversations and click on them to open for details.
The top row of the left panel allows you to perform four actions to your conversation list.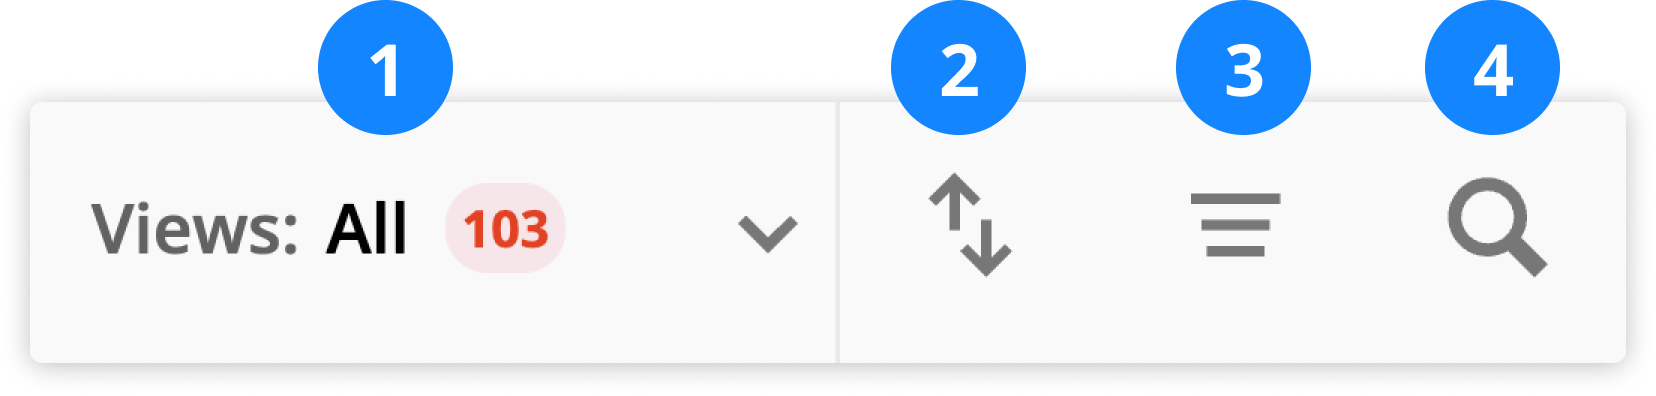
- Choose which types of conversations you want to view.
- Choose between options such as “All open” or “My unread.”
- Sort your conversations.
- Choose between new messages first or conversations in the order they were added.
- Filter your conversations by Inbox.
- Search your conversation list.
- The search will honor the view and filter options you’ve selected.
2. Central panel
This section shows the details of a specific conversation when you click on it. From the central panel, you can send a new message. You’ll also see important events in your conversation timeline, such as phone calls and purchases.
The top row of the central panel allows you to perform five actions on the message:
- Change assignee
- Mark the message unread
- Move conversation to another inbox
- Mark the message as spam
- Close the conversation
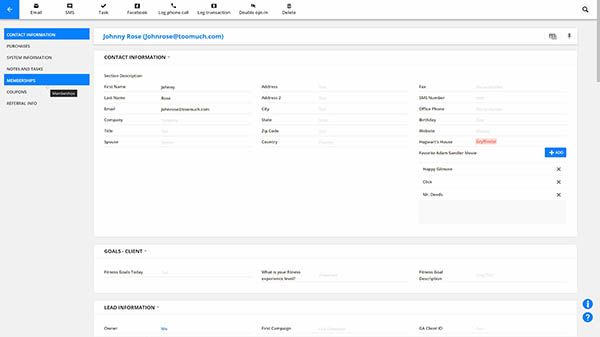
3. Right panel
This section shows you your customer data. You can view conversation details, contact details, notes and subcollections.
You can update these fields and subcollections in the same way you edit the widgets section of the record quick view.
You can also easily hide the right panel if you want more space to write your message. Just click on the button in the top right corner.
Enable notifications
Back to top of section
When notifications are enabled, you’ll see an alert at the bottom of your screen when you receive new messages.
- Toggle the “Notifications” setting at the top of your Inbox to enable notifications.
Access conversations from the contact log
Back to top of section
Conversations create an entry in your contact’s contact log. From the the details of this event, you can click View conversation to go to it in your inbox.
Inbox settings
Back to top of section
The Inbox settings include the same options as most objects, such as a field editor, default merge fields and import/export options.
To reach your Inbox settings, hover over Inbox and click Settings.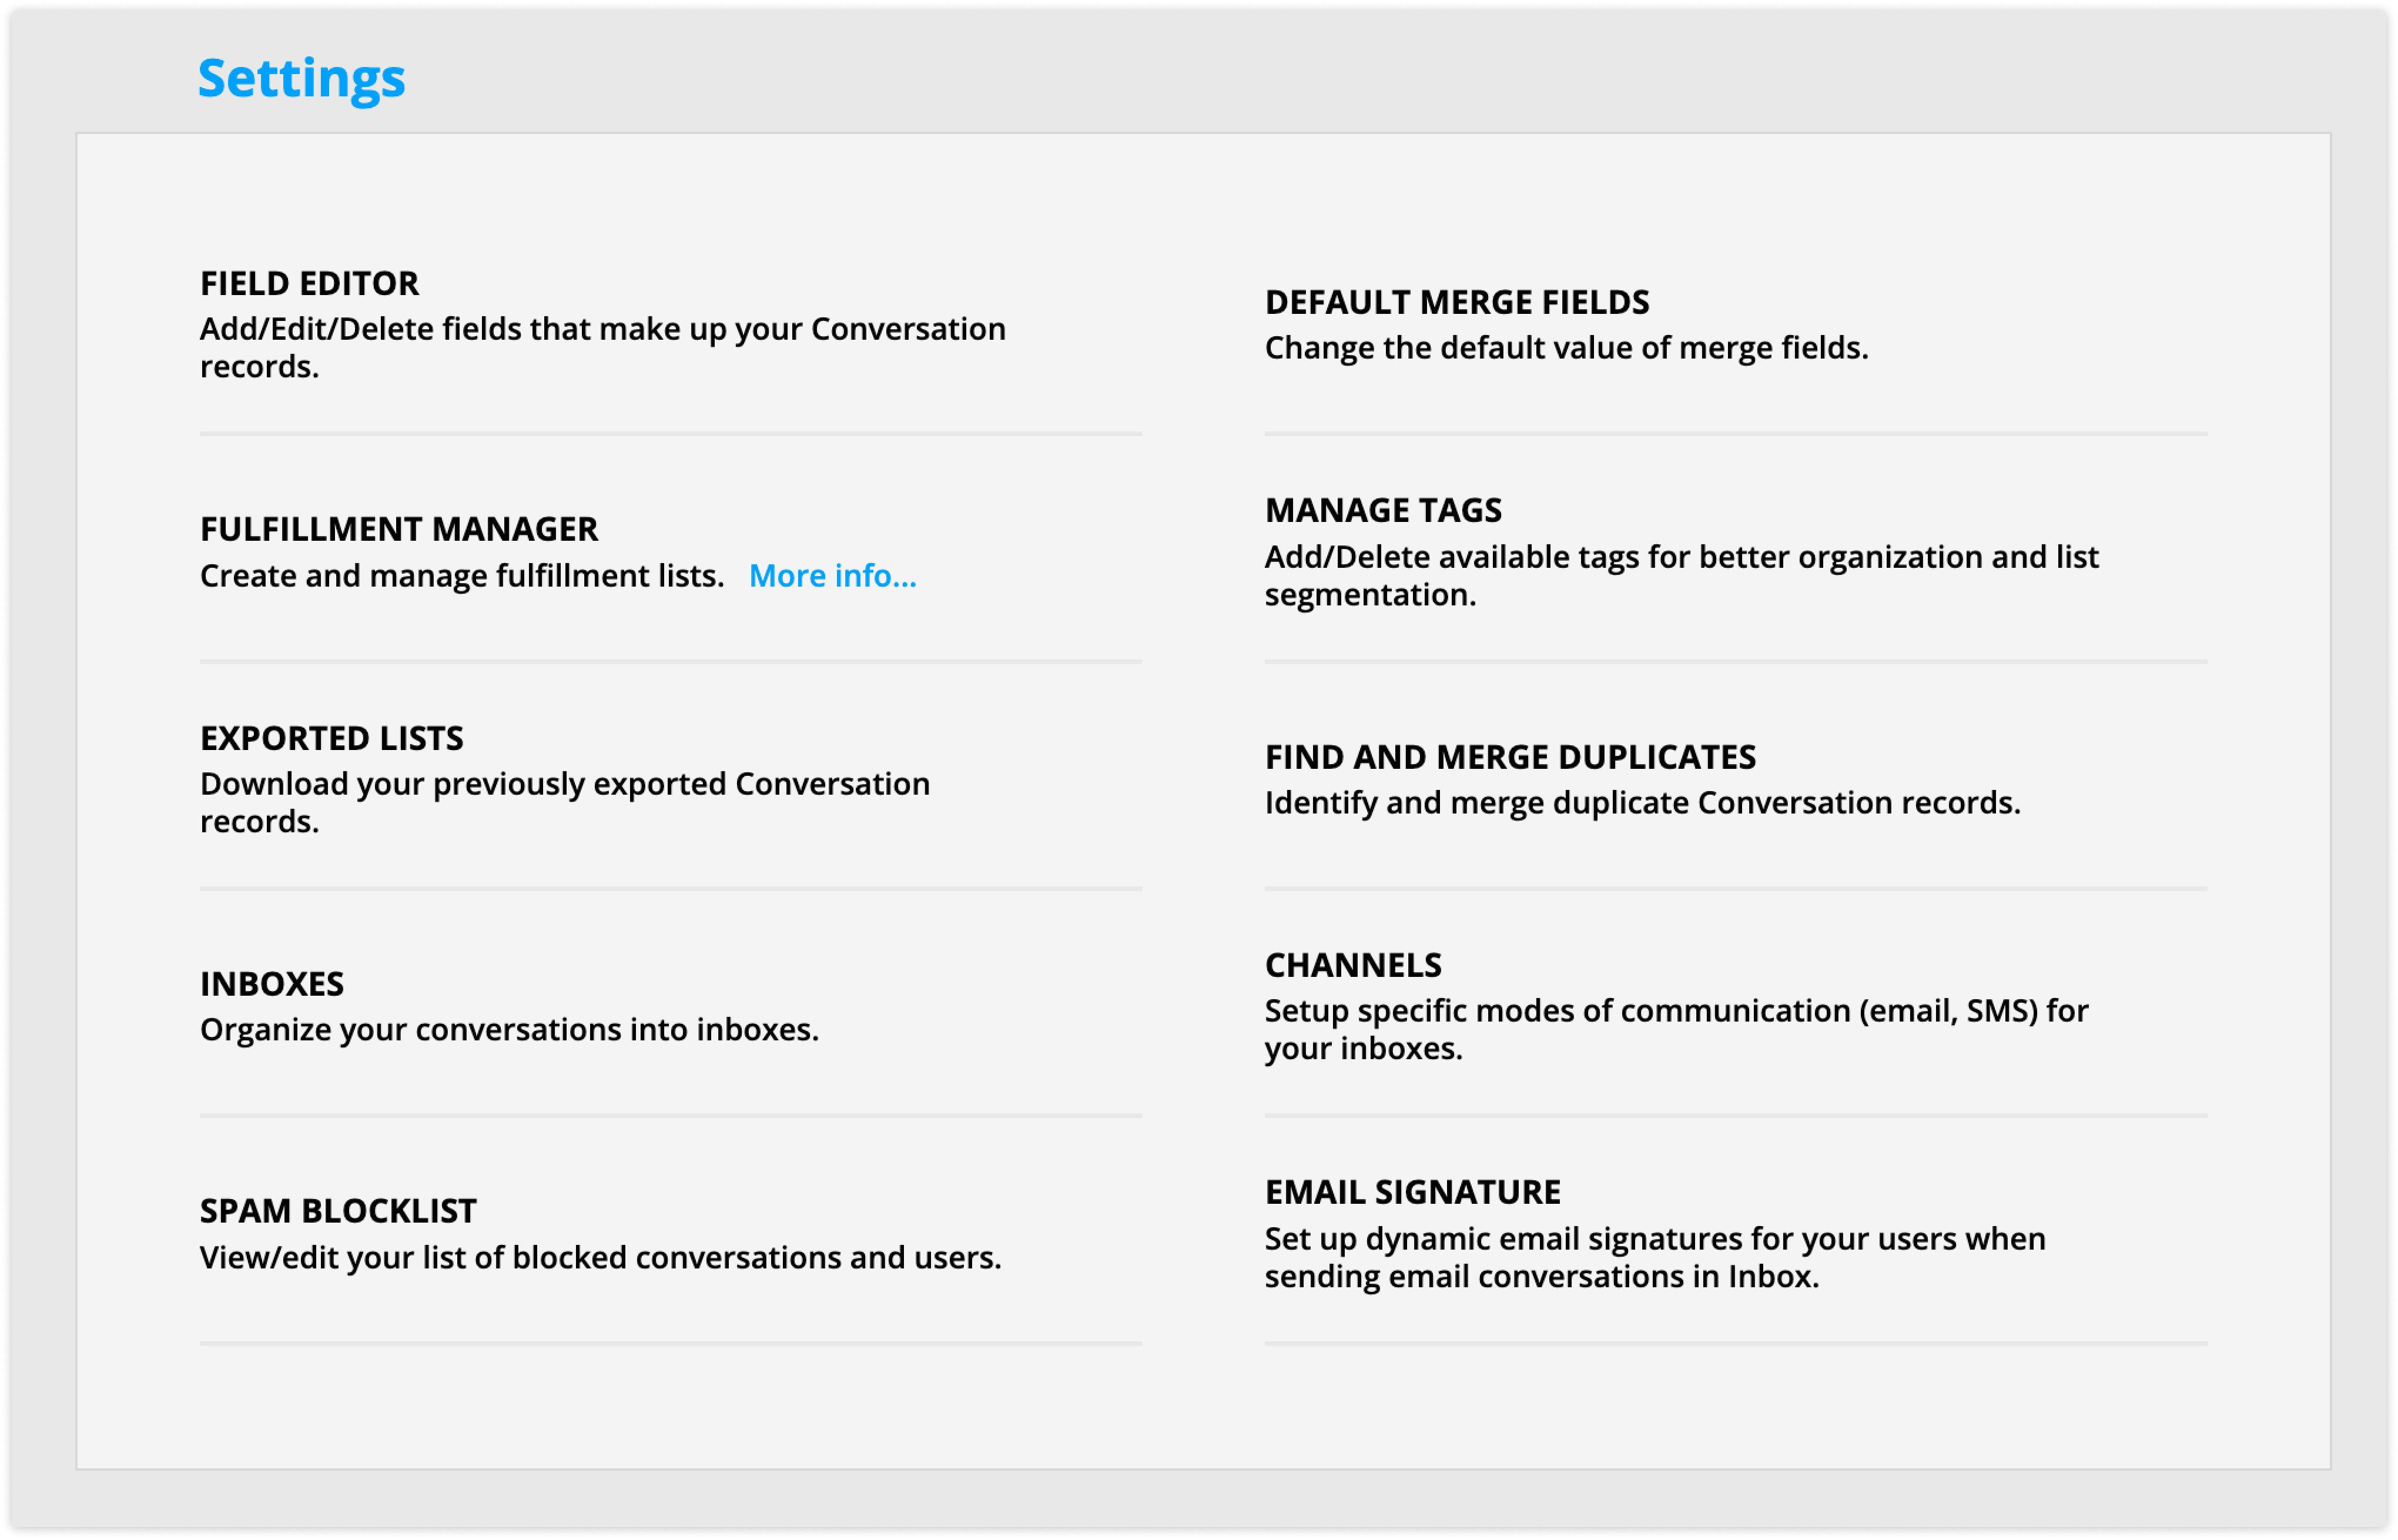
However, some settings are specific to Inbox:
- Channels — The channel settings allow you to configure and manage different communication channels.
- Inboxes — The Inboxes settings allow you to create different inboxes so you can group and organize conversations for your business.
- Spam blocklist — The spam blocklist collection allows you to manage unwanted communication.
- Email signature — Automatically add an email signature to all inbox emails.
Start a new conversation
Back to top of section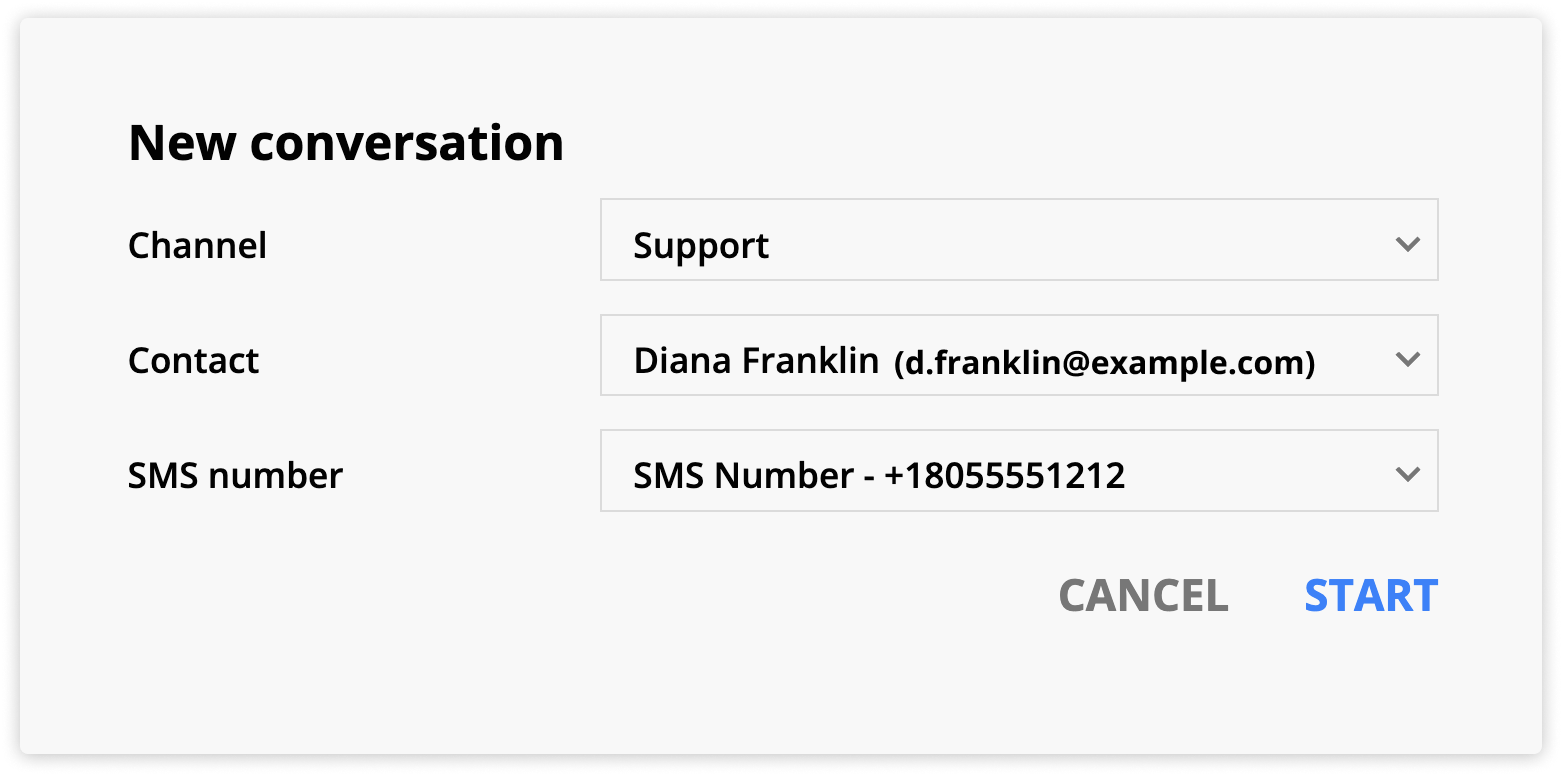
You can send a message to any of your contacts by starting a conversation.
- Go to Inbox and click New.
- Select a channel and a contact.
- If your contact has more than one SMS number, choose which number you’d like to send your message.
- Click Start.
- If you are sending a message from an email channel, add a subject line and any recipients you’d like to CC.
- You will go to the new conversation where you can type your message and click
 to send it.
SMS editor
Back to top of section
The SMS editor is very basic because SMS messages are predominantly plain text. Simply type your message and click ![]() to add an emoji or click
to add an emoji or click ![]() to add an image.
to add an image.
Email editor
Back to top of section
The inbox email editor uses the Simple mail editor, and gives you all of the same options you see when you create a new email from the messages collection. However you’ll see the options in a slightly different format.
Subject — Add your email subject
CC — CC additional recipients to include them in the conversation. Choose contacts or users from the dropdown menu. If your contacts send a message with CCed recipients or include multiple recipients, they’ll automatically appear in the CC field.![]() — Insert an emoji to the message.
— Insert an emoji to the message.![]() — Add an image to your message.
— Add an image to your message.![]() — Attach a file to the message.
— Attach a file to the message.![]() — Insert a canned message.
— Insert a canned message.![]() — Click to access your formatting options.
— Click to access your formatting options.
You’ll also see that email channels have a “Related Conversations” widget on the right-hand side of the screen. This allows you to jump to other conversations related to the contact quickly. Unlike SMS, email channels allow your contacts to open multiple conversations with you. This allows you to create separate ticking systems for your Support and Sales teams.
From form submissions
Back to top of section
Your leads and customers can start new conversations from forms when you select the “Start a new conversation from this form” option in your forms settings. This is a great option to create a support ticketing system or give your site visitors an easy way to talk with your sales team.
- Create your form like normal.
- Go to the form’s advanced settings and check the “Start a new conversation from this form” setting.
- Choose your channel and save your settings.
- Publish your page.
Receive new messages and replies
Back to top of section
When contacts send you a message, and you have notifications enabled, you’ll see an in app notification on the bottom left of your screen. Click View to go to your new message.
When a contact clicks reply on a message sent from an email channel in your inbox, the reply to address will be your channel’s forwarding address plus the ID of the conversation it belongs to. This ensures that replies are added to the correct conversation thread.
Merge in conversation history
Back to top of section
It’s common to send full conversation threads when a support or sales conversation is completed to send to your contact so they can reference the conversation later on. You can provide this for your leads and clients by simply using the Conversation history merge field.
- Draft your inbox email and click
.png) to add a merge field.
to add a merge field. - Choose “Conversation history” from the dropdown.
- Save and send your message and the merge field will populate the whole conversation with your contact.
Inbox automations
Back to top of section
You can effectively organize and manage your conversations by creating automation maps for your inbox. For instance, you can set up automation maps to alert your rep's manager when a rep doesn't respond to a contact within a specific timeframe or to close out conversations after your contact stops replying. This streamlines your workflow and ensures timely responses and efficient conversation closure. You can also automate responses to certain types of incoming messages, such as immediately letting a customer know you've received their inquiry and will be with them shortly.
Building inbox automations is just like creating contact automations, but you gain access to new triggers and unique fields that can be used in conditions. These fields help you optimize your inbox management, making it more efficient and tailored to your needs.
Your inbox won't create a conversation for each contact who receives a message through automation maps. It will only create a conversation when a contact responds.
Check out this video by the CEO and Founder, Landon Ray to learn more about Inbox automations:
Inbox specific triggers
- Conversation is created
- Conversation message is received
- Conversation message is sent
Inbox specific fields
- Conversation status - Shows if the conversation is open or closed
- Time to first response - The amount of time it took for a team member to respond when a contact starts a conversation
- Time to close - The time between the conversation starting and closing
- Time since last inbound message (In minutes) - The amount of time since the contact last sent you a message
- Time since last outbound message (In minutes) - The amount of time since a member of your team sent a message
Automate customer experience processes
Once you’ve set up your inboxes and channels, you can set up systems and automation to make managing your conversations a breeze.
Create a basic inquiry and response system
Manage spam
Create an AI autoresponder
Automate manager oversight
Automatically close conversations with no reply
Send an automated SMS first reply
Create a basic inquiry and response system
Back to top of section
Once you have your inboxes and channels set up, you’ll want to create systems to manage your processes. At the most basic level, all businesses need a simple system that allows site visitors to submit a form to create a support ticket or inquiry for the sales team and send a follow-up email when the conversation is closed.
Create a contact form
The first step in this system is to create a form that site visitors can submit to create a ticket.
The form needs a long text or rich text field for your contact to add a message. You can create a custom field for this; however, the instructions below use the Notes field in contact records because you can save multiple notes in a contact’s record each time they submit your form instead of overwriting the content in a text field.
- Go to Pages → New landing page.
- Start from scratch or choose a prebuilt template.
- Create a form on your page with the source equal to “Contacts.”
- Add the fields you want on your form. We recommend at least Email and Notes.
- Add a submit button to the form and click on it then click Form settings.
- Customize your form’s thank you page, then scroll to the Advanced section and check the “Start a new conversation from this form” option, then select a channel.
- Click Save then save and publish your page to make it live.
Step 1 is done. Great job!
Now, create an automation that sends a follow-up email when conversations are closed. This email will contain a transcript of the conversation for your contacts’ records.
- Go to Inbox → Automations → New automation → Start from scratch.
- Add a trigger to your map and click Add trigger and select A field is updated.
- Select the Conversation status field.
- Customize your trigger settings:
- Which Conversations can activate this trigger?: Any conversation in account
- If Conversation is already on map, then…: Move here when triggered
- Click Add condition and select Field is this value.
- Choose the Conversation status field equal to closed.
- Click Done.
- Click What happens next? Below the trigger, select Send an email and click on the element to open its settings.
- In the “Send Conversations this Email” dropdown, click New message and name it, “Conversation closed | Follow-up.”
- Select Simple mail.
- Draft your message and make sure that you include the “Conversation History” merge field to share the chat transcript with your contact. Here’s what we recommend:
Subject: Chat with [BusinessInformation//Business name]
Preheader: Here’s a copy of our conversation 📄
Message:
Hi [Contact//First Name],
It was great chatting with you today!
Here’s your conversation transcript for reference:
Need anything else? Just reply to this message — we’re happy to help!
[Assigned to//First Name] [Assigned to//Last Name]
[BusinessInformation//Business name]
- Click Save to return to the automation map.
- Add End or Exit elements to all incomplete lines of automation and save and publish.
Manage spam
Back to top of section
As with any inbox, you will likely receive spam messages, but they're easy to manage with Ontraport Inbox. You can manually mark any message as spam and set up automation to mark the obvious spam messages.
When you mark a message as spam, your account will add the contact associated with the email address or SMS number they contacted you on to the spam blocklist. Any messages from contacts on your block list won't appear in your inbox.
Once you've marked a message as spam, you can mark the content as not spam so you can view their messages in your inbox again.
- Go to Inbox → Settings → Spam blocklist.
- Select the conversation and click Mark as not spam.
Automatically quarantine messages that are clearly spam
The Inbox feature comes with default spam detection. The system described below helps filter your conversations further based on your specific business.
The best way to automatically identify spam messages is to check the message for spam trigger words that your business frequently encounters. All you need to do is build an automation that is triggered when you receive a new conversation, check the message for spam trigger words. If the message contains any of those words, the automation marks the message as spam.
If you want some manual oversight of this process, you can assign a team member the task of checking your spam messages.
Here’s how:
- Go to Inbox → Automations → New automation → Start from scratch.
- Add a trigger element to the map and click Add trigger → Conversation is created.
- Click Add condition → Field is this value.
- Select the field Last message > Last inbound message.
- Choose the condition “contains.”
- Add your first spam trigger word.
- Click the copy icon and add all of the spam trigger words you want to include.
- Customize your trigger settings:
- Which Conversations can activate this trigger?: Any conversation in account
- If Conversation is already on map, then…: Move here when triggered
- Click Done.
- Click What happens next? Below your trigger and choose Update conversation and click on it to open its settings.
- Select Spam in the Update this field dropdown.
- Check the box.
- Click Done.
If you don’t want to include a task for a team member to check your spam blocklist, then add End or Exit elements to all incomplete lines of automation and save and publish.
Add a task (Optional)
- Click What happens next? Below the update conversation element and select an Assign task element and click on it to open its settings.
- In the “Assign conversation to this task” dropdown click New message and name it “Check spam” then click Save & edit then click Task.
- You can customize your task to include any information you’d like, these are the basic recommended settings:
- Task subject: Check spam messages
- Due date: 1 day after assignment
- Task owner: Conversation owner
- Task instructions:
This message was marked as spam:
"[Last inbound message]"
If the message is not spam, remove the contact from the spam block list.
1. Go to the spam block list: https://app.ontraport.com/#!/spam_block_list/listAll
2. Search for [Contact//First Name] [Contact//Last Name] - [Contact//Email]
3. Select contact and click Mark as not spam.
4. Go to the inbox and reply to the message.
- Task notification: Task assignee when task is assigned by email
- Save the task message to return to the automation map.
Complete the map by adding End or Exit elements to all incomplete lines of automation and save and publish.
Create an AI autoresponder
Back to top of section
When you create email channels, you can choose a specific message to auto-reply to new conversations. That setting sends the same message to everyone when they start a new conversation. However, you can use the AI Assistant element to create personalized first replies to messages.
To get started, you need to create a custom long text or rich text field to save the AI's first response in the conversation’s record. Then, you can use merge fields to add the reply to an email or SMS message.
Create a custom field
- Go to Inbox → Settings → Field editor.
- Create a custom Rich or Long text field named, “AI reply.”
- Save your changes.
Create an automation
Now that you have your custom field, you can create a new automation map. You can always follow these steps to add this functionality into an existing map as well.
- Go to Inbox → Automations → New automation → Start from scratch.
- Name your map, “AI autoreply.”
- Add a trigger to your map, click Add trigger and select conversation is created.
- Check that your triggers settings are:
- Which Conversations can activate this trigger?: Any conversation in account
- If Conversation is already on map, then…: Ignore this trigger
- Click Done.
- Check that your triggers settings are:
- Click What happens next? Below the trigger and select AI Assistant.
- Customize your system role by telling it how you want it to respond and include answers for questions you expect your visitors to ask. It should also include how you’d like the assistant to respond if it receives a question you didn’t provide an answer for.
- Next, use the merge field dropdown to customize your AI prompt. If contacts send you a message directly, use the “Last message” merge field. However contacts are sending you inquiries from forms, use the merge field for the field on your form, such as “[Contact//Newest Note]”.
- In the response section, choose to store the response in a field, and select the custom field you created earlier.
- Click Done.
- Below the AI Assistant element, click What happens next?, choose Send an email or Send SMS and click on the element to open its settings.
- Click New message and name it, “AI first reply.”
- Select the message editor you prefer.
- Customize your subject line, preheader and message. Include the merge field for the “AI reply” field you created earlier.
- Save your message to return to the automation map.
- Complete your map by adding End or Exit elements to all incomplete lines of automation and save and publish.
Automate manager oversight
Back to top of section
It’s crucial for you and your managers to step in when customers issues aren’t resolved in a timely manner. A common type of automation notifies your rep's manager when a ticket is not updated.
In the Automation Marketplace, we have added prebuilt map alerts managers when the first reply time exceeds 3 hours.
Click here to download it.
Automatically close conversations with no reply
Back to top of section
Sometimes, clients abandon conversations with your team, leaving inactive conversations that clutter your inbox view. With this prebuilt automation, if the contact doesn’t respond within a specific timeframe, the map sends a follow-up message to get the conversation going again. If there is still no reply, the map closes the conversation so your team can focus on active ones.
Click here to download.
Send an automated SMS first reply
Back to top of section
Email channels have a setting that allows you to select a specific message to autorespond to new conversations. This prebuilt automation map can accomplish the same functionality for SMS channels.
When a contact starts a new SMS conversation with you or your team, this map will kick off and send the first reply: "Thanks for reaching out! We've received your message, and a team member will be with you shortly." However, you can customize the map to send any message you want.
Click here to download.