A booking calendar is an essential tool for your business to manage and schedule appointments with clients.
Allowing your customers to book their own appointments increases efficiency and frees up your time for other tasks.
Offering a booking calendar also creates a better customer experience. You’ll book more appointments when your clients can request a date and time that works for them without asking you to schedule or reschedule it.
It also helps your business keep track of your schedules and appointments in a centralized location. When you save all your appointments in Ontraport, you don’t have to worry about double-booking or no-shows.
Check out this video to learn more:
Table of contents
Set your availability
Create a booking page
• Details
• Hosts
• Custom fields
• Confirmation settings
• Form settings
• Create a custom thank you page
• Style
Embed your booking page
Set your availability
Before creating a booking page, it’s important to customize your availability settings. These settings tell Ontraport which calendars to check for availability and where to book appointments.
- Go to
.png) → Personal profile → Calendar.
→ Personal profile → Calendar. - Scroll down to the availability section of the calendar tab and customize the following settings:
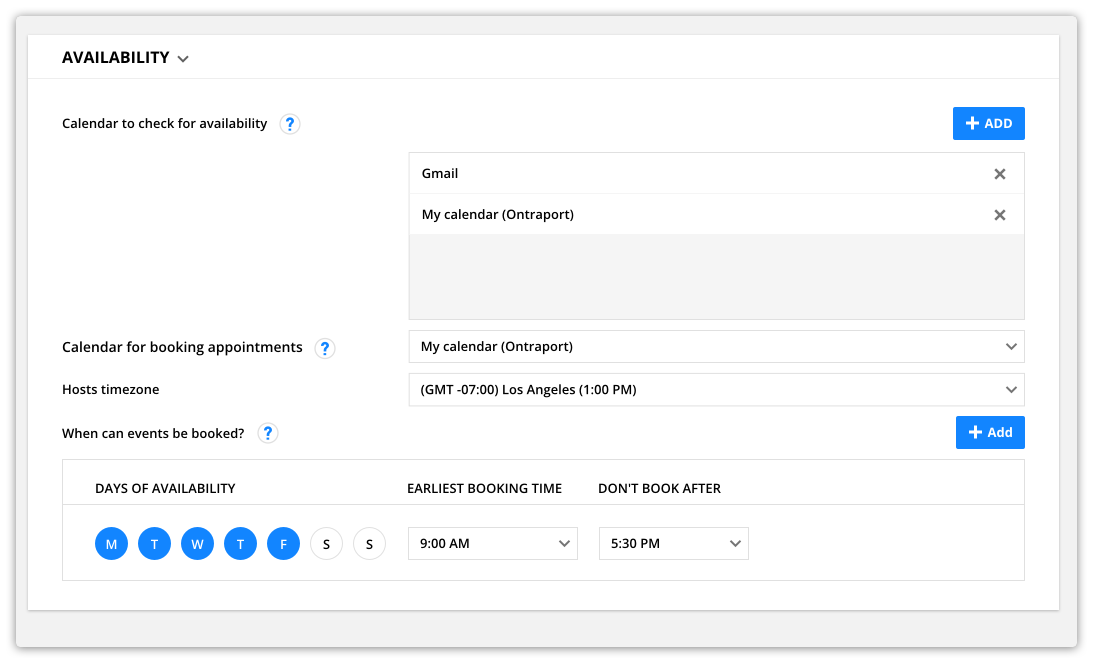
Calendar to check for availability
This section tells Ontraport which calendars to check for availability. For example, you might want to add your work and personal calendars here so your contacts can’t book during your team meeting or doctor’s appointment.
- Click Add at the top of this section and add your calendars.
You can set up your Google Calendar’s privacy settings so that, when it’s synced, none of your event details will be displayed in Ontraport.
Calendar for booking appointments
Your booking page will add scheduled appointments to this calendar.
- Select the calendar you want to book appointments on from the dropdown.
- If your Google Calendar is deleted or missing, your Ontraport Calendar will be used to check your availability.
- If your Ontraport Calendar is missing, you’ll need to manually add it .
- Your published booking page will indicate that there “may be available times” until the calendar is added.
Host’s time zone
This time zone ensures your booking page offers only dates and times when you’re available. You can edit your booking page’s time zone; check out the “Create a booking page” section below to learn more.
- Select your time zone from the dropdown.
When can events be booked?
This section allows you to display only the times and dates that you’re free.
- Select the days you want to take appointments in the “Days of availability” section.
- Choose the times of day you’re available from the dropdown fields.
Create a booking page
Your booking pages are where your visitors schedule appointments with you. Once you’ve set your availability, you’re ready to create a new booking page. Here’s how:
- Go to Calendar → booking pages.
- Click New Booking Page.
- You can also create new booking pages from any of your event templates.
The booking page editor has six pages that allow you to customize your settings:
Below you’ll find descriptions and instructions to customize your settings in each of these pages.
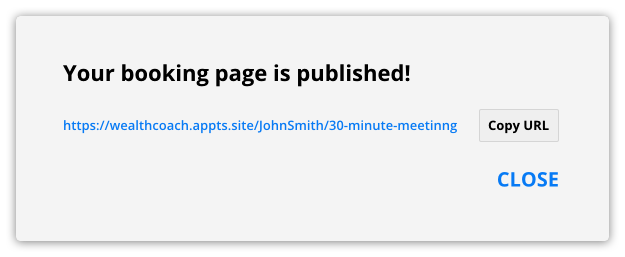
When you’re done customizing your settings, click Save in the top right corner to publish your booking page.
Details
The details page allows you to customize your booking page settings, such as the title and length of your appointments.
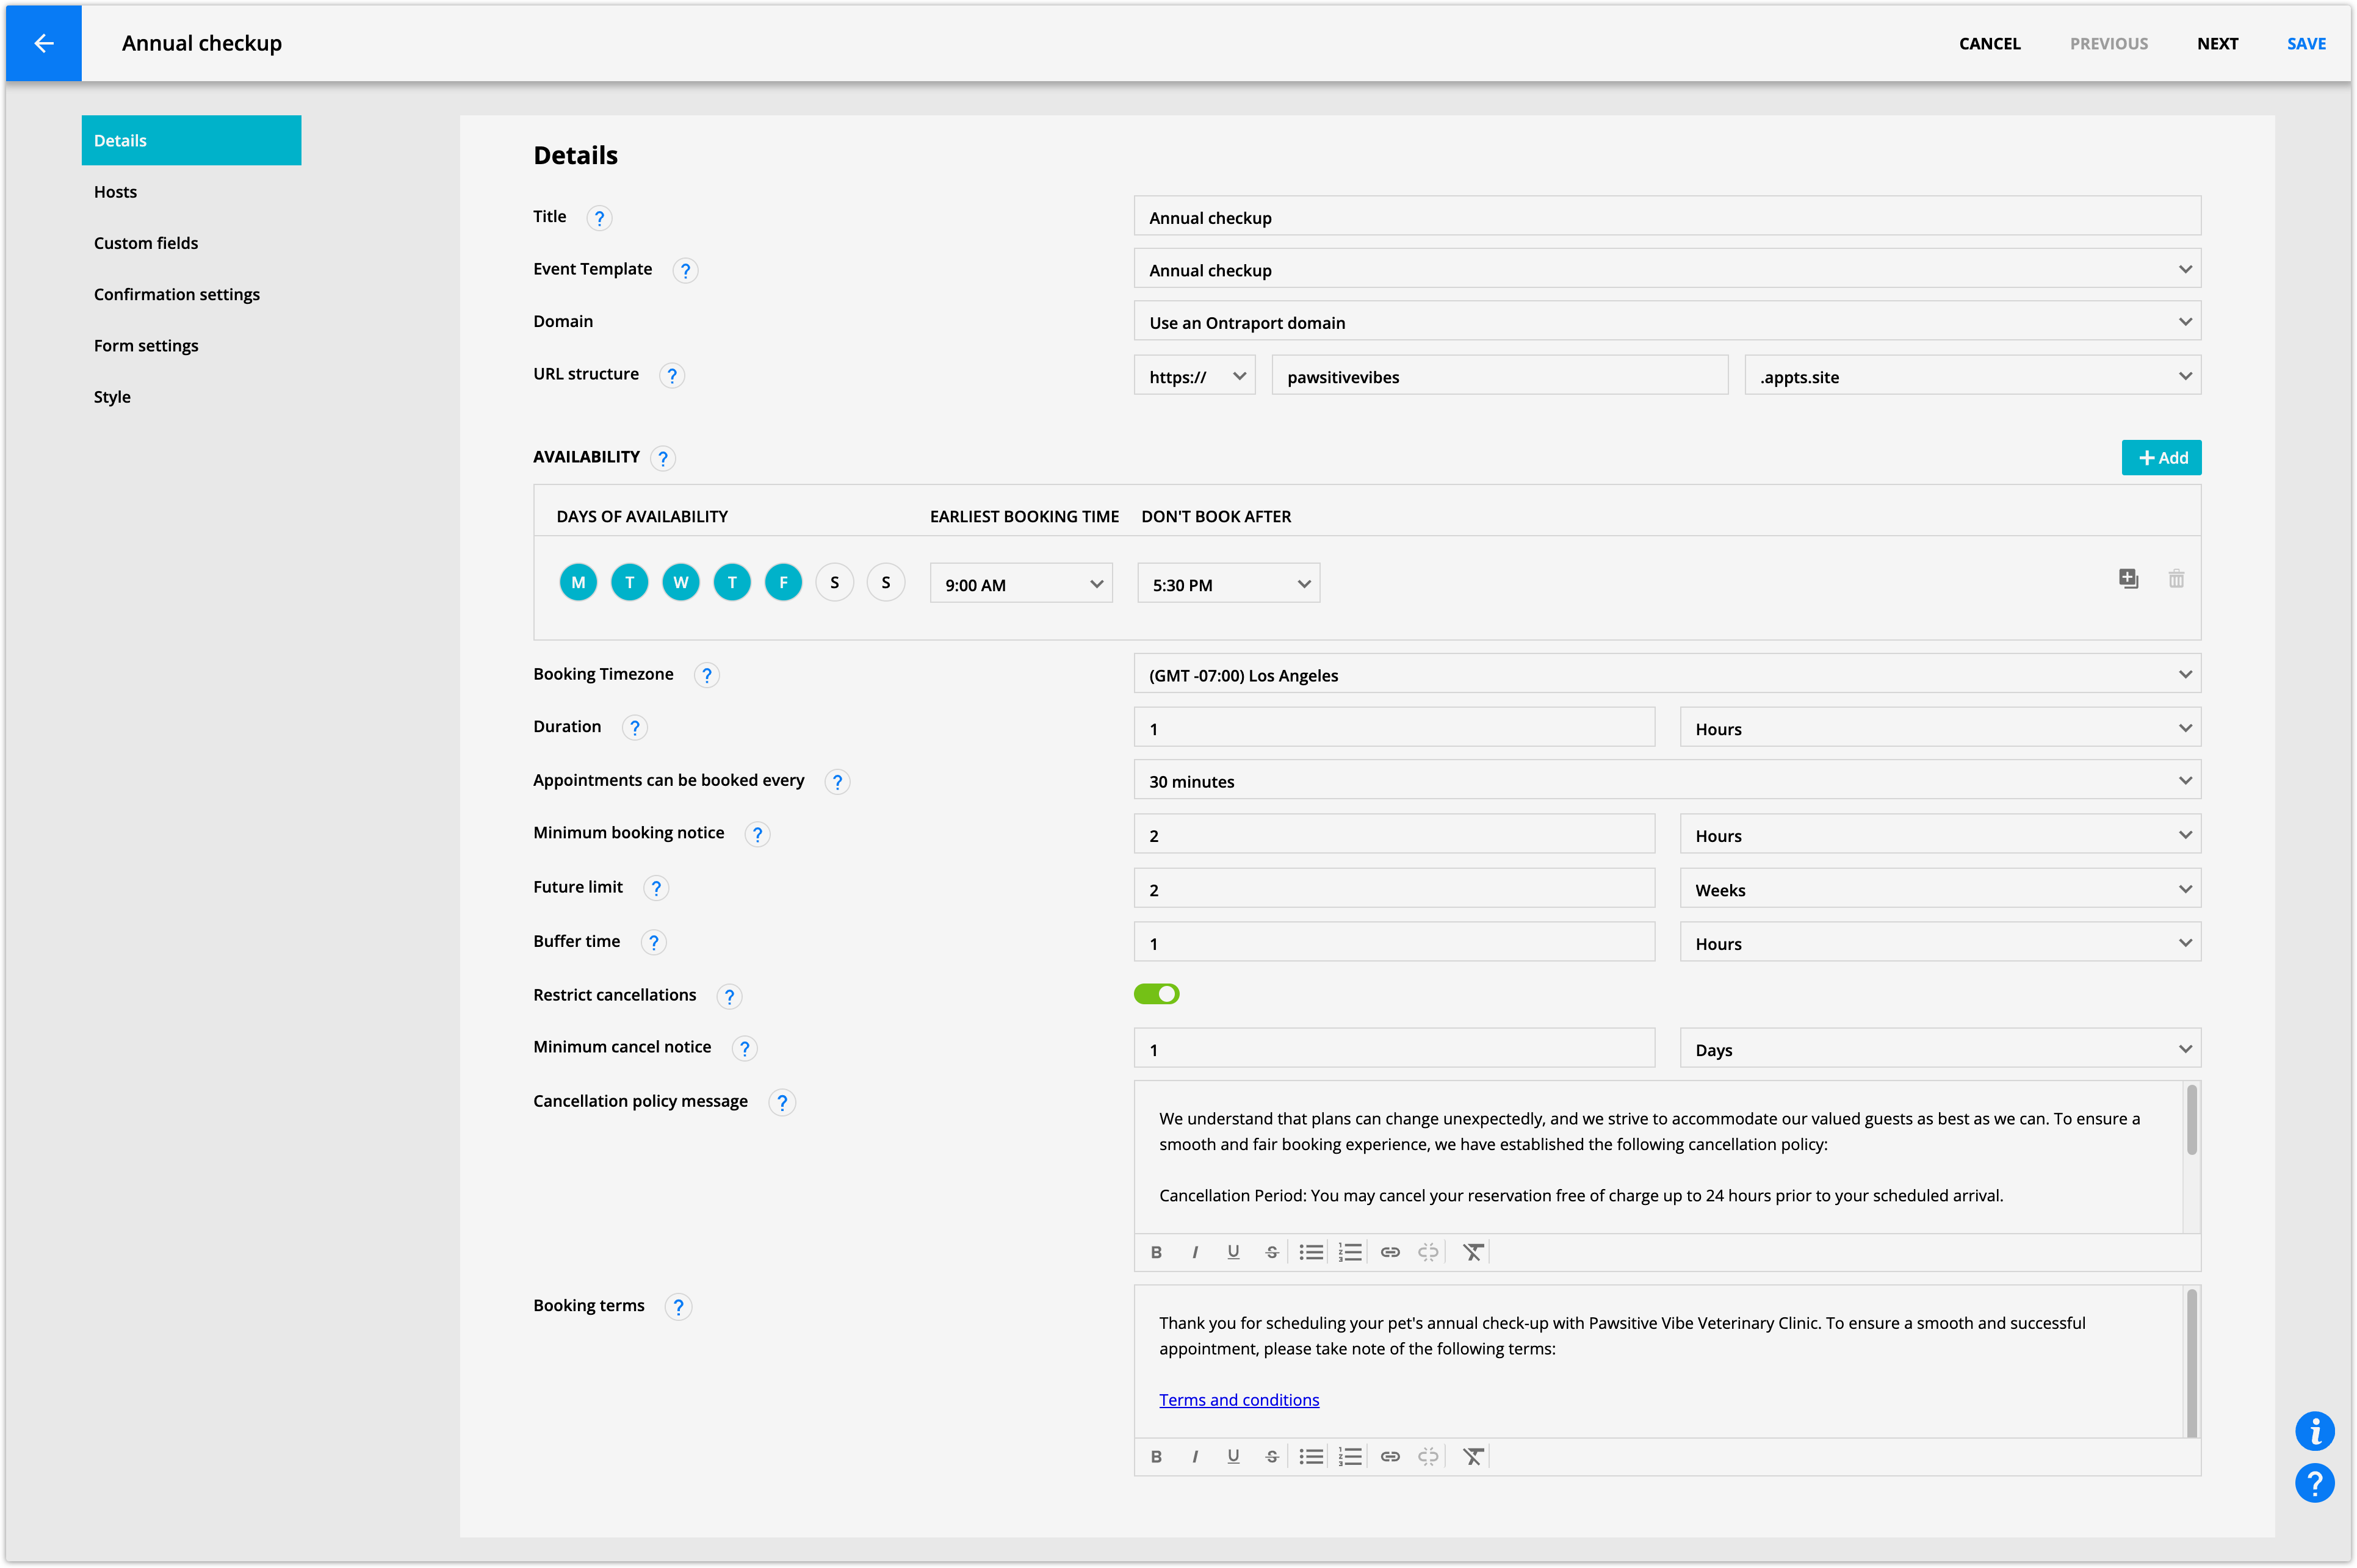
Title
You’ll create a separate booking page for each type of appointment you offer and title it with a short description of the appointment that your customers can see, such as “personal training.” You can also use merge fields in your title.
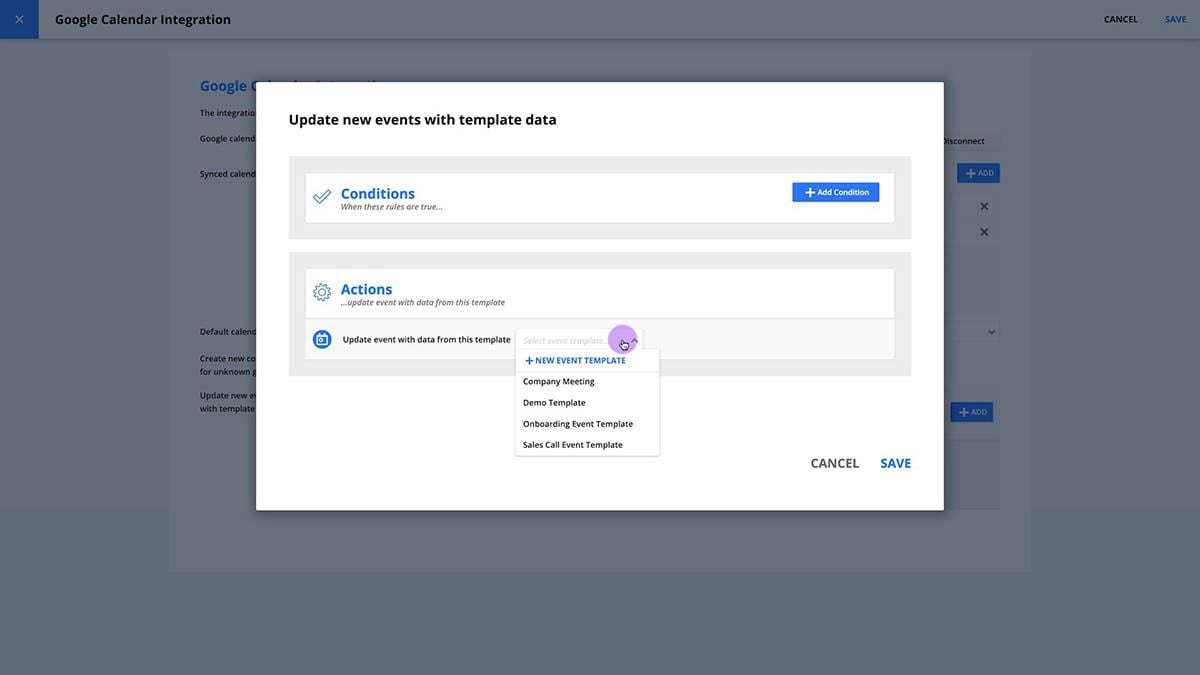
Event Template
Select the event template you want to use for scheduling appointments. We recommend using event templates because they allow you to add merge fields and location information, and automate communication around your booked event.
Domain
Choose if you want to use an Ontraport domain or your own domain (recommended).
URL structure
Add the URL you want to publish your booking page on.
Availability
This section allows you to set the availability of appointment times offered on this specific booking page.
- Click Add to add different schedules for different days. For example, you can make your availability 9-5:30 Monday through Thursday and 9-1 on Fridays.
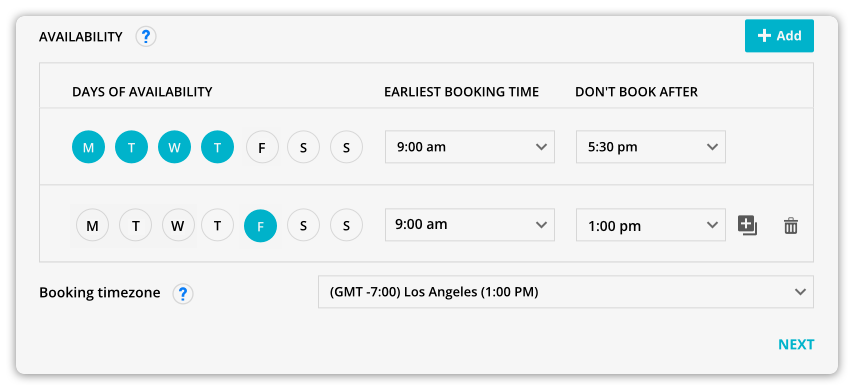
Booking time zone
Select your preferred time zone for your booking page.
- When viewing your booking page, visitors will see the time in their own time zone. They can also click on the time zone to select a different one.
Duration
Add the length of time for your appointments.
Appointments can be booked every
Choose the frequency your appointments can be booked:
- Hour
- 30 minutes
- 15 minutes
Minimum booking notice
Avoid last minute bookings by choosing the minimum amount of time required before an appointment is booked.
Future limit
Avoid appointments booked too far in advance by only allowing appointments in the selected time window.
Buffer time
Choose how much time you’d like between your booked appointments.
Restrict cancellations
Toggle this to prevent cancellations within a specific time frame. When it’s toggled on then you can set your minimum cancel notice.
Minimum cancel notice
The minimum amount of time before an event’s start time that a guest can cancel. For example, you may allow students to cancel classes two hours before the start time. But you could require 24 hours’ notice for other appointments that require more preparation.
- If the guest does cancel after cut-off time, they’ll be sent to a cancellation policy page.
Cancellation policy message
Add the message you want to display on your cancellation policy page. For example, if you charge 40% of a service fee when a customer cancels late, add that message here.
Booking terms
Add the information you want clients to see before they book an appointment. Add dates, terms and any other booking requirements you want your guests to know.
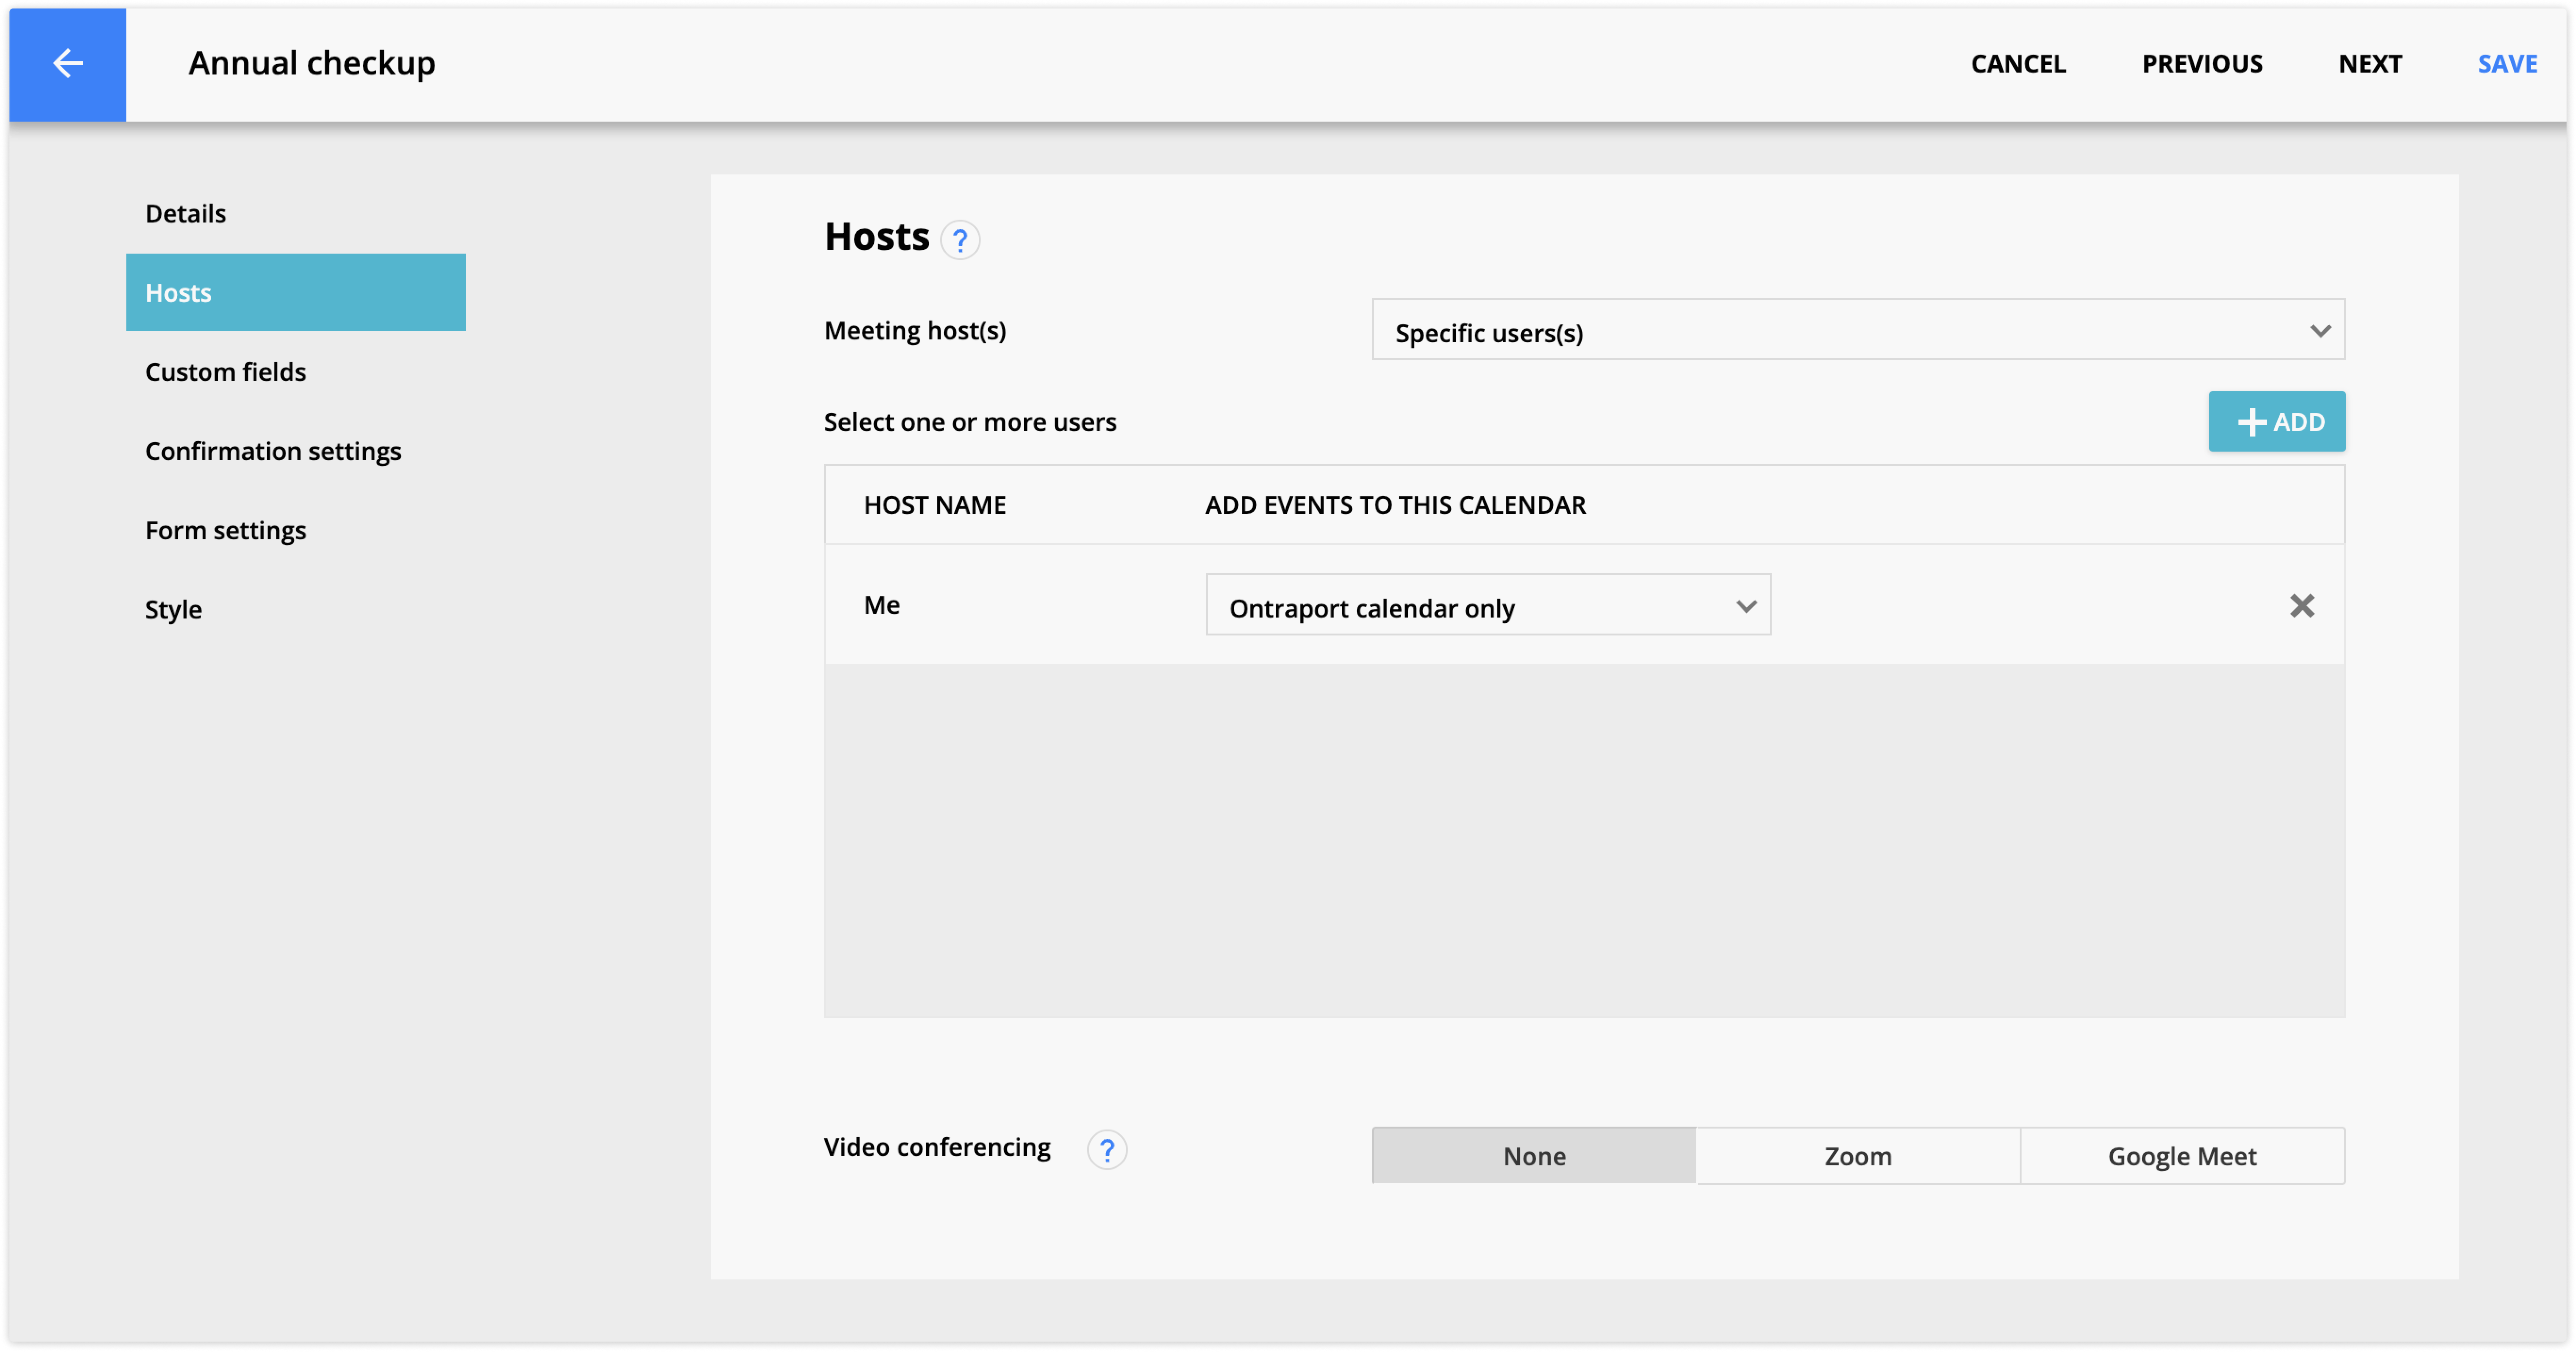
Hosts
The hosts page allows you to select one or more users or a specific role to host meetings generated from your booking page.
Meeting host(s)
Add the user(s) who will host meetings scheduled on this booking page. Choose from:
- Specific user(s)
- This option is great when you want specific people to run these appointments.
- Click Add and select your host(s).
- You can choose separate calendars for each host. This allows you to organize bookings on different calendars. For example, you can schedule first-time consultations on one calendar and follow-up sessions on another.
- Everyone in a role
- This option is great when you want a team to run these appointments. For example, your “Software demo” appointments can be booked with your sales team.
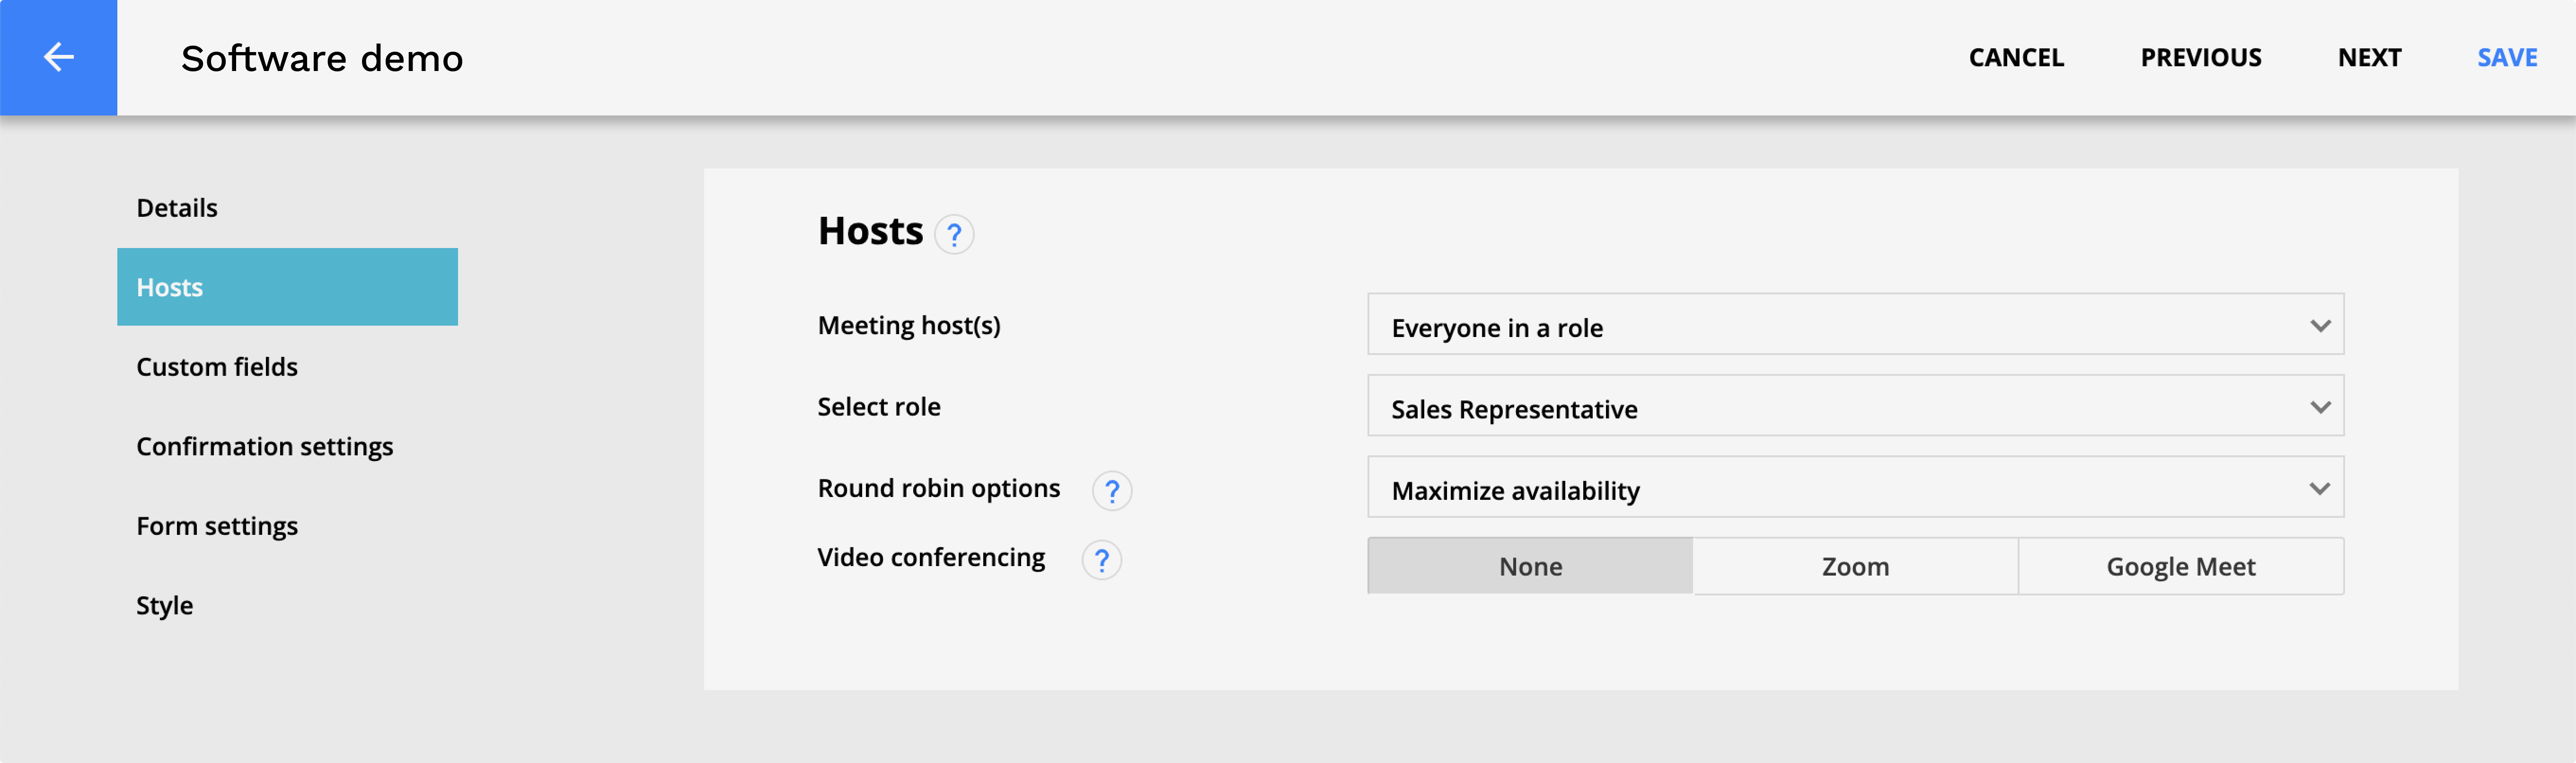
Round robin options
Both host options include a “Round robin options” dropdown field. From there, you can choose from the following:
- Maximize fairness. This option will ensure that all of your hosts will have an even amount of appointments booked. It will offer your visitor fewer booking options because it will not show all hosts’ availability at all times. However, your page will schedule appointments evenly across your team.
- Maximize availability. This option allows visitors to book any available appointment. This setting may result in one of your hosts getting booked more often than others.
Video conferencing
Turn on video conferencing to automatically generate unique Zoom or Google Meet links for the meeting. This option ensures a secure and private location for your guests to meet with you. Before adding video conferencing to your booking page, ensure that the hosts have the Zoom or Google Calendar integration set up.
The video conferencing settings allow you to choose from three options:
- None
- Use this option if your meeting will be in person or you want to reuse a Zoom or Google Meet link.
- Zoom
- Generate unique Zoom meeting links for each of your booked events.
- Toggle on the Zoom waiting room setting if you want guests to enter your waiting room before the meeting. You must manually admit guests when this setting is enabled.
- Generate unique Zoom meeting links for each of your booked events.
- Google
- Generate a unique Google Meet link for each of your booked events.
- Google Meet does not offer waiting rooms.
- Generate a unique Google Meet link for each of your booked events.
The automatically generated meeting links can be found in the Video conference link field in the event’s record. Conference data is also automatically added to your event details.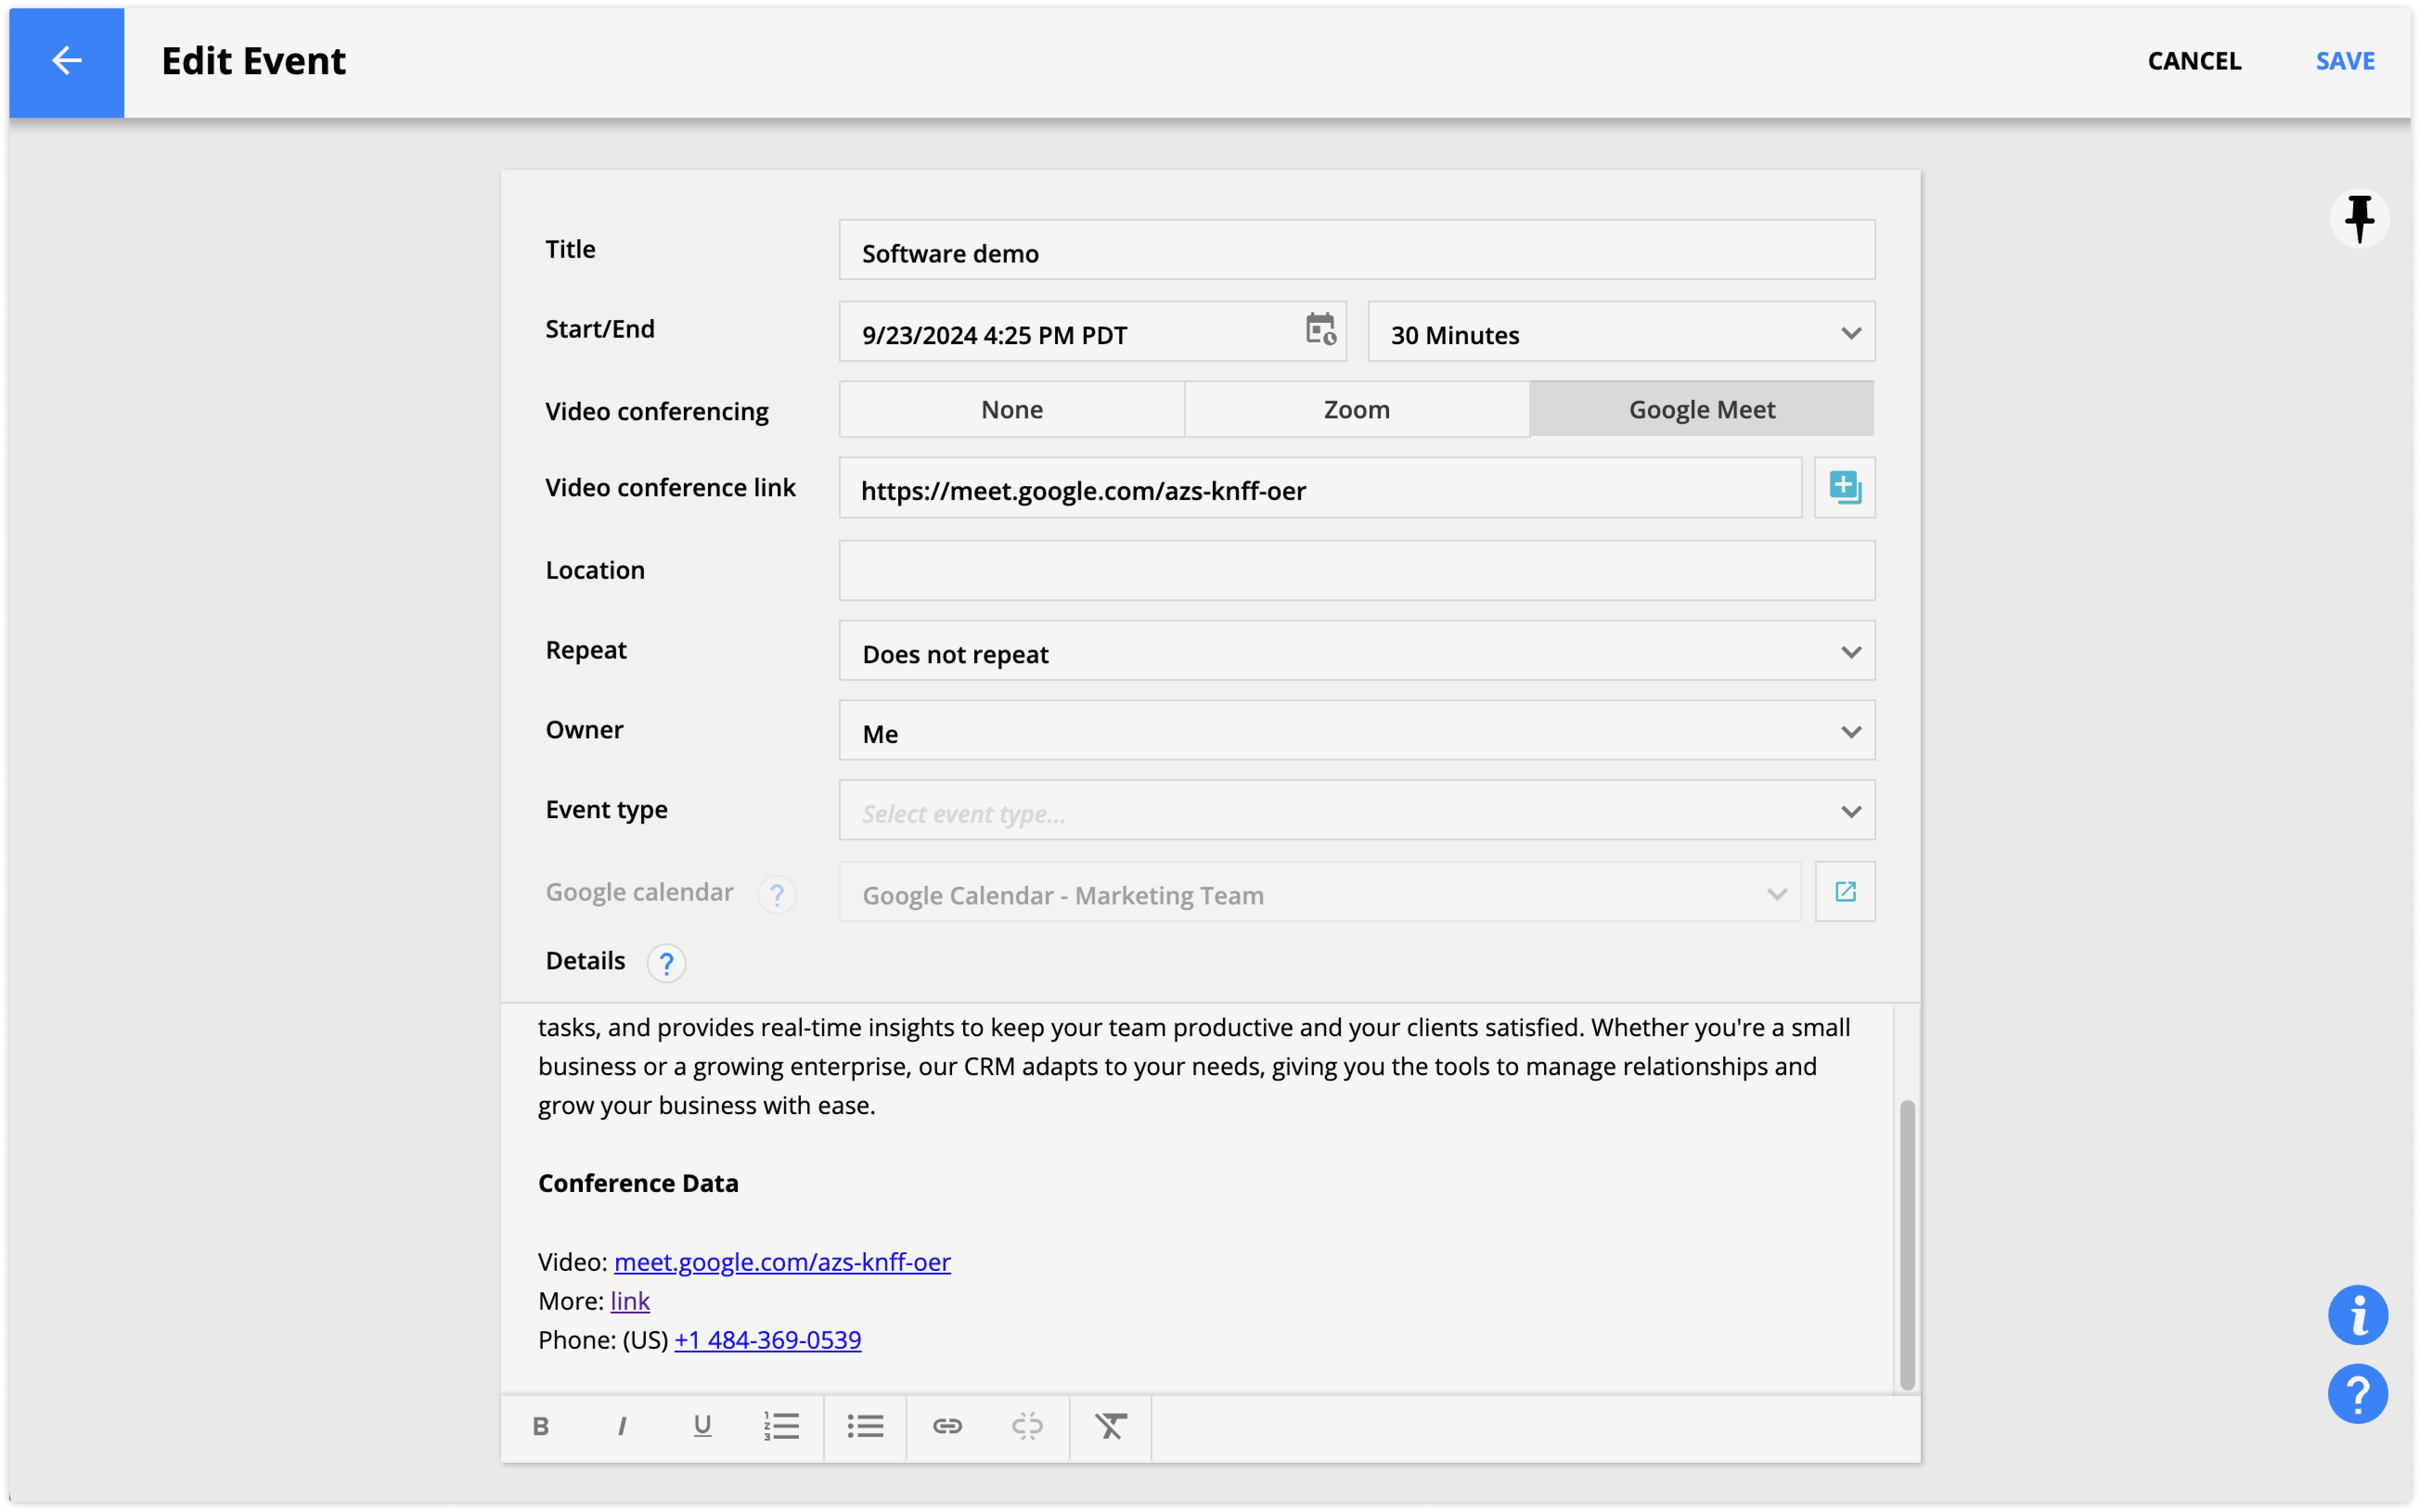
Custom fields
This page allows you to customize the form visitors need to fill out before they book an appointment with you. Select the fields you want them to fill out.
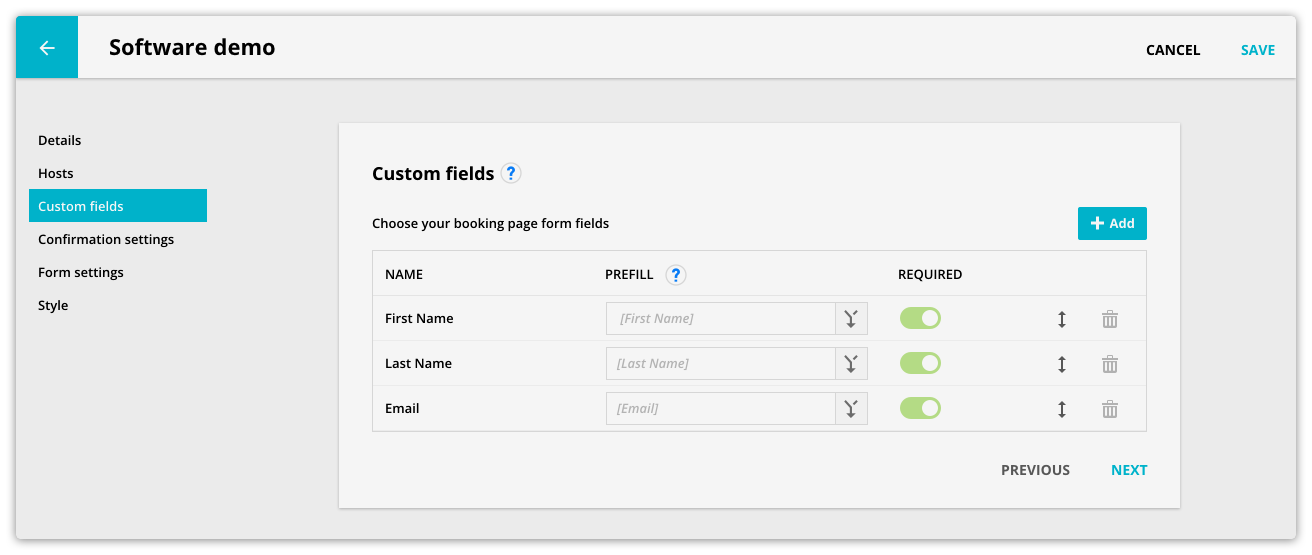
- Click Add to add the fields you want to appear on your form.
- (Optional) Click
.png) to add merge fields to prefill values with cookied data.
to add merge fields to prefill values with cookied data.- Follow these steps to create links that pass values to your booking page without relying on cookies.
- (Optional) Toggle on the "Required setting" to make all visitors fill out the field before submitting your form.
- (Optional) Click
Confirmation settings
These settings determine what happens after an appointment is booked.
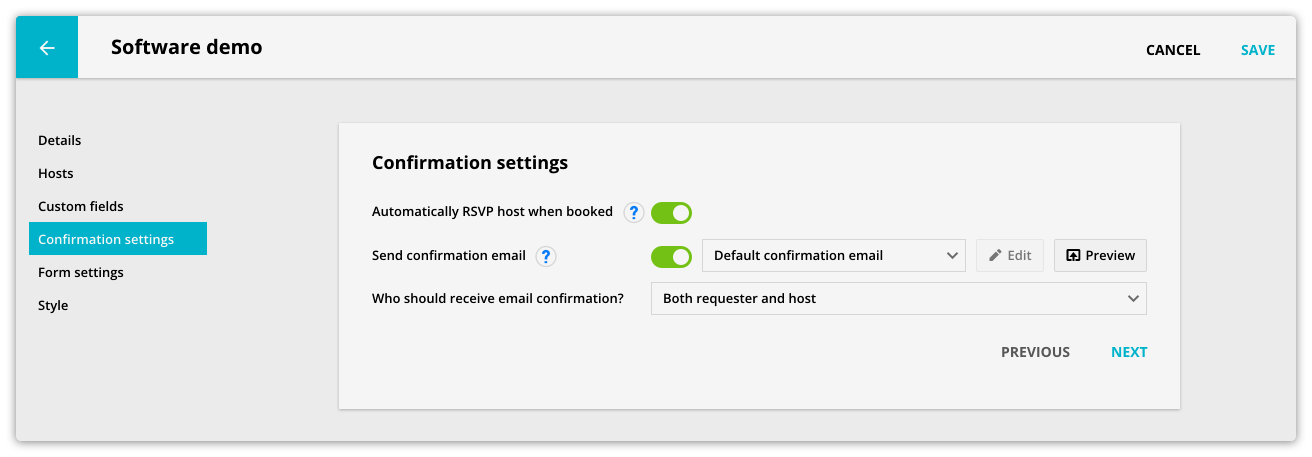
Automatically RSVP host when booked
When this option is toggled on, all appointments booked through this booking page will be automatically accepted on the host’s calendar.
Send confirmation email
Toggle this option on to send a confirmation email when a visitor books an appointment. When you select this option, the “Who should receive email confirmation?” dropdown appears. You have the option to use a system generated confirmation email or create your own. Select the email you want to send from the dropdown field for this setting.
Who should receive email confirmation?
This dropdown lets you choose who should receive your confirmation email. You can choose from the following:
- Requester
- Host
- Both requester and host
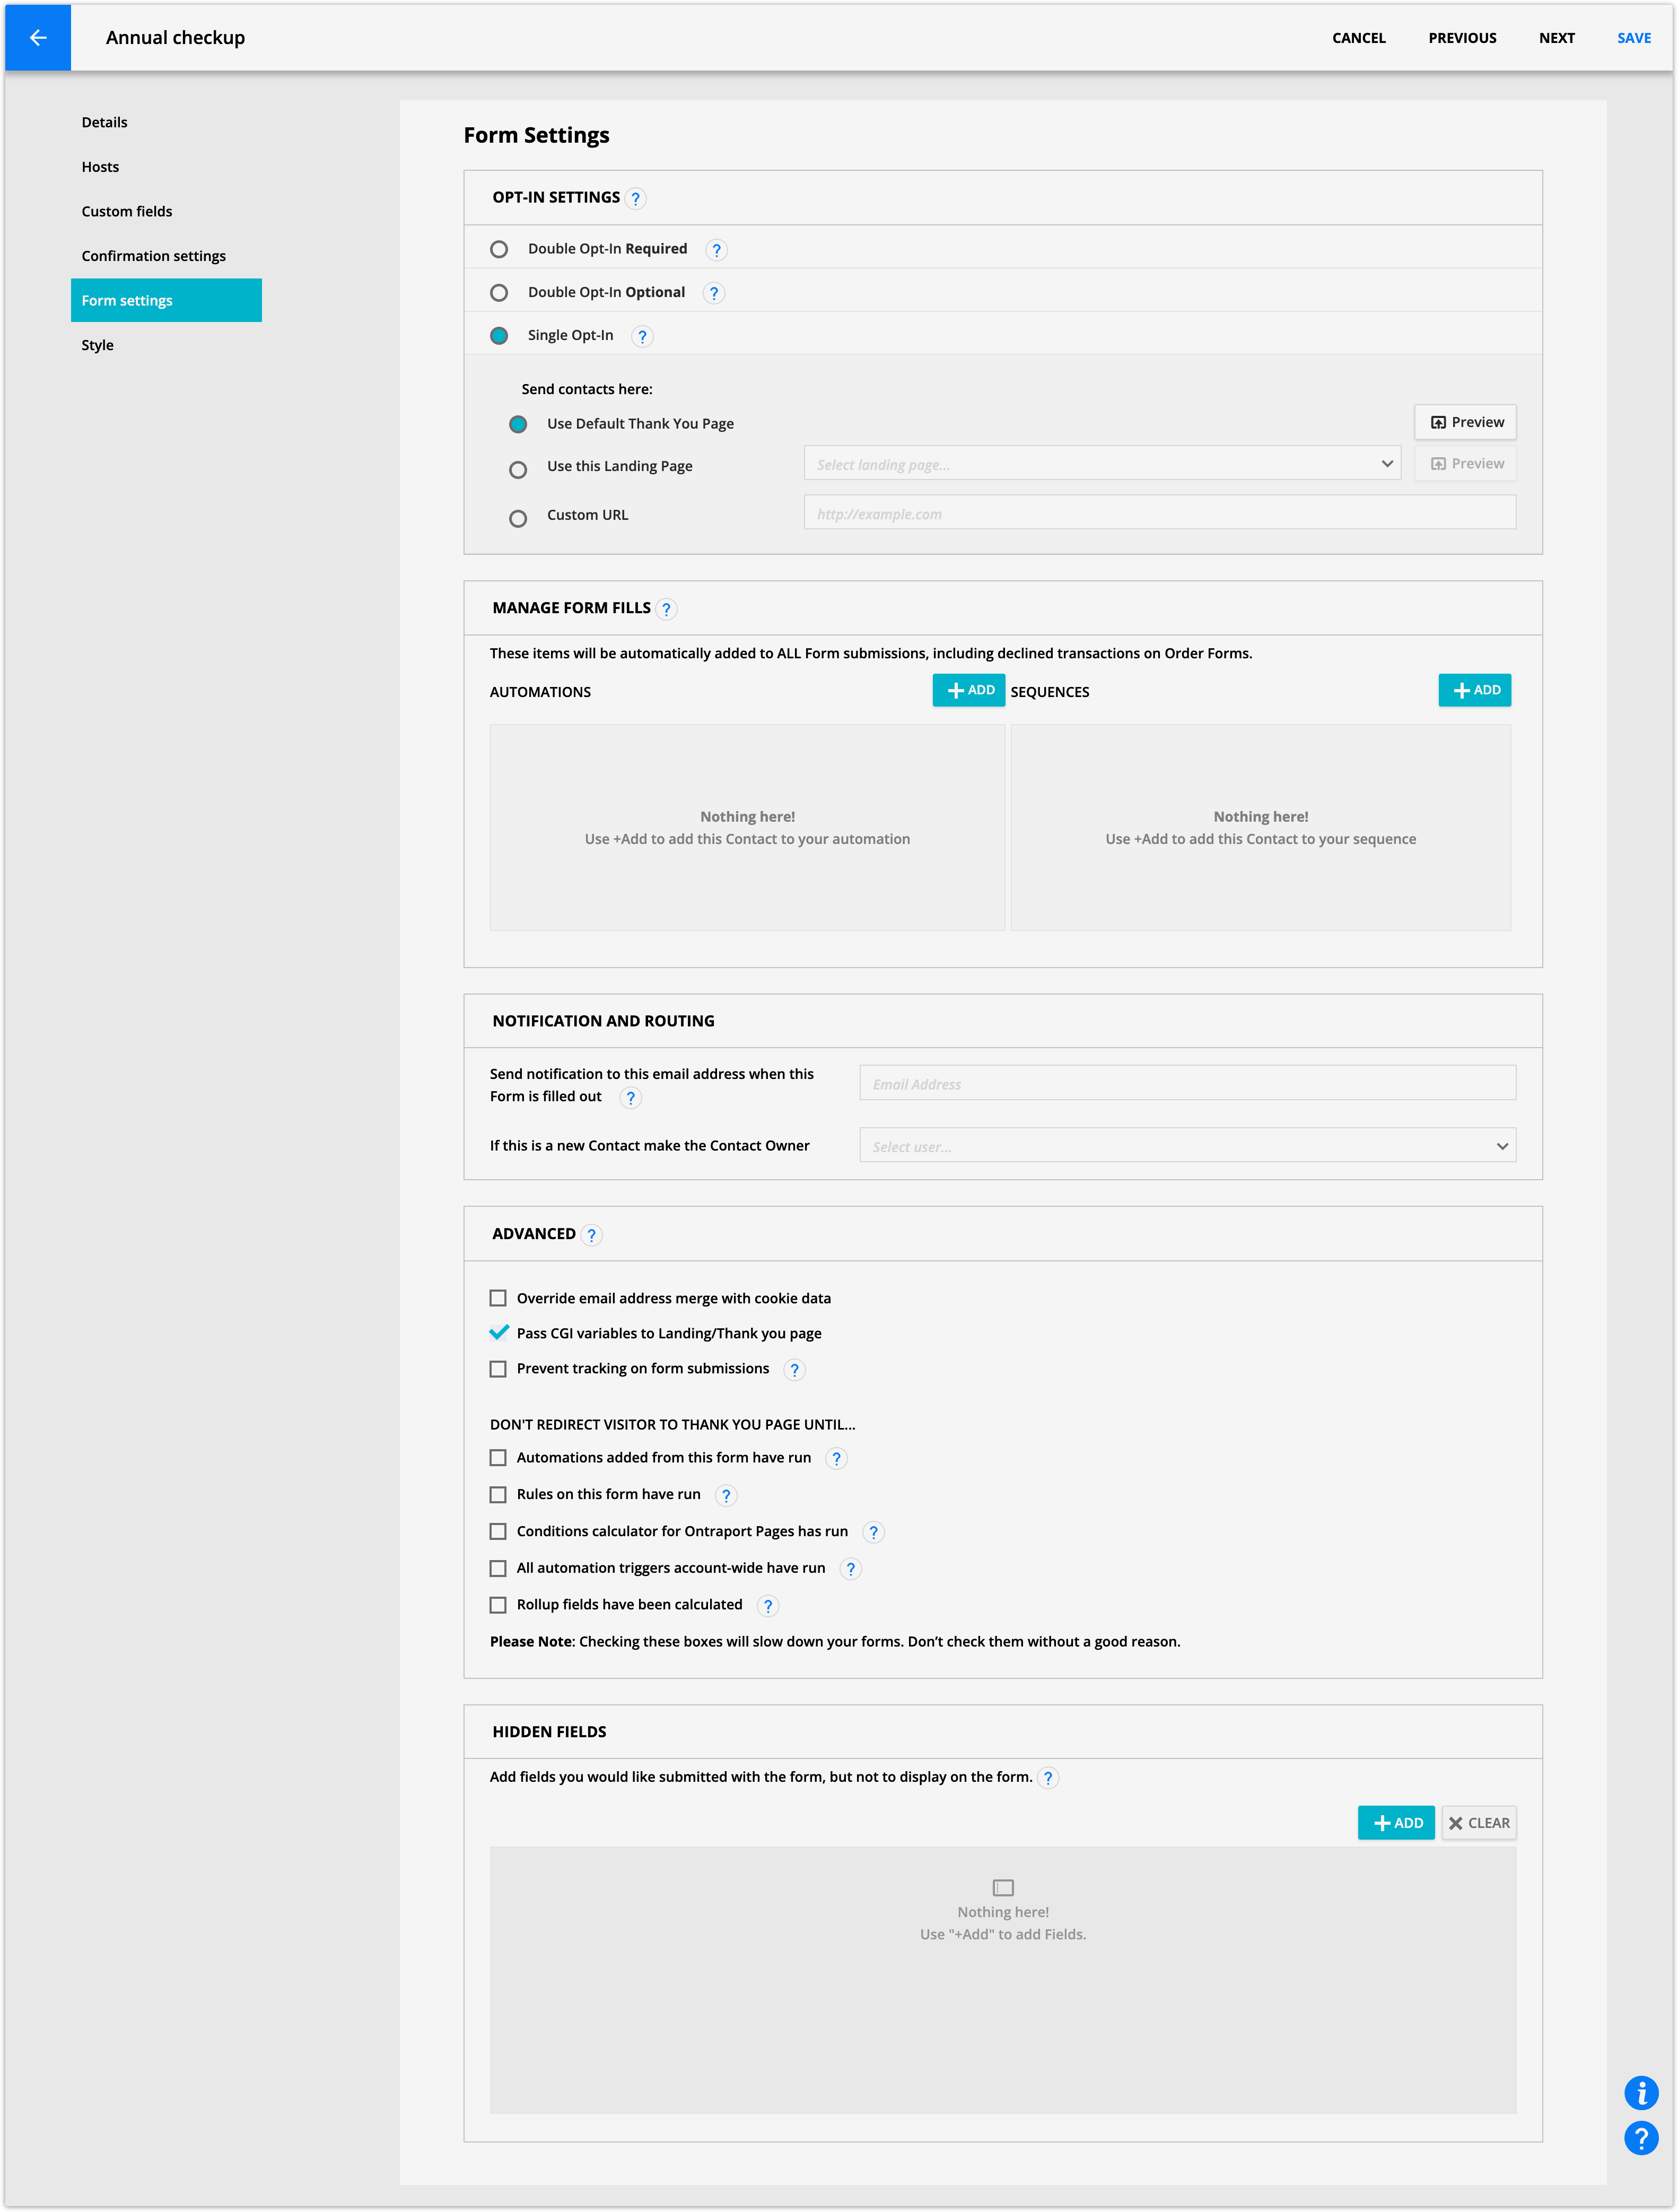
Form settings
Your booking page form settings work like form settings on any other form in your account. Choose where your visitors will go after they submit your booking form, add hidden fields and more.
Create a custom thank you page
You can create custom thank you pages for your booking form just like any other form in your account. What makes forms on booking pages unique is that you have access to some specific merge fields when you pass CGI variables to your custom thank you page.
Create a custom thank you page, and personalize it using the merge fields below to add information about the appointment. After publishing, update your booking page’s form settings to include the thank you page.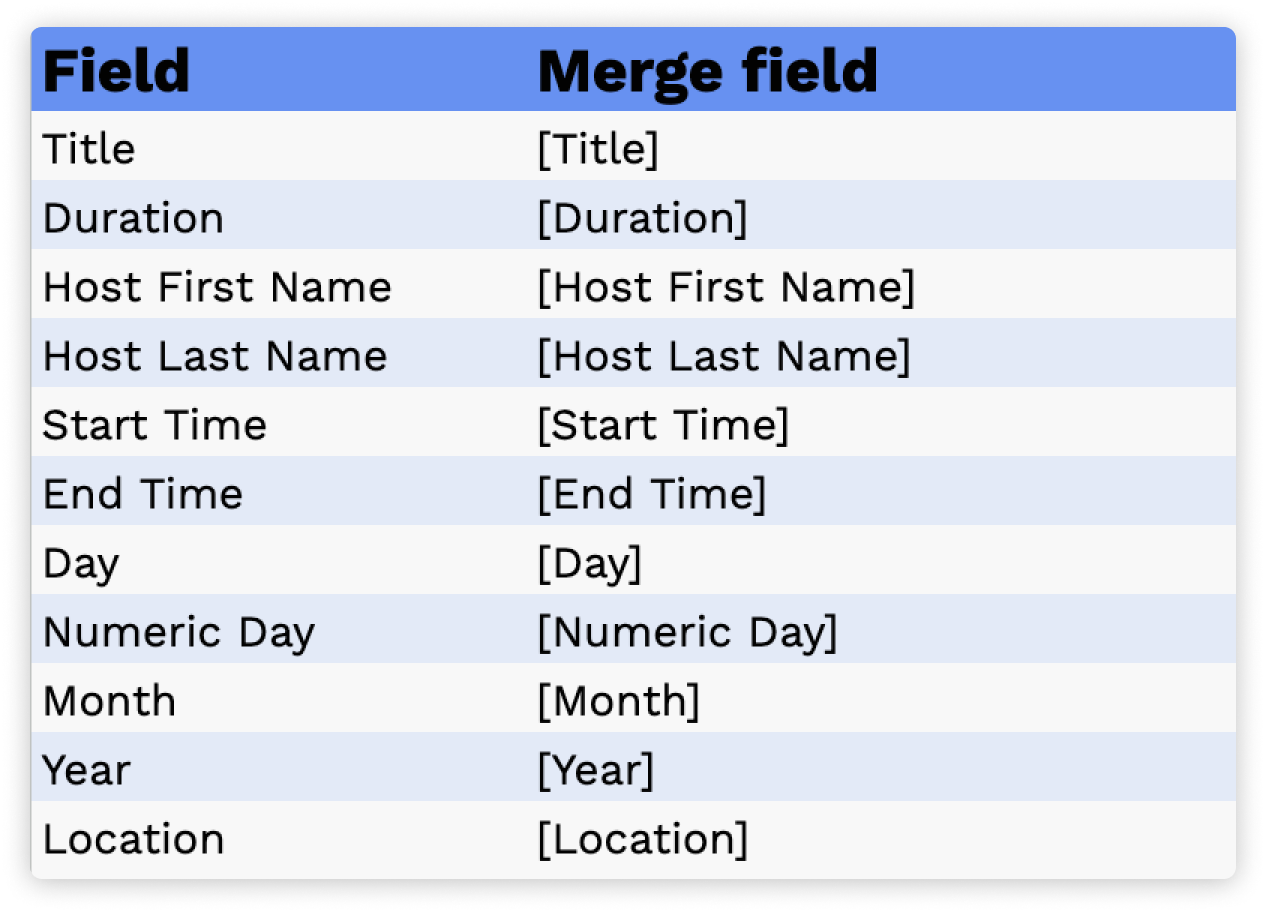
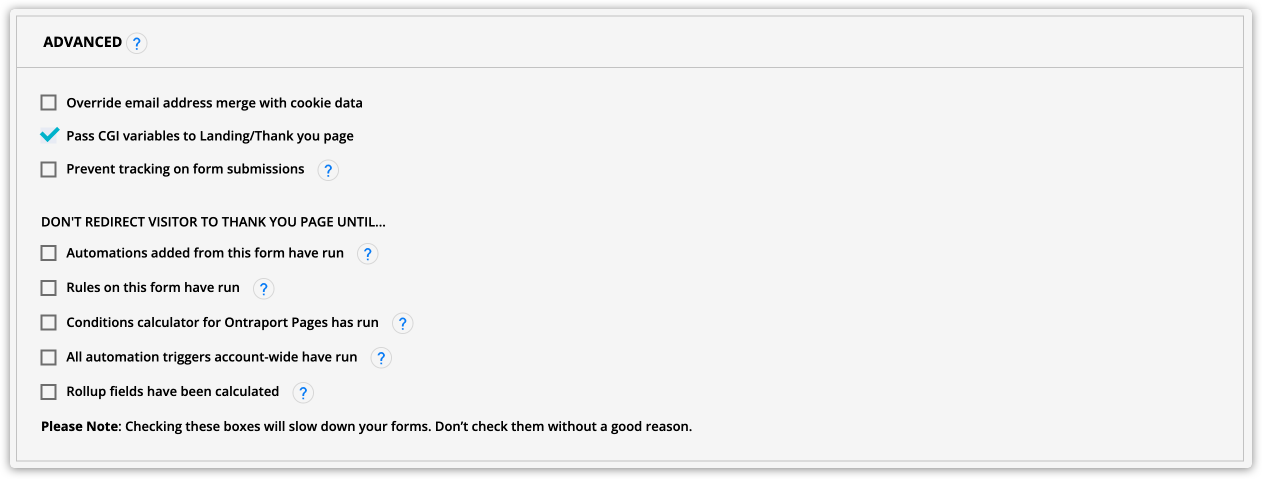
- Select your thank you page in your opt-in settings from the Form settings tab of your booking page’s settings.
- In the Advanced section, check “Pass CGI variables to Landing/Thank you page.”
- Save your booking page.
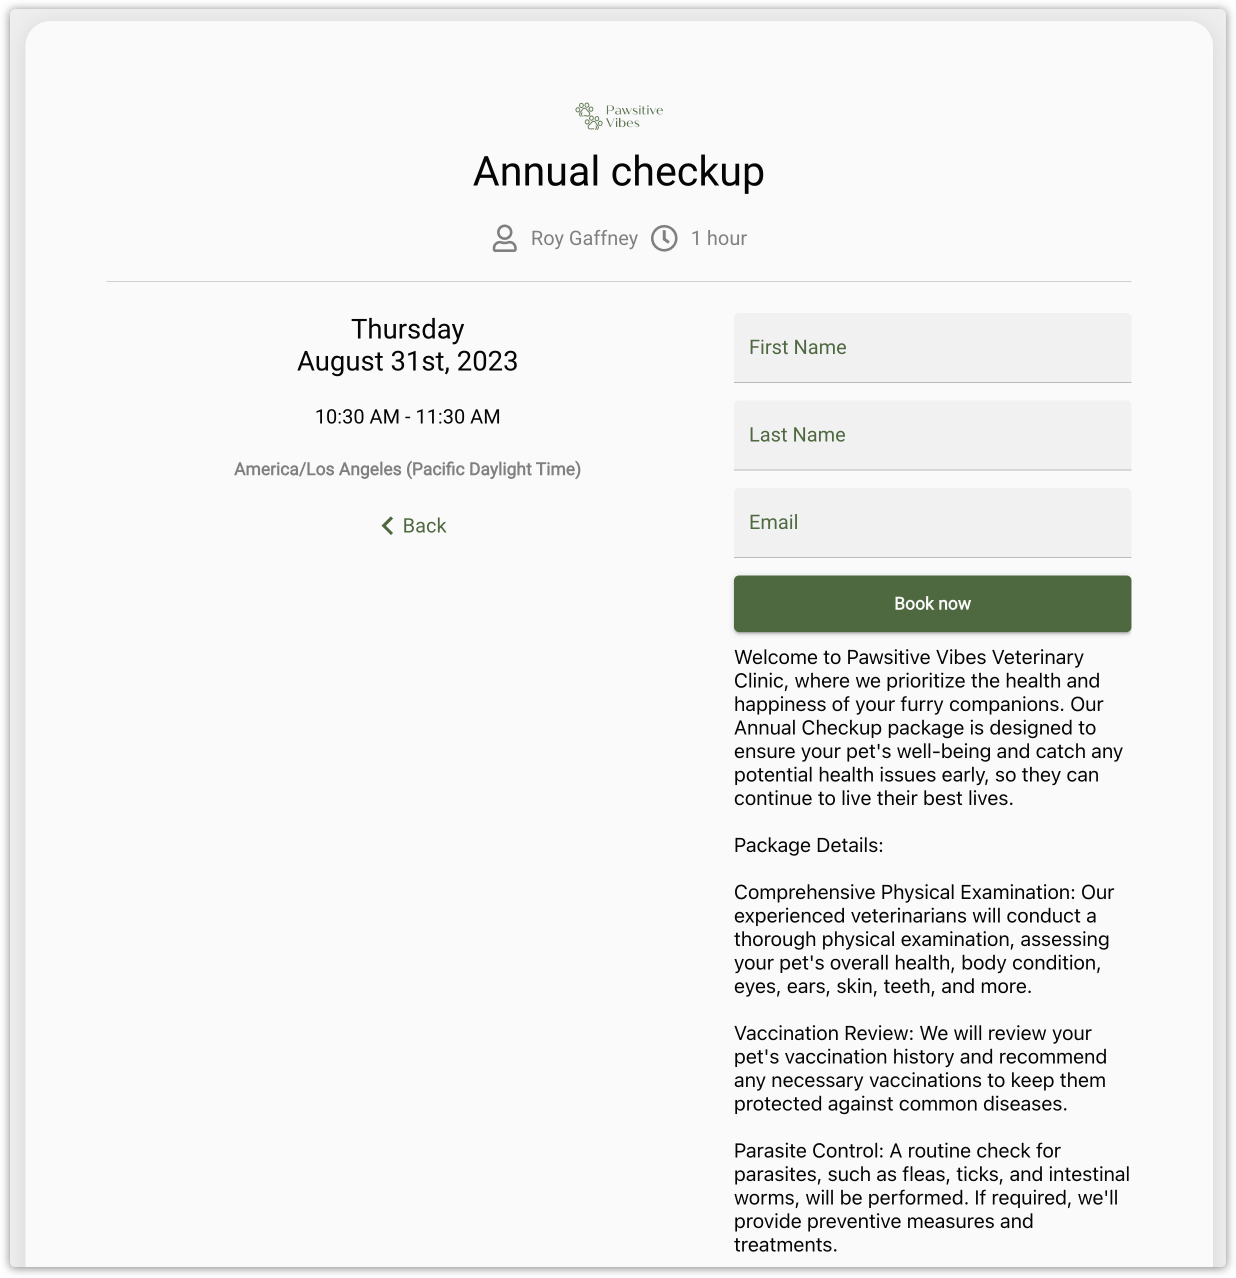
Style
The style page is the final page of your booking page editor. This section allows you to customize how your booking page will look.
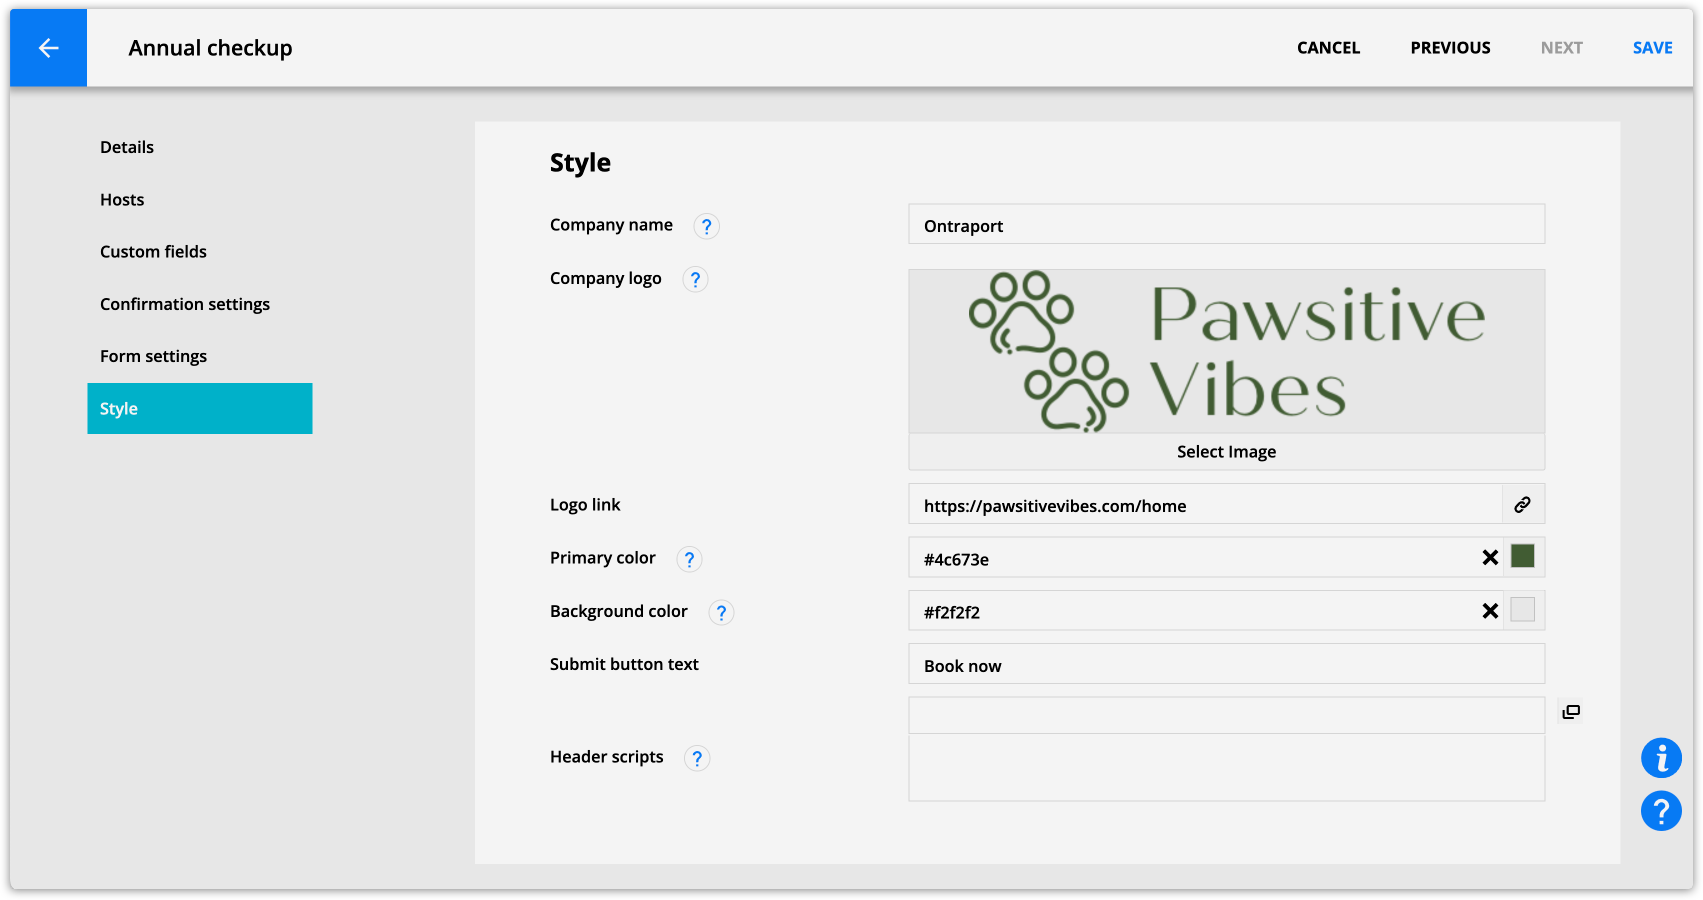
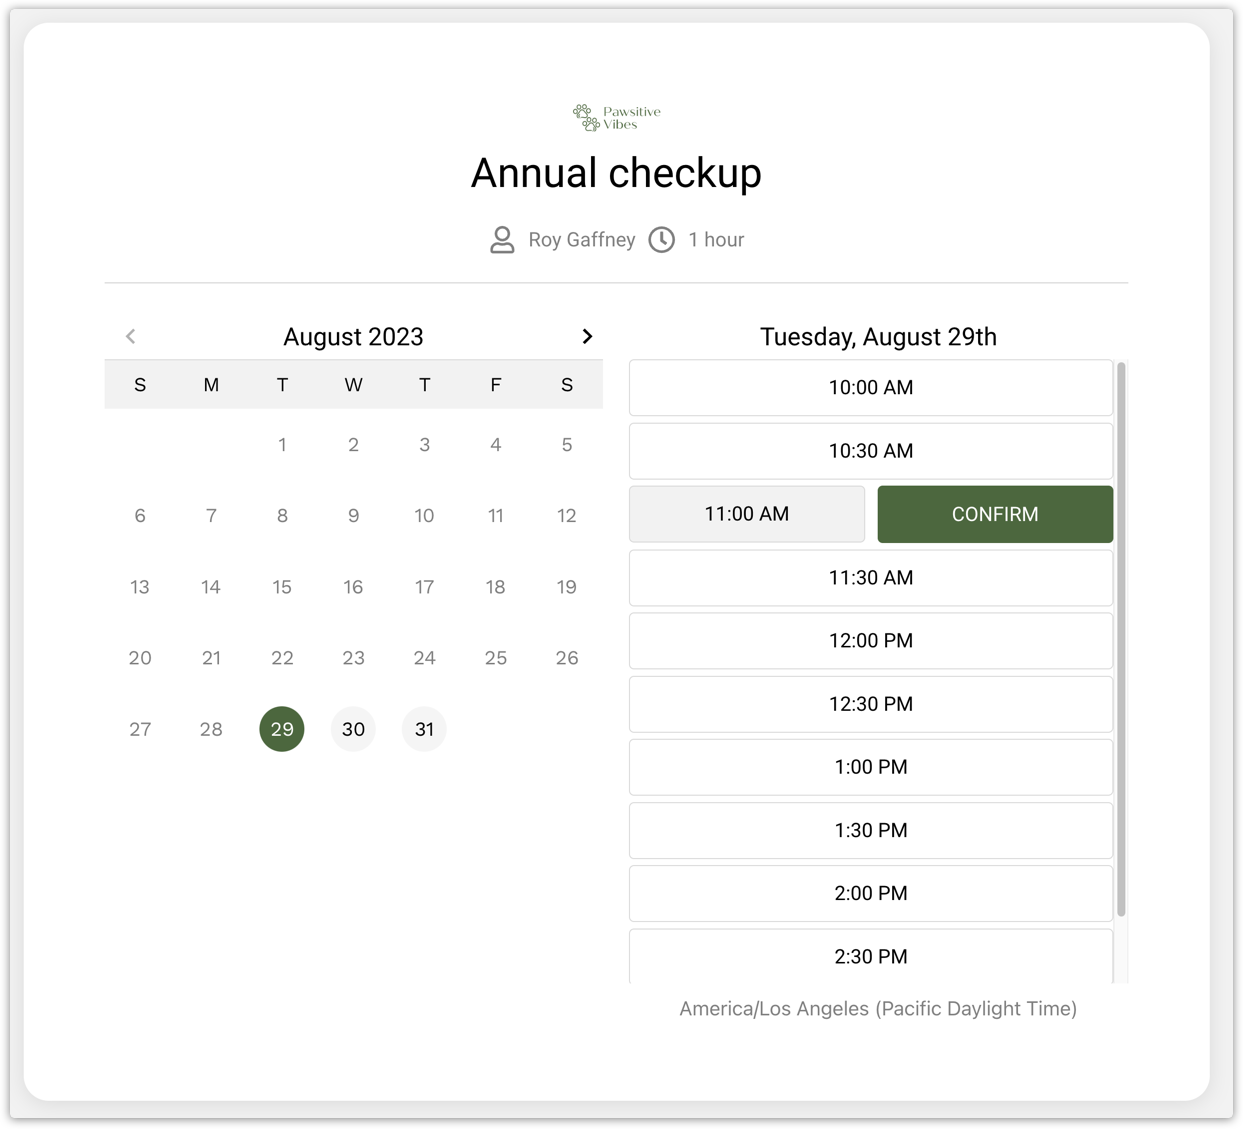
Here’s an example of a customized booking page:
Company name
Your company name will appear in the browser title and the automatic booking confirmation email. The business info page in your account automatically fills in this field.
Company logo
This image is the logo displayed at the top of your booking page. The business info page in your account automatically fills in this field.
Logo link
Add a URL you want to send visitors when they click on your logo.
Primary color
This color determines the color of the buttons on your booking page.
Background color
Add the color you want to appear as the background of your booking page.
Submit button text
Customize the text on your booking form “submit” button.
Header scripts
Add custom code and tracking to your page in this header scripts section. For example, add Google Analytics tracking scripts here.
Embed your booking page
You can embed your booking page on other Ontraport pages. For example, you can set up your calendar to appear on the page that promotes your appointments. Follow these steps to get set up.
Download a prebuilt automation map Demo follow-up Streamline your demo scheduling with this automation! Designed to work seamlessly with your booking page, it ensures a smooth process for visitors to book demos with you and your team. Click here to download. |