Many businesses use custom fonts to keep their branding consistent across all platforms. Others want to use Google and Adobe’s library of fonts on their website. Ontraport makes it possible to add any type of custom font to your pages with a little custom code.
This article shows you how to add Google Fonts, Adobe Fonts and any other custom font to your pages.
Table of contents
Use cases
How do custom fonts work?
Adding custom code to pages vs. sites
Font classes
Use Google and Adobe Fonts on Ontraport Pages
• CSS for Ontraport Page font overrides
Use Google Fonts on Ontraport Pages
• Use multiple Google Fonts on Ontraport Pages
Use Adobe Fonts on Ontraport Pages
• Use multiple Adobe Fonts on Ontraport Pages
Embed custom fonts in Ontraport Pages
• Download custom font and file type variations
• Upload your files to Ontraport
• Add custom code to your page
• Target your classes
• Use multiple custom fonts on Ontraport Pages
Use cases
Here are some common ways to use this feature:
“I want to replace all of the fonts on my site with one custom font.”
Use your chosen custom font family for every single font style throughout the CSS font override code. Once you have updated all the placeholder fonts to match your single custom font, place the fully updated code into your site's custom code header setting.
“I only want to replace specific fonts on my site, such as the Headline and Quote font styles.”
When you update specific fonts, locate the sections for those font styles in the CSS overrides. For example, look for the .h1 section for headlines and the .blockquote section for quotes. Replace the code inside the brackets with your font. Delete the sections for the font styles you do not want to override. When you remove those sections, your site uses the fonts in the page editor.
“I want to use several custom fonts on my pages.”
You can add more than one custom font to your sites and pages. Follow the steps to use multiple Google fonts, multiple Adobe fonts or self-hosted fonts you’ve purchased.
“I purchased a custom font and want to add it to my site.”
When you purchase a font, you can host the font files with Ontraport to apply them to your sites and pages.How do custom fonts work?
Back to top
There are two ways to add custom fonts to your sites and pages, and both follow the same core approach.
In each case, you add a small snippet of code to your site that overrides the fonts selected in the page’s font style dropdown and applies the fonts specified in the code instead.
The primary difference between the two methods is where the fonts are sourced from and how you configure your pages to use them.
- Using Google or Adobe’s hosted web fonts
- Pull from the font styles provided by these third parties.
- Download font files and self-host them
- Purchase a font and host the files in your account.
- Purchase a font and host the files in your account.
Adding custom code to pages vs. sites
Back to top
Adding code to your site’s custom code section updates fonts across all published pages on that site. Adding code to a single page updates fonts only on that page.
This article focuses on sites, but you can follow the same steps for pages. To access custom code for a page, go to Settings → Custom code.
Font classes
Before jumping into the steps to add custom fonts to your pages, it’s important to understand the relationship between font styles and font classes.
To add custom fonts to your pages, you need to tell your page where to apply that custom font. Since Ontraport’s servers don’t speak English, you need to use a font class in your code instead of your font style’s name.
A font class is a code that represents a font’s name. Every font style has its own font class.
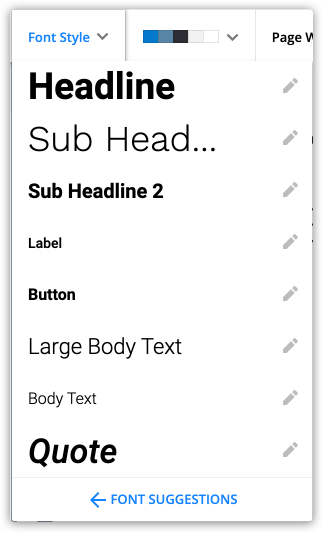
Here are the classes for each of the available font styles:
Font style | Font class |
| Headline | .h1 |
| Sub Headline | .h2 |
| Sub Headline 2 | .h3 |
| Label | .label |
| Button | .button |
| Large Body Text | .large-body-text |
| Body Text | .body-text |
| Quote | .blockquote |
You’ll use these classes to apply the specific font styles you want.
Use Google and Adobe Fonts on Ontraport Pages
Both Google and Adobe Fonts use the same CSS for Ontraport Page font overrides below.
But the steps for each provider are slightly different, so check out the separate steps to use Google Fonts and for Adobe Fonts below.
CSS for Ontraport Page font overrides
| <style> /* Start typography styles */ .h1.h1.h1.h1 { font-family: 'Work Sans', sans-serif; font-size: 60px; line-height: 64px; font-weight: 700; } .h2.h2.h2.h2 { font-family: 'Work Sans', sans-serif; font-size: 40px; line-height: 44px; font-weight:700; } .h3.h3.h3.h3 { font-family: 'Work Sans', sans-serif; font-size: 20px; line-height: 24px; font-weight: 600; } .label.label.label.label { font-family: 'Work Sans', sans-serif; font-size: 14px; line-height: 16px; font-weight: 500; } .button.button.button.button { font-family: 'Work Sans', sans-serif; font-size: 18px; line-height: 18px; font-weight: 500; } .large-body-text.large-body-text.large-body-text.large-body-text { font-family: 'Work Sans', sans-serif; font-size: 24px; line-height: 32px; font-weight: 300; } .body-text.body-text.body-text.body-text { font-family: 'Roboto', sans-serif; font-size: 16px; line-height: 24px; font-weight: 400; } .blockquote.blockquote.blockquote.blockquote { font-family: 'Work Sans', sans-serif; font-size: 24px; line-height: 32px; font-weight: 400; } /* Start mobile styles */ @media only screen and (max-width: 600px) { .h1.h1.h1.h1 { font-family: 'Work Sans', sans-serif; font-size: 36px; line-height: 40px; font-weight:700; } .h2.h2.h2.h2 { font-family: 'Work Sans', sans-serif; font-size: 28px; line-height: 32px; font-weight: 700; } .h3.h3.h3.h3 { font-family: 'Work Sans', sans-serif; font-size: 20px; line-height: 24px; font-weight: 600; } .label.label.label.label { font-family: 'Work Sans', sans-serif; font-size: 12px; line-height: 14px; font-weight: 500; } .button.button.button.button { font-family: 'Work Sans', sans-serif; font-size: 17px; line-height: 24px; font-weight: 500; } .large-body-text.large-body-text.large-body-text.large-body-text { font-family: 'Roboto', sans-serif; font-size: 20px; line-height: 28px; font-weight: 300; } .body-text.body-text.body-text.body-text { font-family: 'Roboto', sans-serif; font-size: 16px; line-height: 24px; font-weight: 400; } .blockquote.blockquote.blockquote.blockquote { font-family: 'Work Sans', sans-serif; font-size: 20px; line-height: 28px; font-style: bold;important! font-weight: 700;important! } /* End mobile styles */ } /* End typography styles */ </style> |
Use Google Fonts on Ontraport Pages
Google makes it simple to add their fonts to your Ontraport Pages. Here’s how:
- Go to fonts.google.com and locate the font family you want to use on your page.
- Note, it’s possible to use more than one Google Font on your page. Once you’re familiar with these steps, check out the additional steps to use multiple fonts below.
- Click Get font → Get embed code.
- From the web tab, use the <link> option and click Copy code in the "Embed code in the <head> of your html" section.
/Custom+Fonts/fonts-google_selected_font.png)
In Ontraport
- Go to your site in Ontraport and click Advanced
- Paste the code you copied in step two above in the Header code section.
- Copy and paste CSS for Ontraport Pages font overrides a line below the code you copied from Google.
/Custom+Fonts/fonts-google_custom_code_1.png)
In Google
- Go back to your selected font family in Google and copy the styling between { }in the “CSS class for a variable style” section.
/Custom+Fonts/fonts-google_css_rules.png)
In Ontraport
- Identify and locate the font style you want to apply your custom font to.
- For example, if you want to apply the font “Lobster” to your “Headline” font style, you’ll look for the “.h1” section.
- Use the chart above for a refresher on what each font class is.
- For example, if you want to apply the font “Lobster” to your “Headline” font style, you’ll look for the “.h1” section.
- Replace the CSS with the code you copied from Google.
- Scroll down to your mobile font styles, and update the same font style.
- This ensures that you’ll use your custom fonts on desktop and mobile devices.
- Save your site and visit a published page to view your custom font.
- If you’ve applied the custom font overrides to a page instead of a site, you can click Preview to view your custom font before publishing.
/Custom+Fonts/fonts-google_custom_code_3.png)
Use multiple Google Fonts on Ontraport Pages
You can use more than one custom font on the same page. You'll use your font classes to tell your page which custom fonts you want to apply to which font styles.
In Google, select all the fonts you want to use. This will add CSS sections for each of your selected fonts when you click Get embed code./Custom+Fonts/fonts-google-multiple_fonts_selected.png)
The rest of the steps are exactly the same as applying one custom font on your page. The only difference is you'll use CSS rules to determine the fonts you want to apply to each font style.
Note, remember to also update your mobile styles as well.
Use Adobe Fonts on Ontraport Pages
Adobe makes it simple to add their fonts to your Ontraport Pages. Here’s how:
- Go to fonts.adobe.com and add the font you want to a web project.
- Note, it’s possible to use more than one Adobe Font on your page. Once you’re familiar with these steps, check out the additional steps to use multiple fonts below.
- The first step is to copy your external style sheet.
- If you created a new project, you’ll see a pop-up where you can copy your code.
- If you are opening an existing web project, you can copy the style sheet when you view the project.
- Copy the external style sheet.
/Custom+Fonts/fonts-adobe-web_project-link.png)
In Ontraport
- Go to your site in Ontraport and click Advanced.
- Paste the code you copied in step two above in the Header code section.
- Copy and paste CSS for Ontraport Pages font overrides a line below the code you copied from Adobe.
/Custom+Fonts/fonts-adobe-custom_code_1.png)
In Adobe
- Go back to your web project in Adobe, edit it and click Copy CSS on your font.
In Ontraport
- Identify and locate the font style you want to apply your custom font to.
- For example, if you want to apply the font “Source Serif Pro Regular” to your “Headline” font style, you'll look for the “.h1” section.
- Use the chart above for a refresher on what each font class is.
- For example, if you want to apply the font “Source Serif Pro Regular” to your “Headline” font style, you'll look for the “.h1” section.
- Replace the CSS with the code you copied from Adobe.
- Scroll down to your mobile font styles, and update the same font style.
- This ensures that you’ll use your custom fonts on desktop and mobile devices.
- Publish your page to view your custom font.
- If you’ve applied the custom font overrides to a page instead of a site, you can click Preview to view your custom font before publishing.
/Custom+Fonts/fonts-adobe-custom_code_3.png)
Use multiple Adobe Fonts on Ontraport Pages
You can use more than one custom Adobe Font on the same page. You'll use your font classes to tell your page which custom fonts you want to apply to which font styles.
In Adobe, add all the fonts you want to use to the same web project. When you edit your project, you will be able to copy the CSS from each of the saved fonts./Custom+Fonts/fonts-adobe-multiple_fonts_web_project.png)
The rest of the steps are exactly the same as applying one custom font on your page, but you’ll apply different CSS rules to different font styles.
Note, remember to also update your mobile styles as well.
Embed custom fonts in Ontraport Pages
Use this method if you’ve purchased a custom font for your business and want to use it on your pages.
This method only works if your font files were properly formatted. That means that if you download free font files, it’s possible that those fonts will fail to render.
Download custom font and file type variations
The most commonly downloaded custom fonts are a TrueType (.ttf) or OpenType (.otf) font format. But, if you want your fonts to work on all web browsers, you need additional font formats.
These steps show you how to download a font and generate all the font formats you need:
- Find the font you want, download it and extract/unzip your zipped files.
- Note, it’s possible to use more than one custom font on your page. Once you’re familiar with these steps, check out the additional steps to use multiple fonts below.
- Go to transfonter.org and click Add fonts and select your extracted font file.
- Check all of the options in the “Formats” section and click Convert.
- TTF
- EOT
- WOFF
- WOFF2
- SVG
- Download your @font-face kit.
- Extract/unzip your zipped font files.
Upload your files to Ontraport
Once you have the font formats you want, you’re ready to upload them to Ontraport. When that’s done, Ontraport can use them on your sites and pages.
- Go to
.png) → Administration → Data → File Manager.
→ Administration → Data → File Manager. - Click Upload File and upload all of your font formats, then click Close.
/Custom+Fonts/custom_font-upload_font_files.png)
Add custom code to your page
You’ll add custom code to your page so you can use your custom fonts. Here’s how.
- Go back to transfonter.org, click the Font formats tab, copy the code in the CSS @font-face syntax, and save it for later.
![]()
In Ontraport
- In Ontraport, go to the site you’d like to apply custom fonts to.
- Click Advanced.
- In the header section, add in a style tag - <style></style>.
- Paste the code you copied from transfonter.org in between your style tags.
- Replace “FontName” with your font’s name.
- This is the actual name of your custom font such as, “MomoSignature-Regular.”
/Custom+Fonts/custom_font-custom_code_1.png)
Add your font files
In another tab, open your account’s file manager and click on your .eot file and copy your download link./Custom+Fonts/custom_font-eot_download_link.png)
- Go back to your site and replace the “webfont.eot” text with your link.
- There is a second instance of “webfont.eot” below your first. Replace the whole string “webfont.eot?#iefix” with your link.
/Custom+Fonts/custom_font-custom_code_2.png)
- Repeat steps 8 and 9 to download each font type and replace all of the placeholder text in with the font file links.
- Note, the .svg entry also includes “#FontName”, Replace “FontName” with the same name you entered in your font-family setting.
Target your classes
The custom code you added to your page tells Ontraport what font you want to use. The last step is to target the specific classes you want to display using your custom font. For example, you may only want to use the font on your headline text or for all of the font styles on the page.
- Copy the code below and place it directly above your closing style tag (</style>)
- Remove any of the classes you don’t want to use.
- Note, do not include a comma after your final class.
- Replace “FontName” with your font’s name.
- Make sure that the name you add here matches the name you added in step six of the “Add custom code to your page” instructions above.
- Click Save.
View a page published on your site to view the custom font. Custom fonts will not appear in the editor.
Use multiple custom fonts on Ontraport Pages
You can use more than one custom font on your pages at the same time. You’ll use your font classes to tell your page which custom fonts you want to apply to which font styles.
To add more than one custom font on your pages, repeat the steps above. You'll download your custom font files, upload them to Ontraport, and add your custom code to your page.
Create a separate style tag for each font you add.
Then target your classes by including only the ones that should use each font within that font’s style tag.
/Custom+Fonts/custom_fonts-multiple_fonts_code.png)