Lead scoring uses a point system to track contact engagement. When contacts interact with your content, they earn points. A high score tells your sales team that a contact wants to buy your product.
You can build your system in three ways. You can use the built-in lead scoring tool, create a custom automated lead scoring system or combine both tools for a mixed approach.
In this article, you will learn how to design your scoring rules and set up your lead scoring system in Ontraport.
Table of contents
Getting started with lead scoring
Recommended lead scoring system
Set up lead scoring
Use lead scores
• Lead score display
Use custom automated lead scoring
• Adjusted Lead Score Automation
• Custom Lead Scoring Automation
Getting started with lead scoring
You can use two types of information to score your contacts:
Contact details
You store data about your contacts in their records. This includes their job title, city or business type. Assign points based on details that match your target audience. For example, you can give 10 points to CEOs if executives buy your product.
Contact actions
Contacts interact with your content. They click links, fill out forms, buy products, open emails, or send texts. You assign point values to these conditions. For example, you can give contacts 3 points when they click an email link, 10 points when they visit your pricing page or 20 points when they buy a membership.
Recommended lead scoring system
Back to top
This system gives you a starting point. You can use it as a stepping stone and change these rules to fit your business.
Score brackets
Use a 0–100 scale. Cap your maximum score at 100 so contacts stay reachable. Divide your contacts into three tiers:
- High (70–100): Contact these leads immediately.
- Medium (40–69): Send targeted content to these leads.
- Low (0–39): Track these leads.
Scoring rules
Base your points on actions, purchases and contact details.
- Give contacts 5 points each time they click a link in an email.
- Give contacts 4 points each time they visit a pricing or feature page.
- Give contacts 8 points each time they send a text message containing words like "price" or "demo."
- Give contacts 5 points each time they visit any page.
- Give contacts 25 points when they subscribe to a product.
- Give contacts 20 points when they spend above a set amount.
- Give contacts 10 points when they keep a subscription for 90 days.
- 3% / day for longer sales cycles (30–90 days), like B2B, high-ticket, or subscription products.
- 5% / day for shorter cycles (7–14 days), like e-commerce or impulse purchases.
Set up lead scoring
- Go to Contacts → Settings → Lead Scoring.
- Create Contact Scoring Conditions by clicking Add.
- Select a condition from the dropdown menu.
- Assign a point value (score) to the condition.
- Repeat step 2 for each rule you want to add.
- Set the score degradation, a percentage value of how much a contact’s accumulated score should go down in one day.
- Click Save.
Use lead scores
Back to top
Once you have a system scoring your contacts, you can use their score for:
- Sales prioritization - Sort your contact list by lead score so you can easily see your leads with the highest scores and take action.
- Segmentation - Use score brackets to send different content. High scores get case studies and pricing info, Medium scores get educational content and Low scores receive broad awareness emails.
- Lead routing - Automatically assign leads with high scores to your most experienced reps.
- Suppression - Exclude low-scoring contacts from high-cost campaigns like direct mail or paid retargeting to protect your budget.
- Re-engagement - If a contact previously had a high score but it decays to low, you can trigger a win-back campaign before they go cold entirely.
- Reporting - Track what score range leads are at when they convert to customers. Over time, this tells you if your scoring ranges are correct. If most of your customers converted with a medium score, your high bracket may be set too aggressively.
Lead score display
Back to top
Each contact's lead score shows two values: the raw score and a percentage. The percentage reflects that contact's relative rank; the highest score in your list is 100%, the median is 50%, and all others fall in between. Because percentages are calculated from the unrounded score, two contacts with the same displayed number may show slightly different percentages.
Use custom automated lead scoring
Back to top
There are two ways you can use automation for lead scoring:
- Create an adjusted lead score by using the built-in lead scoring plus additional criteria from automation
- Create a completely custom lead scoring automation
When you build a custom automated lead scoring system, you gain more control over your contact scores. You can use automations to manage your scores instead of the built-in lead scoring tool.
Choose a custom system when you want to:
- Use more triggers: Automations give you more triggers than the lead scoring tool. You can update a score when a contact submits a form, abandons a checkout or logs a call.
- Reset scores: You can reset a score to zero when a contact shows no activity for 30 days. Nothing breaks a lead scoring system faster than stale "High" contacts cluttering a sales queue.
- Decay by points: You can subtract point values for inactivity. The lead scoring tool only subtracts a percentage.
- Cap scores: You can set a maximum score. This prevents a score from going over 100 points.
- Create lead scores with decimal places: You can create a custom lead score numeric field with up to three decimal places to prevent rounding inaccuracies.
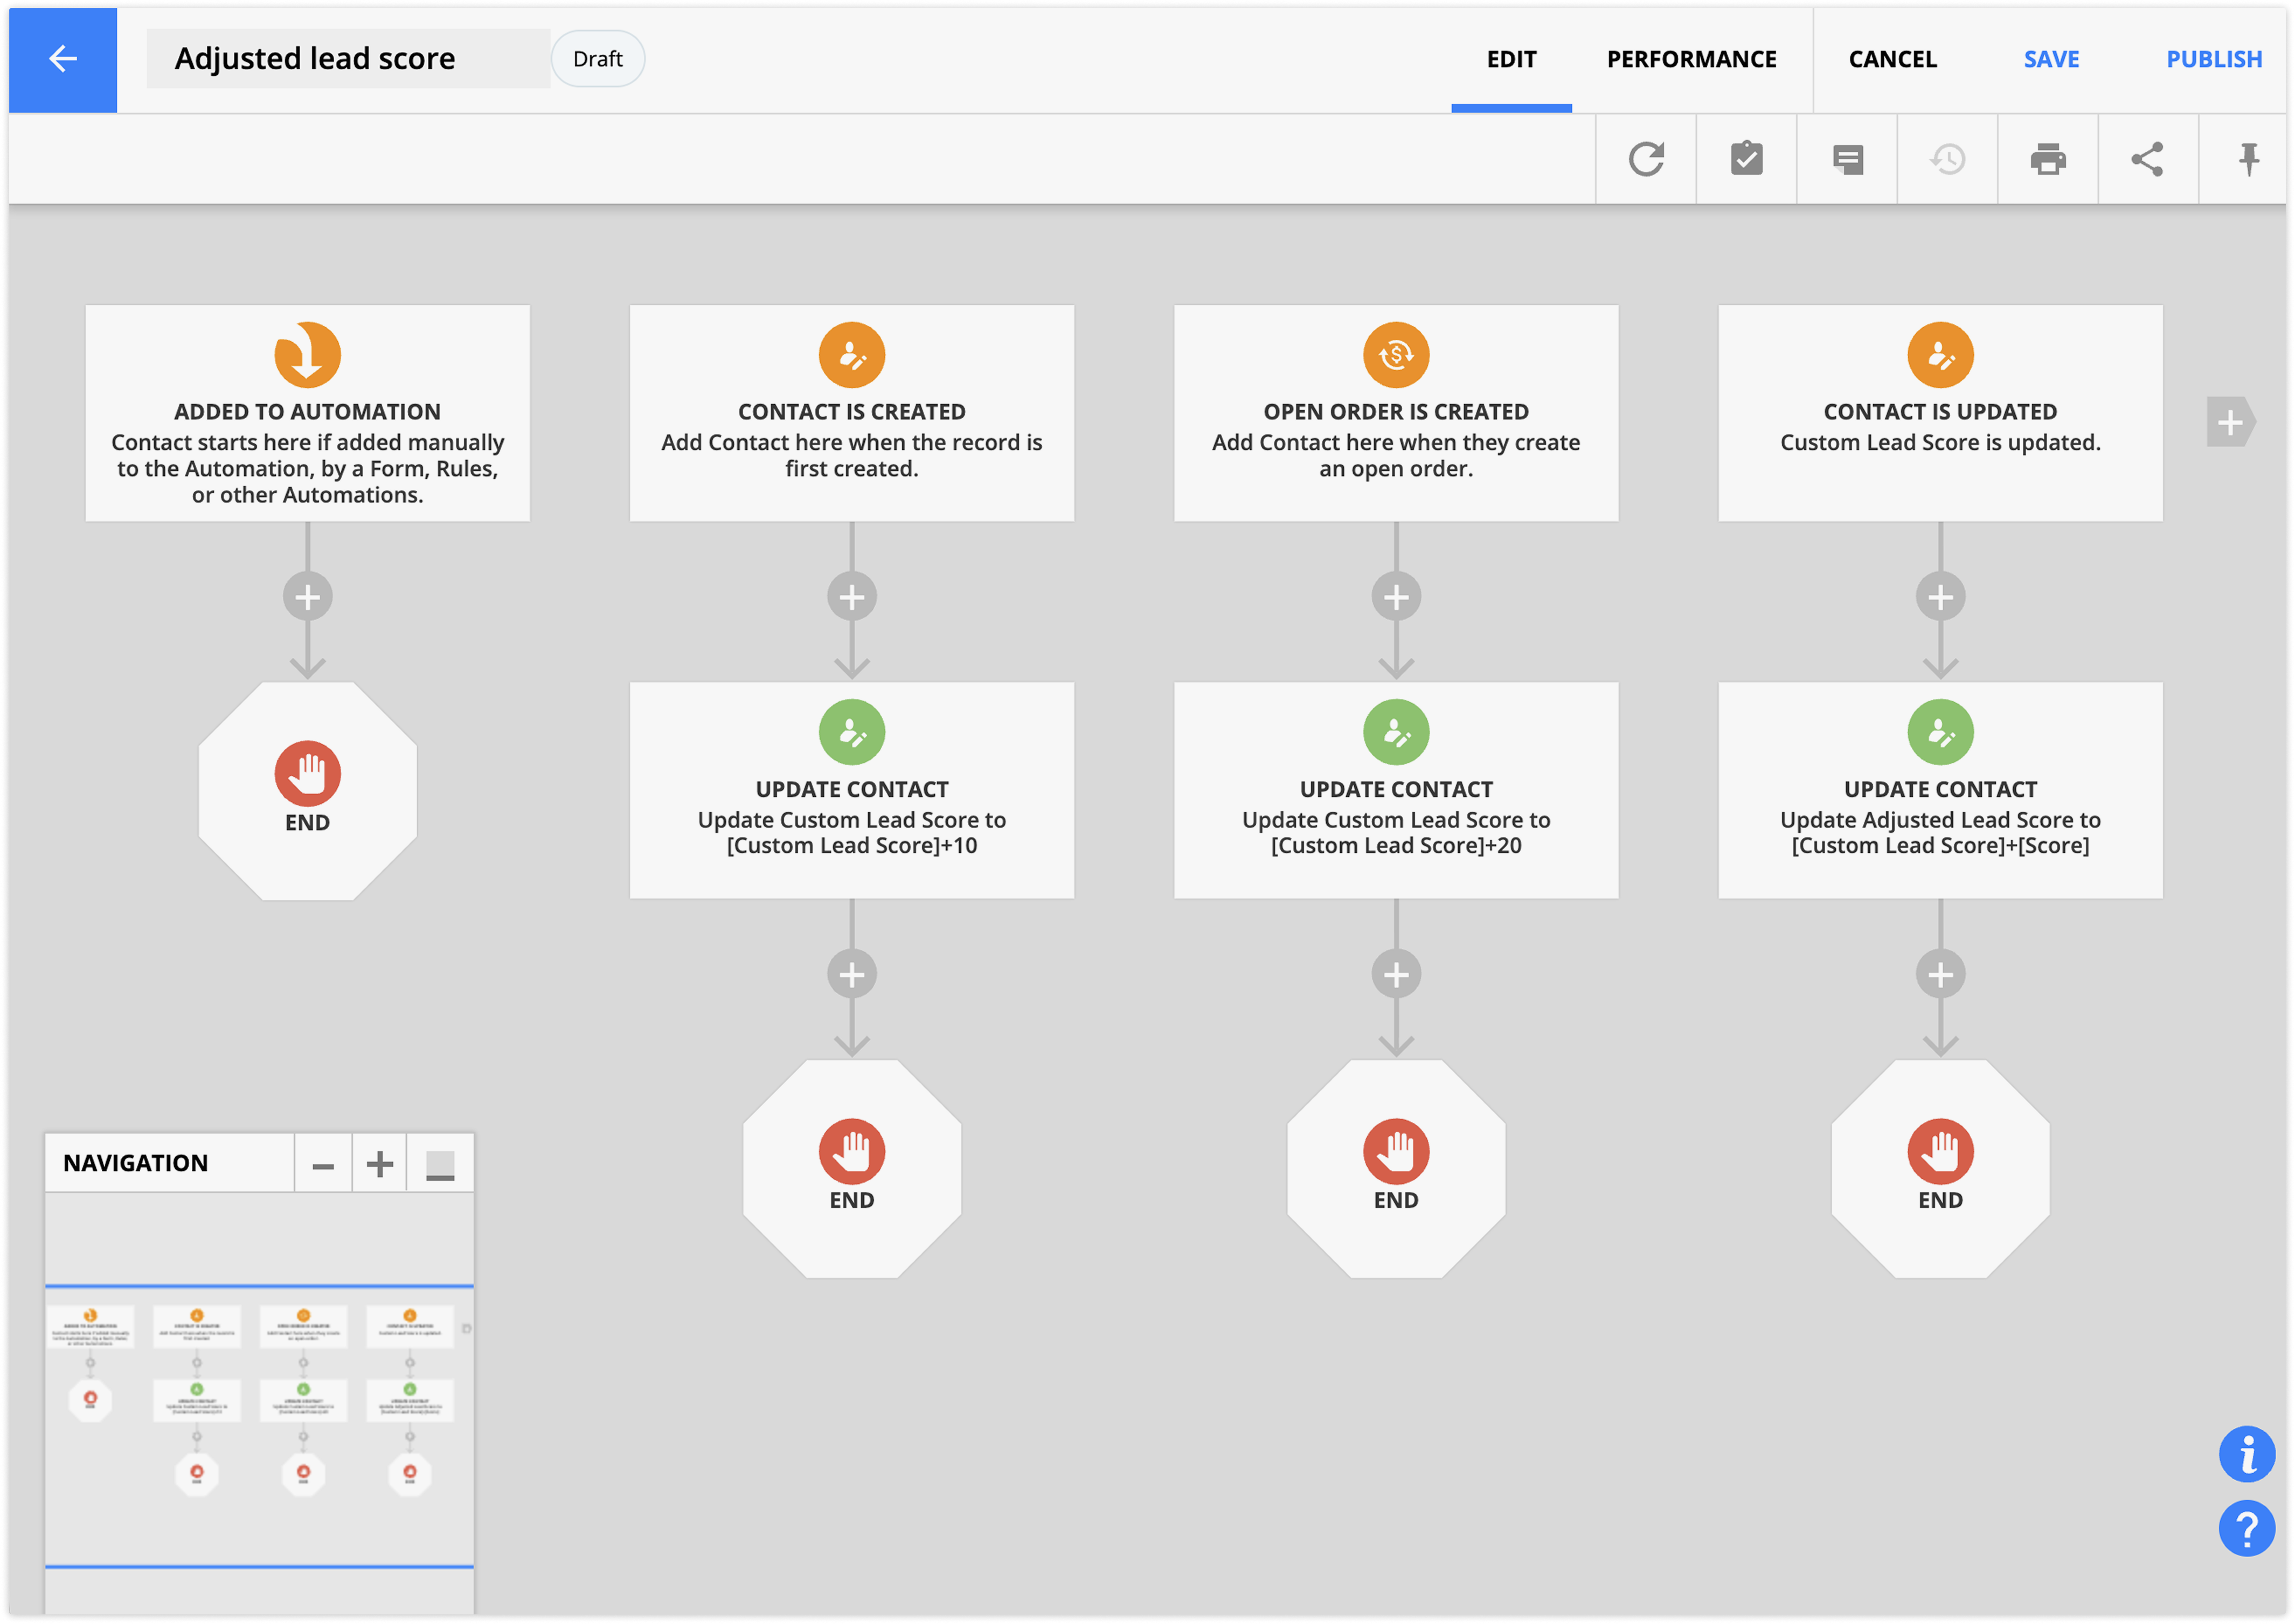
Adjusted Lead Score Automation
Back to top
You’ll want to create an adjusted lead score if there are specific actions available in automations that are not available from the built-in lead scoring system, such as when a contact is created, or when a new open order is created.
To create an adjusted lead score automation, you need two custom fields: Custom Lead Score and Adjusted Lead Score. And you’ll use the Adjusted Lead Score for segmentation and reference.
Here’s how to create an adjusted lead score automation:
- Create two numeric fields: Custom Lead Score and Adjusted Lead Score.
- Go to Contacts automations collection and click New automation → Start from scratch.
- Name your automation map Adjusted Lead Score.
- Add triggers to the map for each of the actions you want to add to your lead scoring system.
- Update the If Contact is already on map, then… setting to Move here when triggered.
- Below each trigger, use an Update contact element to add points to the custom lead score.
- For example, the [Custom Lead Score]+5.
- Add a trigger for Field is updated and select Custom Lead Score.
- Update the If Contact is already on map, then… setting to Move here when triggered.
- Below the trigger, add an update contact element and select the Adjusted Lead score.
- Update the Adjusted Lead Score to be the sum of Custom Lead Score and Score, [Custom Lead Score]+[Score ].
- Add End elements to all empty What happens next? Boxes.
- Save and publish.
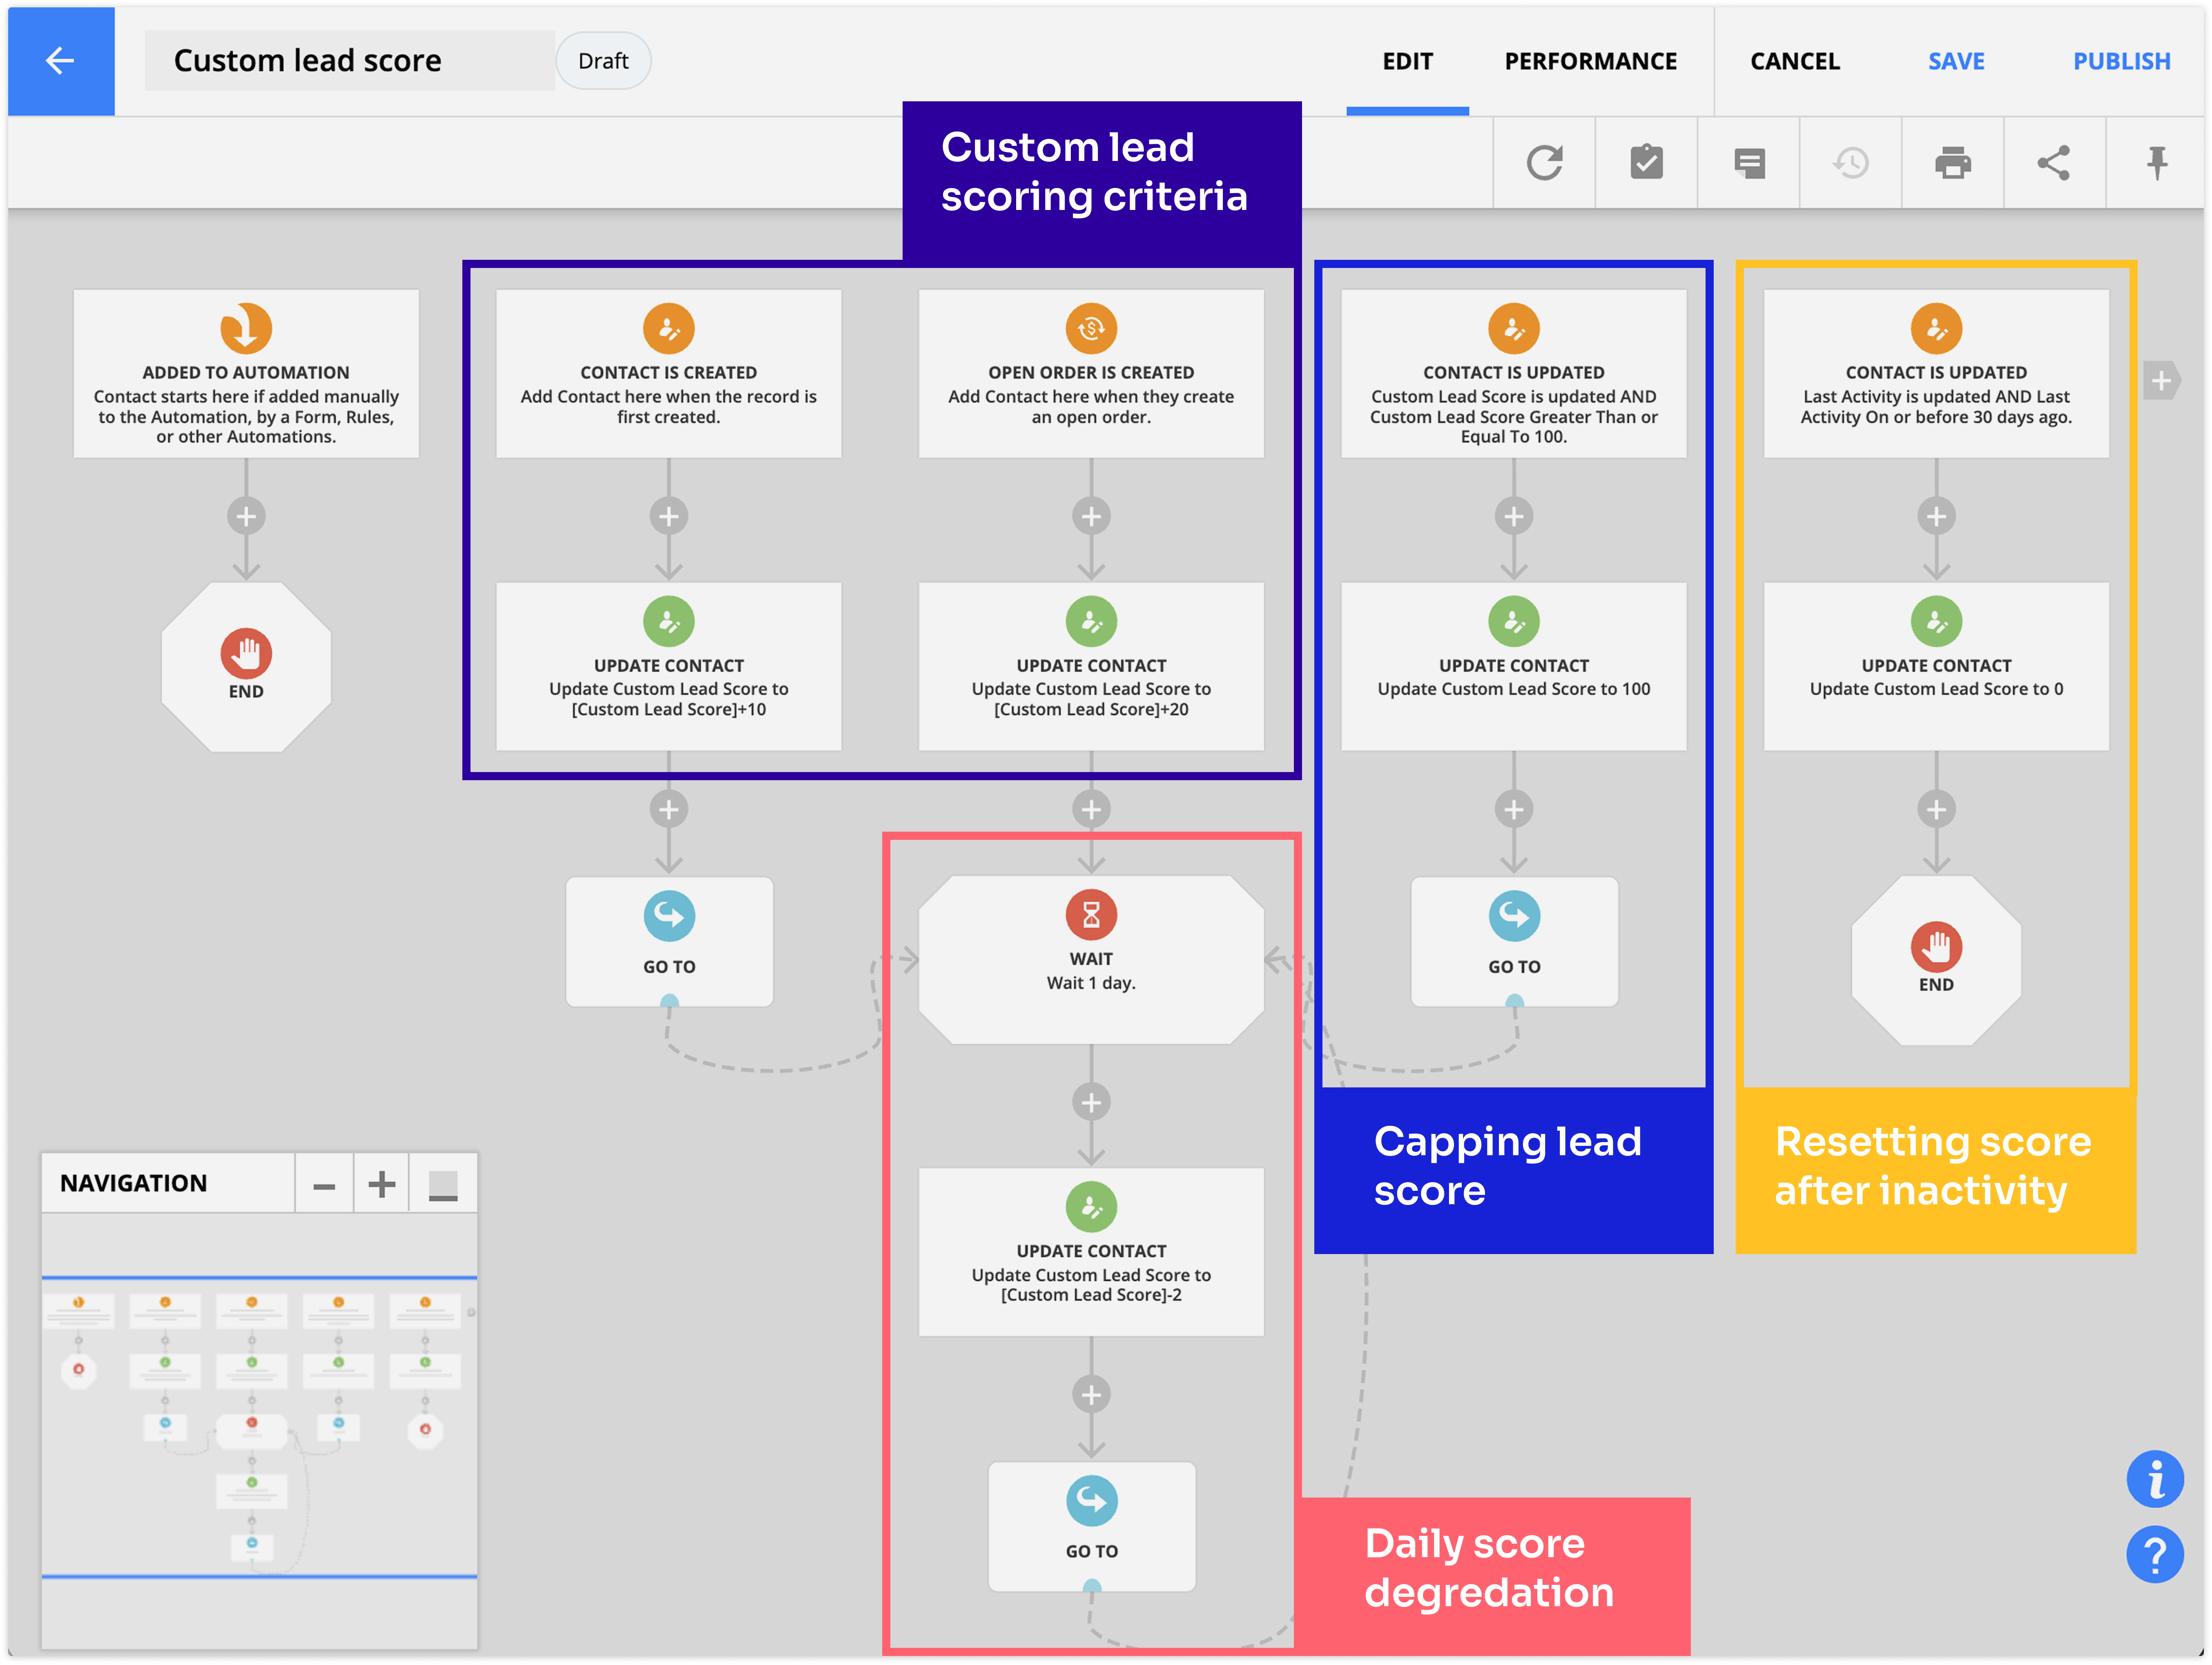
Custom Lead Scoring Automation
Back to top
The second option is to create a completely custom lead scoring automation and not set up any lead scoring rules in the built-in system. With this build, you only need one custom field, Custom Lead Score. It is also possible to reset a contact’s score after a period of inactivity using this method and gain additional insights by using performance mode reports.
- Create a custom numeric field, Custom Lead score.
- Go to Contacts automations collection and click New automation → Start from scratch.
- Add triggers to the map for each of the actions you want to add to your lead scoring system.
- Update the If Contact is already on map, then… setting to Move here when triggered.
- Below each trigger, use an Update contact element to add points to the custom lead score.
- For example, the [Custom Lead Score]+5.
- To add in daily score degradation, add a wait under one of your Update contact elements and set it to wait one day.
- Below that, add another Update contact element and subtract from the custom lead score, such as [Custom Lead Score]-2.
- Add a Go To below and loop it back up to the wait.
- Add a Go To below the other Update contact elements and connect them to the Wait.
- To reset the score after inactivity, add a trigger for “Field is updated” and select “Last activity.”
- Add a condition to the trigger that Last activity is on or before 30 days ago.
- Below that trigger, update the Adjusted Lead Score field to 0.
- Add an End element below this line of automation to avoid creating negative lead scores.
- To cap the lead score, add a Field is updated trigger and select the Custom Lead Score field.
- Add a condition to the trigger that Custom Lead Score is greater than or equal to 100.
- Update the If Contact is already on map, then… setting to Move here when triggered.
- Below that trigger, add an Update contact element and update the Custom Lead Score to 100 to account for scores that are slightly over 100.
- Add a Go To element below that and connect it to the 1-day wait for lead score degradation.
- And End elements to the Default trigger and save and publish the map.