This article is for those building a membership site using Ontraport Membership Sites. If you're using WordPress and PilotPress, click here. If you're getting started and don't know which to choose, this article will help.
Create an Ontraport Membership Site from a prebuilt automation map
The simplest and most ideal way to build an Ontraport Membership Site is by using one of our prebuilt automation maps. You’ll simply install the map that suits your membership site model, and your site and all the automated functionality for managing it are set up for you. You can then customize it with your branding and content.
Table of contents
Step 1: Decide what type of membership site you want
Step 2: Install and publish the pre-built automation map
Step 3: Customize and publish your pages
Step 4: Set up your site’s branding and structure
Step 5: Add additional, optional functionality
• Upsell members to the next access level
• Display targeted content to only some members
• Set up redirects based on membership level
• Customize your registration email
• Add your Ontraport Membership Site to a subdomain of your existing WordPress site
• Give members free access to your site
• Set up a navigation across all pages
• Add and protect new pages to your site
• Create a credit card update page
Step 1: Decide what type of membership site you want
You can currently choose from two membership site models based on how you’d like to release your content: drip access and immediate access.
- Drip Access Membership Site: With this type of site, you can release your content to members relative to when they signed up or on specific dates. This model allows you to deliver your content to your members in smaller pieces and ensure that they have time to consume your content without feeling overwhelmed.

- Immediate Access Membership Site: This type of site allows you to release all your content to your members as soon as they purchase access to your site. This lets them work through your content on their own schedule and works great as either a subscription or one-time fee product.

Step 2: Install and publish the prebuilt automation map
Once you’ve decided on your site model, click to install the matching automation map in your account: Immediate Access or Drip Access. Follow the in-app notifications, and when your membership automation is installed you’ll see it in your Automations collection or on your screen. Review your map to understand how it functions.
The automation will handle the following membership site functionality:
- Release your content based on the membership model of the automation
- Give access to new members
- Automate your members’ login and registration process
- Automate your members’ “forgot password” functionality
- Manage failed subscription payments
Installing the automation map will also install templates for a variety of membership site pages, such as:
- Login Page
- Registration Page
- Reset Password Page
- Course Overview Page
- Lesson Pages (these come with the appropriate protection so that only members can see them)
- Sales Page
- Order Page
- Thank You Page
- Contact Us Page
Next, we recommend adding your new membership product before publishing your map.
- Click to open the “Open order is charged but declined” trigger. To create your new membership product, click New Product from the empty dropdown, name your product, then click Save & Edit.
- Add a price and click Save.
- Click to open the “Open order is charged and successful” goal → select your product → click Done.
- Now your membership site automation is ready to publish. Click Publish → Save & Publish. When you publish the automation map, your site is not yet live.
Step 3: Customize and publish your pages
Once your automation map has been downloaded and published, you can focus on your site’s pages.
- Go to your page collection and select the templates you’d like to customize.
- Add your own branding and content to the templates.
- On your Order Page, add the membership product you created in Step 2 to your order form block. Be sure to set it up as a subscription.
- Make your pages part of your site by publishing them to your membership site’s domain.From your page editor click Publish.
- If your site is hosted on Ontraport’s domain, select “Use our domain” → add your site’s subdomain → select the domain your site is hosted on → click Save & Publish.
- If your site is hosted on your own domain, select “Use your own domain” → add your site’s domain → click Save & Publishg.
Step 4: Set up your site’s branding and structure
Once your automation and pages are published, your membership site is almost complete. What’s left is tying up the loose ends, such as adding your brand’s color and logo, and setting up basic login navigation. Follow the steps below:
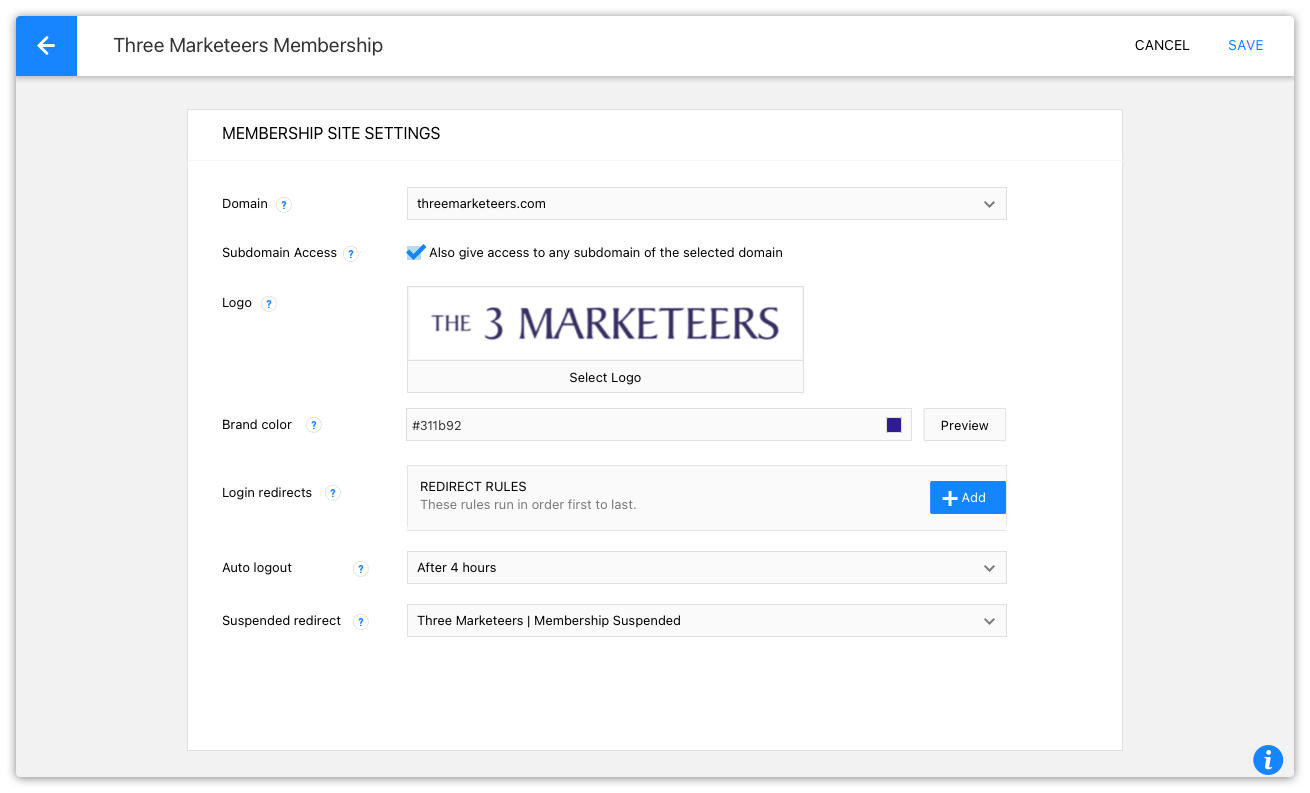
- Go to your Ontraport Membership Sites collection.
- Click New Membership Site and name your site or select an existing site to edit its settings.
- Choose which domain you’d like to use for your site. All the pages hosted on your domain will be part of your membership site (for example, if you set your domain to be http://threemarketeers.com, any page on that domain will automatically be part of that site, including pages like http://threemarketeers.com/home or http://threemarketeers.com/lesson1). To learn more about domains and determine what you’d like to use, read here. To set your domain, in the “Domain” dropdown, select a domain you’ve previously published to or click New Domain.
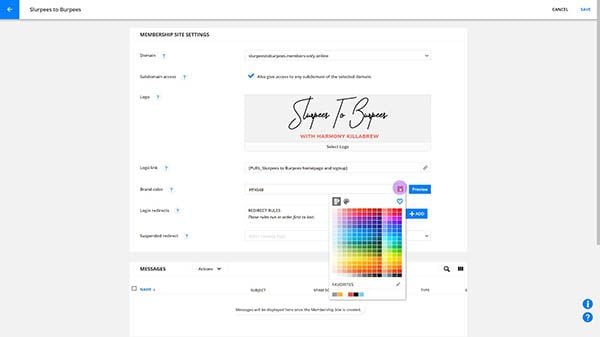
- Click Select Logo and upload your logo, then click Insert.
- In the “Logo link” field, select a link that you’d like to add to your logo. This gives your members a quick and easy way to get back to your site from your system-generated assets, such as your forgot password page or registration email.
- In the “Brand color” field, select a color from the color picker or add a hex code.
- In the “Login redirects” section, click Add to choose which page you’ll send your members to when they log in, such as your course overview page.
- If your members click on a link that sends them to a protected page, they’ll be prompted to log in. After your members log in, Ontraport will send your members to the page they tried to reach before logging in. This creates a smooth user experience for your members.
- In the “Suspended redirect” dropdown, select where your members with suspended access will be sent when they log in, such as a page where they can update their credit card information (see Step 5, “Create a credit card update page” below for instructions on creating this type of page).
- In the “Automatic logout” dropdown, select how long you’d like your members to remain inactive for before automatically logging them out of your site.
- Click Save.
Your site is now live, and your automation is set up to manage your new members.
Step 5: Add additional, optional functionality
With Ontraport’s all-in-one platform you have access to a variety of additional features so you can do more with your membership site. Here are some ideas and links to directions for accomplishing them.
Upsell members to the next access level
When site visitors try to visit a page they don’t have access to, rather than simply directing them to an error or login page, you can show them a specific page by using your page’s “Redirect users with no access” setting (you’ll find this in your page settings under Display Settings).
That page can serve as your opportunity to suggest that the visitors purchase access to the page they were trying to visit. You can do this on a per-page basis, meaning you can customize the redirect page based on which content the person is trying to access.
Display targeted content to only some members
You can select content on your page’s blocks to show or hide for specific members by editing your block’s display settings.
- Hover over the block you’d like to protect and click
/ontraport+pages+-+builder+-+edit+block+(gear+icon).png) → Display Settings.
→ Display Settings. - In the “Display this block to whom?” dropdown, select “Some logged in members,” click Add a condition → Add Condition and select “Field is this value.”
- Select your membership level field in the first dropdown and set the condition to be “contains,” then select the appropriate membership level. You can also set up custom membership level protection by using other display conditions.
Set up redirects based on membership level
You can set up rules with conditions for sending members to pages based on their membership level or other information stored in contact records. Create a login redirect as described in step 1, then add a condition for your each of your membership levels. Here’s how:
- In the “Conditions” section, click Add Condition and select “Field is this value.”
- Select your membership level field from the “Select field” dropdown, add the condition “Contains,” and choose your membership level value.
- In the “Redirect” section, select which page to send your members to.
- Click Save.
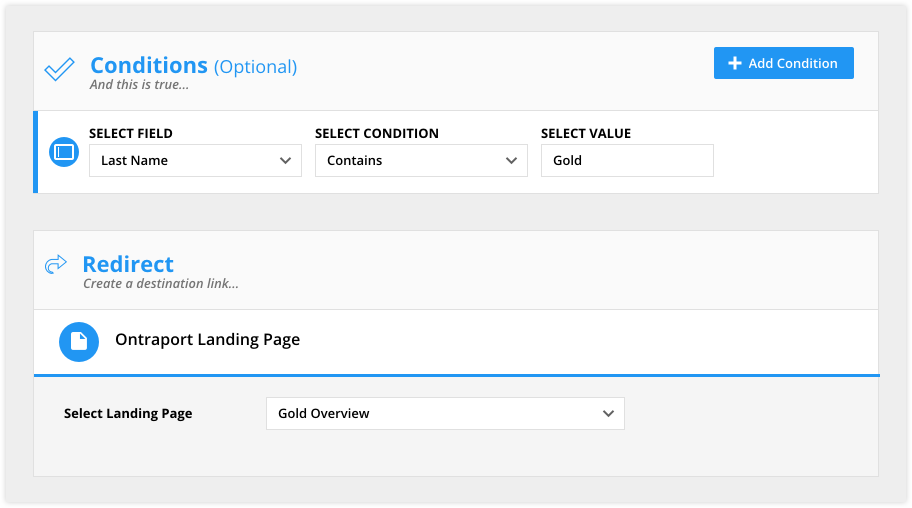
The conditions run in order from top to bottom. When your members log in, they will be redirected to the page of your choice based on the first condition they meet. For example, if your contact has two membership levels — gold and silver — and your first rule redirects gold members, and your second rule redirects silver members, your subscriber will be sent to your gold page when they log in.
Customize your registration email
Your system-generated emails to manage registration and “forgot password” do not need to be customized to be functional and will automatically include your brand’s logo, color and physical address. You can customize the content of your registration email and the “send from” information of your “forgot password” email. Here’s how:
- Go to your Ontraport Membership Sites collection and select your membership site.
- Scroll down to the “Messages” section and hover over the message you’d like to edit and
.png) the box to its left.
the box to its left. - Click Edit.
- Make your changes and click Save.
Add your Ontraport Membership Site to a subdomain of your existing WordPress site
If you already have an existing WordPress membership site hosted to your own domain, and you’d like to keep your old content while creating an Ontraport Membership Site with cohesive branding, create a subdomain through your domain provider. Use your subdomain in Step 1 above.
Give members free access to your site
If you’d like to give contacts access for free, such as giving your friends and family access, you can manually add them to your automation. Here’s how:
- To give free access to your site, go to Contacts and select the contact(s) you’d like to add.
- Click Automations and select the option to add the contact(s) to your membership site automation.
- Click Submit.
Set up a navigation across all pages
If you’d like to set up your site’s navigation, you can add global block to your pages.
Add and protect new pages to your site
If you’d like to add any new pages to your site, follow the steps below to add and protect them.
To add new pages
- Go to the Pages section of your membership site’s settings.
- Click New Landing Page and follow these steps for creating a page — begin on step 2.
To protect pages
By default, all new pages are available to the public. To require a user to log in before viewing them, you have to protect them.
- From your page, click Settings → Display Settings .
- Select who can access your page:
- Set your page to show to “all logged in members” to allow any contact who has an active membership to view the page.
- Optionally, you can set the page to show to “some logged in members” and then set conditions to control which logged in members can access it. This is useful for more sophisticated sites that have multiple access levels or which deliver additional access to a user over time. View the list of possible conditions here.
- Click Done.
Create a credit card update page
To easily manage failed payments in collections, you can create a page where your members can update their own credit card information. Here’s how to set it up.