Sequences are Ontraport’s legacy automation feature. Each sequence is made up of a series of steps. And each step performs an action, such as:
- SMS
- Postcard
- Fulfillment List
While we recommend using Ontraport’s visual automation builder instead of sequences or rules, we know that some people are still using these features. This documentation is intended for them. Note, new accounts will not see this feature at all.
Important: Sequences and rules are legacy automation features and are not enabled by default.
- To enable sequences and rules go to
.png) → Administration → toggle “Sequences” on.
→ Administration → toggle “Sequences” on.
Table of contents
Types of sequences
• Step sequences
• Date Sequences
Step types
• Email steps
• SMS steps
• Fulfillment list steps
• Rules steps
• Task steps
• Postcard steps
Add steps to sequences
Delete steps from sequences
Edit steps in sequences
Editing live sequences
Sequence settings
• Unsubscribe after last sequence step
• Show this sequence on the subscription management page
• Run this sequence only on weekdays
Adding contacts to sequences
Rules
Types of sequences
You can create two types of sequences.
- Step sequences
- Date sequences
Fundamentally, they work the same way. When contacts are added to a sequence, they’ll move through a series of automation steps. The difference between step and date sequences is the way your contacts move through your sequence.
In step sequences, your contacts will move through your automation linearly — step-by-step.
In date sequences, your contacts will move to each step based on the date set in the step’s settings.
Step sequences
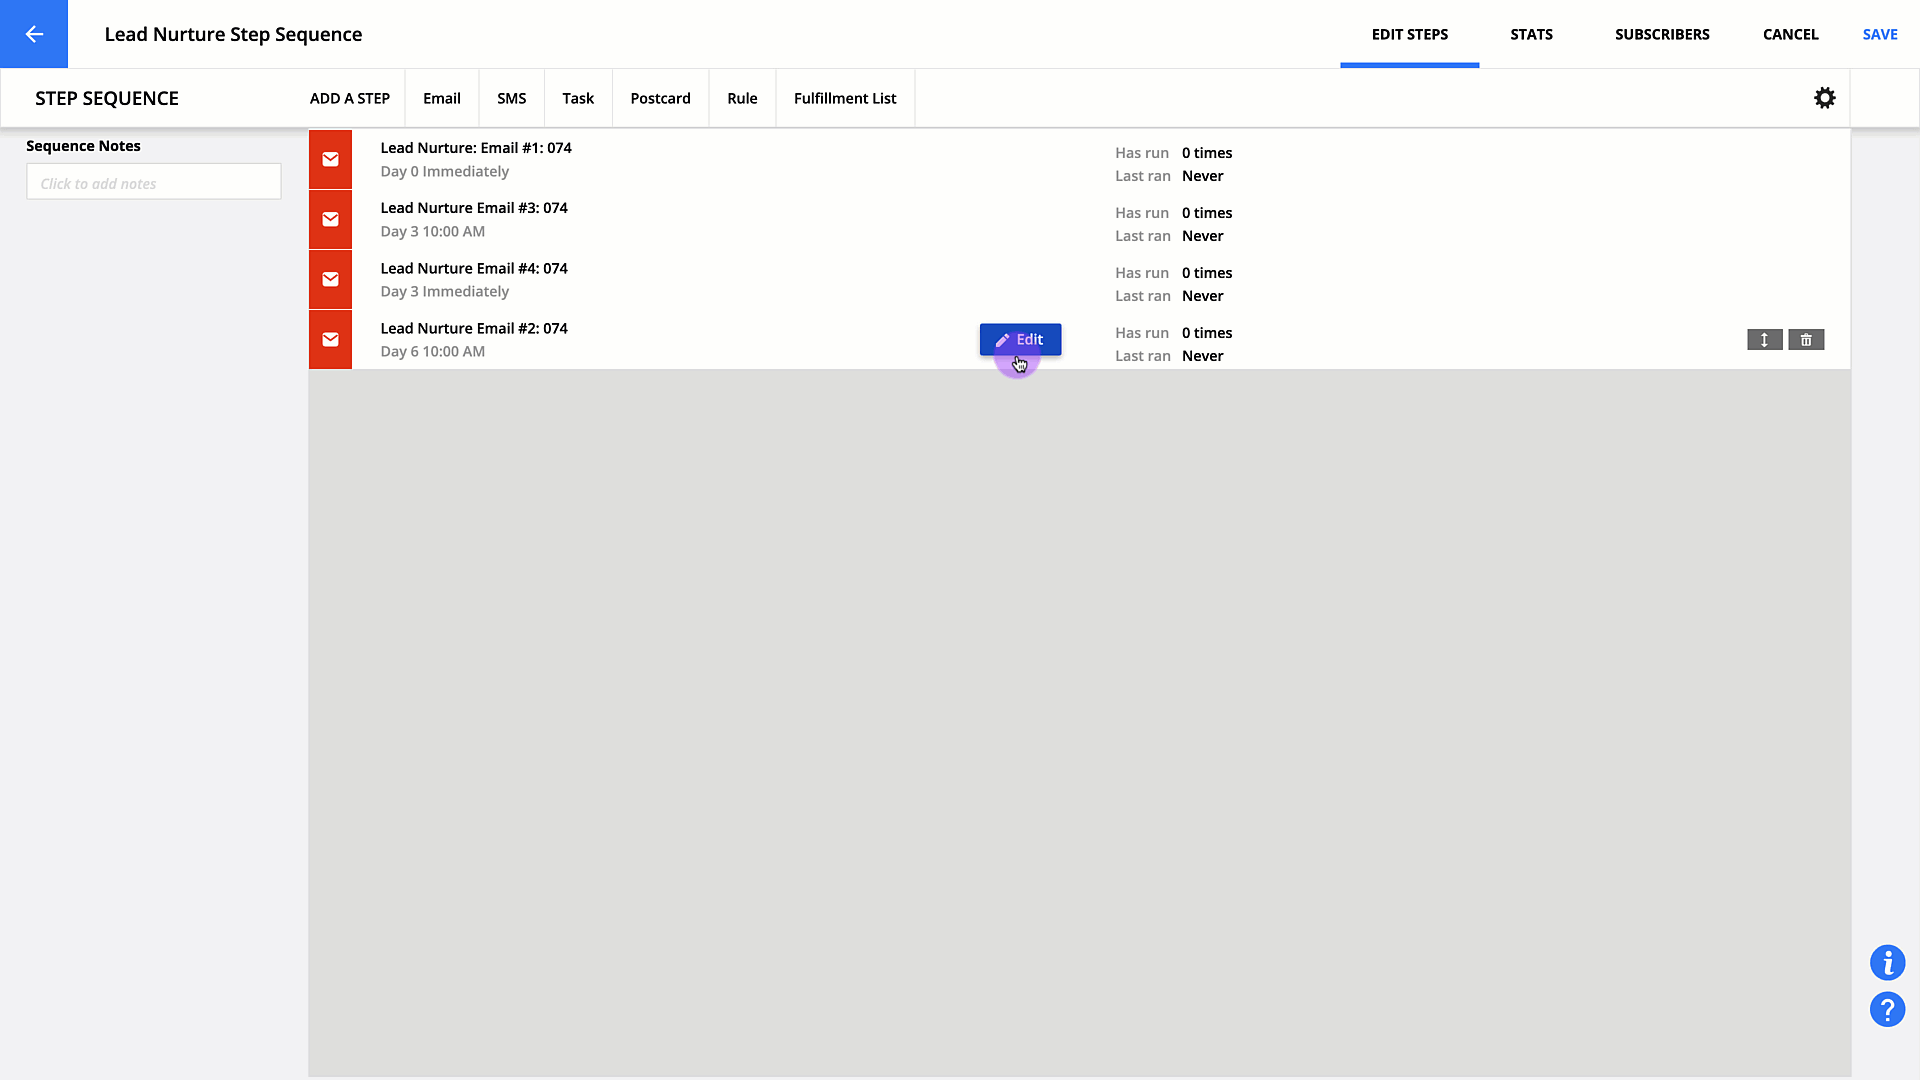
When you add contacts to a step sequence, they start on day 0 — your first step. Every contact who is subscribed will start on the same step and move step-by-step through your sequence. That means your contacts move through the steps in your sequence on their own schedule. One contact may be on step 1, while another may be on step 10.
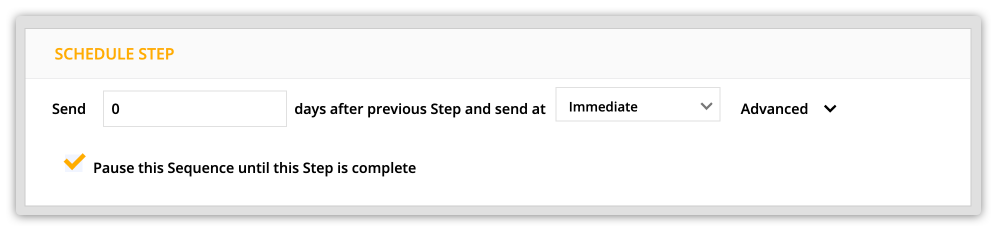
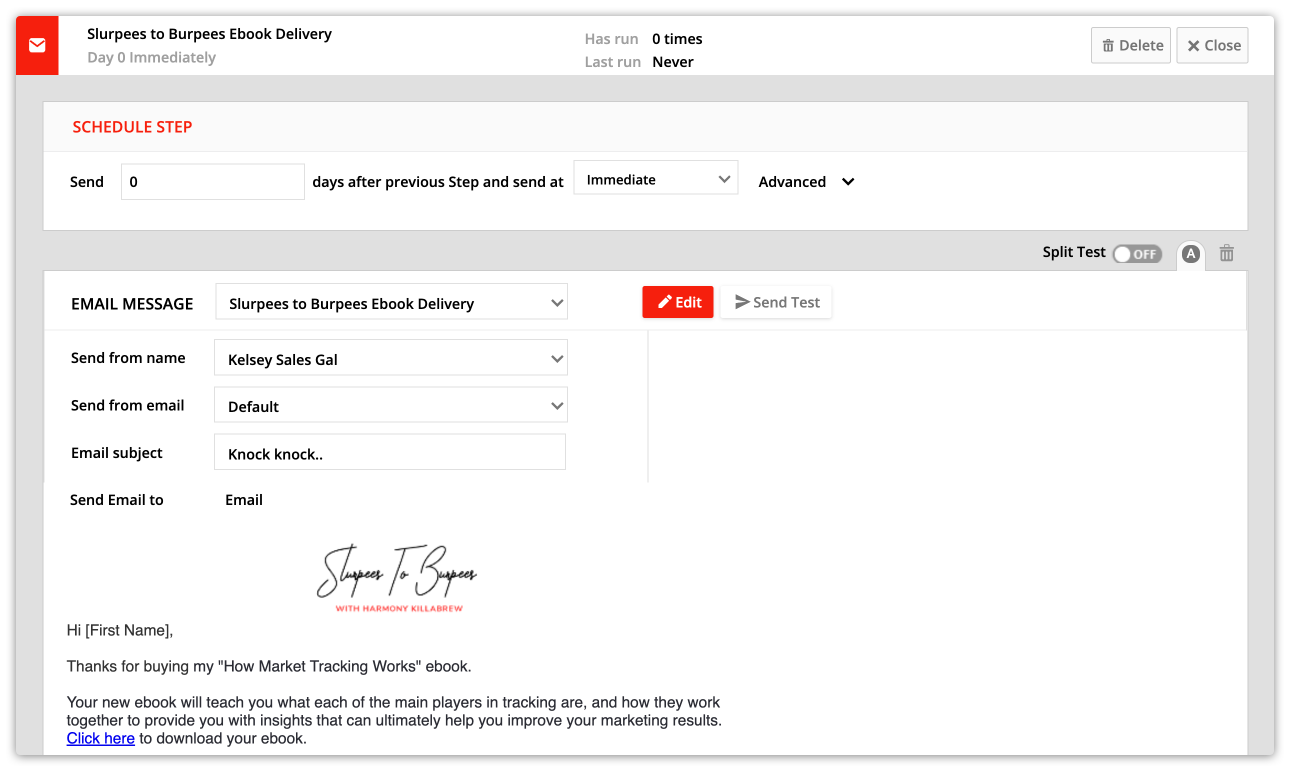
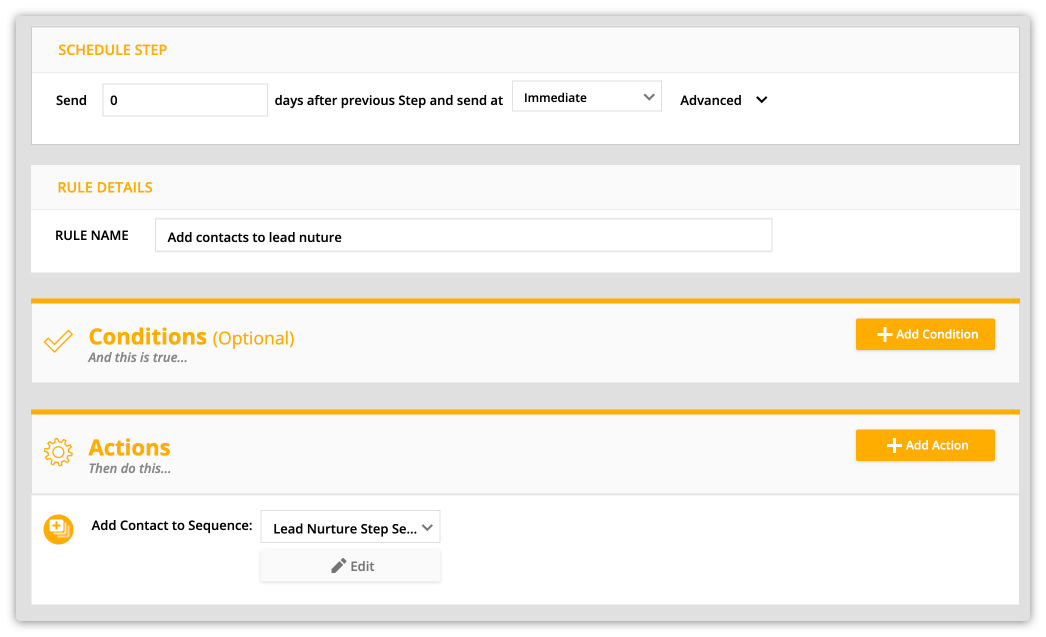
The “Schedule Step” section in step sequence settings allows you to schedule your steps relative to the previous step. Step sequences always run in the order that you set.

To schedule a step, add in how many days your automation should wait relative to your last step. For example, if you want to wait three days in between sending emails, add “3” in the first field.
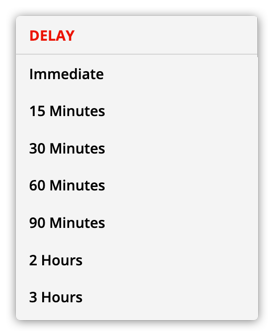
In the dropdown field, choose when your step should fire. There are “Delay” options that allow you to choose an amount of time you’d like to wait.
Or you can select a specific time of day.

Date Sequences
Date sequences allow you to schedule steps for specific dates. All your subscribed contacts move through the steps on the exact same schedule.
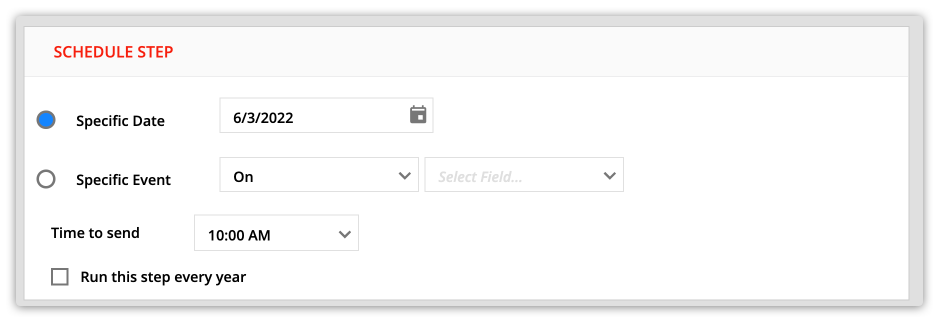
The “Schedule Step” section in date sequences allows you to schedule steps for specific dates or for dates saved in your contact’s records.
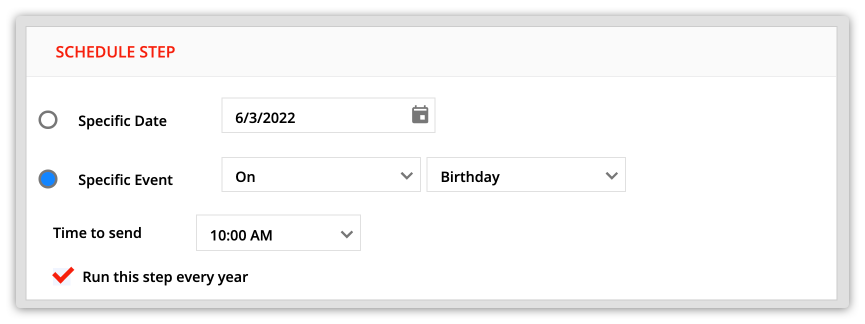
- In the “Time to send” dropdown, select the time of day you’d like your step to fire.
- Check “Run this step every year” if you want your automation to run every year. You’d use this if you send a happy birthday email to all your contacts every year.
Step types
Step types indicate the type of action each of the steps in your sequence will perform. By default you can use three types of steps in your sequences:
However, you can also enable three other step types:
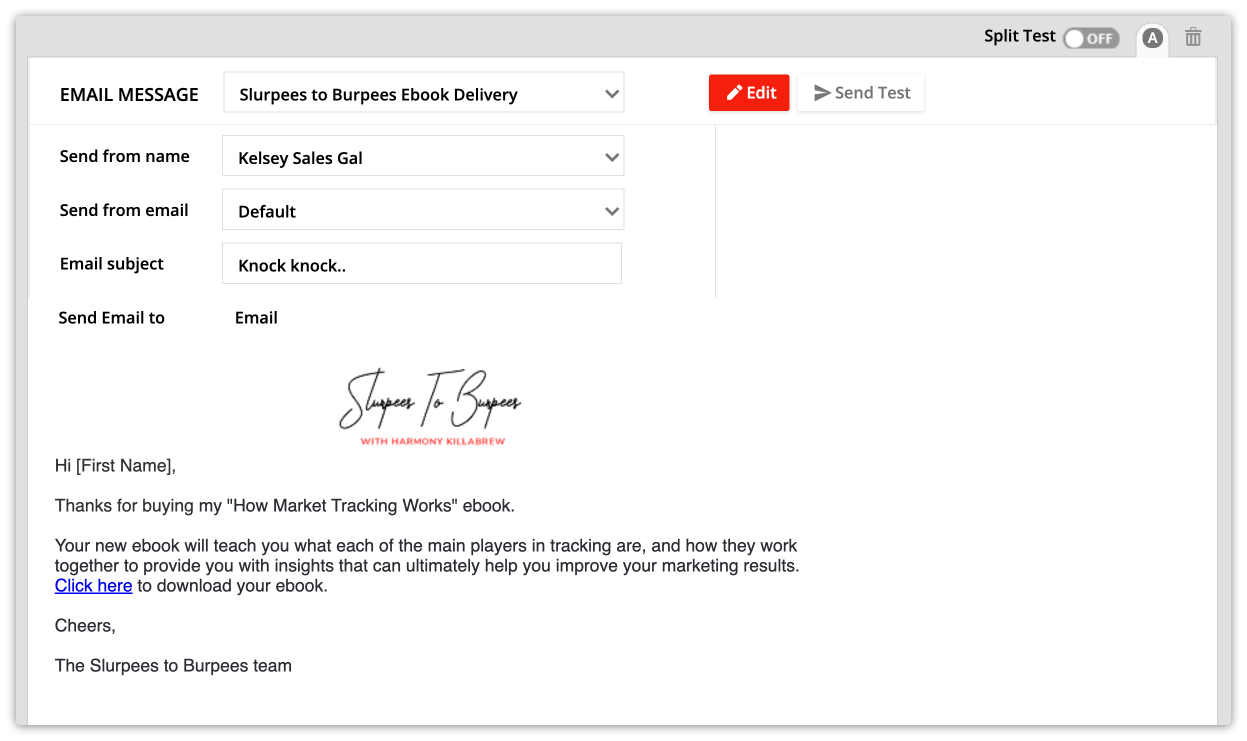
Email steps
Email steps let you send emails. Choose the message you want to send from the “Email Message” drop down field. You can also customize your emails’ send from name and email or click Edit to update your email’s subject or body.
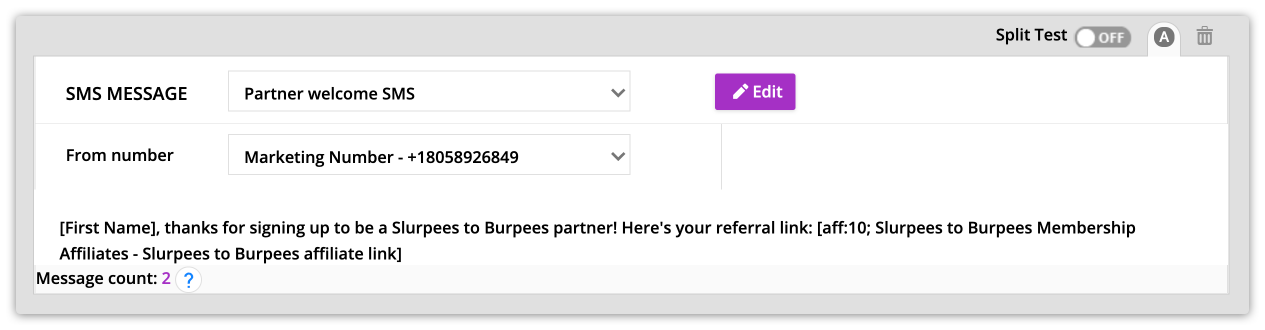
SMS steps
SMS steps allow you to send SMS and MMS messages. Choose the message you want to send from the “SMS Message” drop down field. You can also customize your SMS messages “from number” or click Edit to update the content in your message.
Fulfillment list step
Fulfillment list steps allow you to add your contacts to fulfillment lists. Choose the list you want to add contacts to in the “Fulfillment List” dropdown field. Click Edit to update your list’s settings.

Rules steps
Rule steps allow you to add additional actions in your sequences. This step type needs to be enabled before you can add them to your sequences.
- Go to → Administration → Sequences → toggle “Rule steps in sequences” on.
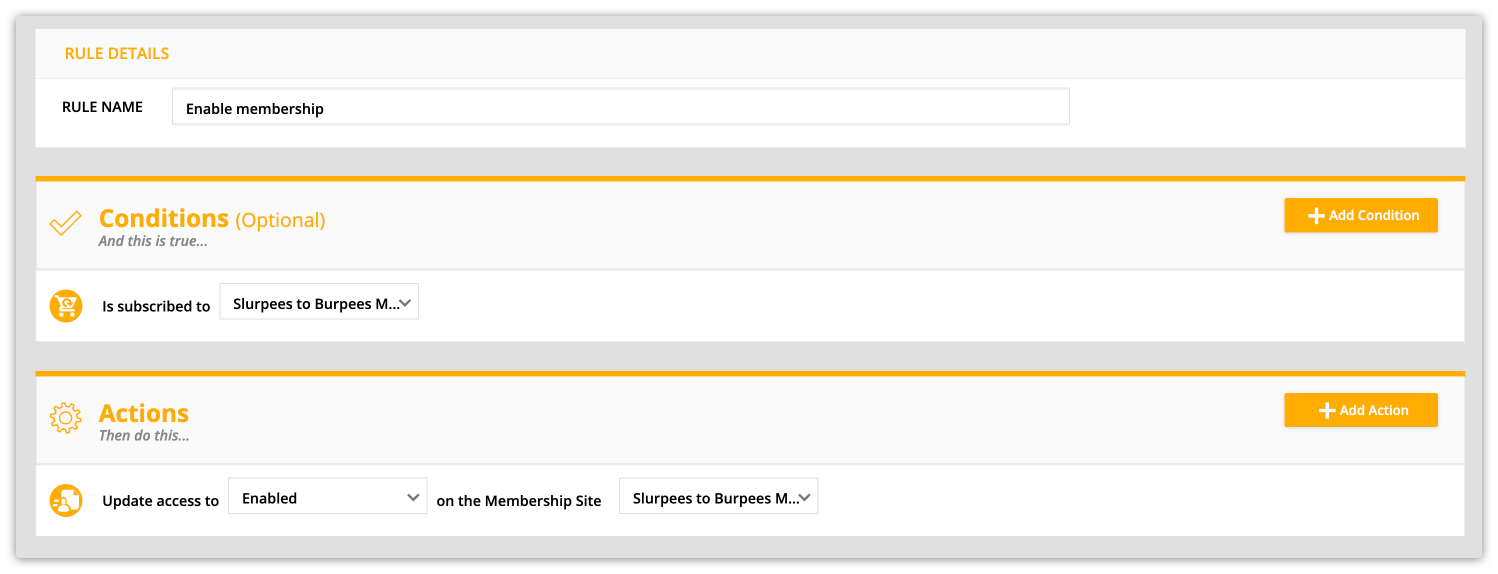
Customize your rule step
- Name your rule.
- Add a condition (optional).
- Add a condition to your rule if you only want to take an action on a certain portion of the contacts subscribed to your sequence.
- Click Add Condition and pick the condition you want to use to filter your contacts.
- Add an action.
- Click Add Action and pick the action you want to take. Each action has its own settings.
Task steps
Task steps allow you to assign tasks to account users in your sequences. This step type needs to be enabled before you can add them to your sequences.
- Go to → Administration → Sequences → toggle “Task steps in sequences” on.
Note, task steps have an additional setting “Pause this sequence until this step is complete” in the “Schedule Step” section. This setting ensures that your contact won’t continue to the next step until a member of your team has completed a manual task.
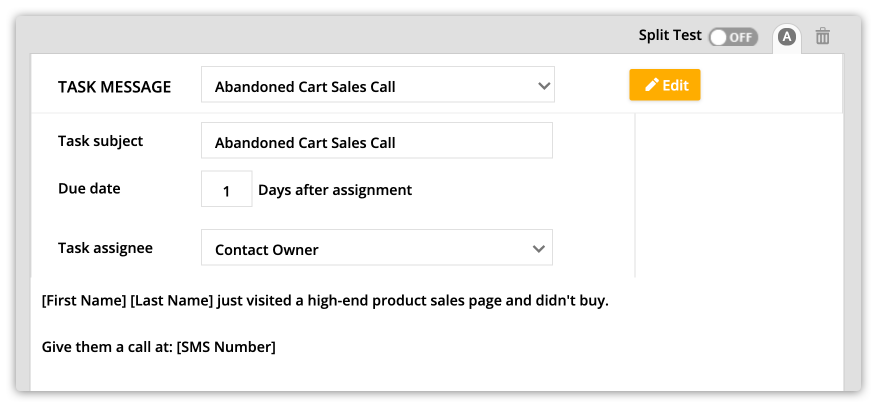
You can update your task’s due date and assignee from your task step. Click Edit to update your tasks subject, body and outcomes.
Add steps to sequences
- Click on the type of step you’d like to add from the “Add a Step” section at the top of your sequence editor.

- Customize your step’s settings.
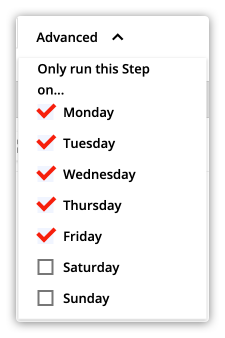
- (Optional) click Advanced and choose which days of the week you want your step to run.
- Click Close.
- Move your step into position.
- When you add a new step, it appears at the bottom of your sequence. To move your step, hover over, click and drag
.png) to the location you want.
to the location you want.
- When you add a new step, it appears at the bottom of your sequence. To move your step, hover over, click and drag
Delete steps from sequences
To delete any step, hover over it and click ![]() .
.
- Any contacts who were on that step before it fired will advance to the next step at the date you have selected.

Edit steps in sequences
- To edit any of the steps in your sequence, hover over the step and click Edit.
- When you’re done making changes, click Close.
Editing live sequences
Before you edit sequences that have active subscribers, be sure to pause your sequence.
- Select your sequence from the collection and click Pause.
- Add, delete or edit the steps in your sequence.
- Click Save and click the back button to return to your sequence collection.
- Select your sequence from the collection and click Resume.
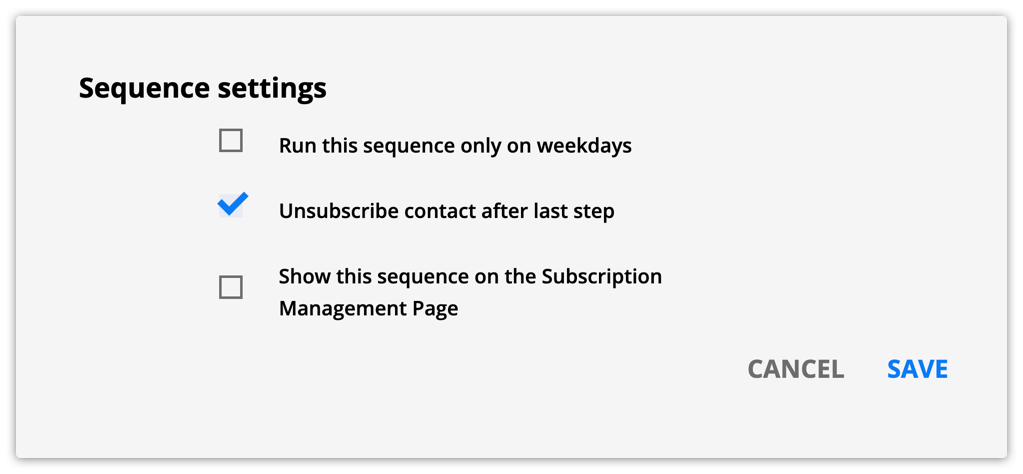
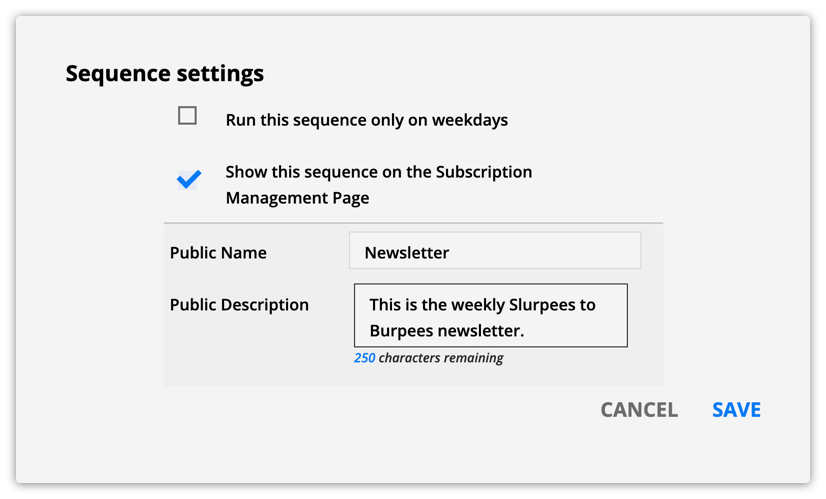
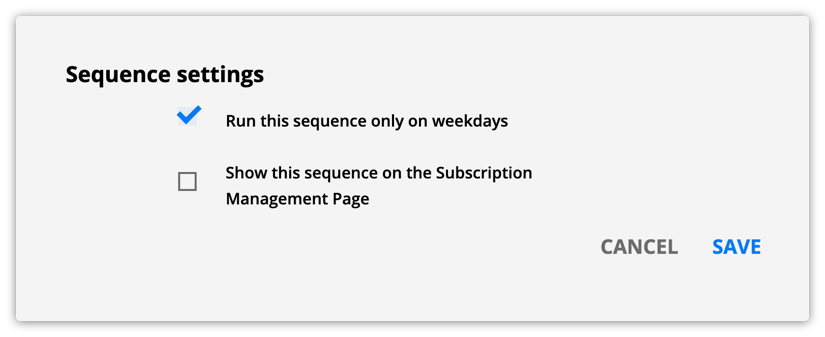
Sequence settings
Your sequence settings allow you to customize the way your sequence functions.
There are three sequence settings:
- Unsubscribe after last sequence step — only for step sequences
- Show this sequence on the subscription management page
- Run this sequence only on weekdays
Unsubscribe after last sequence step
This setting is only available on step sequences and if the related sequence setting is enabled.
By default, step sequences unsubscribe contacts when they complete the final step. If you’ve enabled the “Unsubscribe after last sequence step” setting, you’re overriding the default behavior. As a result you’ll see this setting on your step sequences.
- Go to → Administration → Sequences → toggle “Prevent unsubscribe after last sequence step” on.
Keeping contacts subscribed is helpful if you want to add steps to your automation. For example, if you want to keep a group of VIPs informed about important business updates as they happen.
Unsubscribing contacts is helpful if you have a sequence that manages appointment requests. Every time your contacts request a new appointment, they can be re-added to your sequence.
Show this sequence on the subscription management page
This allows you to add a public name and description for your sequence to appear on the subscription management page when your contacts click the unsubscribe link. This allows your contacts to unsubscribe from specific automation instead of unsubscribing from all of your marketing emails.
Run this sequence only on weekdays
If you want to ensure that you don’t send any emails over the weekend, you can check the “Run this sequence only on weekdays” setting.
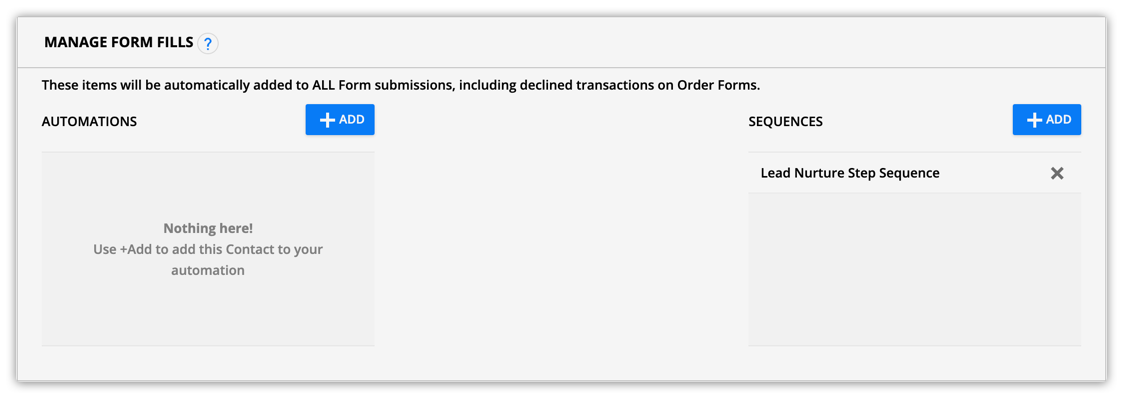
Adding contacts to sequences
You can add contacts to sequences both automatically and manually.
Automatically
• Sequences on form submissions
Set your form settings to automatically add anyone who fills out the form to any of the sequences in your account. This feature needs to be enabled before you can access it in your form settings.
- Go to → Administration → Sequences → toggle “Sequences on form submissions” on.
• Global rules
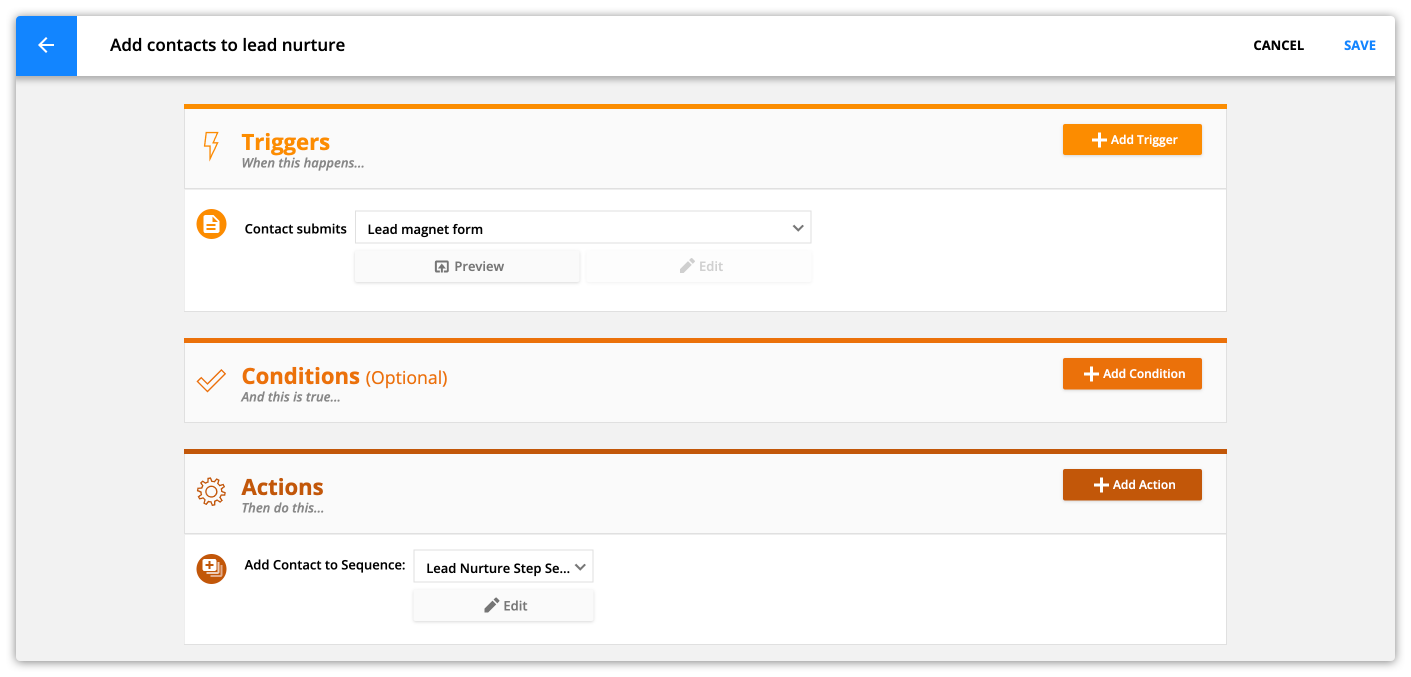
Automatically add contacts to your sequences based on all kinds of events or actions using global rules.
- You can also remove contacts from sequences using the “Remove contact from sequence” action.
Note, global rules need to be enabled from the advanced features tab.
• Using rule steps
Rule steps in sequences can add a contact to another sequence; you can add optional conditions to filter the contacts added.
- You can also remove contacts from sequences using the “Remove contact from sequence” action.
Manually
You can add and remove contacts to sequences manually using contact actions. Check out the “Perform actions on contacts” article for more information.
Rules
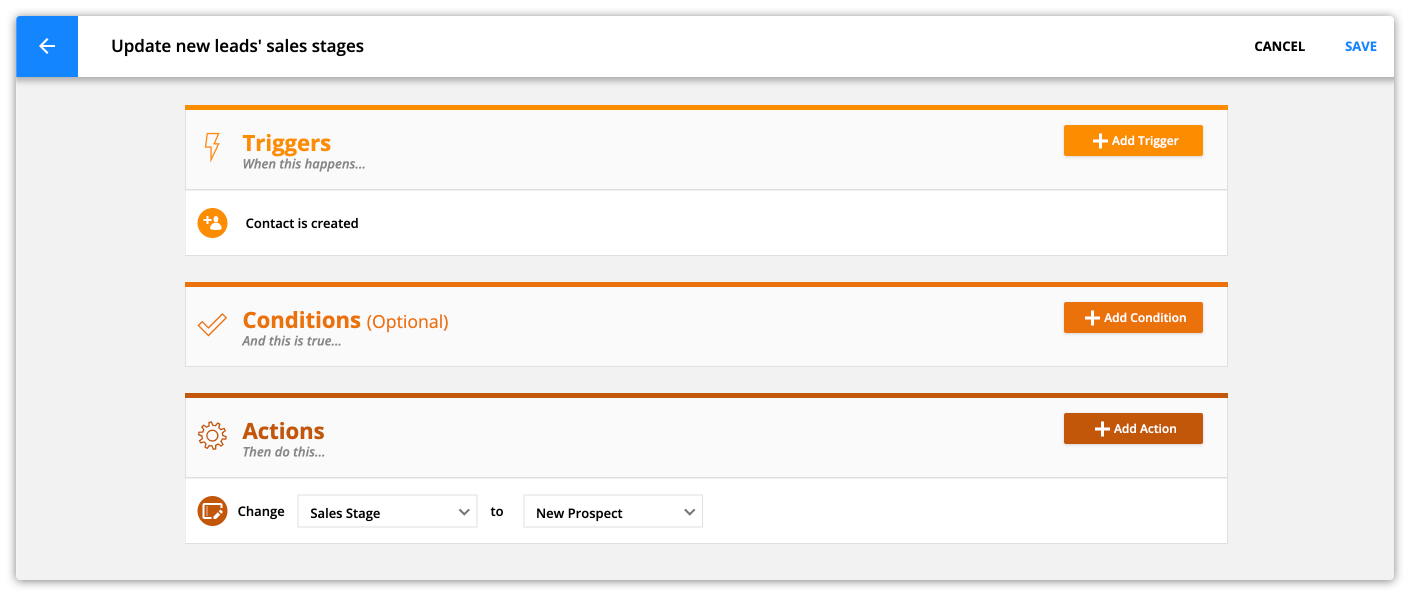
Global rules are simple automations that consist of a trigger, action and optional condition. For example, if you wanted to update the sales stage of every new contact in your account to “New Prospect,” you can create a rule that looks like this:
The triggers, conditions and actions on global rules work exactly like trigger elements in Ontraport’s visual automation builder.
Enable global rules
- Go to → Administration → Advanced Features → toggle “Global rules” on.
Create a new rule
- Hover over Contacts in your main navigation and click Rules.
- Or hover over any other object, such as Deals or Companies.
- Click New Rule.
- Name your rule in the top right corner.
- Add a condition (optional).
- Add a condition to your rule if you only want to take an action on a certain portion of the contacts subscribed to your sequence.
- Click Add Condition and pick the condition you want to use to filter your contacts.
- Add an action.
- Click Add Action and pick the action you want to take. Each action has its own settings.
- Click Save.