Add a chat widget to your website to instantly connect with visitors the moment they land on your pages. This widget gives your audience an immediate way to reach out, letting you answer questions and capture leads in real time instead of making them wait for an email response.
The widget routes every conversation directly into your Ontraport Inbox alongside Email and SMS. This centralized hub keeps a complete history of every customer interaction in one place, so your team never has to switch between different apps to manage conversations.
You can customize the widget to fit your workflow. Build automated chatbots to qualify leads and answer questions 24/7, or let your team handle live chats directly to provide hands-on support. By blending automation with live team coverage, you ensure your business stays responsive, captures traffic, and builds relationships around the clock.
Web Chat is available to all account levels with an Inbox plan.
Upgrade from Inbox Preview: If your account is currently on the "Inbox Preview" level, you will need to upgrade to a standard plan to create and turn on your chat channels.
Table of contents
Use Cases
User experience
Visitor experience
Create a web chat channel
• General tab
• Engagement tab
• Automation tab
• Installation tab
Customize global style
Web Chat automations
• Using Web Chat Automation Elements
• Triggers and goals
• Conditions
• Additional functionality
Visitor automations
• How visitor automations work
• The create conversation element
Use Cases
Here are some common ways to use Web Chat:
Build fully automated chatbots that operate around the clock by deploying specialized Chatbot form, Chatbot button, and Chatbot message elements directly into your automation flow. This allows you to seamlessly capture leads, answer common questions, and guide visitors to next steps, like scheduling appointments, without needing a live agent available.
Configure "Auto-greetings" to automatically trigger a message after a visitor has been browsing a page for a set amount of time, or deploy "Exit Intent" messages to grab their attention right as they show signs of leaving. This turns passive browsers into active conversations without waiting for them to make the first move.
Create page-specific chat experiences by setting a default channel for your broader site while overriding specific pages with a dedicated route. For example, direct general traffic to a "Support" channel while sending checkout visitors straight to your "Sales" channel, so your closers are handling purchase-ready conversations in real time.
Enable "Missed Chat" email notifications that automatically send identified contacts their recent chat history along with a direct link to re-enter the conversation. Whether they click the link or simply reply to the email, the thread routes seamlessly back to your Inbox so no lead falls through the cracks.
User experience
Back to top
Your day in Inbox starts the same way each time. Open Inbox and see emails, texts, and web chats in one place. Open the Filters menu. Select the Web Chat channel to focus on web chat. Filter to active chats to see who's online.
Your narrowed queue reveals plenty of information before you open any conversation. Each visitor's icon carries a colored dot. Green marks an open widget with focus on the chat. Orange means the visitor has the widget open in another tab. No dot marks an offline visitor. When chats aren't answers with your time limit, an alert appears at the top of the list. Click it, and the Inbox filters down to those chats.
Ready to jump in and help your team? Hover over a conversation and click "Assign to me." A toast confirms the assignment. Your picture appears on the conversation.
Opening the chat displays the Conversation Details panel on the right. It shows where the visitor started chatting and the page they're browsing. You'll know when the visitor is responding using the "typing…" indicator at the bottom of the thread. If the visitor goes offline mid-conversation, a banner appears and warns you. And your next reply goes out by email.
You can use emojis, paste images, attach files up to 50MB, and apply basic formatting. Plus, insert canned messages your team built for web chat.
If a visitor goes offline while you keep replying, inbox sends them via email. That email includes a secure link back into the live chat, active for 90 days. If they reply from that email, it lands back in your Inbox thread, and the conversation continues where it left off.
Visitor experience
Back to top
The visitor experience begins by clicking a launcher button on your website. It displays a simple icon or text, such as "Chat with us." An automated greeting appears after the visitor browses for a set time. If the visitor moves the cursor toward the edge of the page, as if to leave, an exit message appears and draws them back.
When the visitor clicks the launcher, the messenger opens and adapts to the device. A returning visitor sees a home screen with your logo, a "Chat with us" button that displays "We're online!" during business hours. And they'll see a list of past conversations. An unidentified visitor sees a welcome message when starting a new chat.
Once the conversation starts, the visitor can add emojis, pasted images, links, and file attachments. Depending on your Web Chat channel settings, visitors see either a specific agent photo and name (first name, last initial) or a generic name and logo. Back in the home view, any conversation with unread messages appears in bold text with a read dot.
Unidentified visitors chat with a bot that collects information for your team and to identify the visitor.
The chat experience follows the visitor, not the browser tab. So if they chat with you in one tab, they'll see updates in every open tab in real time. The moment a visitor shares an email, often through a chatbot form, they become a known contact. Their prior chat history merges into the new profile, so none of their conversations are lost when they become a contact.
If the visitor leaves the website before an agent responds, the system sends a "Missed chat" email. This contains the recent conversation history and a link to pick up where they left off. Replying to that email continues the conversation from their inbox.
Create a web chat channel
Back to top
Setting up a web chat channel allows you to connect with website visitors in real time, capture leads, and automate your after-hours support. The setup is divided into four sections:
- General tab for core settings and identity
- Engagement tab for greetings
- Automation tab for chatbot flows
- Installation tab to put the widget on your site
Note: If you cancel your Ontraport Inbox plan, all Web Chat channels and their associated conversation histories are immediately and permanently deleted. This data cannot be recovered. Ensure all critical conversation data is exported or logged before modifying your plan status. |
General tab
Back to top
The General tab lets you configure your web chat's core behavior, identity, and appearance. Inside, you can manage basic setup like channel activation and inbox routing, set business hours and unanswered message alerts, and customize how your agents and chatbots appear to visitors. You can also use the style shortcut to quickly update the look of your chat widget.
General settings
- Navigate to Inbox → Settings → Channels and select Web chat.
- Name your channel.
- Enable web chat: Toggle this setting on when you want the channel to go live.
- Once enabled, the web chat window will be available everywhere it’s installed.
- Route new conversations to: Select a routing inbox. Connecting this channel to a specific inbox automatically directs your incoming messages there, keeping your team organized.
- We recommend using unique inboxes for distinct workflows, like Customer Requests or New Leads.
- Business hours: Set your business hours.
- Combining your hours with automation lets you instantly reply to customers who message you after hours. Just add a chatbot message to your web chat or visitor automation, using the condition "Now is before or after business hours."
- Launcher visibility: Choose if the launcher should always be visible or hidden until activated.
- Unanswered chat notice: Choose the amount of time you’d like a message to wait before your team is altered that there is a message that has not been replied to.
Chat identity
- Display usernames: Toggle this setting on to display the first name and last initial of the user responding to chat messages. This comes from the first and last name fields in each user's profile. Disable if you'd prefer to always show the same user name no matter who is chatting.
- Chatbot name: Add the name you want visitors to see when they view messages from your chatbot (automated web chat messages).
- Chatbot image: Upload an image that you want your visitors to see when they receive messages from your chatbot.
Style
This section is a short cut to the Web Chat global styling settings.
Engagement tab
Back to top
The Engagement tab is where you set up proactive messages to greet people when they land on your site. Inside, you can enable a one-time welcome message for new conversations or configure timed automatic greetings tailored to different types of visitors, including unidentified guests, known contacts, and logged-in members.
Welcome message (new chats)
- Welcome message: Toggle on this setting to add a message that displays automatically the first time a visitor starts a new conversation on this channel. When using this with automatic greetings, this will not display if the visitor has seen the automatic greeting.
Automatic greeting (launcher)
When toggled on, all of the settings in this section include a rich text field for you to add your message and a “seconds until displayed” which determines the amount of time to wait between visitors arriving on your page and displaying the message.
- Greet unidentified visitors: Enable this setting to show an automatic message to your unidentified visitors after a set amount of time.
- Greet identified contacts: Enable this setting to show an automatic message to your identified contacts after a set amount of time.
- Greet logged-in members: Enable this setting to show an automatic message to your logged-in members after a set amount of time.
Automation tab
Back to top
The automation tab is where you can view and edit the Visitor automation.
Unidentified visitors are not yet contacts, so the goal of the visitor automation is to allow visitors to get information from your chatbot messages and buttons, and to collect contact information from visitors in order to create a contact record for them so that they can chat with your team or get added to full web chat automations.
Each channel comes with a default automation, but you have full control to change it. Click Edit to open the map and make any changes you’d like. Learn more about the default visitor automation here.
Installation tab
Back to top
The installation tab includes instructions for you to install webchat on your:
- Ontraport site
- Ontraport pages and templates
- Custom website
- WordPress site
Save your settings to create your new Web chat channel or make updates to it.
Customize global style
Back to top
The global style lets you customize the appearance of your chat widget so it completely matches your brand's look and feel.
Keep in mind that you are only allowed to have one global web chat visual style per account, meaning these settings will apply uniformly across all your sites and pages.
As you tweak the settings on the left, look at the right side of the screen. You will see an interactive, live example of the launcher and web chat messenger that updates in real-time as you make changes.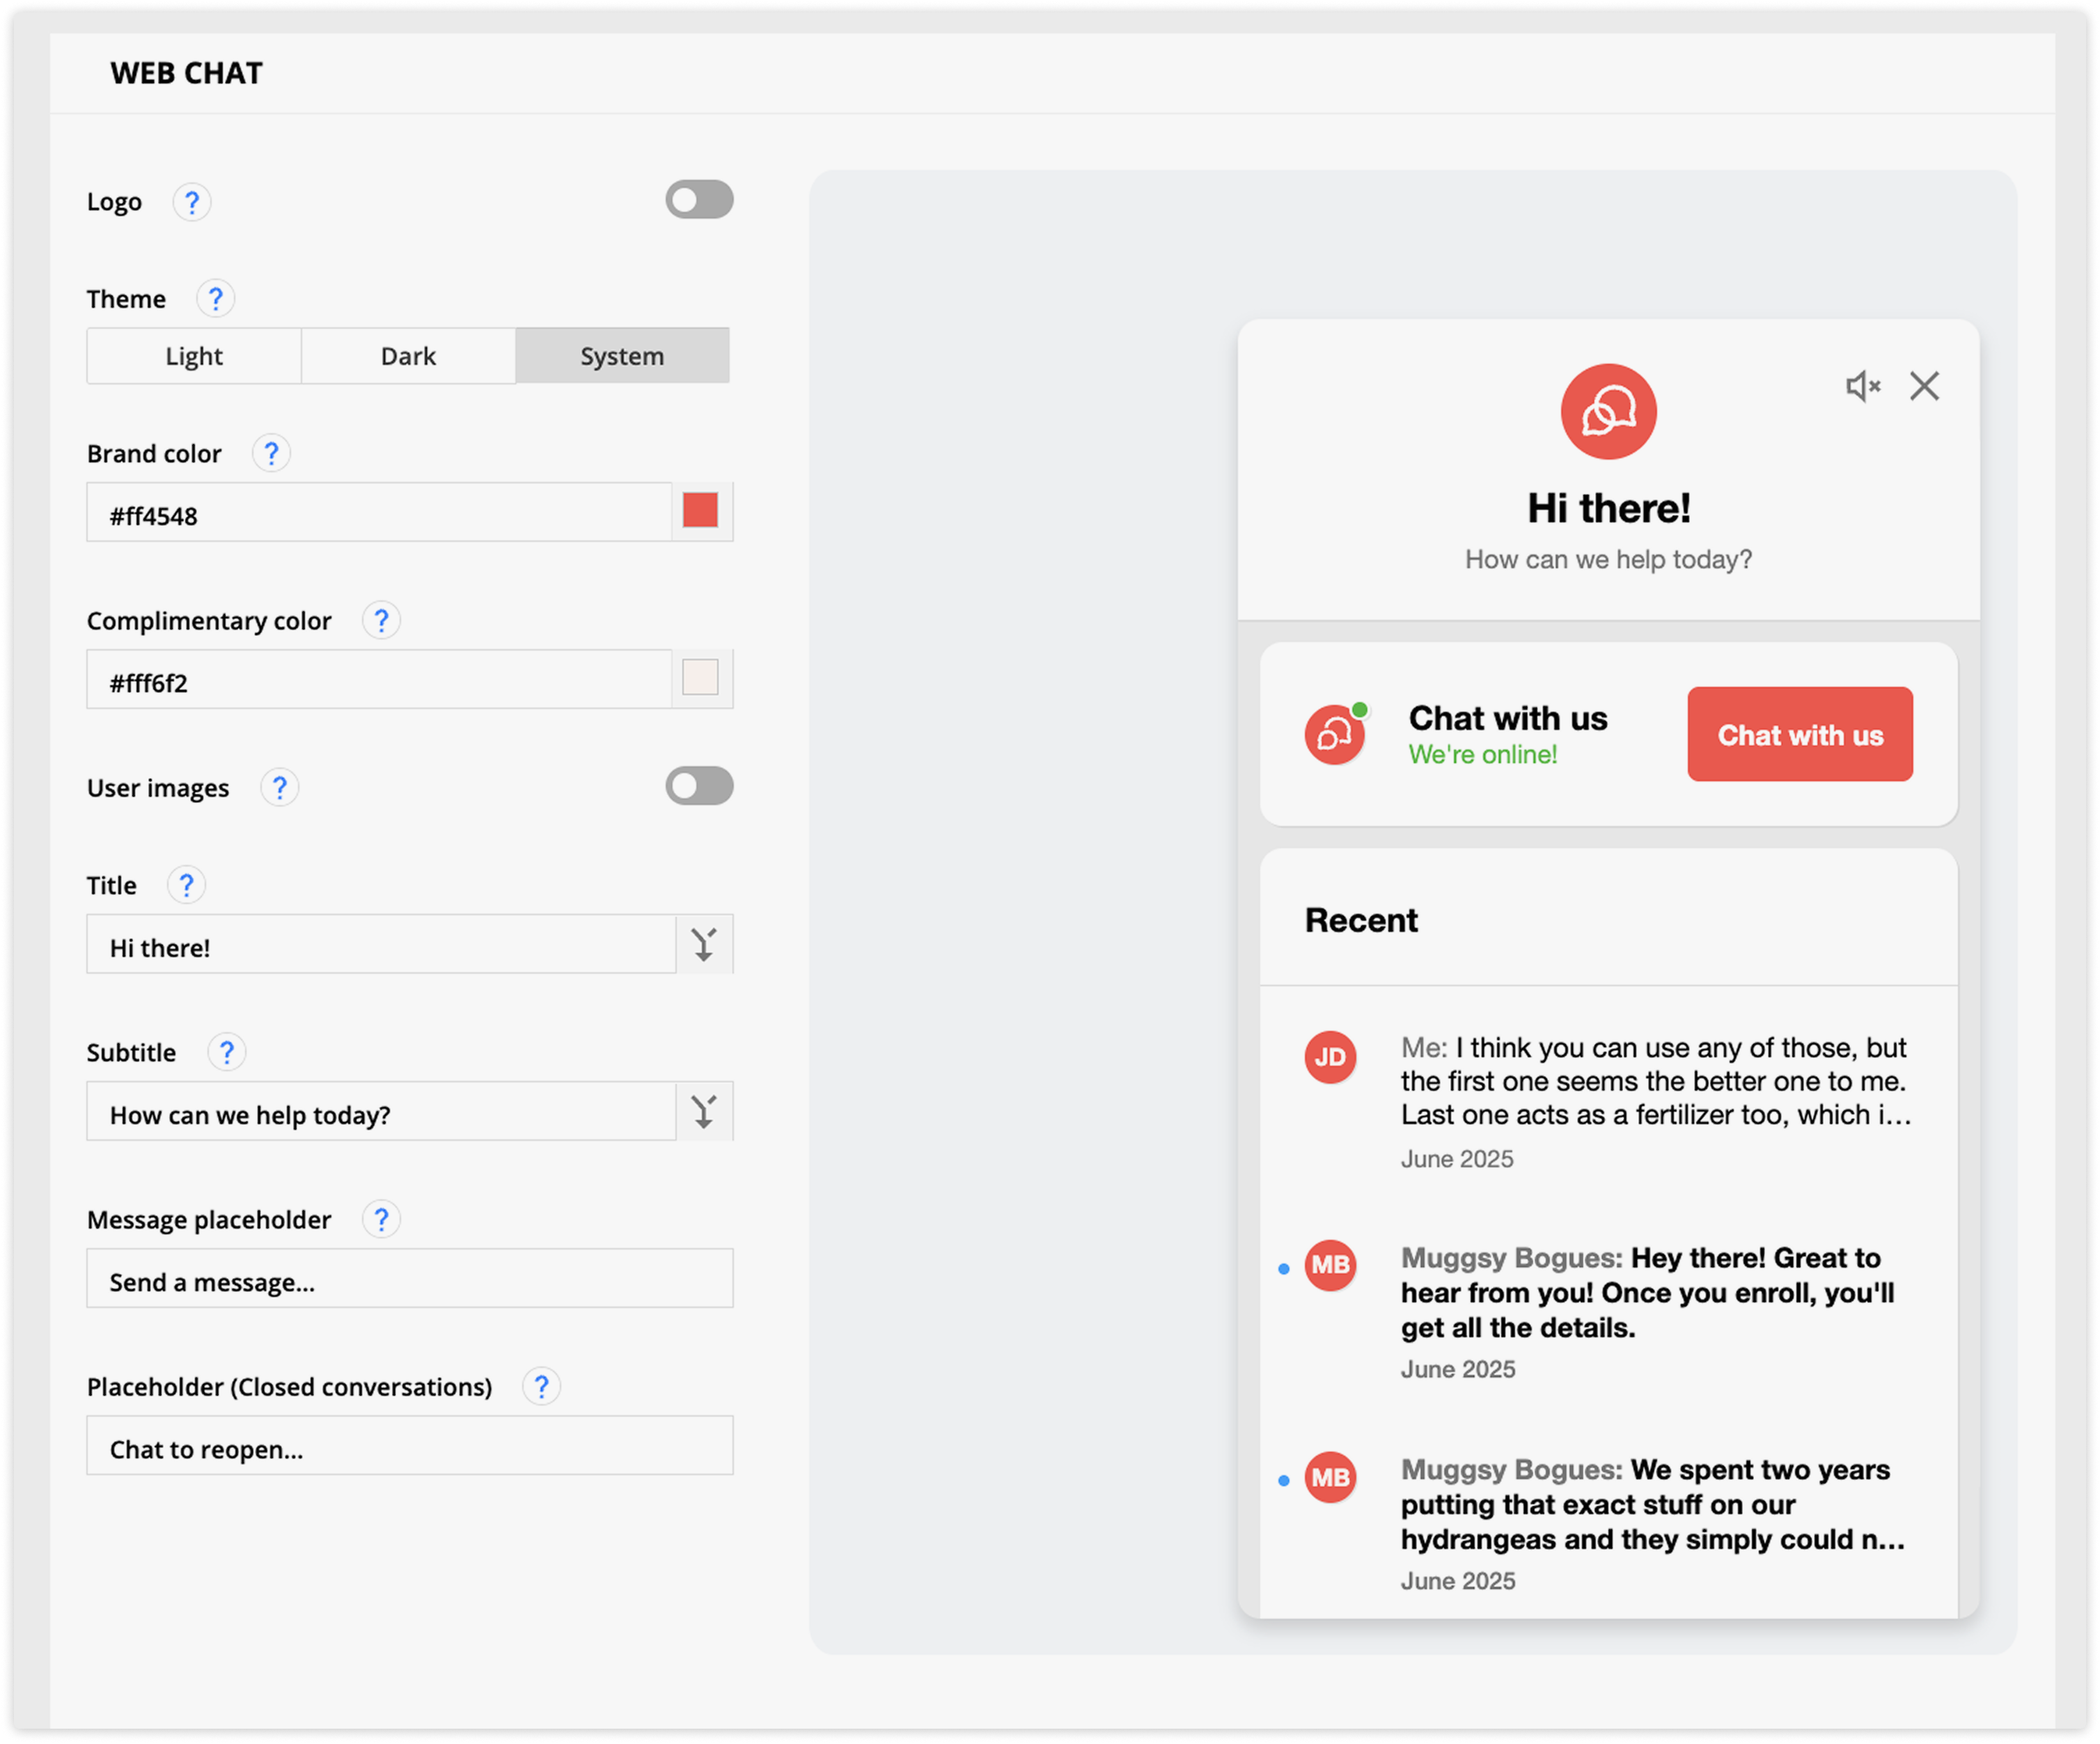
- Go to Inbox → Settings → Web chat style.
- In the Launcher settings customize how the chat button appears on your page:
- Button style: Choose whether the launcher displays an "Icon only" or "Icon & text" (e.g., "Ask a question").
- Position: Select whether the widget sits on the bottom left or bottom right of the screen.
- Background color: Pick a color for the launcher button.
- In the Web chat section you can establish your brand’s core visual identify inside the messenger:
- Logo: Toggle this setting on to add your company logo. This will display at the top of the chat window and acts as the default chat image for your team if individual user names/images are hidden.
- Theme: Choose between a Light, Dark, or let the system automatically detect and match the user's system preferences.
- Brand colors: Select your primary brand color used for the background of buttons and icons.
- Complimentary color: Select your complimentary color for text on buttons and icons.
- User images: Toggle this setting on to add avatars for your team. When you toggle it on you’ll choose the user image field you want to use.
- Title: This text appears at the very top of the web chat home page.
- If you use merge fields in your chat titles or subtitles, set up default merge fields so visitors never see blank spaces before you collect their information.
- Subtitle: This text appears below your title on the web chat home page.
- Message placeholder: Add placeholder text that visitors see when typing messages in web chat.
- Placeholder (Closed conversations): Add placeholder text visitors will see when typing messages in the thread of a closed conversation in web chat.
- Click Save when you are happy with your design.
- Your customized style will go live immediately for any new visitors. Anyone currently chatting on your site will see the updated style the next time they refresh or change pages.
Web Chat automations
Back to top
Web chat automations work like your standard automations, but they're loaded with specialized elements, triggers, and conditions built specifically for chat interfaces. Unlike visitor automations, which handle unidentified website traffic, web chat automations are designed for known, identified contacts so you can deliver personalized, automated follow-up the moment they open the chat.
To access them, navigate to Inbox → Web chat automations.
Using Web Chat Automation Elements
Back to top
When building a web chat automation, your Element Selector includes new tools under the Actions and Popular tabs.
Note that the Create conversation element is reserved for visitor automations and is not available here.
Chatbot messages: Sends automated text directly into the chat widget. Use the rich text editor to add bolding, italics, or links, and insert merge fields to personalize messages with the contact's data.
Chatbot forms: Embeds a form directly inside the chat window so contacts can submit information without leaving the messenger. Select a form from the dropdown menu. Web Chat forms are stored in their own collection.
Chatbot buttons: Add buttons to chat to narrow choices and direct visitors to the next step.
Customize Chatbot messages
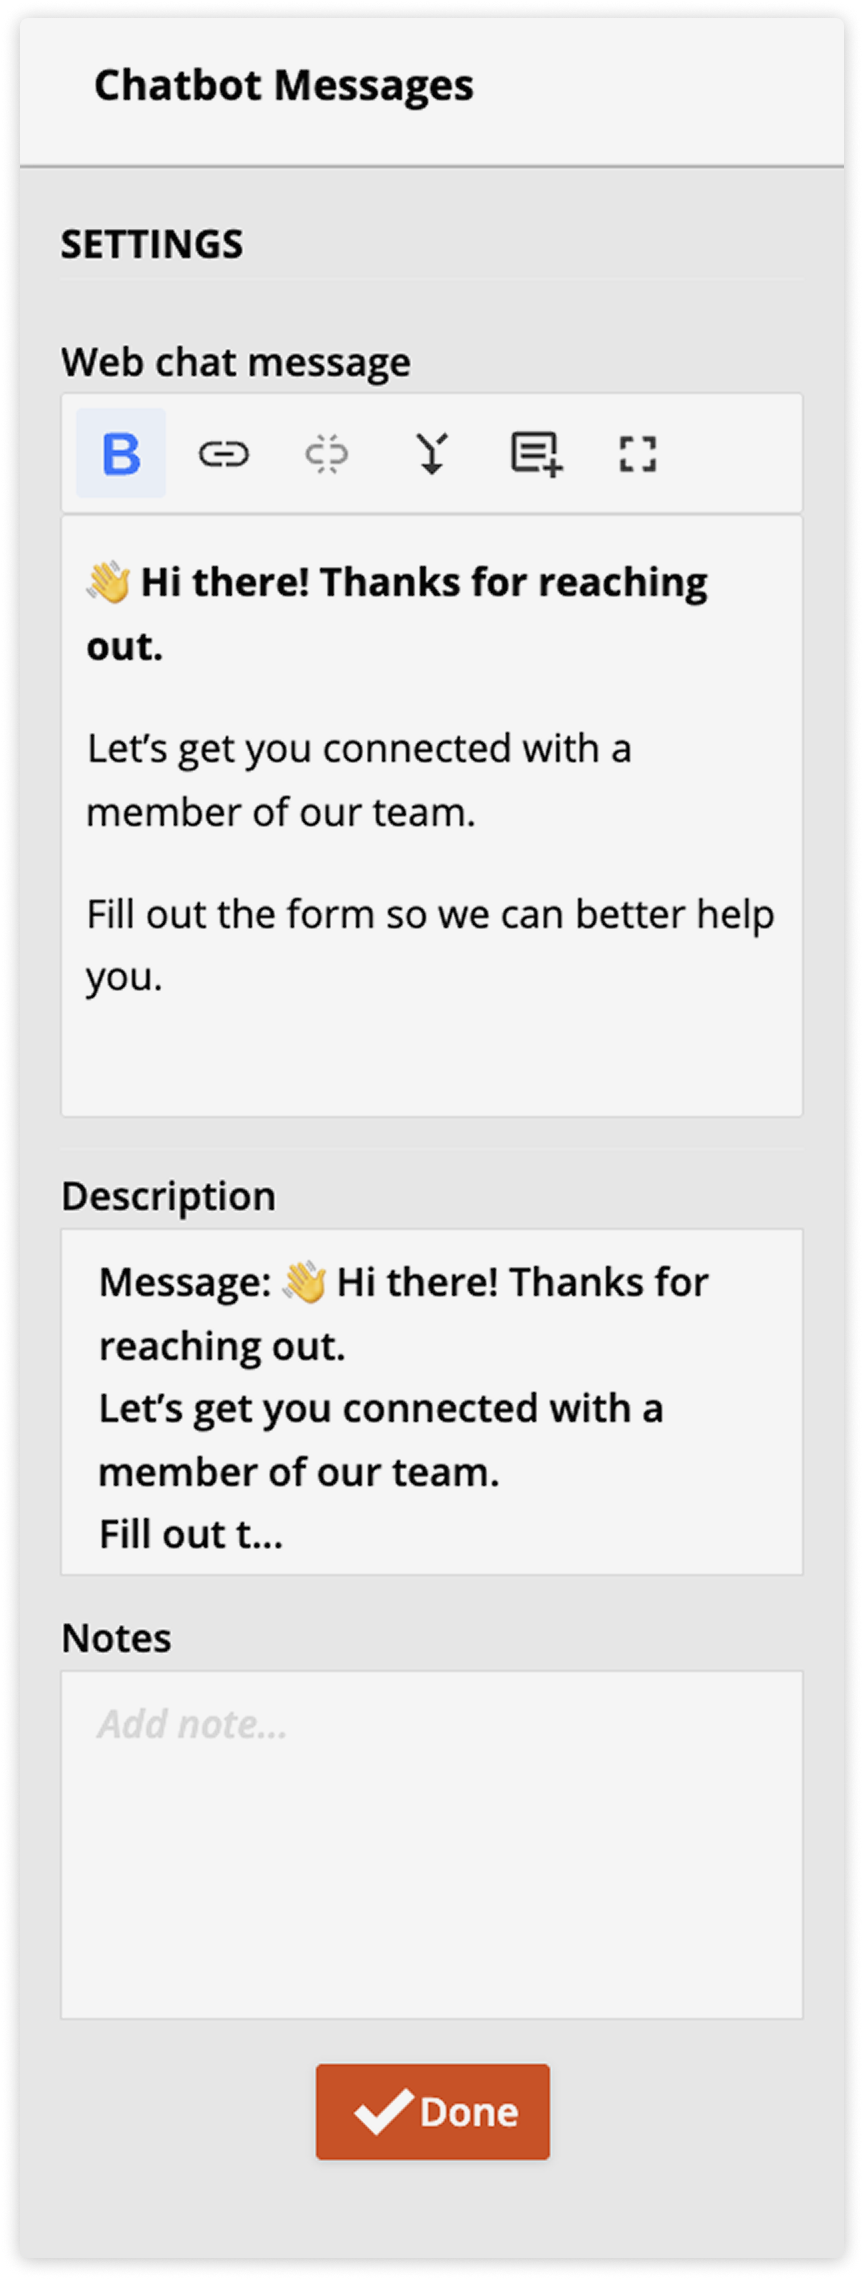
Chatbot messages are automated messages sent by your Web Chat and Visitor automations.
The Chatbot message editor is simple. You’ll click on the element to open its settings to add your message in the wysiwyg editor. You have access to simple formatting such as bolding, hyperlinking, adding merge fields, insert canned messages.
Create a Web Chat form
Web Chat forms are crucial for creating contacts for your unidentified visitors in visitor automations, but they are also a helpful way to collect information from your contacts before sending them to your live channels. For example, collecting information about a support issue before sending a chat to the team.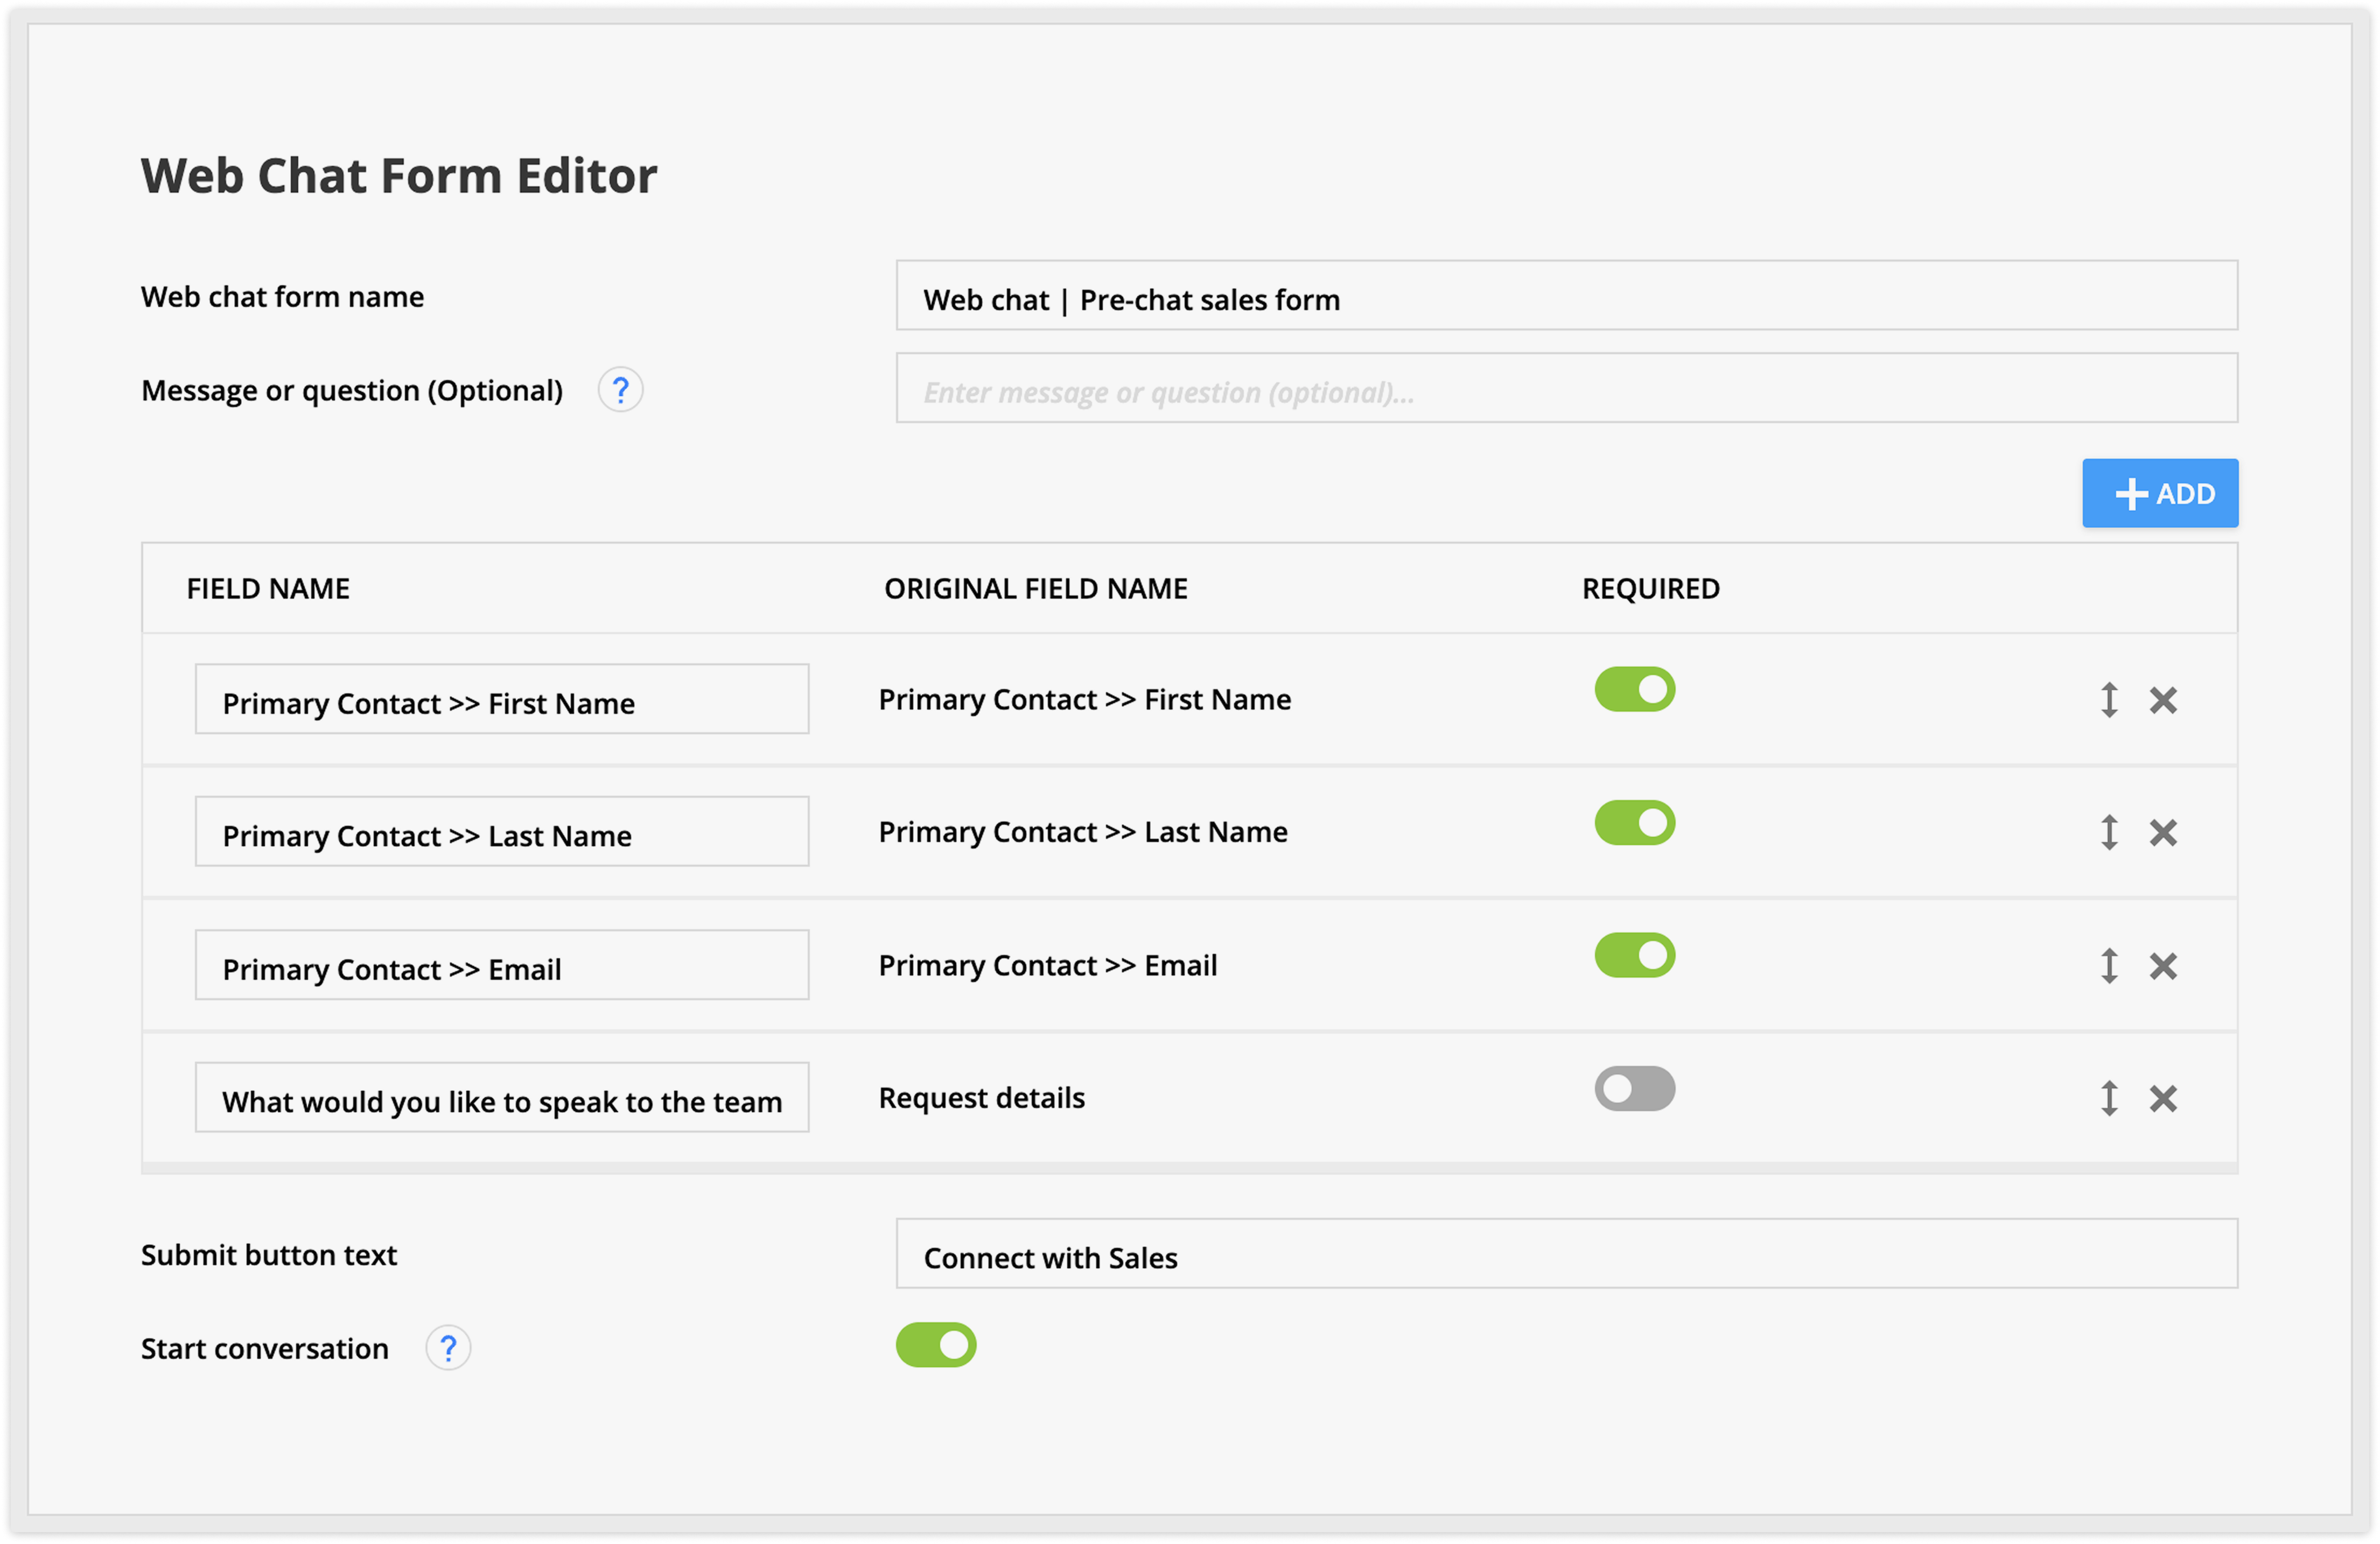
- Go to Inbox → Settings → Web Chat forms.
- Click New Web Chat form.
- Customize the form settings:
- Web chat form name: Add your form’s name
- Message or question (Optional): Add a message or question that appears above your form.
- Fields: Click Add to add new fields to the form. Toggle the required setting to make fields required to submit the form. Click and drag fields to reorder them.
- Change the field name on the form to customize the field’s label.
- Submit button text: Customize your button’s call to action
- Start conversation: Toggle this setting on if you want to create a conversation automatically.
- Click Save in the top right corner.
When you add a Web Chat form to an automation map, then a goal set for the visitor submitting the form is automatically added. Add the automation element that you want to follow the form submission under the goal.
Using Chatbot buttons
Chatbot buttons allow visitors to choose from a set of choices to direct the conversation. These clickable options help guide visitors through a decision. You can automate different actions depending on what your visitor clicks, for example routing the conversation to the sales team vs the support team.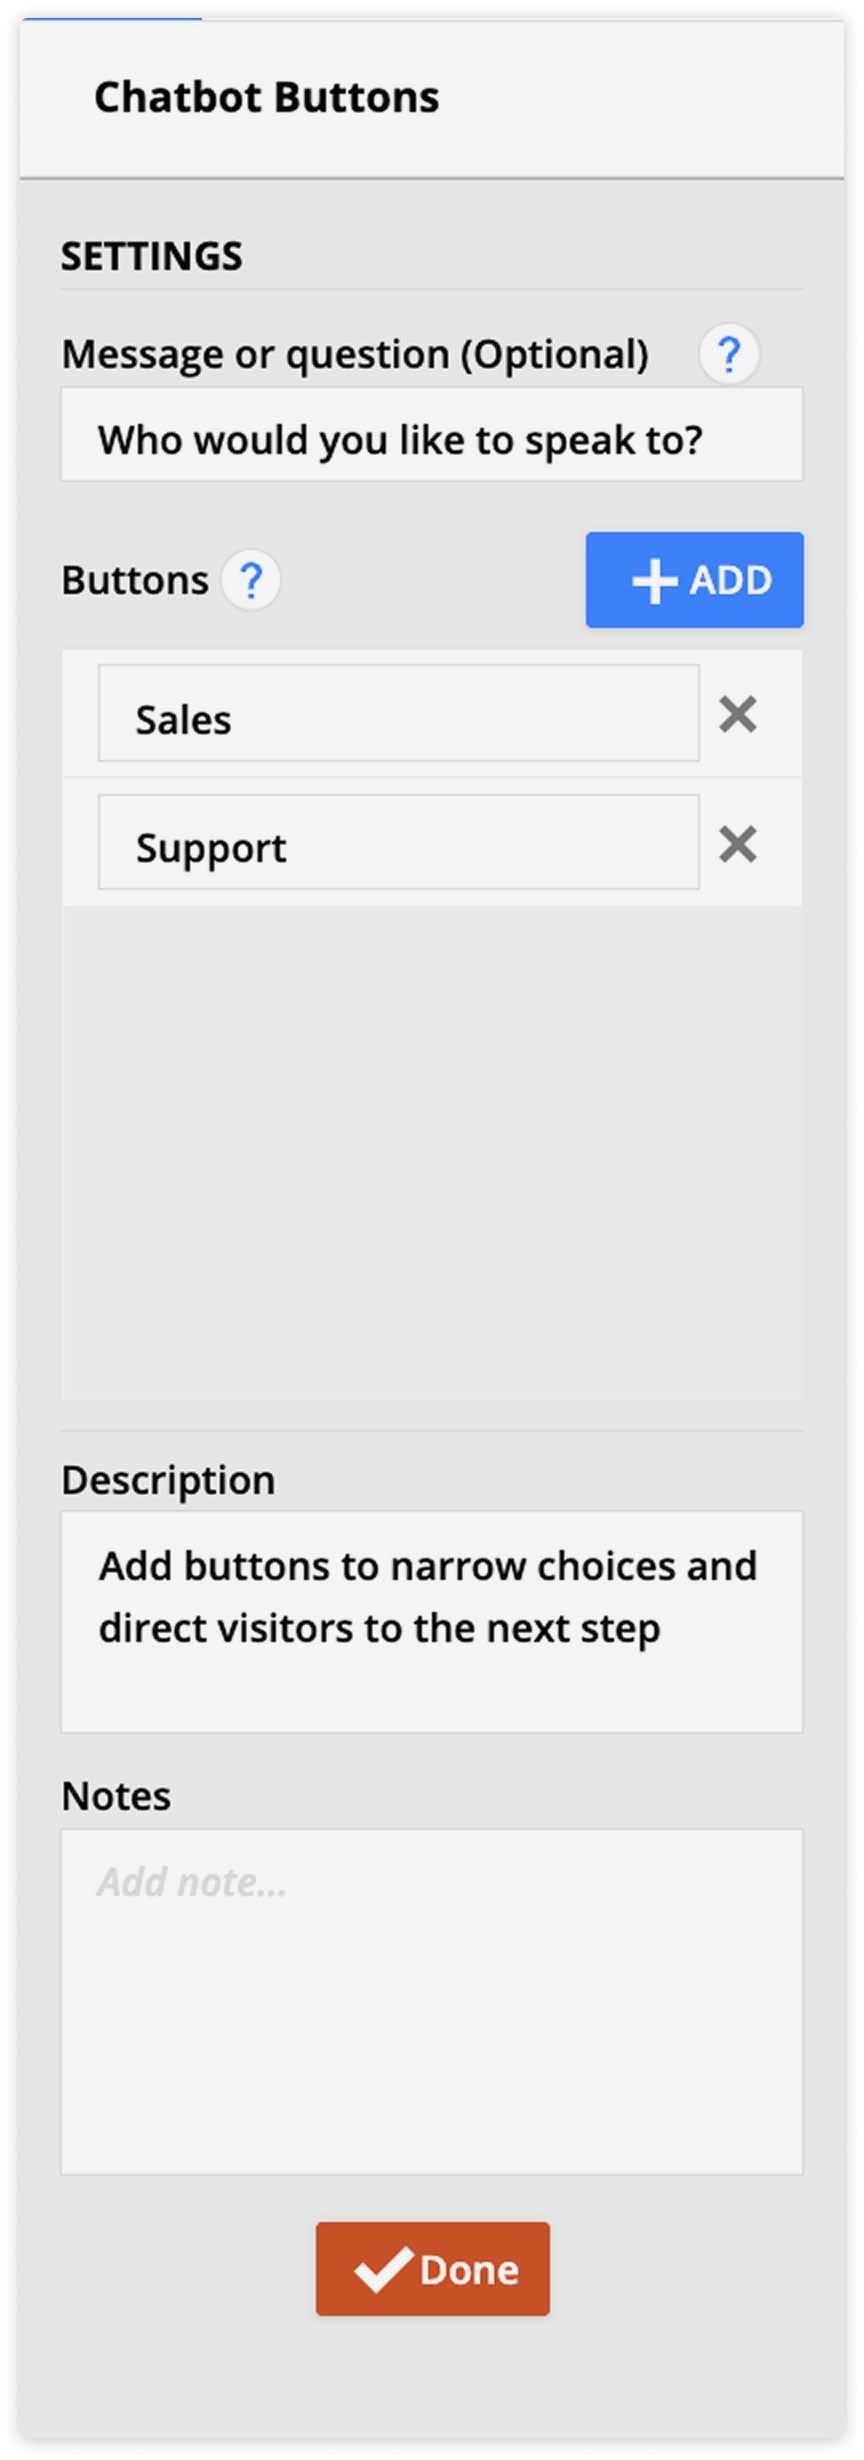
- Add an optional button prompt to add text above your buttons.
- Click Add then add the text for your button.
- Repeat step 2 for every option to add.
When you add Chatbot buttons to an automation map, then a goal appears for each button you add to the element. Add the automation element you want to follow.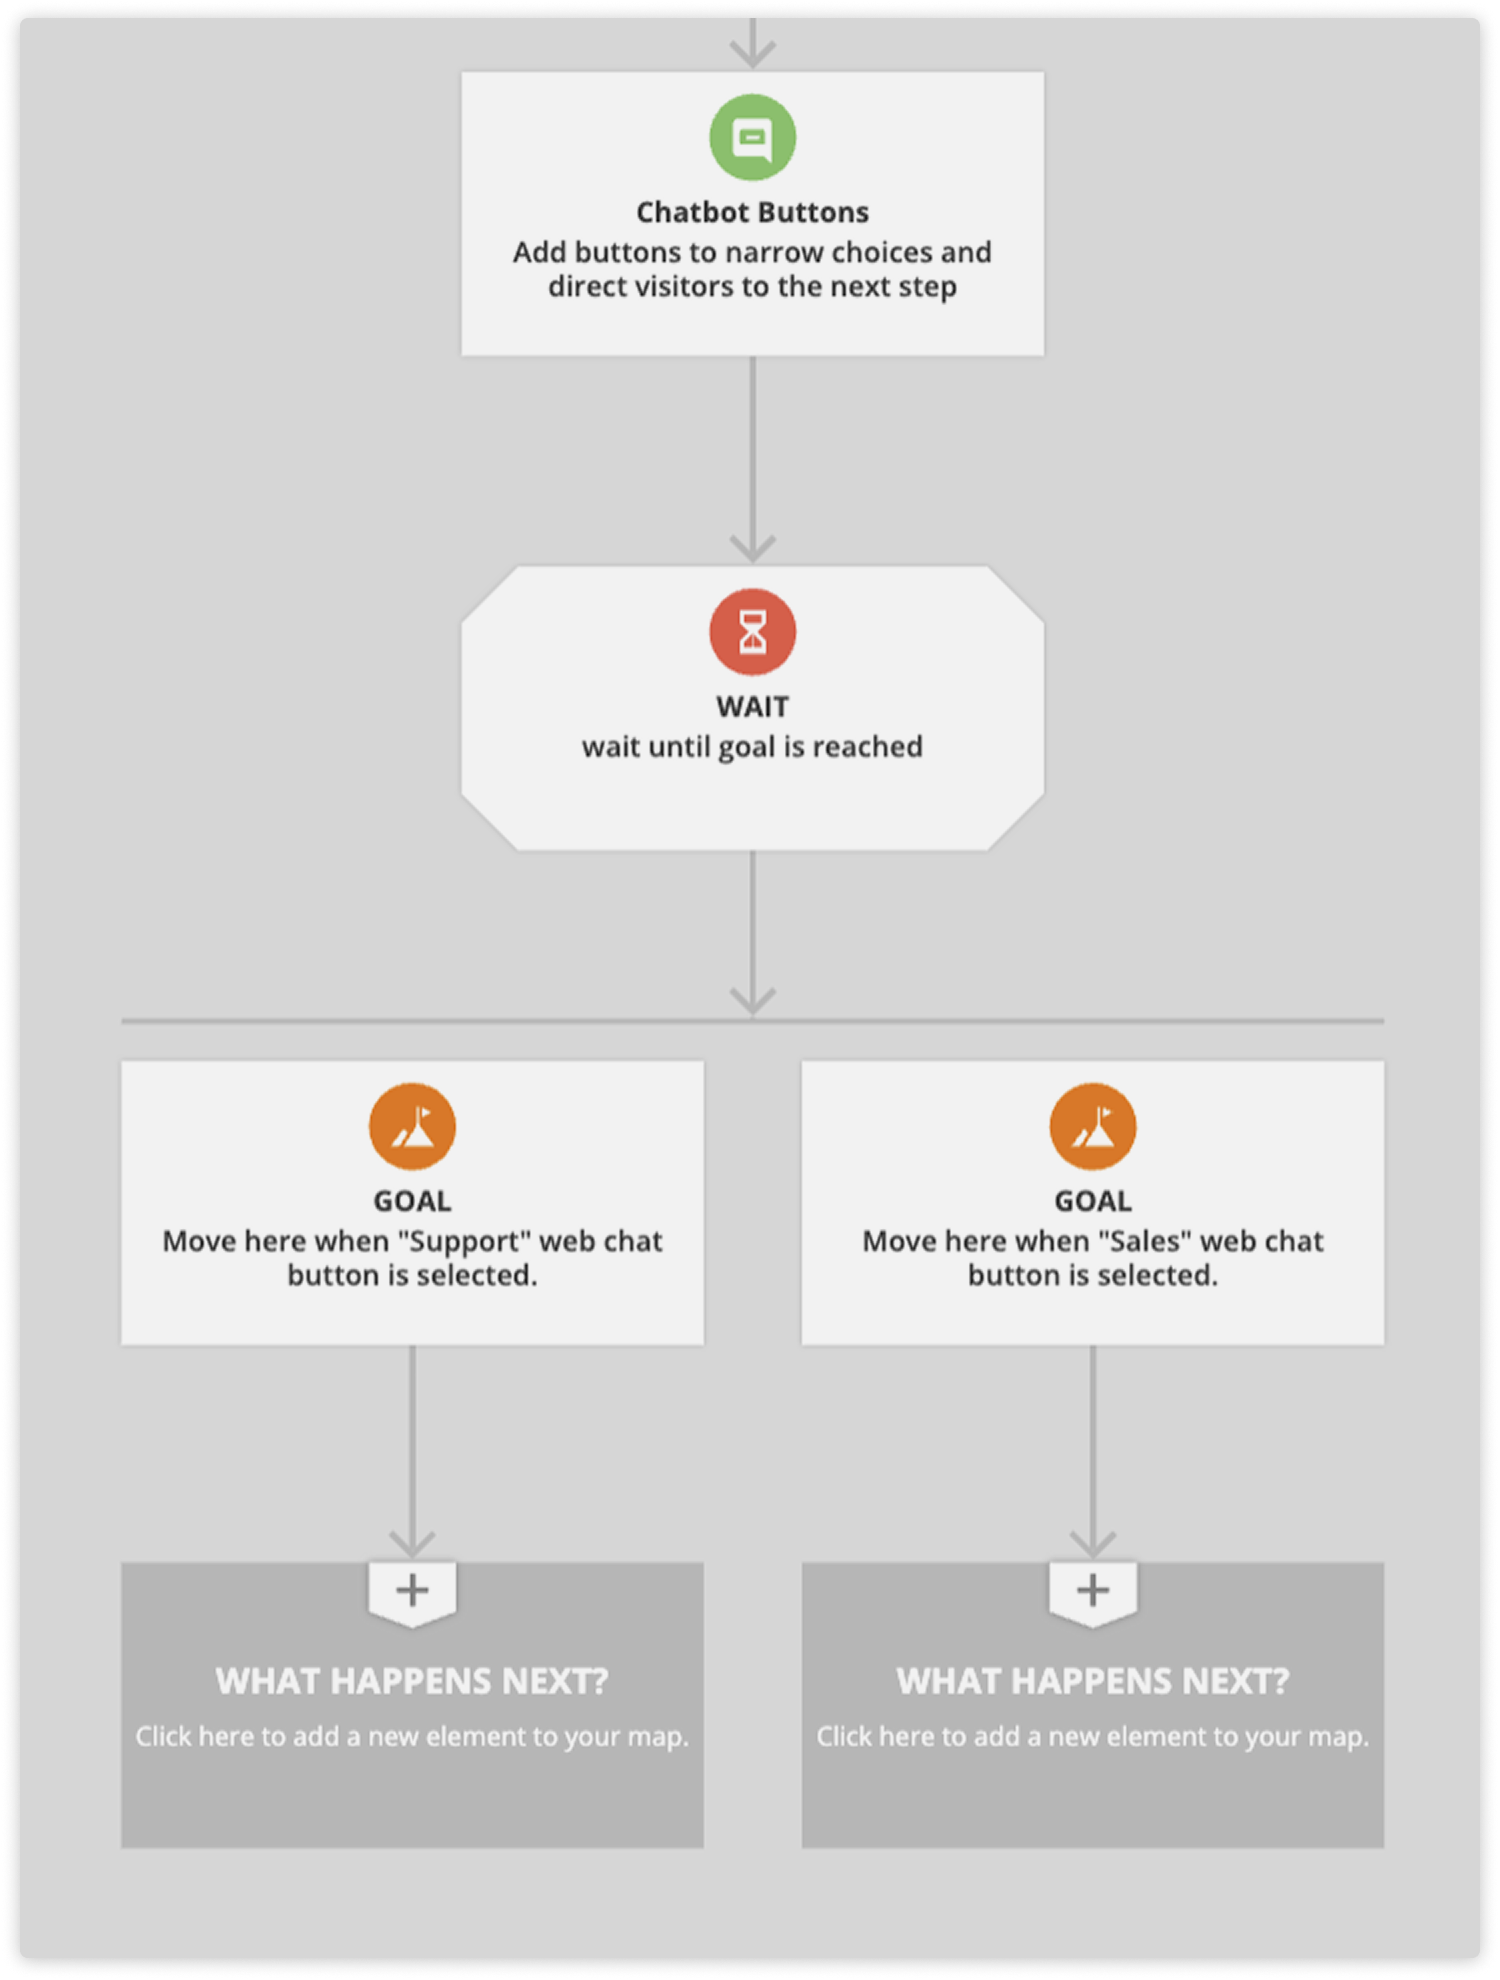
Triggers and goals
Back to top
There are special Web Chat triggered and goals that allow you to manage your chat conversations.
- Web chat becomes active / inactive: Fires based on whether the contact currently has the chat widget open and focused, or has closed it.
- Web chat form is submitted: Fires immediately when a contact submits a specific web chat form (or any form).
- Conversation message is received: Used automatically by the system to achieve a goal when a contact clicks a specific Chatbot button.
Conditions
Back to top
Build conditional Yes/No splits using chat-specific rules in condition elements, trigger conditions, or goal conditions:
- Web chat visitor is / is not a contact: Checks whether the person chatting is an identified contact or an unknown visitor.
- Web chat site is / isn't: Checks if the chat is originating from a specific Ontraport Site.
- Web chat page is / isn't: Checks if the chat is coming from a specific Ontraport Page.
- Web chat page template is / isn't: Checks if the chat originates from a specific page template.
- Web chat URL contains / does not contain: Checks if the contact's URL contains specific text. This is useful for targeting custom domains or WordPress sites.
- Time since last inbound message: Evaluates how long it's been since the contact last sent a message.
- Time on web chat: Evaluates how long the contact has been active in the chat.
- Web chat visitor or contact is / is not active: Checks if the contact currently has the messenger open and focused.
Additional functionality
Back to top
Default trigger: You can add a contact to a web chat automation directly from the Conversation Details widget on the right side of your Inbox while chatting with them. This is useful for manually dropping a contact into a post-chat survey or a standardized closing sequence.
Channel business hours and automation: Define your team's availability in your channel settings. Once your hours are set, you can handle after-hours traffic automatically by adding a condition to your visitor or web chat automation that checks “Now is during business hours.”
This allows you to set up messages and other automation for visitors who message you outside of your set hours. Use the condition “Now is during channel’s business hours” to create automation for when your team is not online.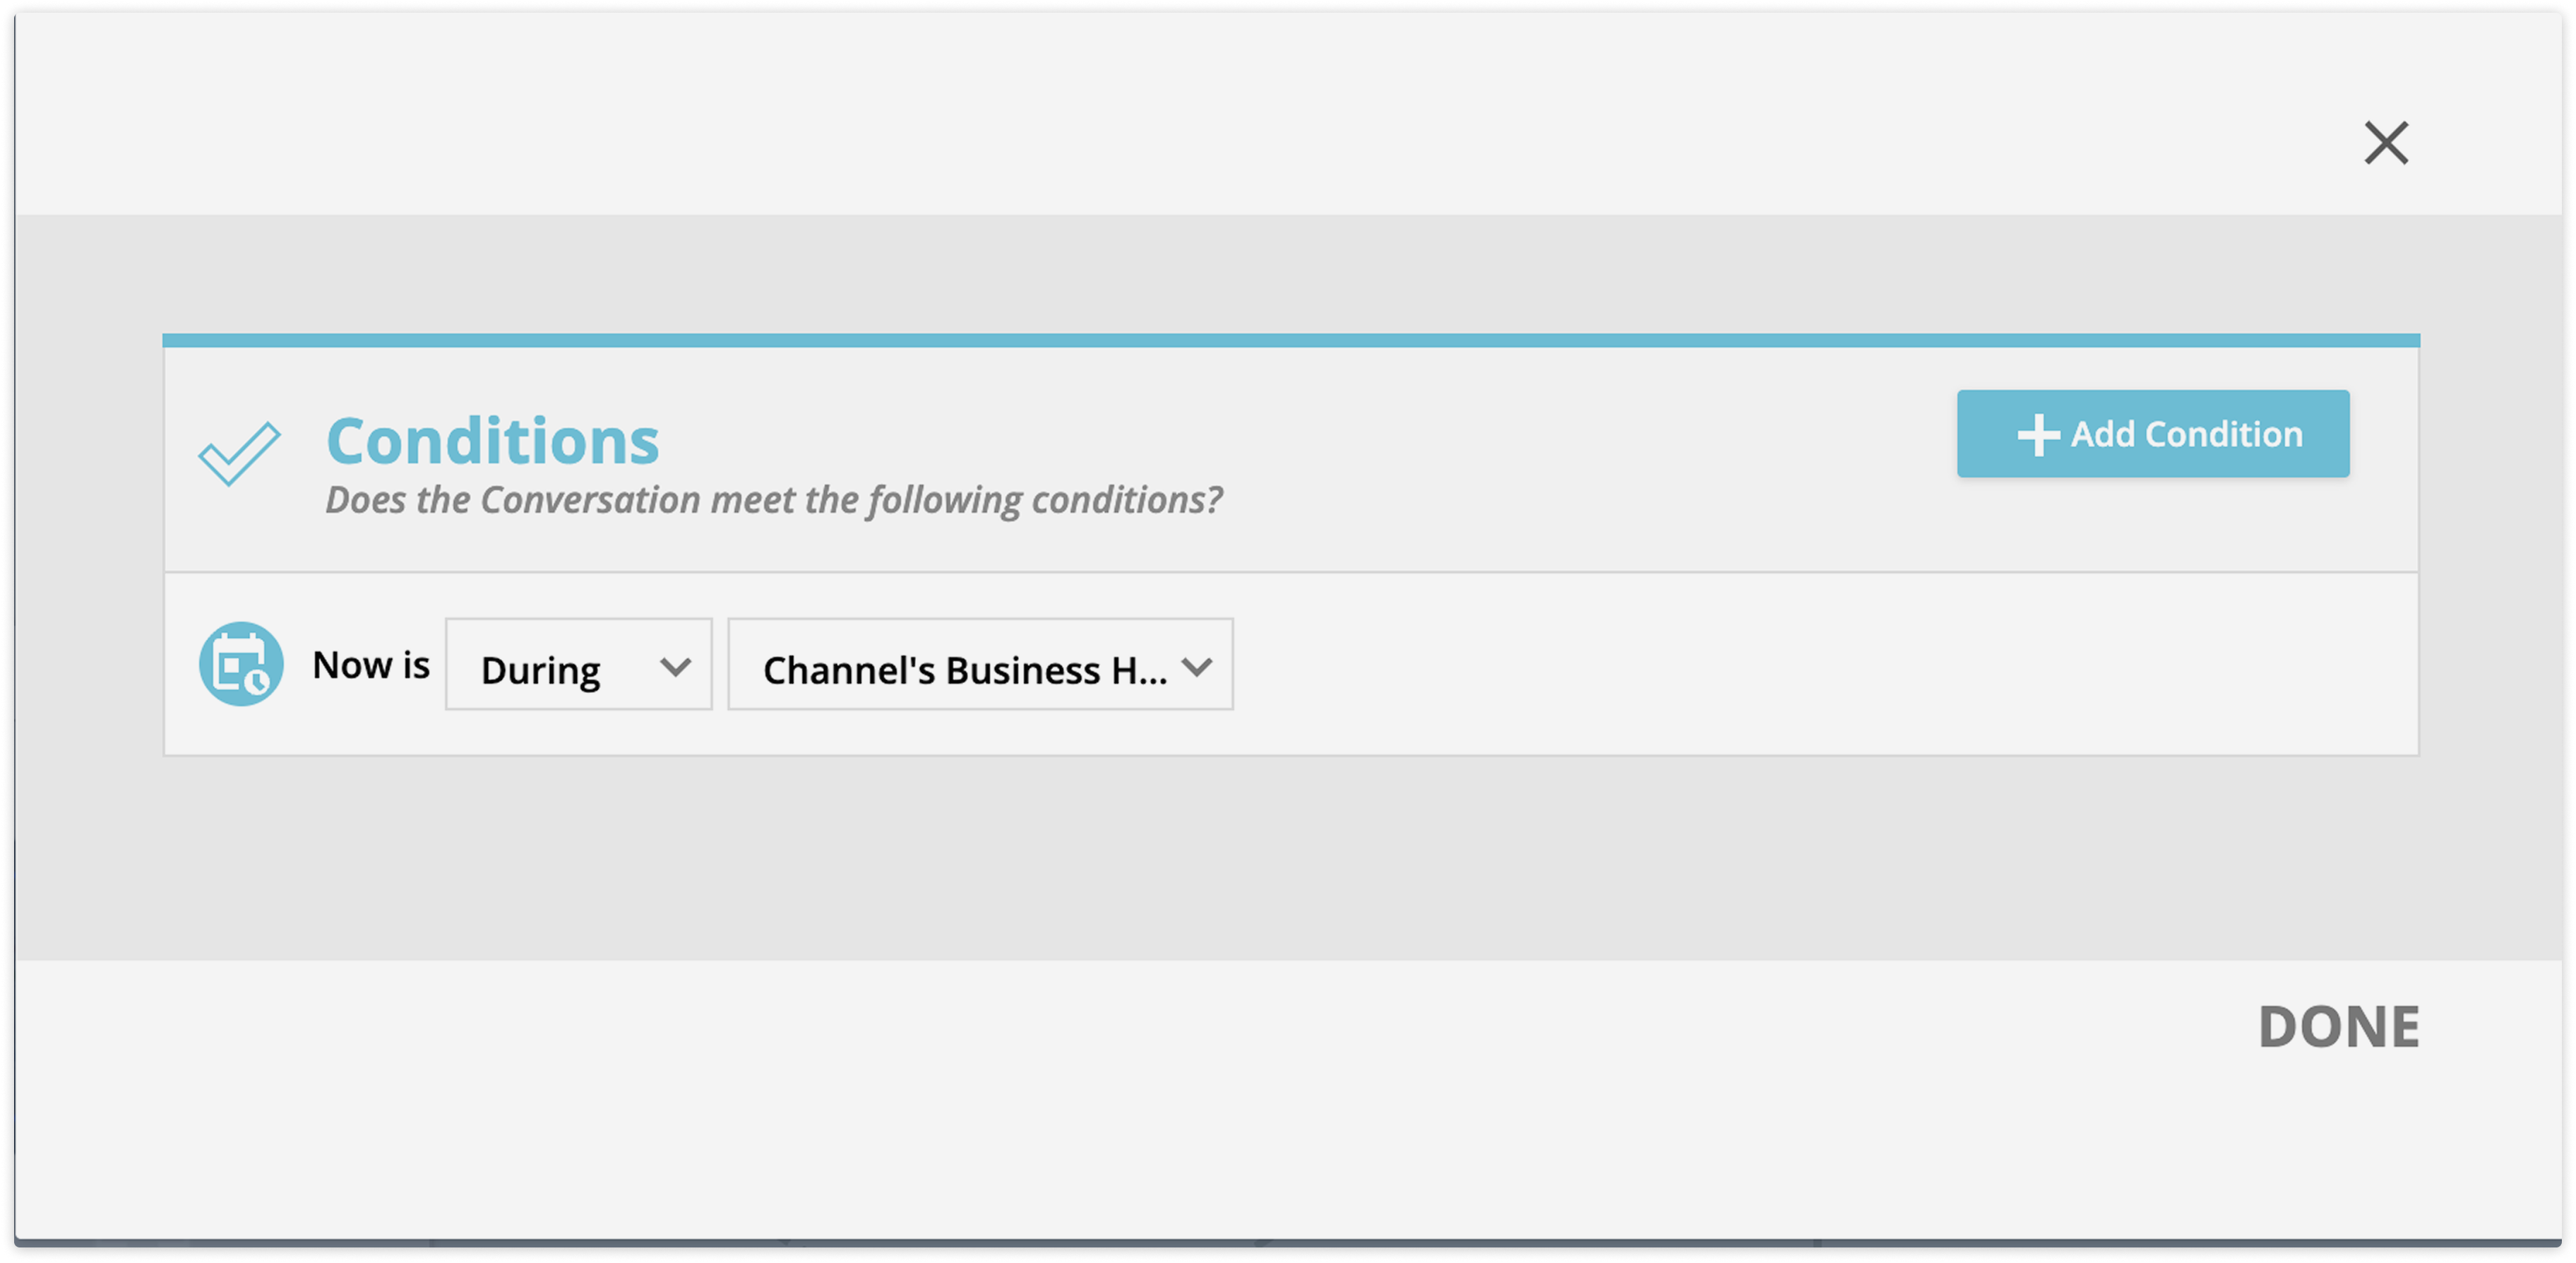
Visitor automations
Back to top
Visitor automations are specialized automation maps tied directly to a specific web chat channel. They're built exclusively to handle unidentified website traffic, so they're entirely stripped of contact-specific settings.
The primary goal of visitor automation is to deliver automated Q&A experiences, using chatbot messages, buttons, and forms, so visitors can find answers on their own, and to ultimately prompt them to share their information and convert into known contacts.
To edit a visitor automation, navigate to Inbox → Settings → Channels, select your channel, and click Edit under the Automation tab. Note that visitor automations are not accessible from your main automations collection.
How visitor automations work
Back to top
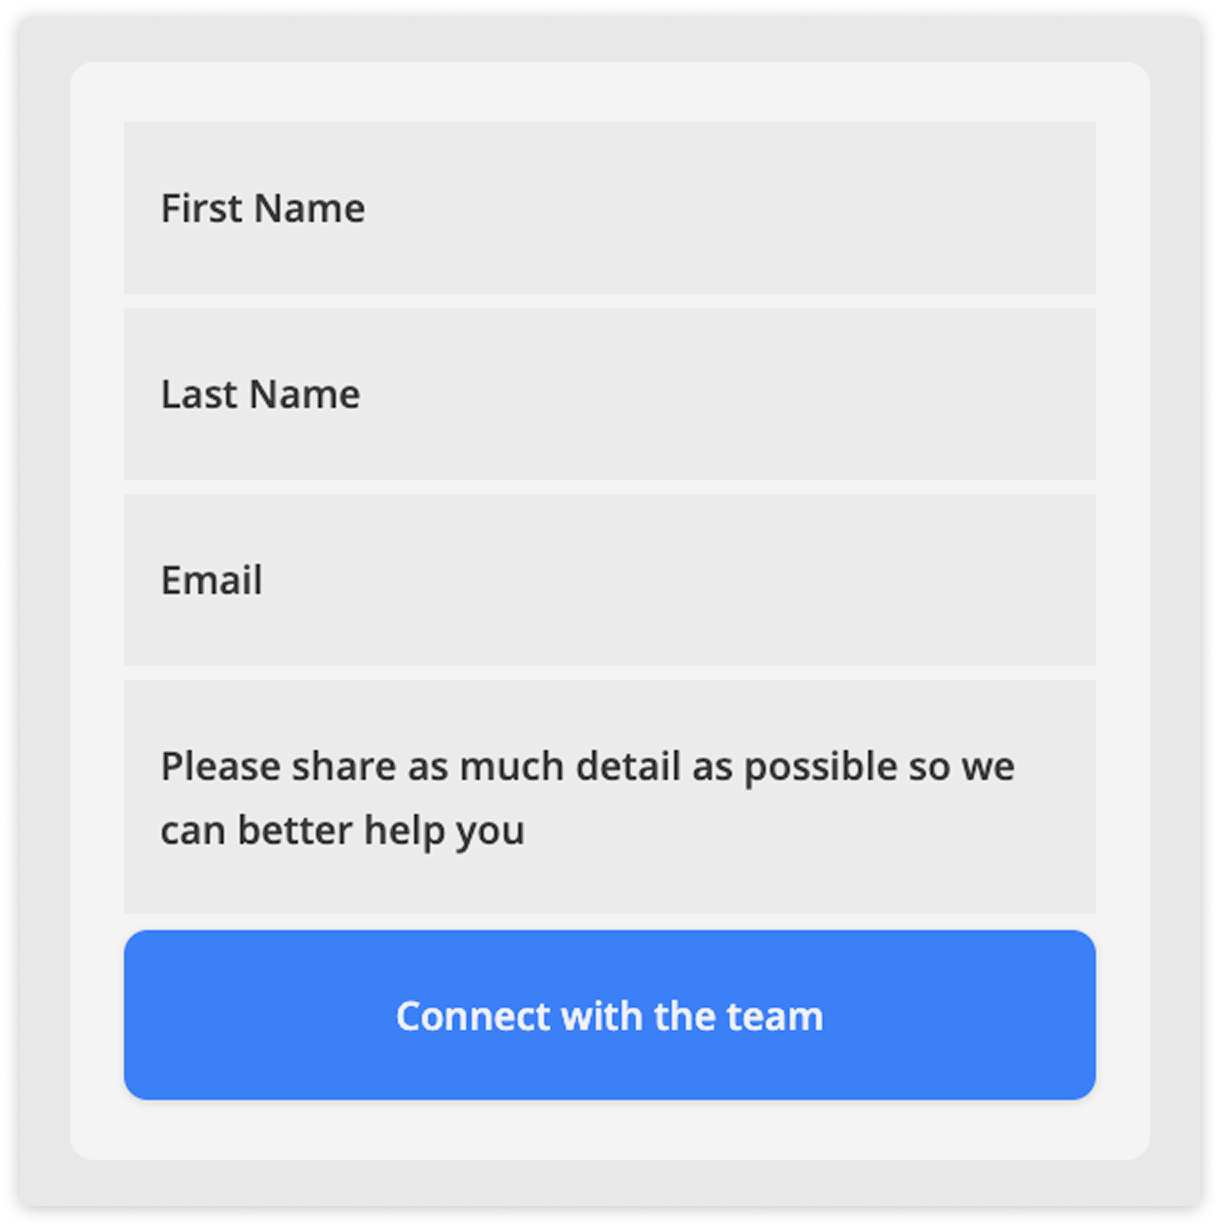
Every new web chat channel automatically generates and publishes a default visitor automation. This default map comes pre-installed with a web chat form which will collect first name, last name, email), an after-hours auto-responder that will collect your visitors information when your team is not online.
You can edit your channel’s visitor automation at any time. So for example if you want to funnel conversations to your sales team or your support team, you may add a chat button that asks your visitor which team they would like to speak to.
The default map is simple, visitors enter the map, and it checks to see if they are already a contact. If so, the map creates a conversation in your web chat channel. If they aren’t a contact, the map checks to see if they are chatting during business hours. If it is during business hours, visitors see the message, “👋 Hi there! Thanks for reaching out. Let’s get you connected with a member of our team. Fill out the form so we can better help you.” And if it’s not they’ll see, “👋 Hi there! Thanks for reaching out. We're currently offline, but we'd still love to hear from you. Leave your message or question below, and a team member will get back to you as soon as possible.” Then the visitor will see a form that collects their contact information and a description of their question or issue.
When the visitor submits the form they’ll become a contact and the system will create a web chat conversation in your inbox. | 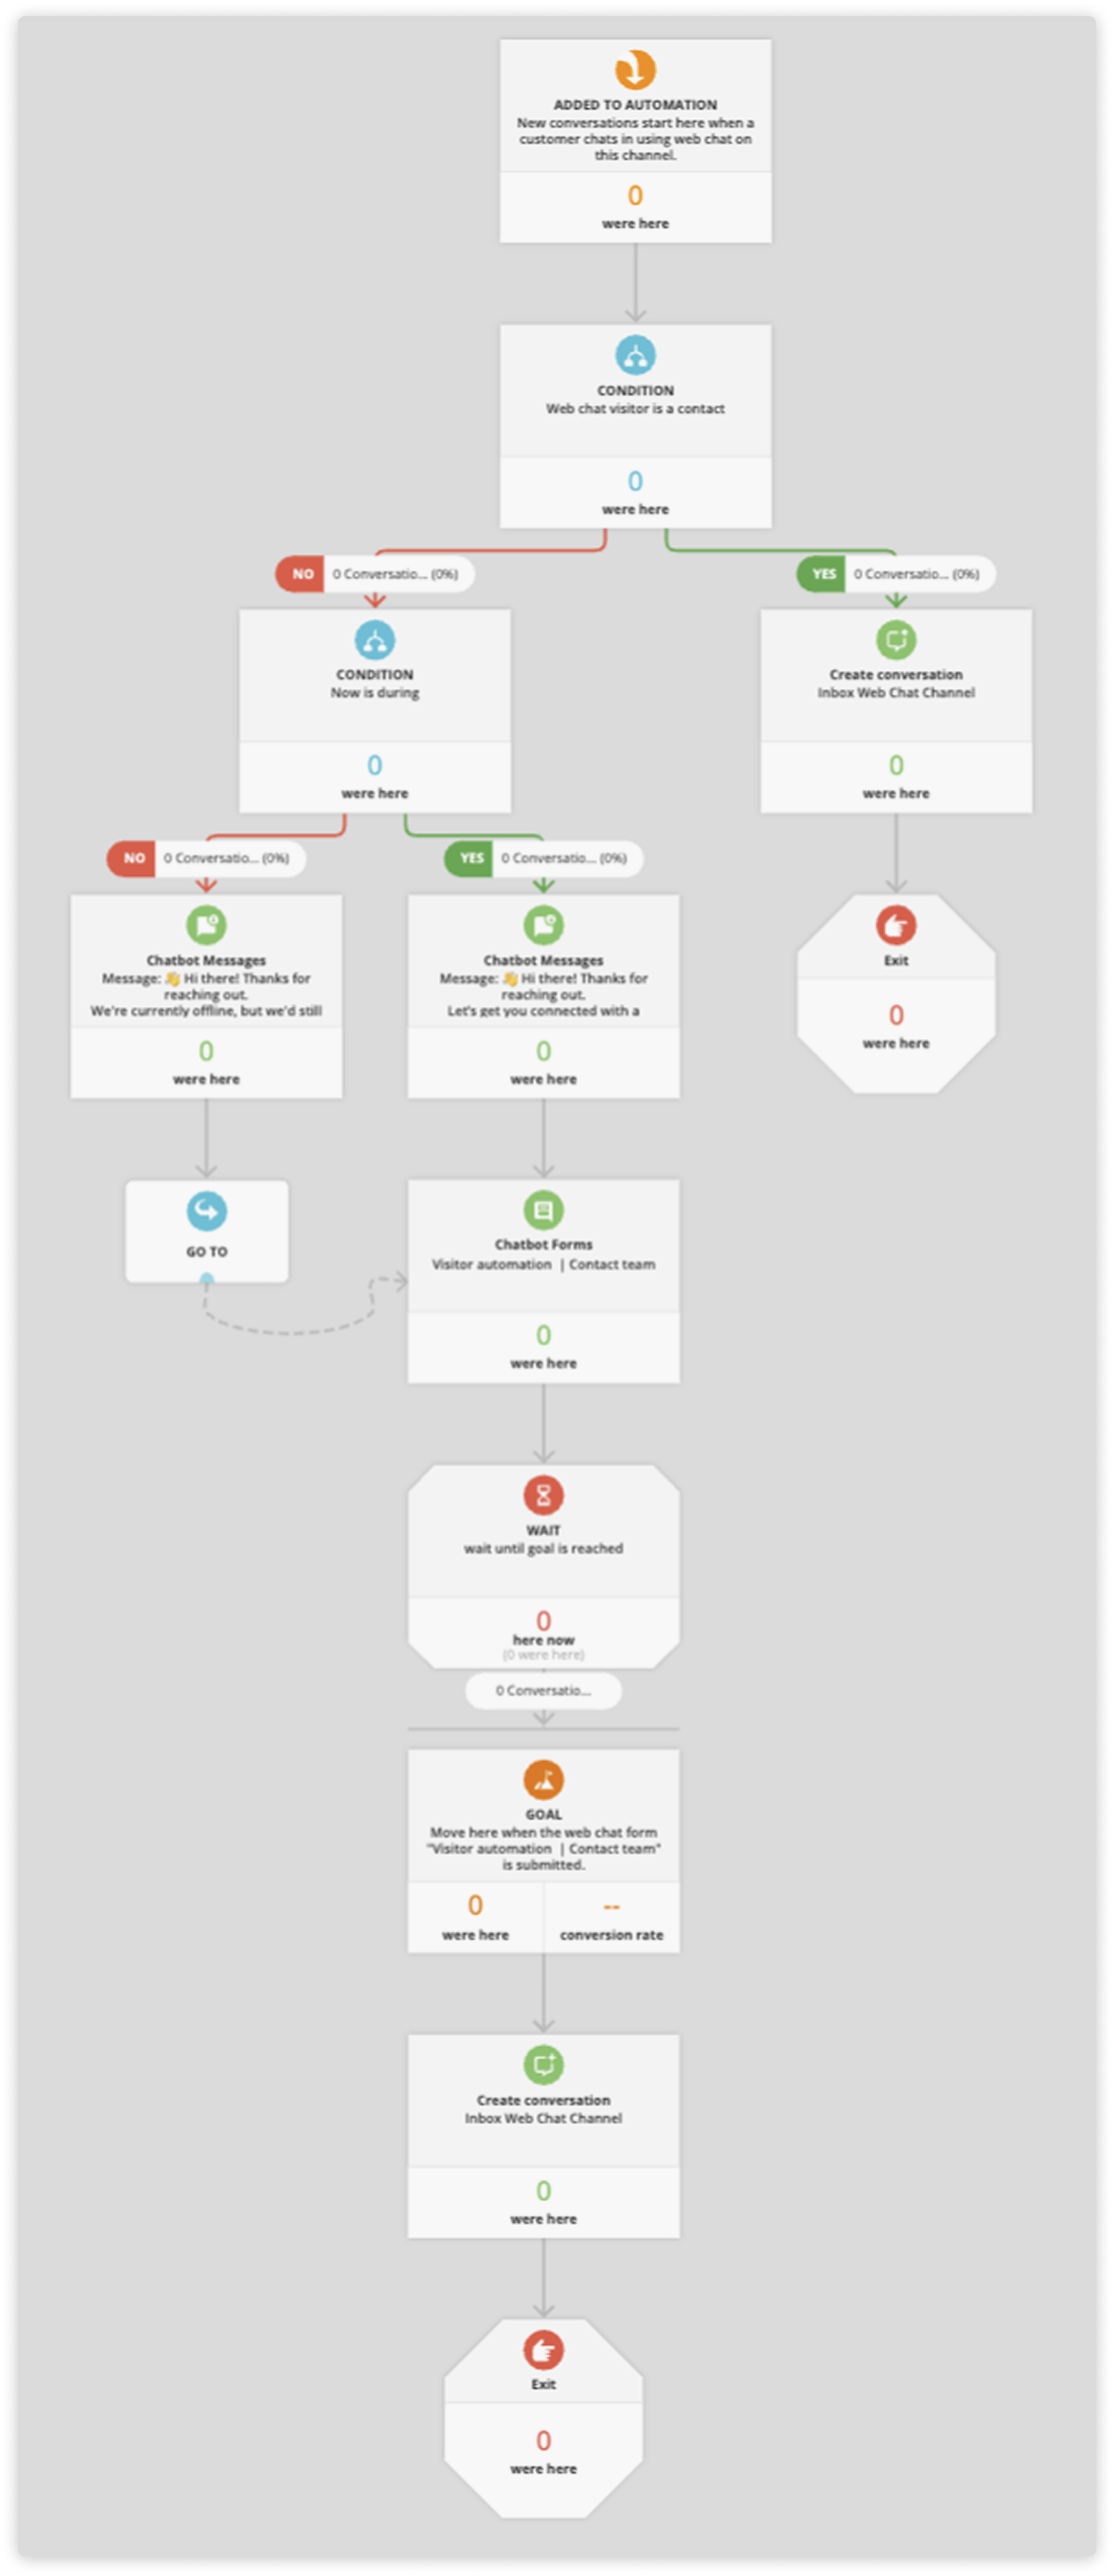 |
Enrollment: All visitors chatting on a channel are automatically added to that channel's visitor automation. The moment they close the web chat and leave, they are automatically removed from the map.
Unique rules: Visitor automations have access to exclusive triggers and conditions not available on standard maps, including the trigger Web chat visitor becomes a contact and the condition Web chat visitor is / is not a contact.
Strict limitations: Because of their unique data constraints, visitor automations have several restrictions:
- The sharing feature is disabled.
- They are published by default and cannot be unpublished, but you can edit them.
The create conversation element
Back to top
The Create conversation element is an action element exclusive to visitor automations, designed to escalate a chat from an automated bot to a live human agent. This element only appears inside visitor automations. It is not available in standard automations or web chat automations.
When a visitor lands on this element, it instantly creates a new conversation in the Inbox, routed to the default inbox of the channel you select, so a live rep can step in and take over the chat.
This element only works for identified contacts. If an unidentified visitor lands on it, the system skips the step entirely.
- The standard workflow is to first use a Chatbot form to collect the visitor's email to convert them into a contact. Then route them through the Create conversation element.
In the element's settings, use the “Create conversation” in dropdown to select which web chat channel the conversation should route to (this defaults to your most recently created channel).