Segmentation, or creating groups, lets you search for records based on behavior, interests or attributes so you can take specific actions. Once you create a group, you can select all and take actions on them, such as adding to an automation, sending an email or adding to an event.
Check out this video lesson on segmenting your data using groups.
Table of contents
How groups work
• Expanding and refining groups
• Groups vs lists
• Group permissions
Create a group
• Use cases
Manage groups
• Favorite groups
• Delete groups
• Edit groups
How groups work
Think of groups as saved searches. Each time you view a group, it shows all the records that match your search criteria, so they are always up to date.
Each condition in your search has three parts:
Field: The record detail you’re searching by, like a field, tag or action.
Condition: How you want to compare the field to your value, such as equal to or contains for text fields.
Value: The specific value you’re searching for, excluding or referencing.
Expanding and refining groups
Back to top
When you create groups, you can leave them as a single statement, add values to make your group broader, or add conditions to make it more specific.
When you do this, your groups use “AND” to connect multiple conditions and “OR” to add additional values. These terms are called Boolean operators.
Adding values
When you add values, you give more options for records to fit your search. Adding more values makes your group broader.
Each value is connected with an OR.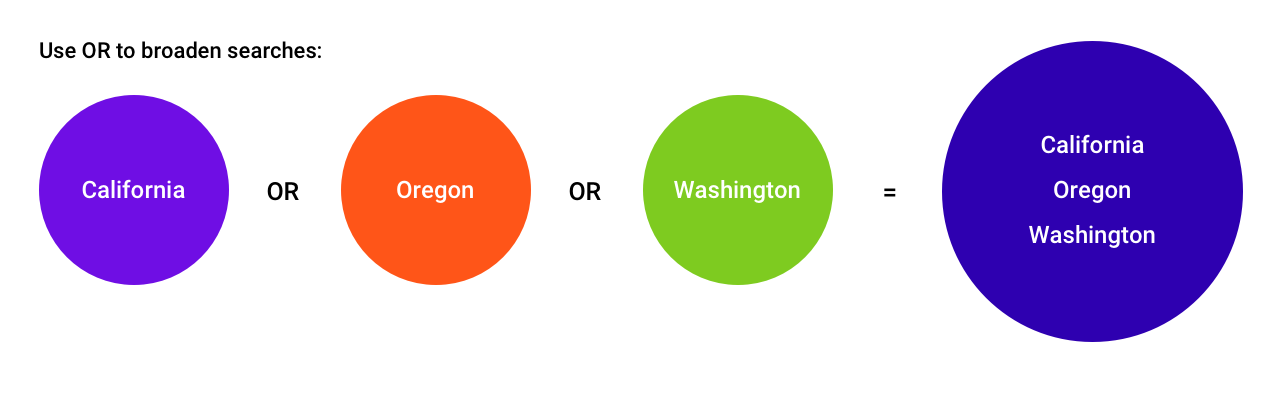
Adding conditions
When you add multiple conditions, all statements must be true for contacts to appear in the group. Adding conditions makes your group more specific, and each condition limits which records appear.
Each condition is connected with an AND.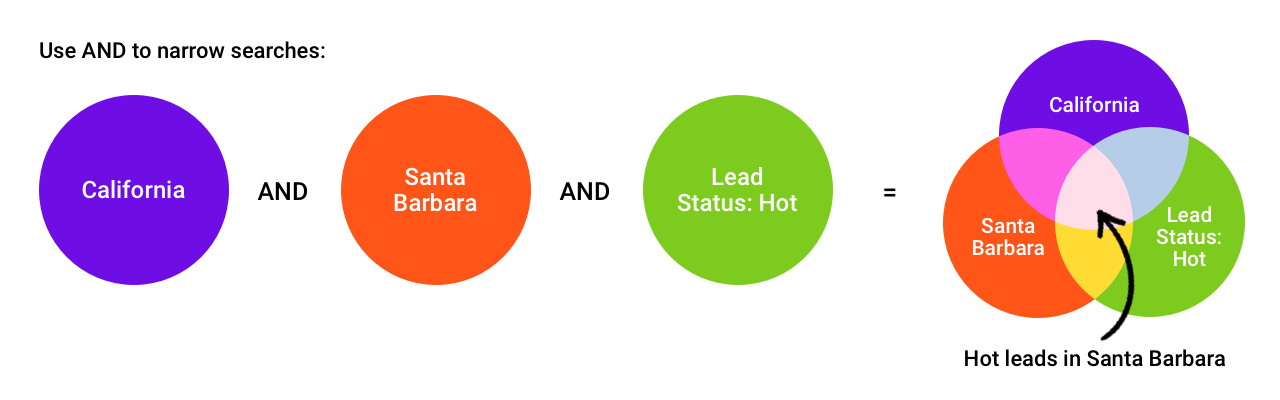
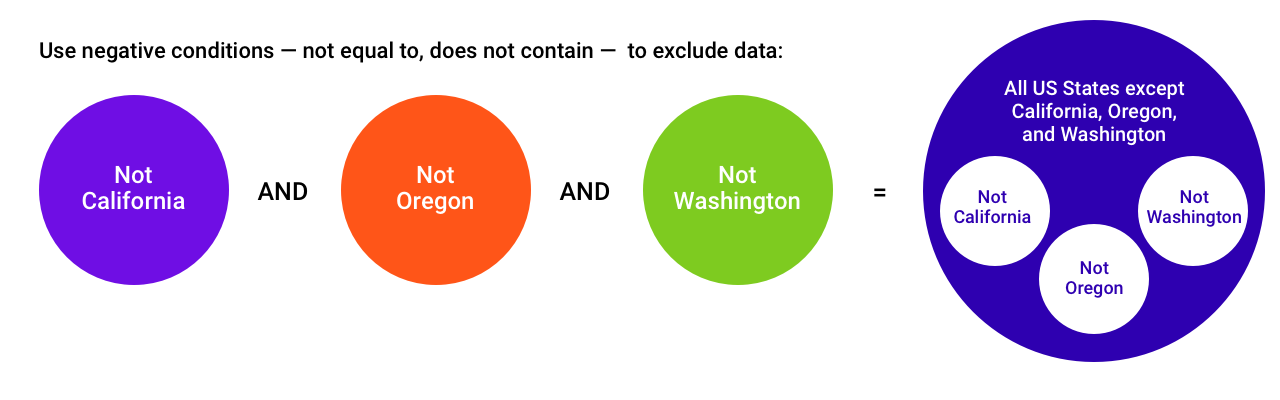
Negative conditions
If you add values to negative conditions, it won’t filter out any records, and you need to add conditions instead.
Say you want to create a group of all US contacts who do not live on the west coast. If you add the values “Washington” and “Oregon” to the statement “State not equal to California,” your group will include west coast contacts because you created an inclusive negative condition. Instead, add each negative statement as its own condition.
Groups vs lists
Back to top
Some platforms use lists for segmentation, where you add and remove contacts from your list. These differ from groups because groups are dynamic, and lists are static.
If you are moving from a platform that uses lists, you may think, I need to add contacts to my monthly newsletter list when they fill out my form.
However, in Ontraport, you can create a group of all contacts who filled out your form. This updates your newsletter list automatically every time a new visitor signs up.
Group permissions
Back to top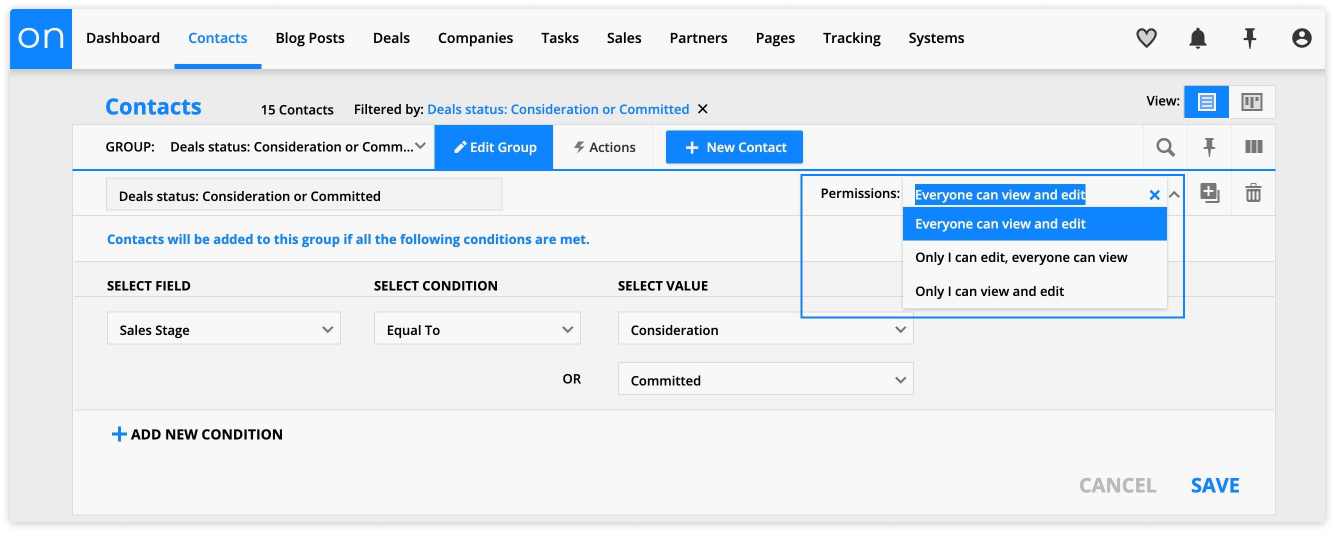
Sharing groups with your team helps you collaborate and keeps all users consistent. To share a group so other users in your account can see it, adjust the group permissions using the dropdown. Select either "Everyone can view and edit" or "Only I can edit, everyone can view."
To create a private group, select "Only I can view and edit."
Create a group
Back to top
You can create groups in any collection in your account. The fields you can use in your conditions depend on the fields available in the collection.
- Go to the collection where you want to add a group.
- Click New group next to the group dropdown.
- Name it and select a field, condition and value to create your search term.
- Click + next to value to add more options.
- Click Add new condition to add another search term.
- Select your preferred group permissions.
- Click Save.
Use cases
Back to top
Here are some use cases to help you see how to create groups around real world goals.
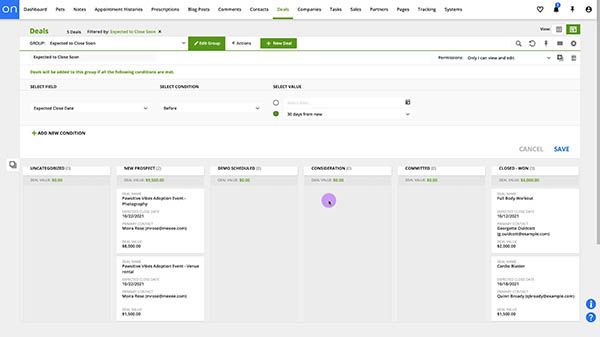
I want to see all deals that are expected to close this week
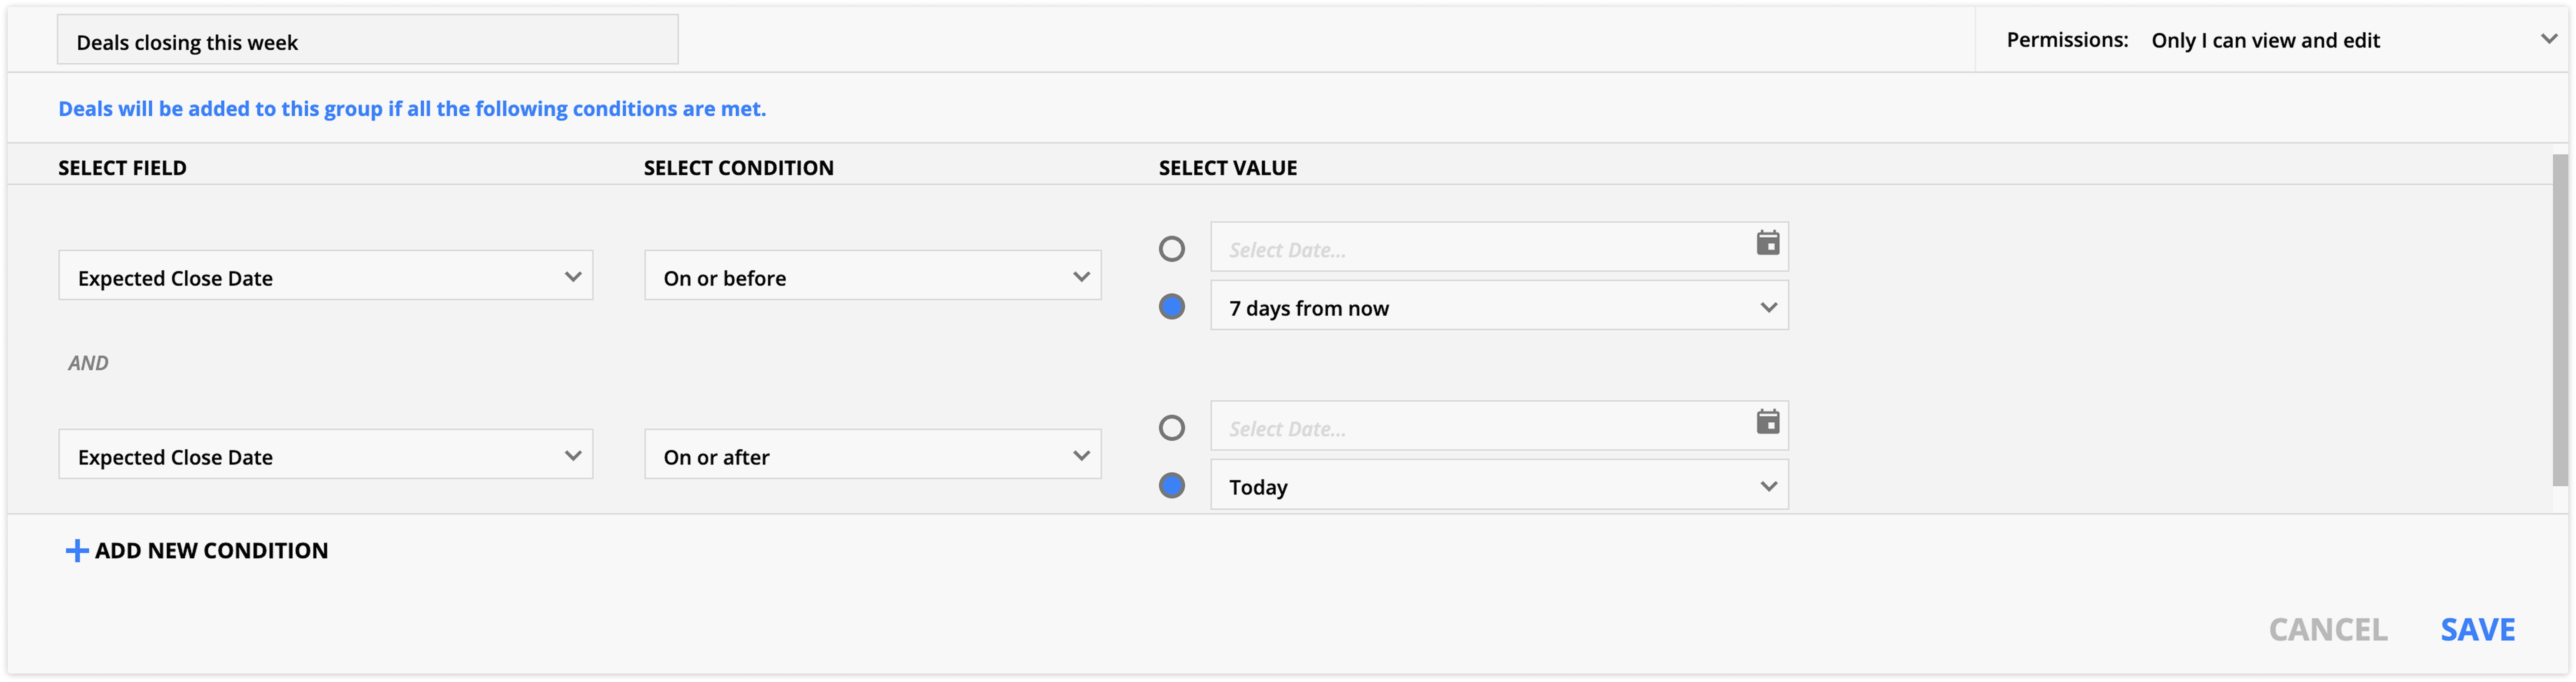
To ensure that none of your deals fall through at the finish line, track all deals expected to close soon. To create a group that shows dates in a specific timeframe, use two conditions to set the start and end of the timeframe.
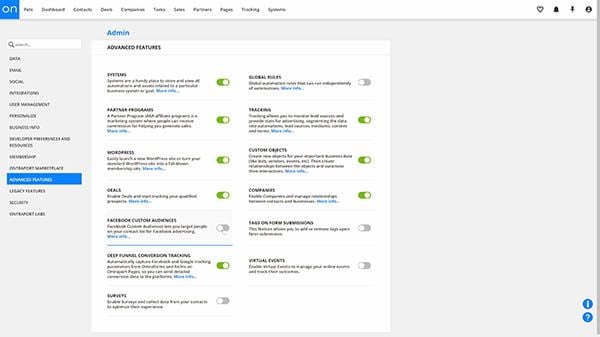
Deals are an additional record type you can enable in your account.
Here’s how to set it up.
- Navigate to your Deals collection.
- Click New group and name it “Deals closing this week.
- Then set up your first condition:
- Field: Expected close date
- Condition: On or before
- Value: 7 days from now
- Click Add new condition and set up your second condition:
- Field: Expected close date
- Condition: On or after
- Value: Today
- Click Save.
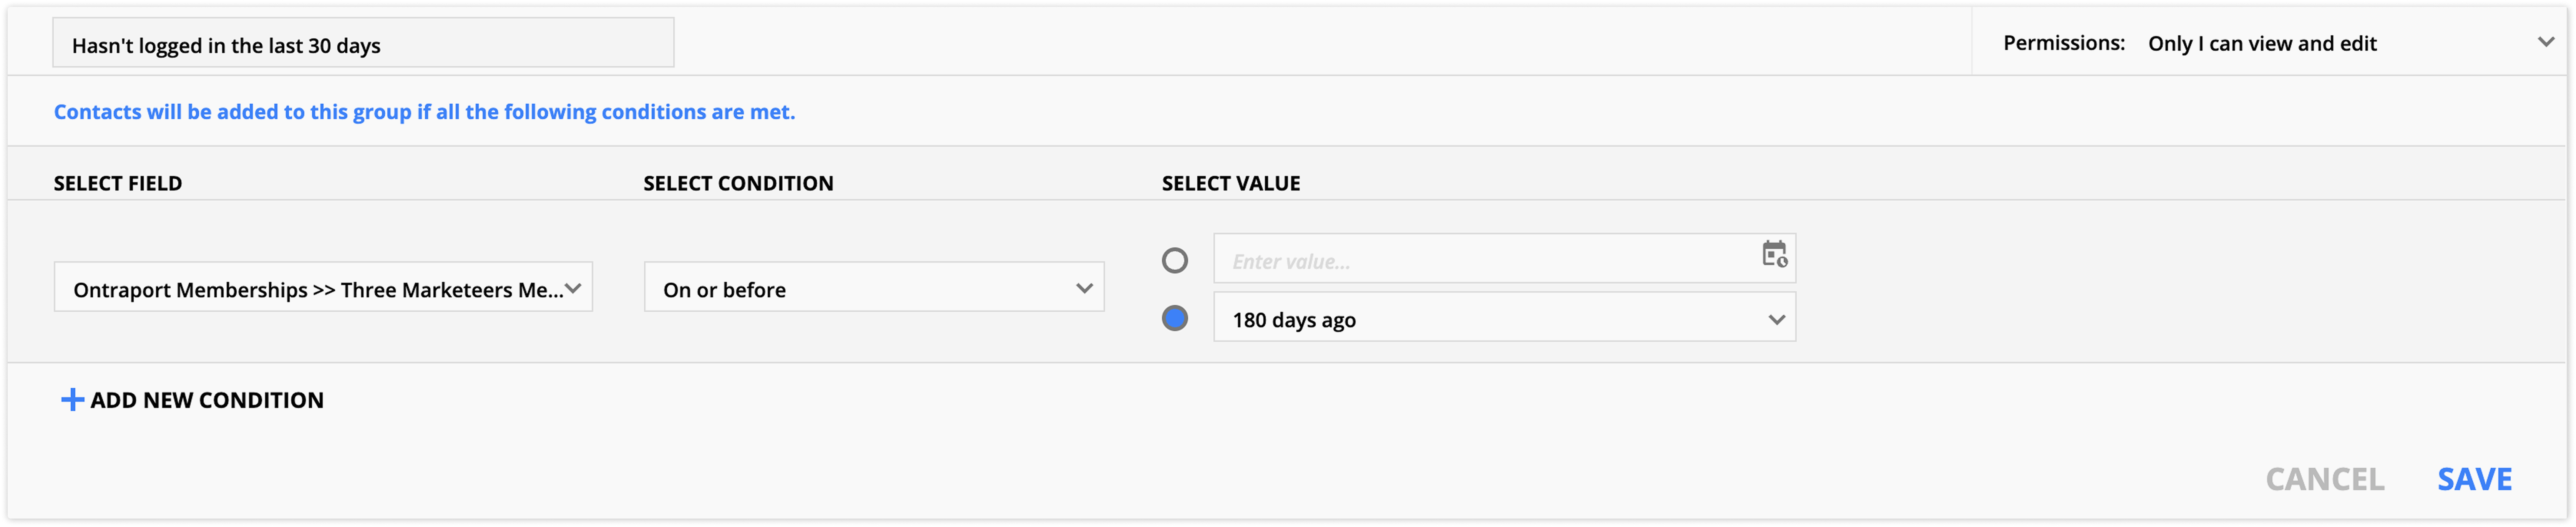
I want to see which members haven’t logged into my site in the last 30 days
Identify members who are at risk of canceling and send them an email to get them to log back into your site and engage with your content. To create this group, drill into your membership fields to access the last login field.
- Navigate to the contacts collection.
- Click New group and name it “Hasn't logged in the last 30 days.”
- In the Field dropdown, type in Membership, then click on Ontraport Memberships → Your membership site name → Last login.
- Then complete your condition:
- Condition: On or before
- Value: 180 days ago
- Click Save.
I want to strengthen my email deliverability
The best practice when sending emails is to mail your most engaged contacts more often and your less engaged contacts less often. Doing this increases your inbox rates by reducing spam complaints and unsubscribes.
If you send your emails via broadcasts instead of automation, you can use these groups to improve your email deliverability.
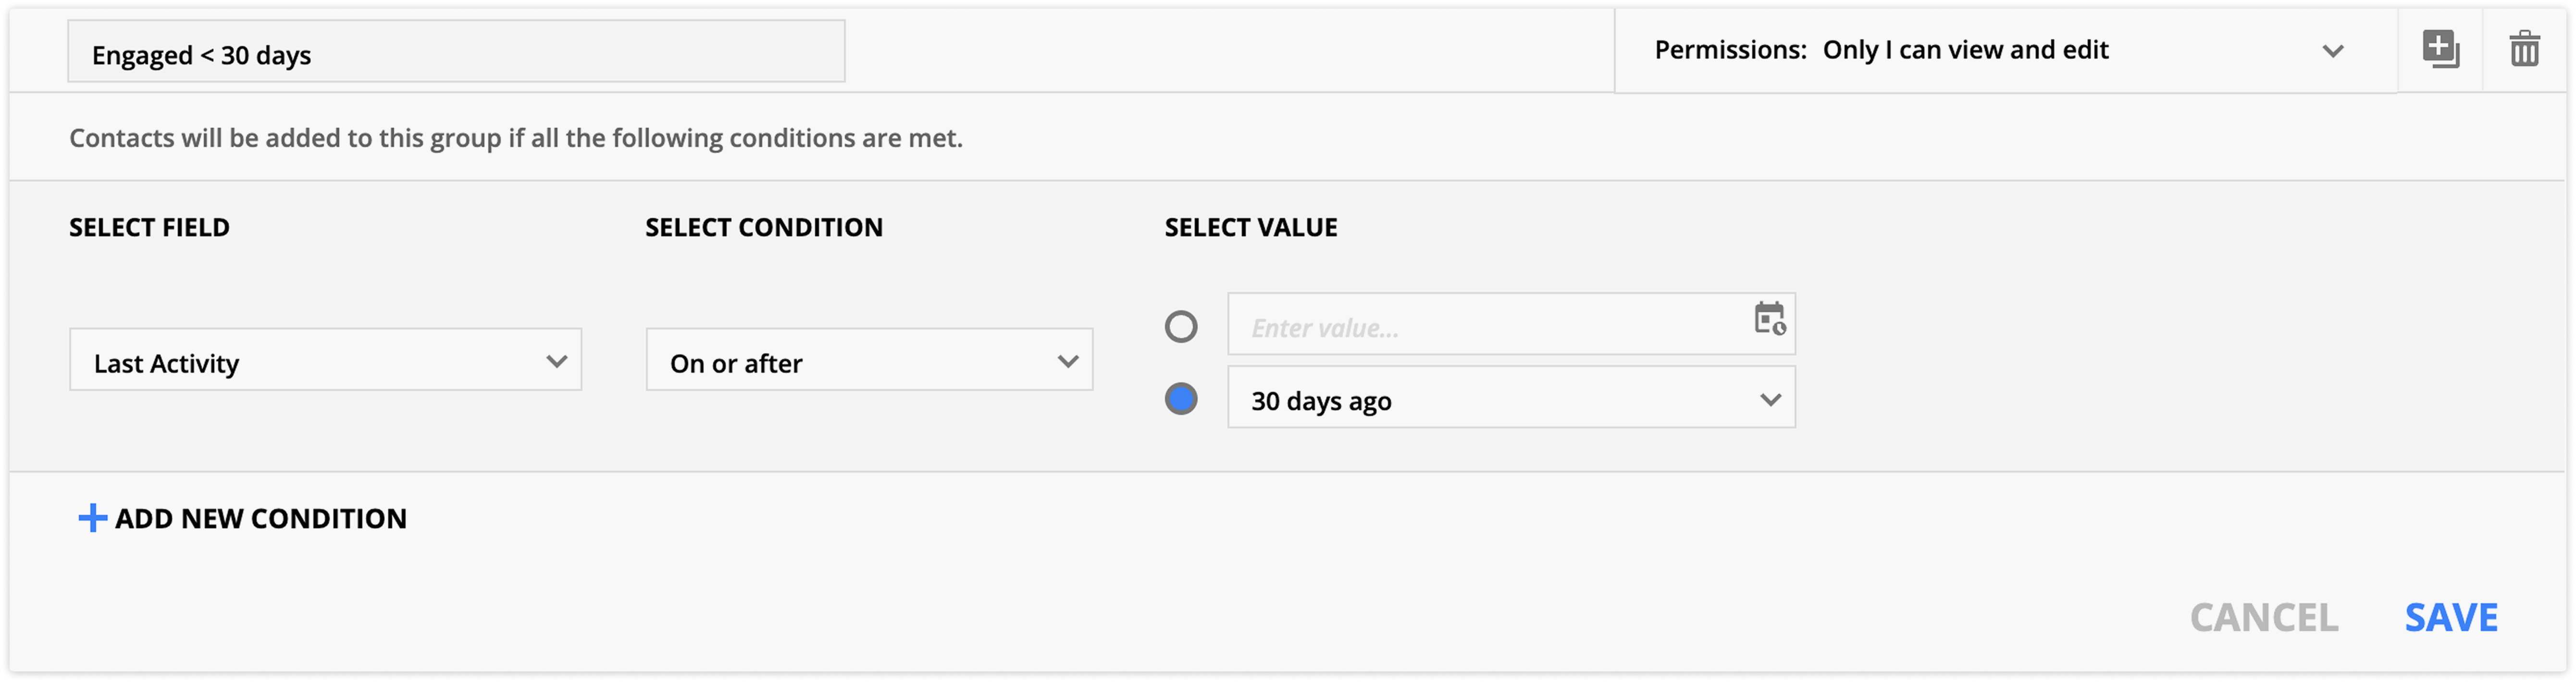
Group 1- Most engaged contacts
Send all your broadcasts to this group.
- Navigate to the contacts collection.
- Click New group and name it “Engaged < 30 days.”
- Then set up your condition:
- Field: Last activity
- Condition: On or after
- Value: 30 days ago
- Click Save.
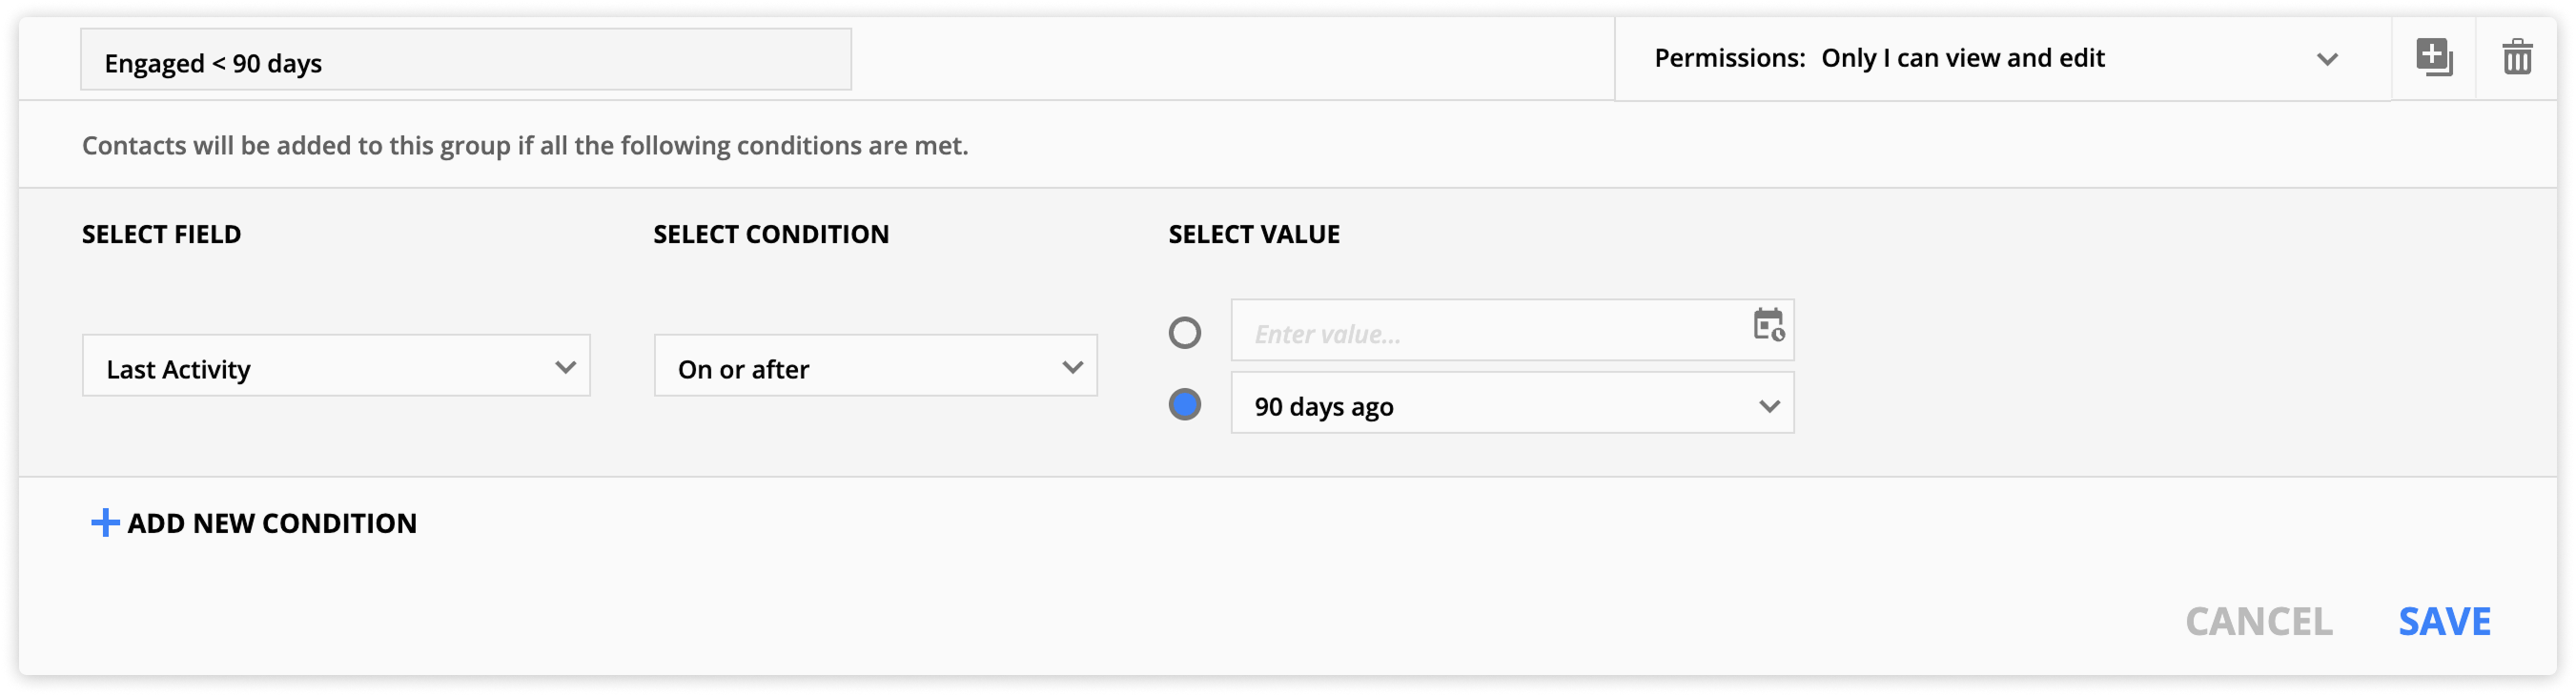
Group 2 - Moderately engaged contacts
Send some of your broadcasts to this group. If you send multiple emails each week to your most engaged contacts, send this group one email per week.
- Navigate to the contacts collection.
- Click New group and name it “Engaged < 90 days.”
- Then set up your condition:
- Field: Last activity
- Condition: On or after
- Value: 90 days ago
- Click Save.
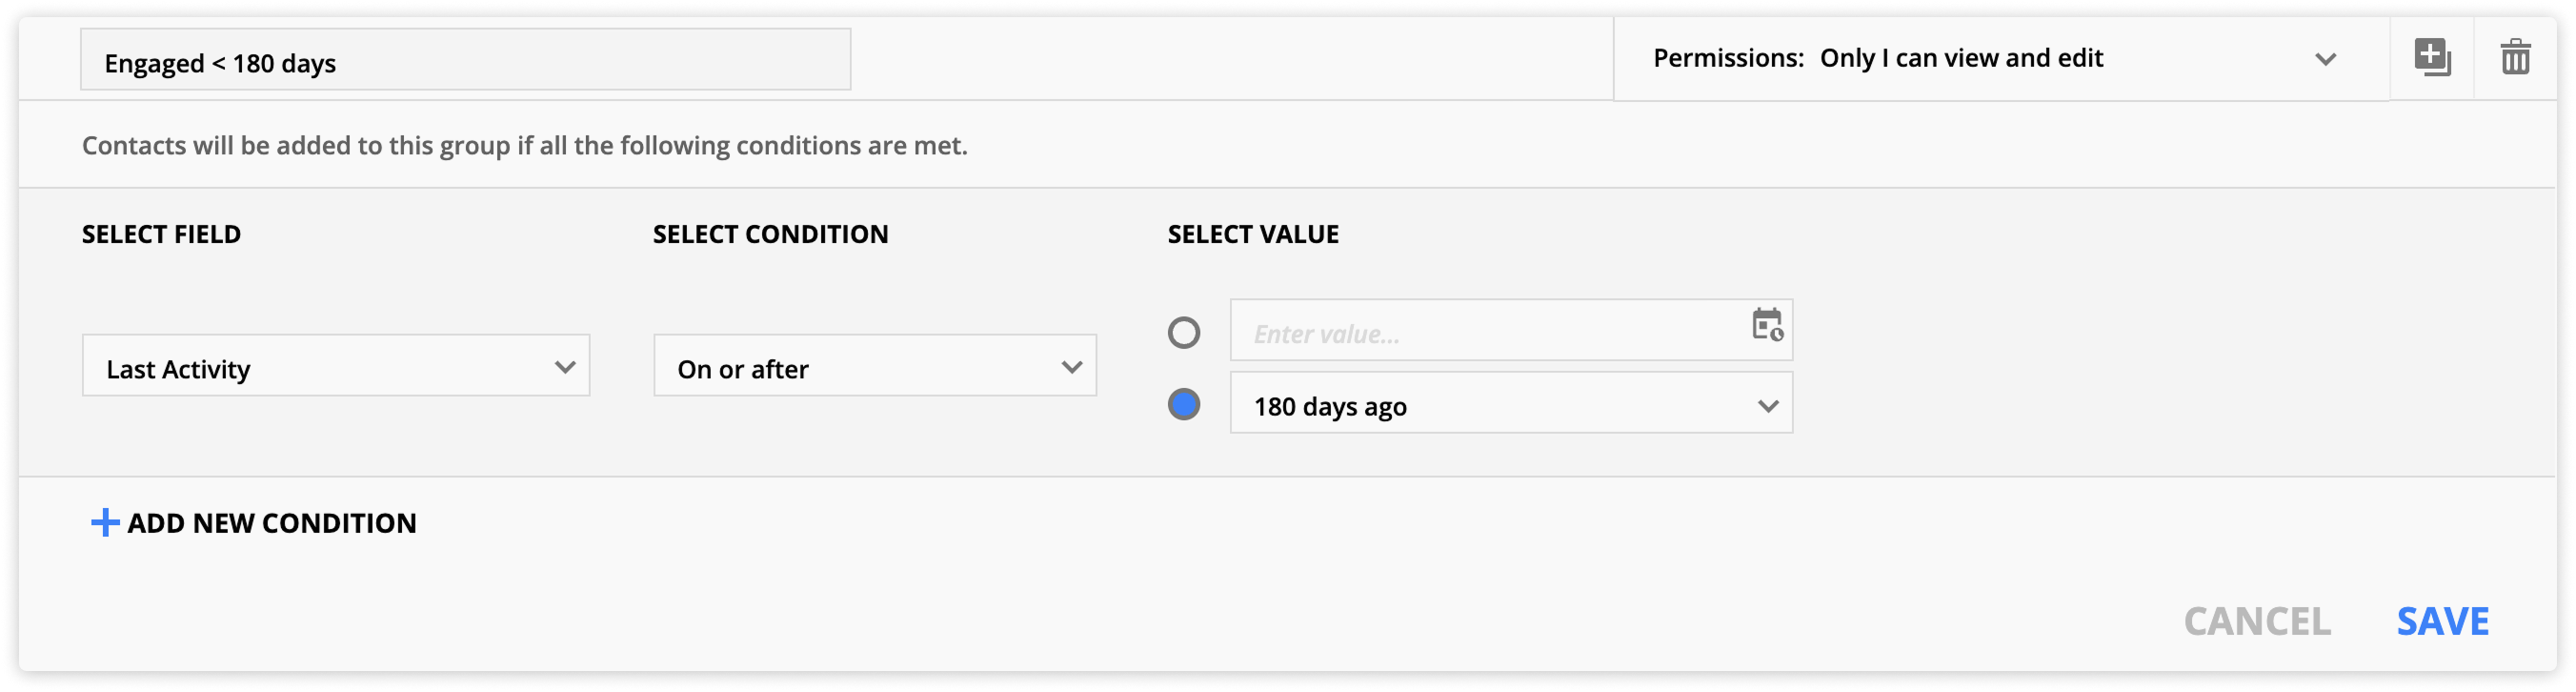
Group 3 - Least engaged contacts
You’ll send the least amount of emails to this group. Consider sending these people one broadcast per month.
Navigate to the contacts collection.
Click New group and name it “Engaged < 180 days.”
Then set up your condition:
- Field: Last activity
- Condition: On or after
- Value: 180 days ago
Manage groups
Back to top
You can manage all groups in your account from the Group manager. From there, you can view groups across all objects, favorite and delete them.
To go to the Group manager go to .png) → Administration → Data → Group manager.
→ Administration → Data → Group manager.
Favorite groups
Back to top
You can favorite frequently used groups to add them to the top of your dropdown. Favorites are per user, and all favorites appear in alphabetical order. You can favorite groups from the group dropdown or the Group manager.
- From the group dropdown, hover over your group’s name and click the heart icon —
 . Click the icon again to remove the group from your favorites.
 - From the Group manager, select one or more groups and click Add to favorites from the action bar. To remove groups from your favorites, click Remove favorites.
Delete groups
Back to top
Only the creator of the group can delete it completely. If you delete a group shared with you using the permissions “Only I can edit, everyone can view,” or “Everyone can view and edit,” you only delete the group for your user seat. Other users still have access. If the group owner deletes the group, it is removed for all users.
When you delete a group, it never deletes the records in that group.
From the Group manager
- → Administration → Data → Group manager.
- Select one or more groups
- Click the Delete action.
- Confirm you want to delete your group.
From the groups dropdown
- Select the group you want to delete from the dropdown.
- Click Edit group →
/ontraport_pages_builder_delete_global_block_(trash_icon).png) .
. - Confirm you want to delete your group.
Edit groups
Back to top
You can edit the groups that you own from the group dropdown or the Group manager.
From the Group manager
- → Administration → Data → Group manager.
- Click on the group’s name.
- Edit the name, condition or permissions.
- Click Save.
From the groups dropdown
- Select the group you want to edit.
- Click Edit group.
- Edit the name, condition or permissions.
- Click Save.

 .
.