A task is a prompt or reminder for someone on your team to perform a non-automated action such as making a phone call to a lead, sending personal gifts to clients, reviewing applications for approval, or following up with a team member. When used as part of your automation, tasks help keep all of the manual parts of your job automated and on track so that human errors are reduced and communication is streamlined.
You can also set up task outcomes, which allow you to automate what happens after the task is completed based on its outcome. For example, a task directing a team member to call a contact might have several possible outcomes:
- Interested, but needs more time: This outcome adds the contact to a series of follow-up actions.
- Not interested: This outcome adds a tag “not interested” to the contact and removes them from further related actions.
- Left a message/No Answer: This outcome adds the contact to another task for a follow-up call the next week.
- No further action: Ontraport requires a task outcome to be selected. You can select the no further action option to meet this requirement.
Table of contents
Create a task message
• Add task notifications (optional)
• Add task outcomes (optional)
• Add a form (optional)
Create and assign quick tasks
Manually assign saved tasks
Add automation after a task is completed
Add automation after a task is completed
Create a task message
- If you have a plus, pro or enterprise account, hover over Contacts or any other object, then click Messages → New Message → Task.
- If you have a basic account, go to Automations → Messages → New Message → Task instead.
- To create user tasks, go to
.png) → Administration → User Management → User Messages → New Message → Task.
→ Administration → User Management → User Messages → New Message → Task.
- Name your task.
- Enter a task subject. This will appear in the subject line in the task notification emails.
- In the “Due Date” field, add how many days the selected user has to complete the assigned task.
- Click on the task owner dropdown and select your task’s assignee. You can choose from:
- Contact Owner
- A specific user
- A role in your account
- Custom user relationships
- Add your task’s instructions — you can use merge fields to add data from your contact records.
- Click Save.
Add task notifications (optional)
Task notifications allow you to send email or SMS notifications to users, roles and custom email addresses to keep users updated on the status of your tasks.
- Click Add.
- Click the first dropdown to select who will receive your notification.
- Select when to send the notification.
- Select notification type — email or SMS.
Add task outcomes (optional)
Task outcomes allow you to create automation based on how the task was completed. For example, a task to call a client would require different follow-up if the outcome was “left a voicemail” as opposed to “won the deal.”
- Click Add in the task outcomes section.
- In the name dropdown menu, select Create New Outcome and name the outcome.
- Add conditions and actions (optional). These options allow you to set up automation within your task. Alternatively, you can add triggers and goals to automation maps to accomplish the same automation in the visual builder.
- Click Add Condition — these work like automation conditions.
- Click Add Action — these work like automation actions.
- Click Save.
Add a form (optional)
You can select a form for your user to fill out after a task is completed to collect additional information.
Note: Tasks only allow you to create and select Smart Forms.
- Choose an existing form from the “Smart Form” drop down or click New Form to create a new one.
Create and assign quick tasks
- Go to your contacts list and select one or more contacts.
- Click Task → Choose Task.
- Add your task subject, due date, task assignee and task details.
- Click Assign.
Manually assign saved tasks
- Go to your contacts list and select one or more contacts.
- Click Task → Choose a Task and select a saved template or create a new task that will be saved in the main task editor.
- Click Assign.
Add tasks to an automation map
- Go to Automations.
- Create a new automation map or edit an existing map.
- Identify where you’d like to add the task, and click
 or What Happens Next?.
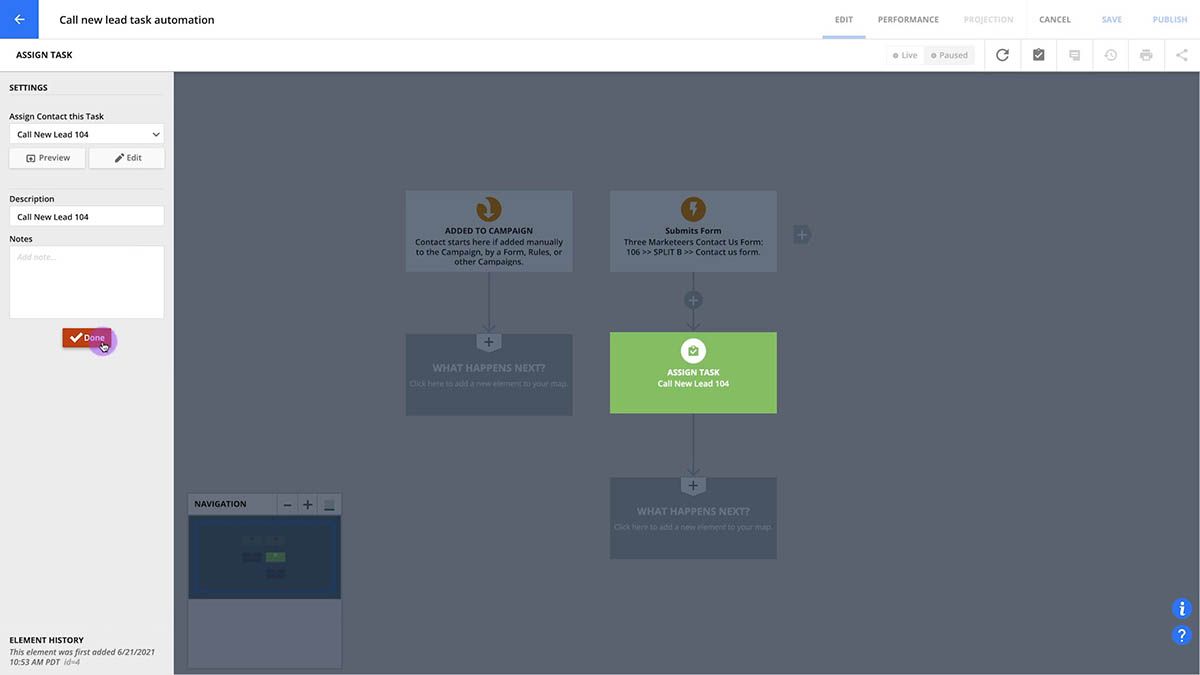
 - Select Assign Task from the actions tab.
- Click on your task to open the settings.
- Choose a task from the “Assign contact this task” dropdown, or create a new task.
- Click Done.
Add automation after a task is completed
Once the task is completed, you can set task outcomes and continue automation based on the result.
You’ll use separate goals for each task outcome so that you can create automated responses relevant to each outcome. For example, a goal for a task outcome of “Left voicemail” might be followed by another assign task element to follow up again, or it might be followed by an SMS element that tells the contact that you’re trying to reach them.
- Below the Assign a task element, click the
.png) or What Happens Next? on your automation.
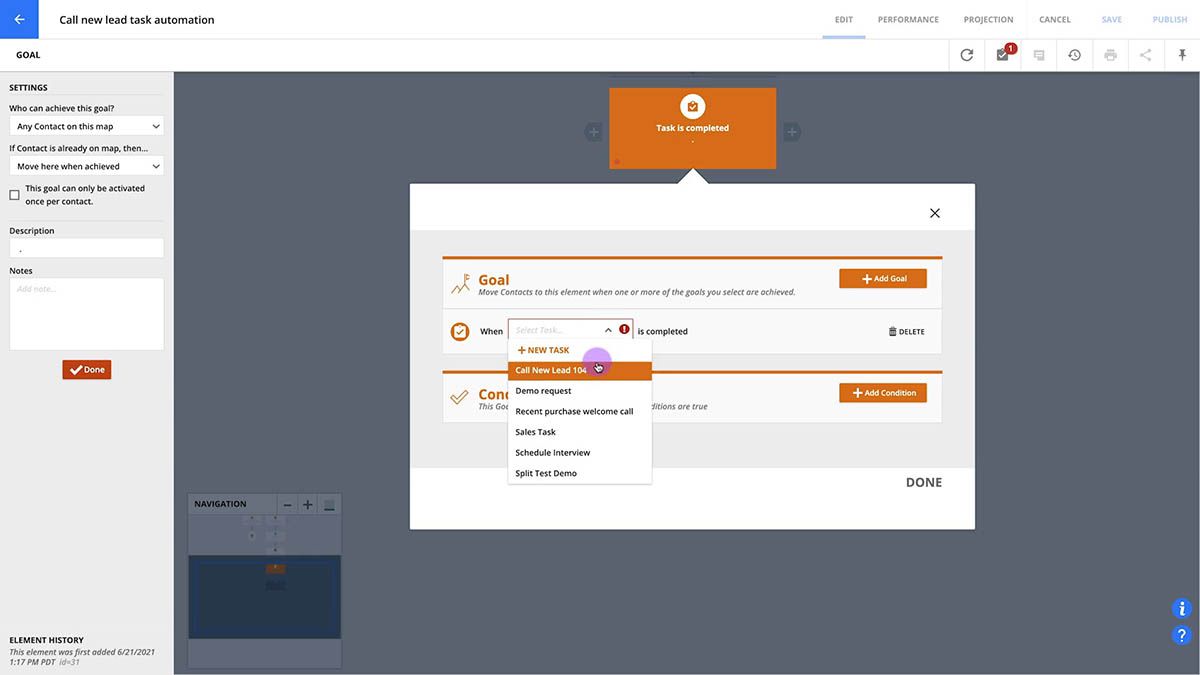
or What Happens Next? on your automation. - Select a goal element. Once the goal element is added to your automation map, click on it, then click Add Goal. Choose “Task is Completed.”
- Use the dropdown menu to find the task you want to use for this goal and choose an outcome.
- Adjust the goal settings to determine who can achieve this goal. A common setting is “Any contact on this map.” Then choose what happens if a contact is already on the map. A common setting is “Move here when achieved.”
- Next to your goal element, click and add a new goal. Use the same task but choose a different outcome. Do this for every outcome option for your task.
- You can then add an action element such as “Send an SMS” or “Send an email” under different goals. To do this, click What Happens Next? under any goal and choose the action element you want to add.