Reactions make it possible for your website members to click to like, upvote, downvote, favorite, or even mark items complete. Adding the ability for your members to interact with your content encourages engagement and creates a sense of belonging. This will keep your users on your site for longer periods.
Reaction buttons update many-to-many relationships between your custom objects. Drag the element onto a dynamic page or block. When your members click it, Ontraport adds or removes a relationship.
Your members can vote for their favorite things, react to content, complete to-do lists, or favorite things they love. And you can automate what happens after these relationships are created. For example, send them promotional offers based on what they “like.” Or trigger notification emails when someone checks in to your event or completes one of your courses.
Check out this video to learn more:
Table of contents
Use cases
Creating relationships for your reactions
Using the reaction button
• Styling your button
Reactions in conditions
Reactions in automation
Use cases
Use case | I want to sort my recommended blog posts by the number of likes each post has to help my visitors discover my most engaging content. |
Solution | Create a many-to-many relationship between Blog Posts and Contacts that shows the number of contacts who liked a post in the blog’s record and a list of posts each contact liked in their record. Add a reaction button to your blog post template that allows your members to like the post. Add a rollup field to your blog post records to count the contacts who liked the post. Create a dynamic block that displays all of your blog posts, and use your rollup field in your block’s order settings so visitors see the most popular posts at the top of the list. |
Use case | I want to allow my members to vote on upcoming webinar topics with up and down arrows. |
Solution | Create a many-to-many relationship between a Webinar Topic object and Contacts. The subcollection in your webinar topic record will show the contacts who voted on the topic. The subcollection in your contact records will show the topics each contact voted for. Add a reaction button to a dynamic block that displays all of your proposed webinar topics to allow members to vote for each one. |
Use case | I want to allow my visitors to favorite my blog articles so they can save articles to view later. |
Solution | Create a many-to-many relationship between Blog Posts and Contacts. The subcollection in the blog posts record will show the contacts who favorited the post. The subcollection in contact records shows the list of blog posts each contact has favorited. Add a reaction button to your blog post template that allows your members to favorite the post. Add a dynamic block to a membership page showing each visitor their favorite posts so it’s easy to return to articles. |
Creating relationships for your reactions
Reaction buttons update many-to-many relationships. You can use reaction buttons to create connections between your existing many-to-many relationships or create new ones.
To create a new relationship:
- Go to
.png) → Administration → Data → Custom objects.
→ Administration → Data → Custom objects. - Click on the object you want to add a relationship to.
- For example, select Blogs to add a relationship to Contacts to allow members to favorite posts. Or choose Lessons to allow members to mark lessons complete.
- Follow these steps to create your new relationship.
- You’ll want your relationship name and subcollection names to make sense for your object and relationship. A “Favorite blog posts” relationship would have a “Members who favorited this post” subcollection in the Blog Post record and a “Favorite blog posts” subcollection in your Contact records.
Using the reaction button
You can only add the reactions button to dynamic templates or blocks published on an Ontraport membership site. Only logged in members can interact with your reaction buttons. Once you add the element to your page, you can click on it to customize the settings. For example, select the relationship it will update and the style of your button.
- Drag to your page.
- You can only add this element to a dynamic template or a dynamic block.
- Click your reaction button to access its settings.
- In the “Display this relationship” dropdown, select the relationship you want to use to prefill your reaction button.
/Reactions-display_this_relationship-context.png)
- Click Add a relationship in the “Add/remove relationships (Selected)” setting.
- Click Add and select the relationship you want to update.
/Reactions-update_relationship-dropdown.png)
- Select if you want to add or remove a relationship in the first dropdown.
- You’ll likely want to leave the default value, “Add.” This setting will add a relationship if one doesn’t exist. Or it will show the selected version of the button when there is already a relationship between the records.
/reactions-add_remove_dropdown-context.png)
- In the second dropdown, select the relationship name you want to update. Then click Save.
/Reactions-select_relationship-dropdown.png)
- Click Add a relationship in the “Add/remove relationships (Unselected)” setting.
- Click Add and select the relationship you want to update.
- In most cases, this will be the same relationship you chose for the selected version of your button.
- Click Add and select the relationship you want to update.
- Select if you want to add or remove a relationship in the first dropdown.
- You’ll most likely want to leave the default value, “Remove.” This setting will remove a relationship if there is already a relationship between your records or show the unselected version of your button if no relationship exists.
/Reactions-remove_relationship-context.png)
- In the second dropdown, select the name of the relationship you want to update. Then click Save.
/Reactions-select_realtionship_remove.png)
- (Optional) Toggle on “Display total records” to show the number of records next to your button.
- (Optional) Toggle on “Refresh block data” if you want the block containing your reaction button to refresh when clicked.
/Reactions-setting_toggles-context.png)
- In the “Button type” settings, choose if you want to display an icon or text.
- If you click Icon, select the icon you want to display.
- If you click Text, add the text you want to display for your selected and unselected versions of your Reactions button.
- Click Done.
Styling your button
You’ll see different styling options, depending on if you selected “Icon” or “Text” in your Reaction element’s settings.
To access your styling options, click into your Reaction element and click Style.
Icon styling
You can choose your icon size and the color of the button when it’s in the “unselected” state.
![]()
Text styling
You can customize the background color, border and text font and color for your text reaction buttons.
/Reactions-text_style_settings-context.png)
Reactions in conditions
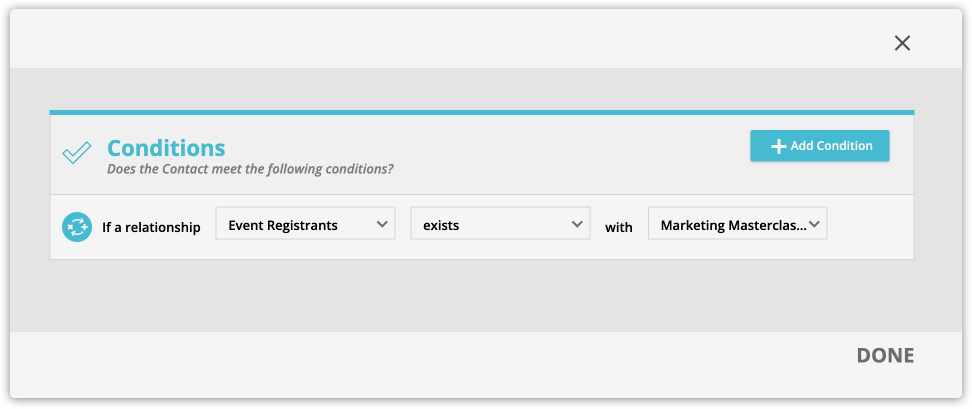
You can use the “Relationship does or does not exist” condition throughout your account in:
- Automation maps
- Page conditions
- Block conditions
- Recharge settings
- Dashboard metrics
- Membership site redirect settings
- Legacy features
- Lead scoring
- Groups
- Task outcomes
When setting up your conditions, select your relationship name, if the relationship exists or not and your related record.
Reactions in automation
You can use the “A relationship is added or removed trigger” on your automation maps to kick off automation when your selected relationship is updated.
When setting up your trigger, select your relationship name, if the relationship was added or removed and your related record.