Dynamic pages are pages that are automatically created based on your saved records. They use dynamic templates to create their layout, styling and design. The content on your page is dynamic because it’s based on one of your custom object records. That means you can easily create a cohesive set of pages using the same dynamic template. Your pages will use the same design but show your visitors different content.
Think of the design of your favorite blog.
Every blog post has its own unique content, but the layout is always the same. That’s because most blogs use a blog template.
Dynamic pages work the same way. First, you create a template for a type of page you publish frequently. Then save your content to a record in your account. For example, a blog record stores the blog’s headline, subheadline, body text, images, etc. so that each blog post has a similar look. Once your dynamic template has been created, you can use it to publish your content, such as each unique blog post — without having to re-create that page each time. Learn more by watching this video lesson on building dynamic pages.
Increase engagement on your dynamic pages by adding reaction buttons, allowing members to interact with your dynamic content.
Add a dynamic content package to your account to use this feature. Here’s how:
- Click here to go to your account details page.
- Click Add plan or Start trial next to “Add Dynamic CMS to your account” and choose the plan that fits your needs.
Table of contents
Create a dynamic template
• Make your elements dynamic
• Add dynamic links
Customize your page’s display settings
Customize your blocks’ display settings
Preview settings
Next steps
Create a dynamic template
- Go to Sites → Pages → Dynamic Templates → New Dynamic Template.
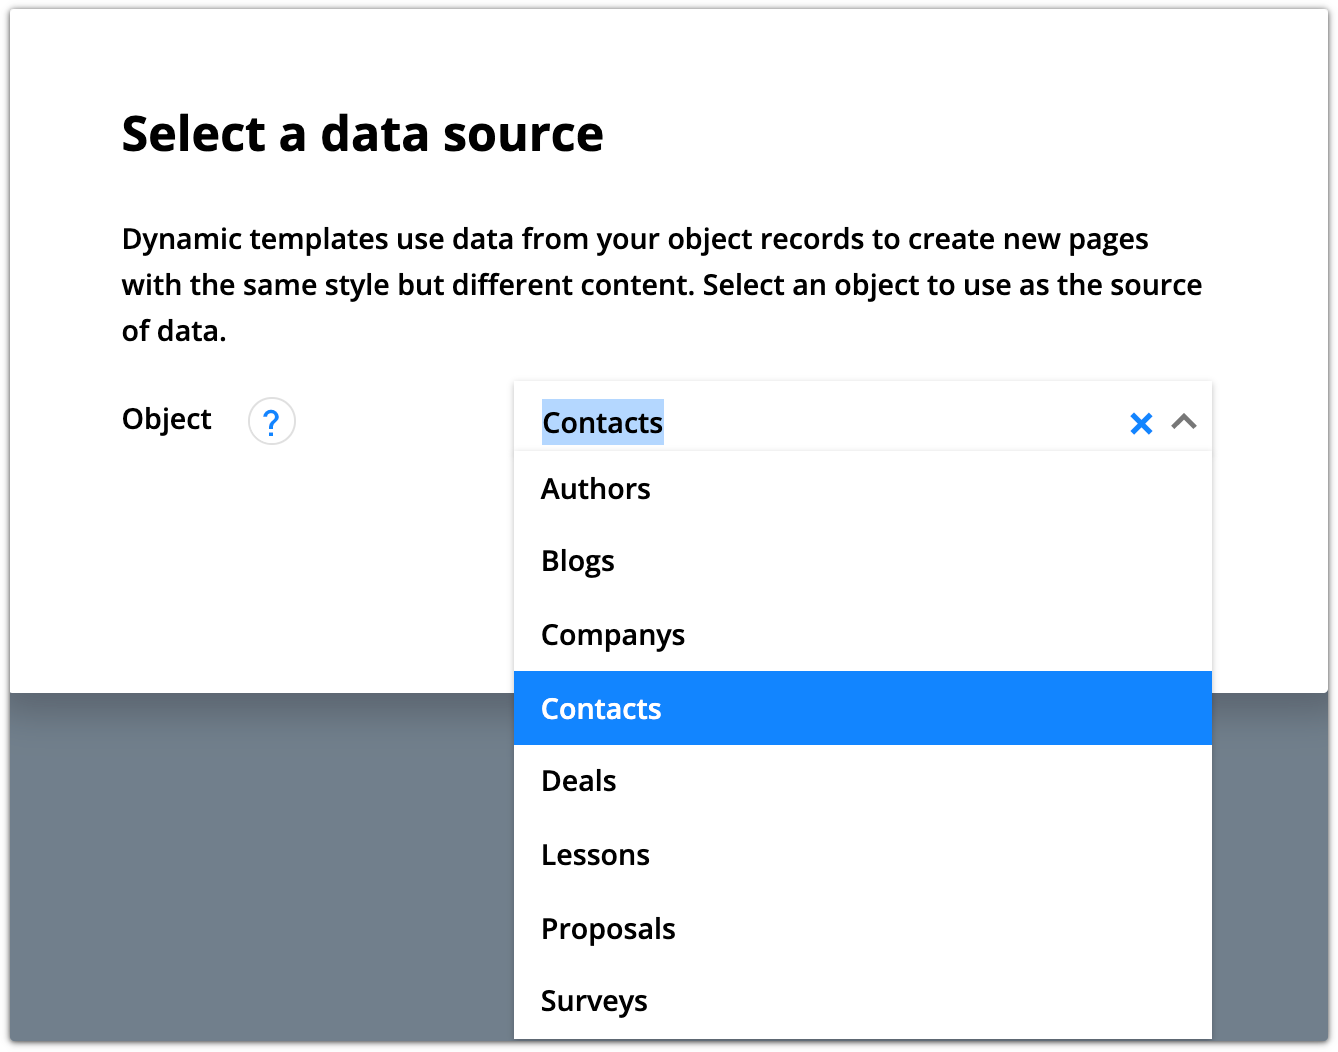
- Select the object in your account that you want to use as a data source.
- Click Continue.
- Name your page and select a page template, or click Start from scratch.
- Customize your page’s design.
- Add all of the static content you want to be the same on every page published using this template, such as navigation links and section labels.
- Add placeholder elements for the headline, subheadline, text and image elements that you want to make dynamic.
Once you’re happy with the layout and styling of your page, you’re ready to make your page elements dynamic. This means you’ll link each element that should be dynamic to the field you want to pull content from.
Make your elements dynamic
- Hover over the placeholder elements you want to make dynamic and click
 .
.
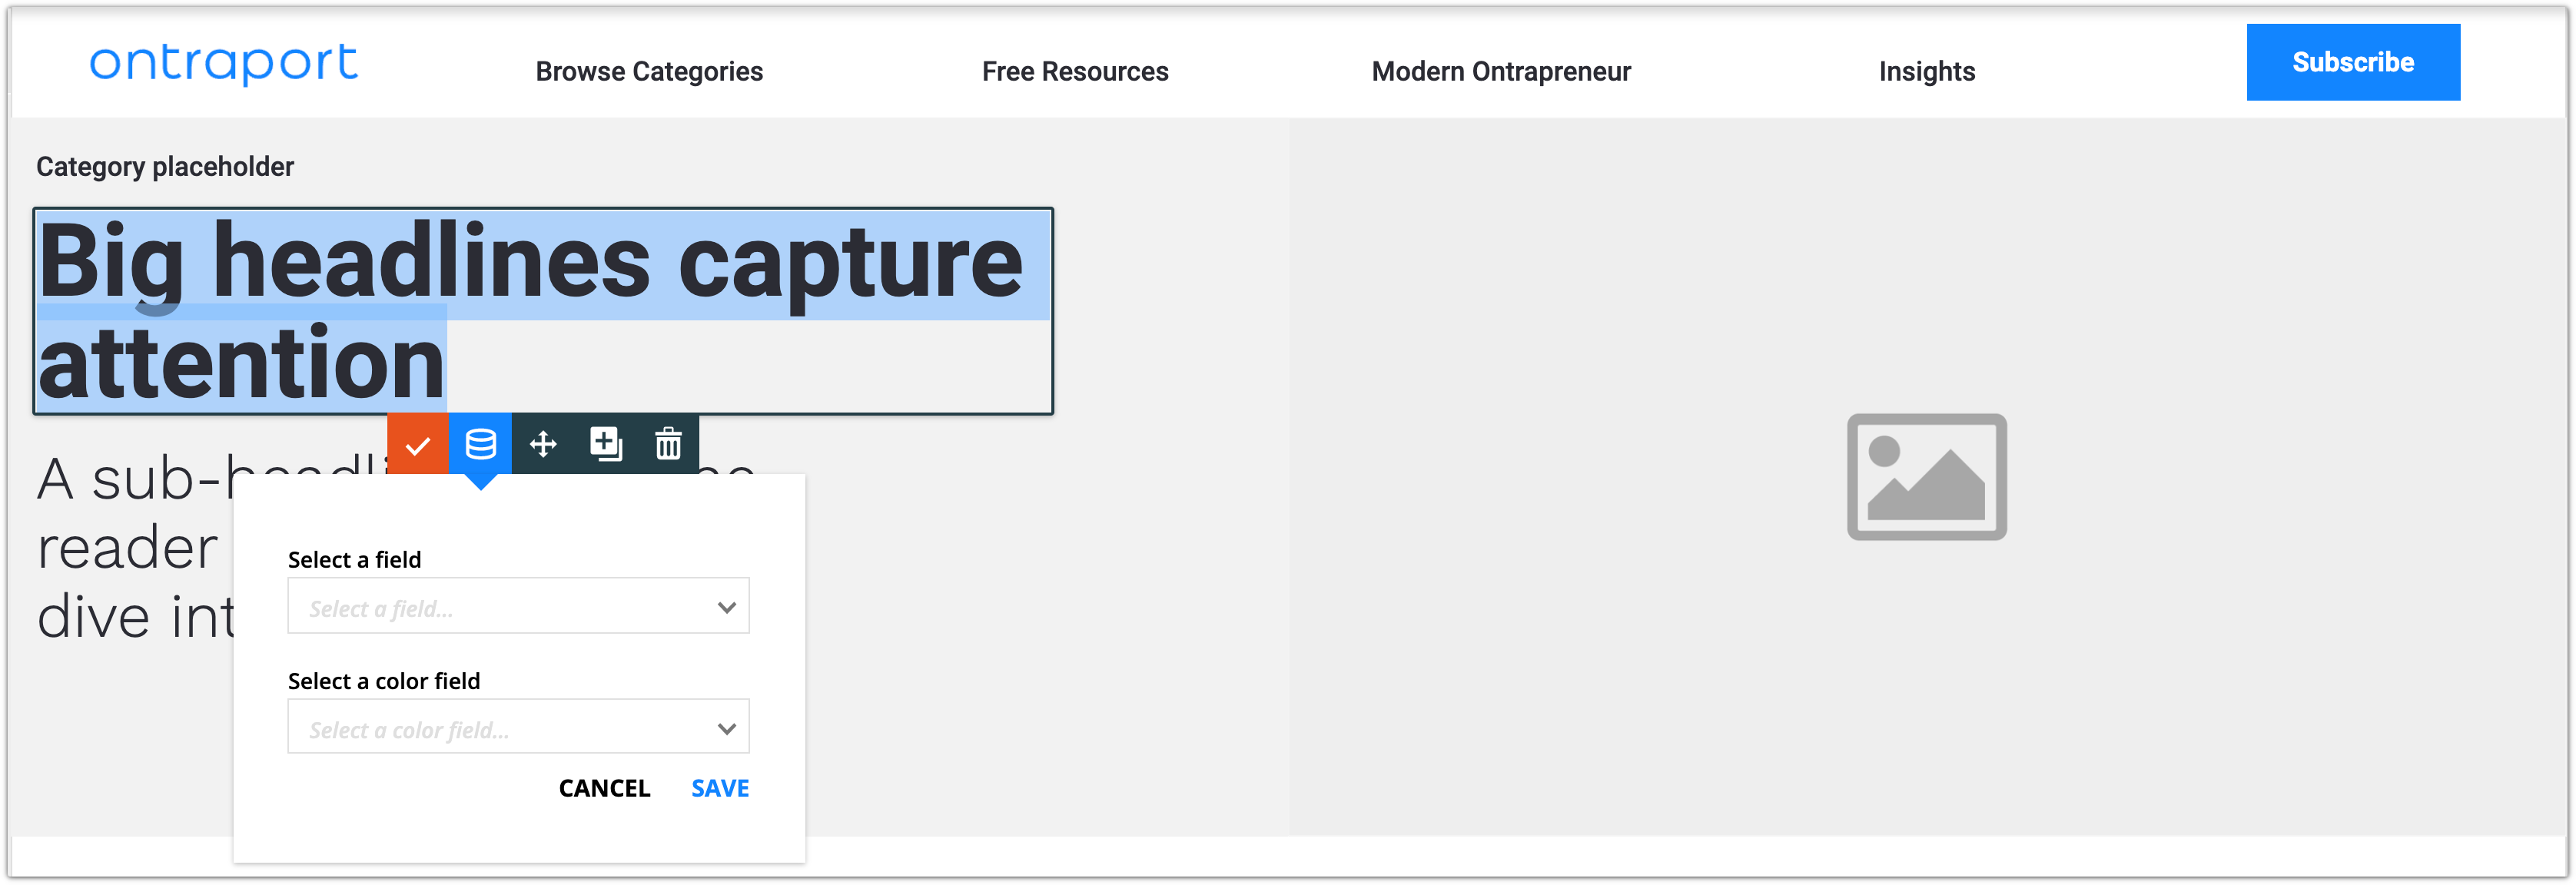
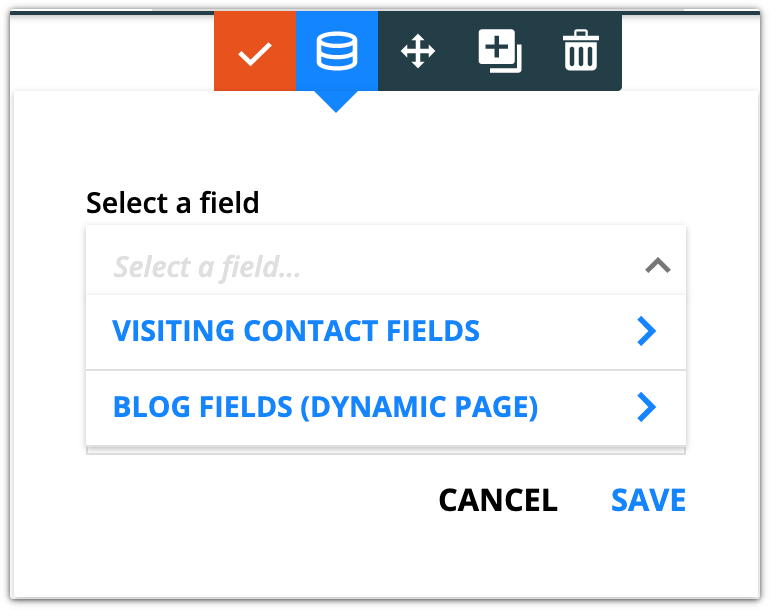
- Click the “Select a field” dropdown, and you have two types of fields to choose from:
- Visiting Contact Fields – These are like merge fields. They add information stored in your visiting contact’s record.
- Object Fields (Dynamic page) – This allows you to add fields from the data source you selected in step 2 of the “Create a dynamic template” instructions above.
- (Optional and for text elements only) Select the color field you want to use as your font color. This is a great option for color coding and categorizing your content visually.

- (Optional) Insert dynamic content into static content using merge fields. This is a great option to fill in the blanks on your page with dynamic content. For example, adding “By [Page//Author//Author name]” automatically adds the name of the author to an article’s byline.
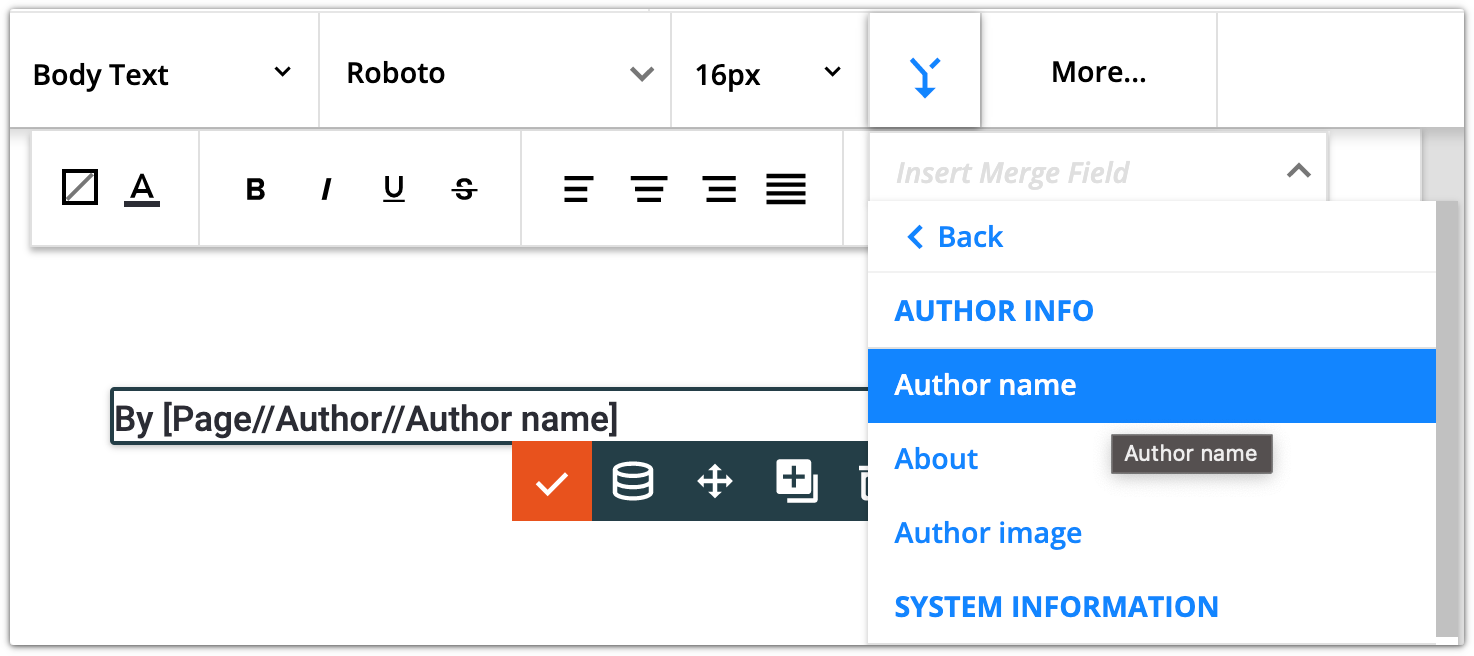
- Click
.png) and select the visiting contact or object field you want to add.
and select the visiting contact or object field you want to add. - Note, when you add dynamic content this way, your merge field won’t automatically transform into a preview. To preview this content, click Preview.
- Click Save.
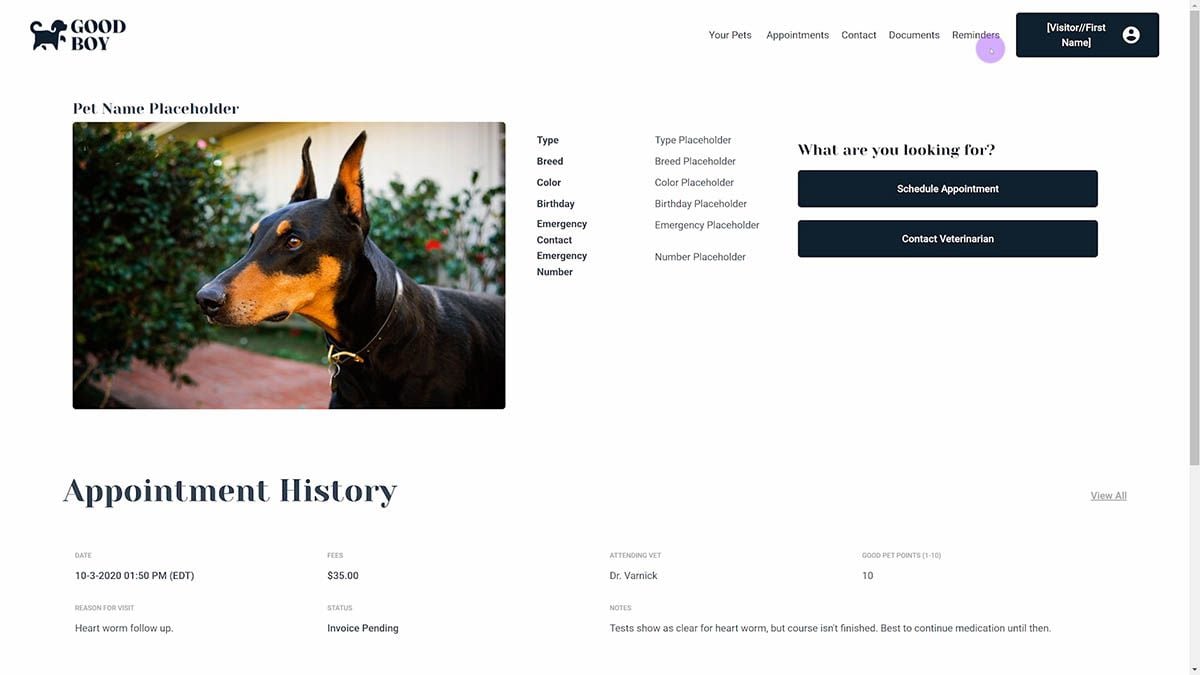
When you save your field’s settings, your placeholder text will automatically transform into a preview like the one below.

Add dynamic links
You have a couple of special link options on your dynamic templates. These options let you add internal links to connect your published dynamic pages. You can also link to URLs you have saved in your records and add “Next” and “Previous” buttons to the bottom of your pages.
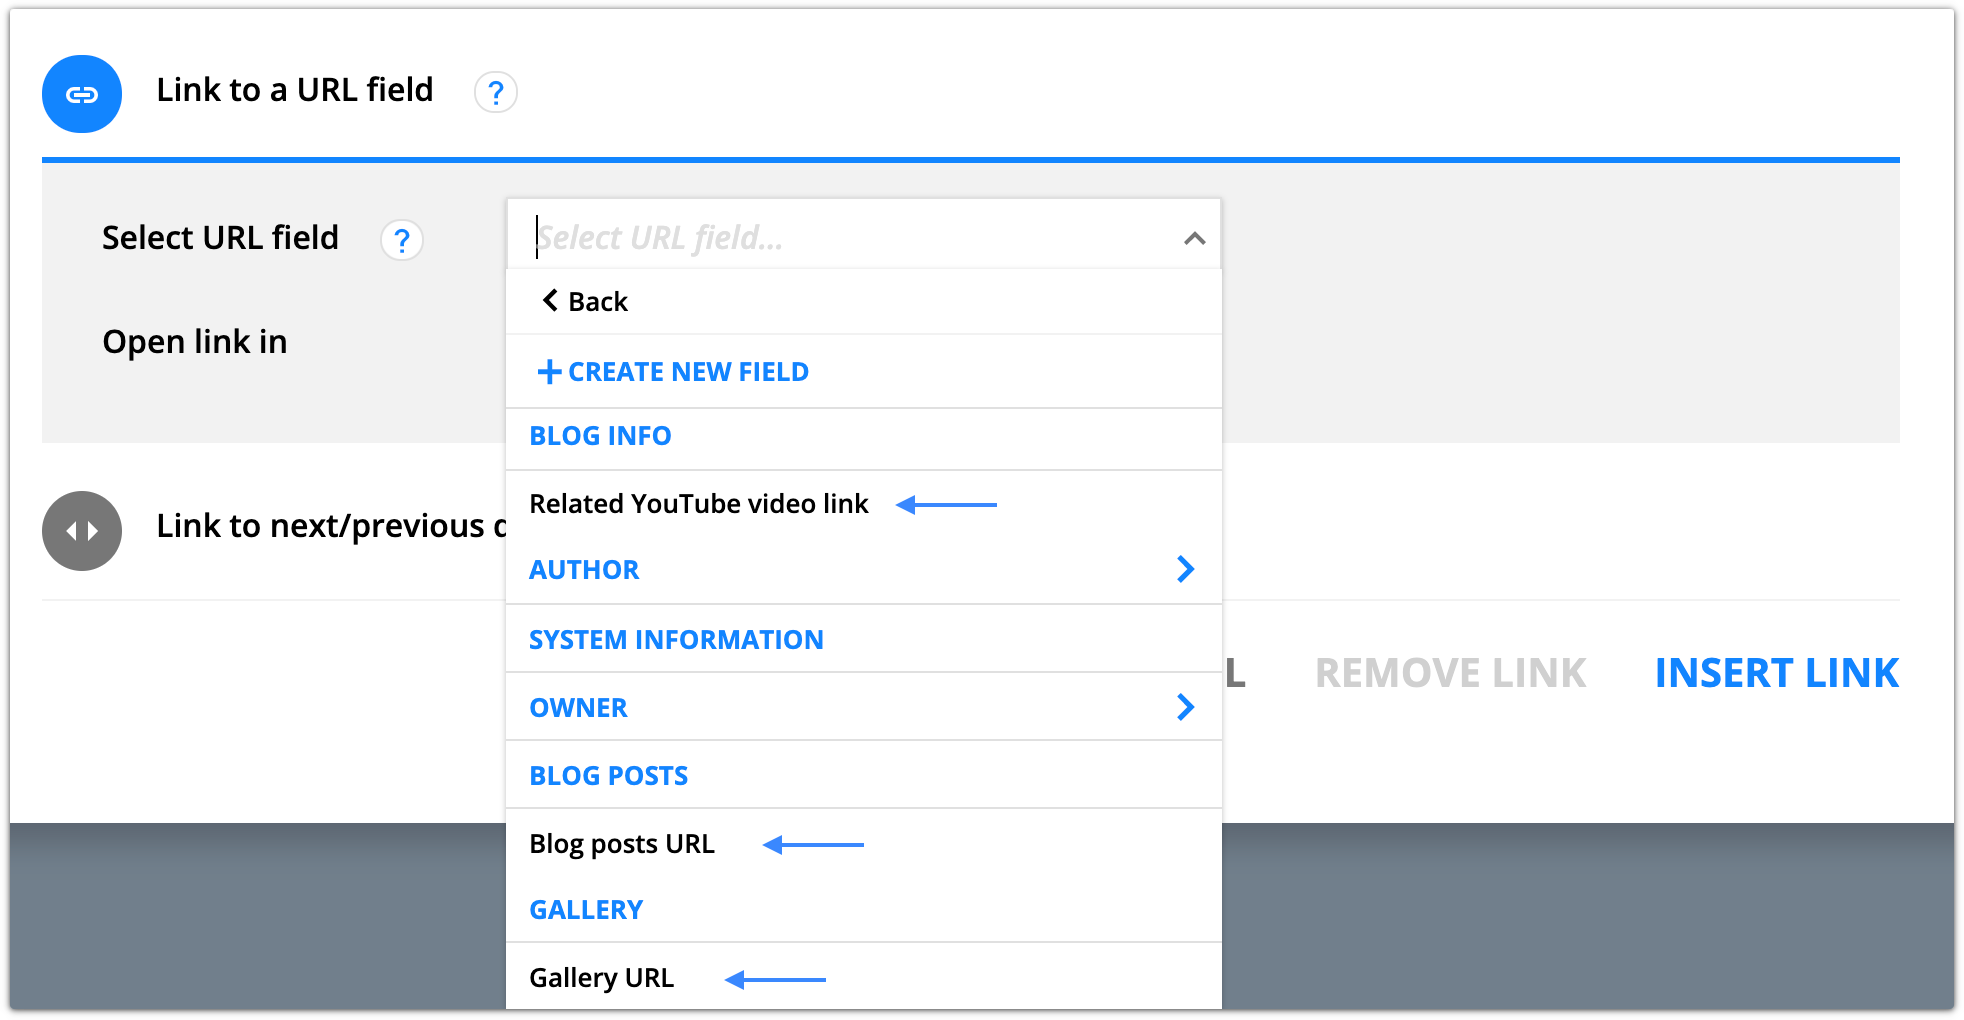
Link to a URL field
Your first dynamic link option allows you to link to a URL field.
There are two types of URL fields that you can link to:
- Custom URL fields saved in your records
- The URLs of your published dynamic pages
Here’s how to add dynamic links:
- Select the text you want to hyperlink and click
 from your top toolbar.
- Or add a button element to your page and click into its button link settings.
- Click Link to a URL field and select the field you want to hyperlink.
- Choose if you want to add a link stored in your visiting contact’s record or a field related to your page’s record.
- Select the URL field you want to hyperlink.
- Click Insert Link.
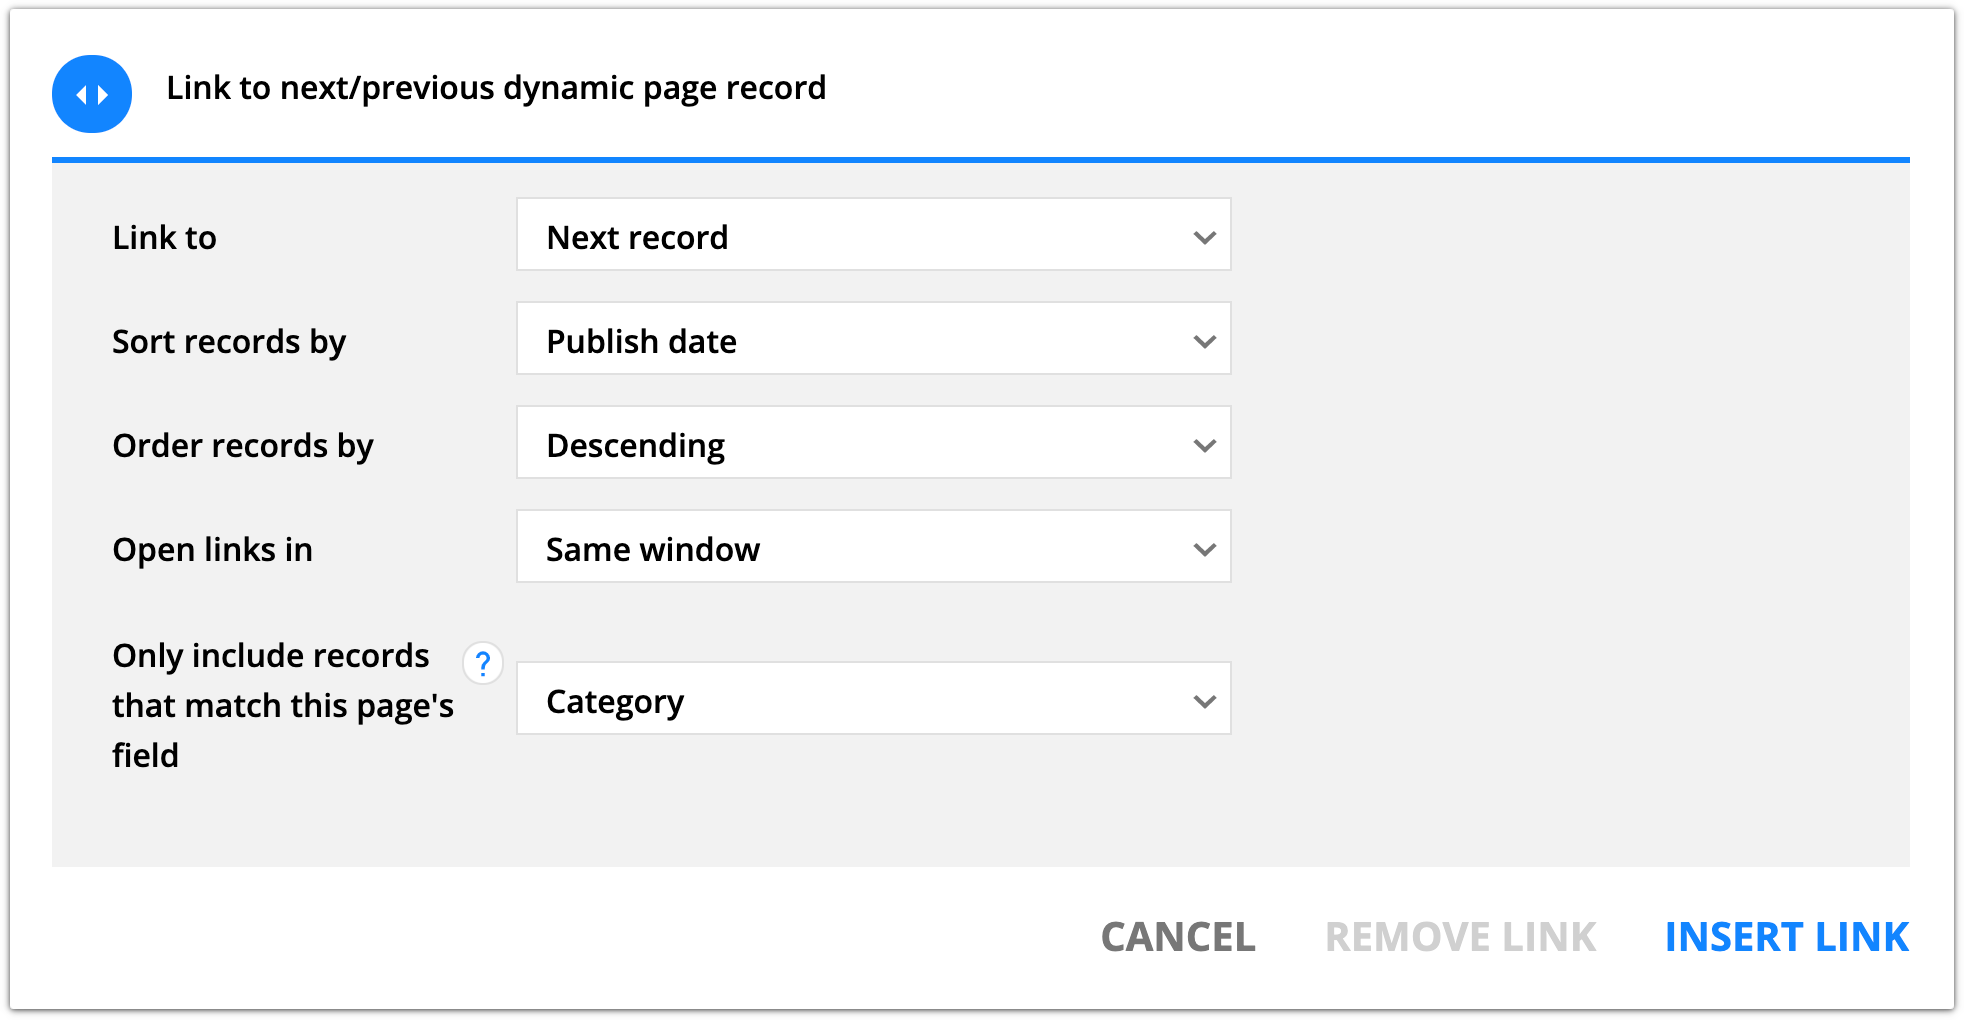
Link to next/previous dynamic page records
Use this option to let your visitors browse through the published pages of your other records. For example, you can add links to your next and previous blog articles or product pages.
Here’s how:
- Select the text you want to hyperlink and click from your top toolbar.
- Or add a button element to your page and click into its button link settings.
- Click Link to next/previous dynamic page record and customize your settings.
- Link to – Select if you want to link to the next or previous record.
- Sort records by – Choose the field to sort your records by, such as Title or Publish date.
- Order records by – Select if you’d like your list in ascending or descending order.
- Open links in – Choose if you want your link to open in the same window or a new window.
- Only include records that match this page’s field – (Optional) Add dynamic display conditions for your linked records. Choose a field that all linked pages should have in common, such as linking to blog articles in the same content category.
Customize your page’s display settings
When you customize your page’s display settings, you choose who should be able to see your page. You have a couple special page display settings that are only available on dynamic templates.
Contact matches dynamic page record
This setting is available on dynamic templates that have Contacts set as your templates’ source. This is ideal for creating personal profile pages on your membership site because it will ensure that your contacts can only access their own information.
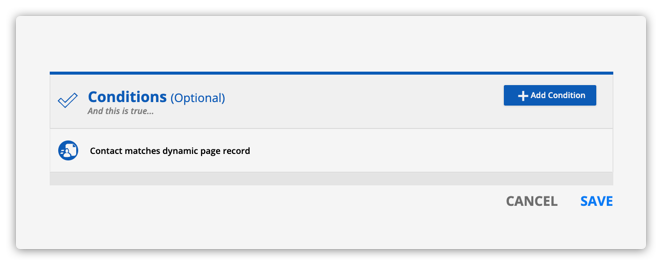
- Create or edit a dynamic template that has Contacts selected as your template’s source.
- Click Settings → Display Settings.
- Select “Some logged in members” from the “Display this page to whom?” dropdown.
- Click Add a condition.
- From your add a condition pop up, click Add Condition and select “Contact matches dynamic page record.
- Click Save.
Only show this page if the dynamic page record meets these conditions
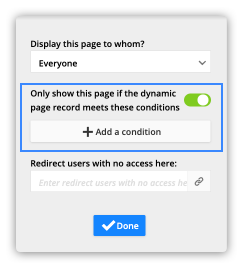
This option allows you to display your page only if the record of your dynamic template’s data source fits a condition. For example, if you want to display a sales page for your events only when you’re ready to sell tickets.
- Click Settings → Display Settings.
- Toggle “Only show this page if the dynamic page record meets these conditions” on.
- Click Add a condition and add the condition your page’s source record must meet in order to be displayed.
- Click Save.
- Add a redirect link to the “Redirect users with no access here” field. (Optional)
- This allows you to choose a page to send visitors to if they land on a page that does not fulfill your display condition.
- Click Done.
Visiting contact is/isn’t related to this dynamic page record
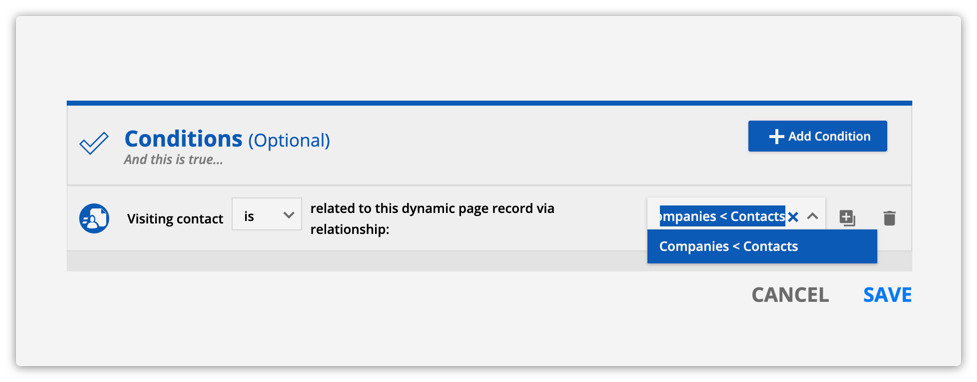
This option allows you to display your block to visitors who have (or don’t have) a relationship with your dynamic page’s source. For example, you can show your prospects contracts for their projects and ensure no one else can see your specific agreement.
- Click Settings → Display Settings.
- In the “Display this page to whom?” dropdown select either:
- Some identified visitors
- Some logged in members
- Click Add Condition and select “Visiting contact is or isn’t related to this dynamic page record.”
- In the first dropdown, select either “is” to create a positive condition or “is not” to create a negative condition.
- In the second dropdown, select the relationship you want.
- For example, if you want to ensure that only contacts who work for a specific company can see your page, add the condition “Visiting contact is related to this dynamic page record via relationship: Companies < Contacts.”
Customize your blocks’ display settings
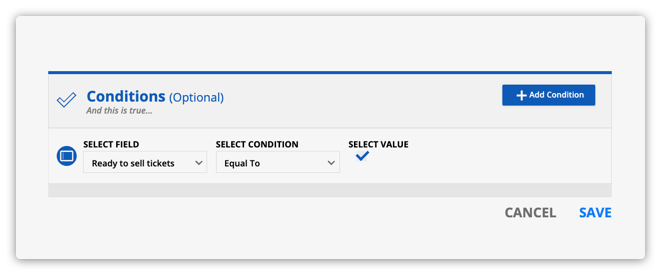
When you create dynamic templates, you can use any of the default block display settings that allow you to choose when you want your block to appear. But you’ve also got a special block display setting that only appears on Dynamic Templates: “Only show this block if the dynamic page record meets these conditions.”
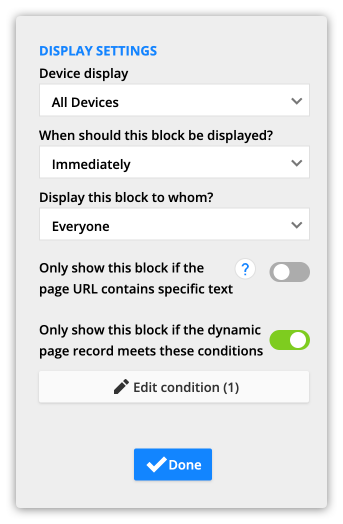
This condition works like the “Only show this page if the dynamic page record meets these conditions” page display condition, but it allows you to show or hide specific blocks instead of your whole page. For example, use this setting to only display an order form on your event’s page when you’re ready to sell tickets.
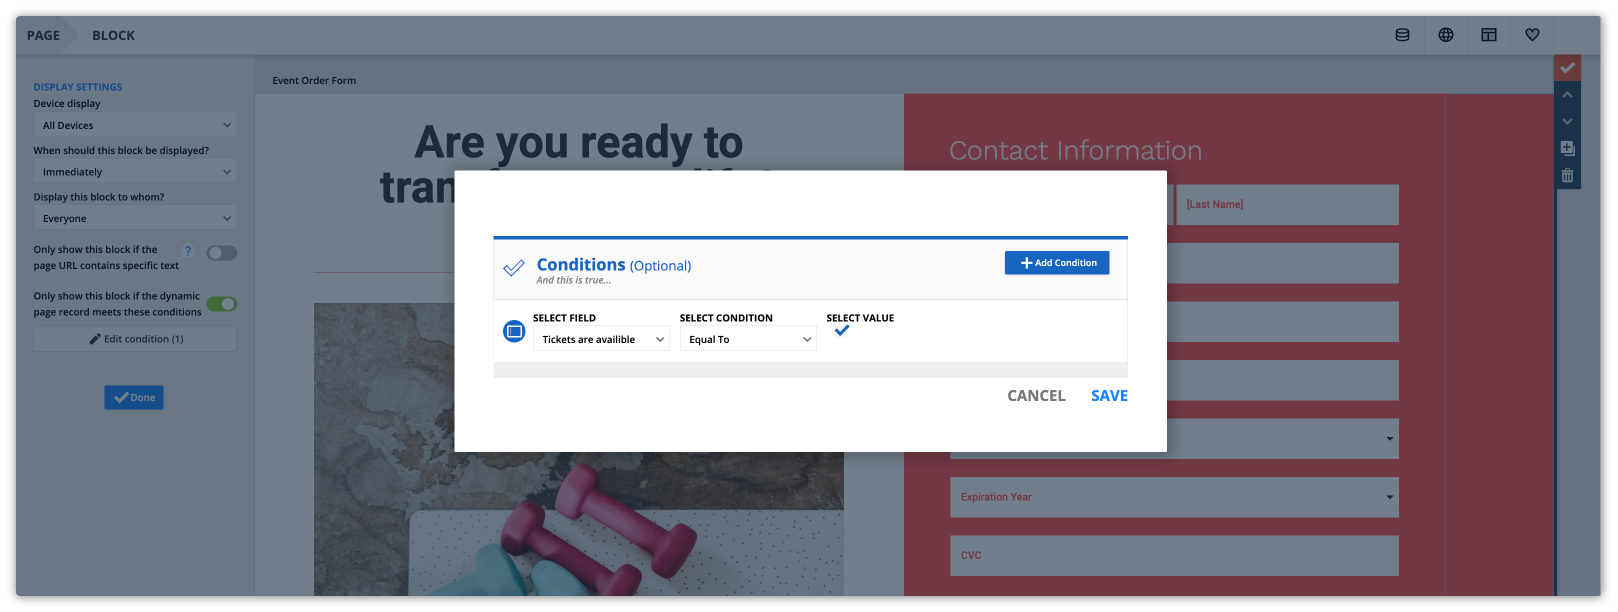
- Click Edit Block → Display Settings.
- Toggle “Only show this block if the dynamic page record meets these conditions” on.
- Click Add a condition and add the condition your page’s source record should meet in order to be displayed.
- Click Save.
- Click Done.
Learn more about customizing your page and block display settings in this video.
Preview settings
You can choose which record you want to use as a data source for your preview. This makes it easy to ensure that you’ve added the right field for your dynamic content.
You can also choose a contact to preview the “visiting contact fields” you’ve added to your template.
Change your data source
- Click the arrow next to the preview button to expand your preview settings.
- Click “Data Source” and “View as Contact” dropdown fields and select the records you’d like to use to preview your content.
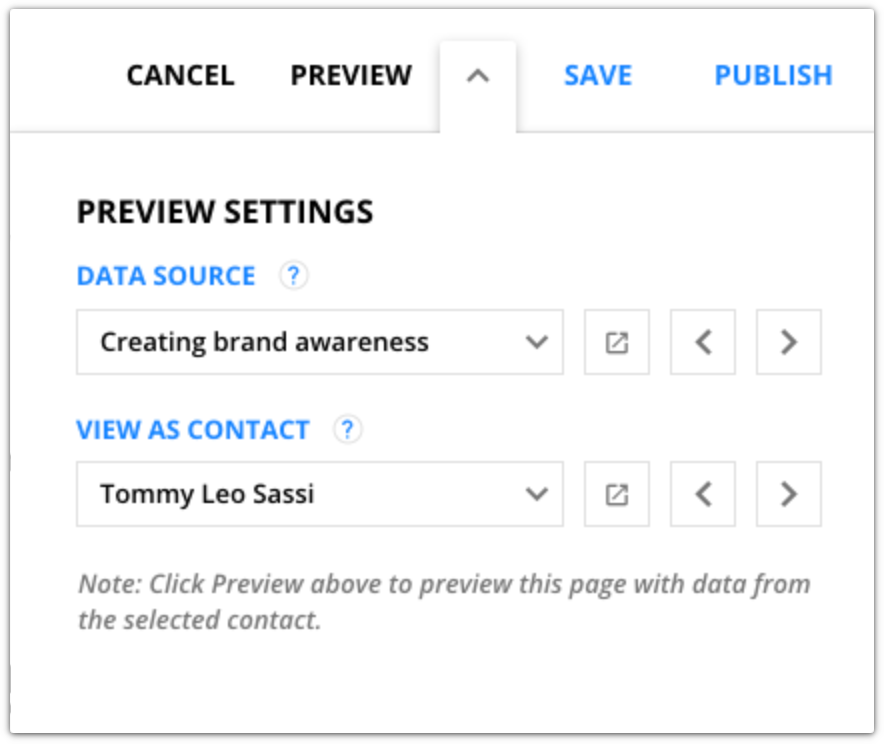
- Click
 to scroll through your records.
- You’ll see your dynamic content change based on the saved data in your selected preview record.
- Click
 to open your record in another window.
Next steps
Once you’ve created your page template and added your dynamic content, your next steps are:
- Add dynamic blocks if you want to add another object’s data or add a list of records on a single page.
- Publish your content.