The Advanced Calendar makes Ontraport's calendar feature more versatile than ever. It turns events into full objects with automations, custom fields and relationships. Enabling it in your account adds the full power of Ontraport’s Dynamic CMS to events, giving you the flexibility to create incredible interactive experiences for your customers.
It also provides access to Event collections that are flexible and can be tailored to your needs. You can create groups to organize your data, and use traditional object views such as Card View and List View.
This is very helpful for users who run many one-on-one meetings with unique configurations, such as sales teams or service providers.
For example, you can:
- Add a status field as a column in Card View to create a pipeline for your meetings. Then, organize the event cards and make updates with a quick drag-and-drop. A custom Card View is a great option to manage either stage or priority, and it's ideal for anyone with many events or meetings.
- Create rollup fields in contacts to keep track of the number of people who attended, canceled, and/or had positive outcomes from events in the past month. These rollup fields make it easy to track stats like the number of committed leads or deals won. It will provide a better understanding of engagement and help you identify when to address ongoing issues.
- Create a dynamic page for an event and design it to resemble Opentable or Resy. This page can include a location map, a description of what to bring, a contact form, and links to cancel or reschedule.
And so much more!
Does your business run relatively straightforward events and require only notifications or basic automation based on the event's start or end date, adding or removing guests, or canceling the event? If so, you can utilize the standard Ontraport Calendar feature to meet your needs.
The Advanced Calendar feature is for Pro accounts and above. It requires a DCMS package to create custom relationships or create dynamic content using your event data.
Table of contents
Enable Advanced Calendar
• Event automations
• Event and guest messages
• Broadcast history
• Event templates and booking pages
• Settings
Disable Advanced Calendar
Event relationships
Calendar views
Create new events
• Recurring events
• Automation for recurring events
• Split recurring events
Use cases
• 1. Create a custom Card View to manage events
• 2. Track how many events your contacts have attended or canceled
• 3. Add a next meeting section in client portals
• 4. Create an event template
Enable Advanced Calendar
The Advanced Calendar saves your existing event information in records like other objects in your account. You can create automation maps, customize Card Views, create groups, and perform other actions for your events.
- Go to
.png) → Administration → Advanced features → toggle on Advanced Calendar.
→ Administration → Advanced features → toggle on Advanced Calendar. - Click Confirm on the upgrade dialog.
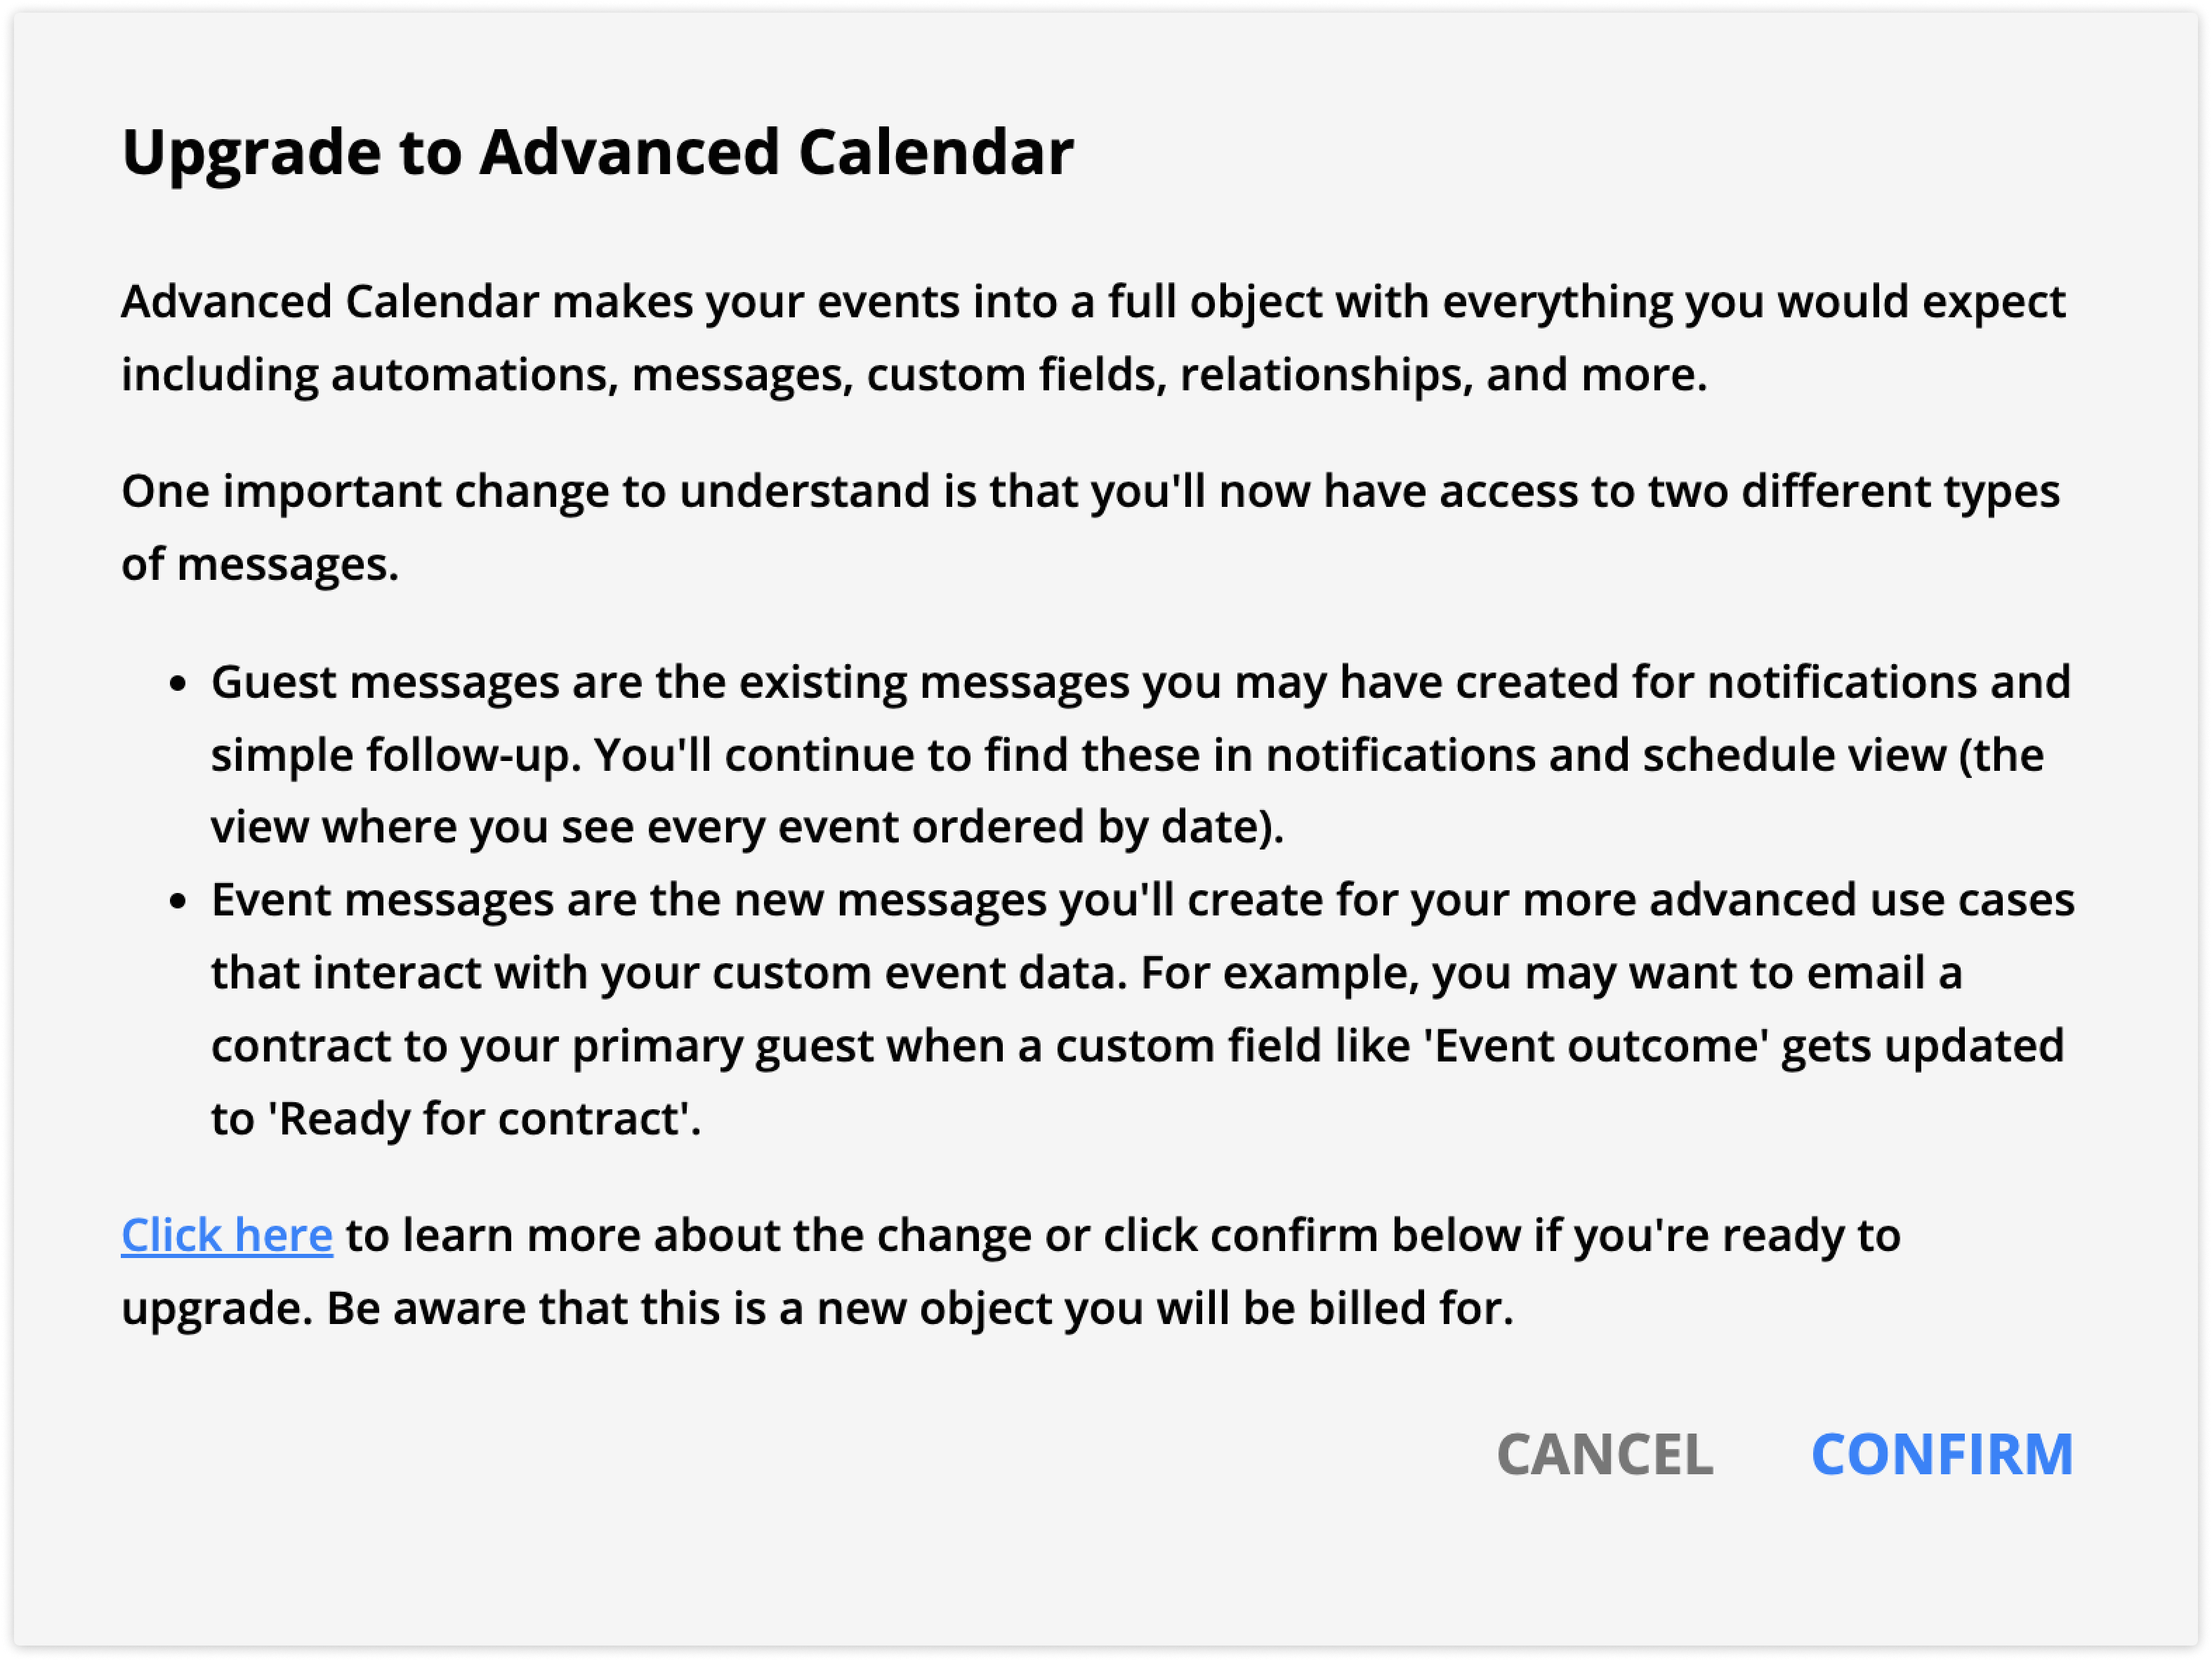
When you enable Advanced Calendar, you’ll see more options under Calendar in your main navigation.
Before | After |
|
Learn more about the new sections below.
Enable Advanced Calendar
Event automations
Back to top
Using the standard Ontraport Calendar, you can add event guests to automation via notifications on your event templates. With Advanced Calendar, you can create unique configurations and flows for your sales teams or service providers.
Event automations work just like automations in other objects.
- Watch this Ontraport University lesson to learn more about automations.
Updating a record with an Update Event element provides access to event, owner, primary guest, primary host and booking page fields.
Event and guest messages
Back to top
Before enabling Advanced Calendar, you’ll find the Messages collection when you hover over Calendar.
Once you enable Advanced Calendar, you’ll have both Event Messages and Guest Messages instead of just Messages. Here are the main differences between the two.
Event Messages | Guest Messages |
You’ll create these messages for more advanced use cases that interact with your custom event data. For example, send a contract when the primary guest’s Event outcome field gets updated to Ready for contract. You can create event tasks.
| These are the existing messages you’ve created for notifications and simple follow-ups. You can’t create guest message tasks. Use contact tasks instead.
|
We recommend avoiding creating Event Messages and Guest Messages for the same type of automation to prevent duplicate messaging.
Broadcast history
Back to top
The Calendar Broadcast History works like it does for other objects and allows you to manage your manual sends.
Event templates and booking pages
Back to top
Event templates and booking pages work the same way they do with the standard Ontraport Calendar.
Settings
Back to top
From the Calendar Settings you can access the following settings:
- Field editor
- Add/edit/delete fields in your event records. You can’t delete the default fields that are necessary for the calendar feature to function.
- Fulfillment manager
- Create fulfillment lists for events for use in the Calendar automations.
- Exported lists
- View and download previously exported lists of events.
- Default merge fields
- Set default merge fields for the fields in your event records.
- Manage tags
- Add or Delete tags that you can apply to event records.
Disable Advanced Calendar
Back to top
You can turn off Advanced Calendar at any time, and the Events object will no longer count against your account object limit.
Before turning off the feature, remove any custom relationships or fields related to Events.
If you attempt to turn off the feature when you still have custom relationships or fields, a pop-up will tell you what to remove.
You can toggle the feature off once you’ve removed custom fields and relationships.
Type “DELETE ADVANCED CALENDAR” in the dialog and click Delete.
Event relationships
Back to top
Advanced Calendar exposes all relationships between Events, Contacts, and Users. Go to ![]() → Administration → Data → Custom objects → Events → Manage relationships to view two relationships that are crucial for your Advanced Event builds:
→ Administration → Data → Custom objects → Events → Manage relationships to view two relationships that are crucial for your Advanced Event builds:
- Users < Events (Primary host) - Use this one-to-many relationship to add host details to event pages and emails or update the host’s information.
- If a user is set as the host on your booking page, they will be the event’s primary host.
- Contacts < Events (Primary guest) - Use this one-to-many relationship to add guest details to event messages, create custom upcoming events pages and update the guest’s information.
- If a guest schedules an event from a booking page, they will be the event’s primary guest.
You will also see two many-to-many relationships that are accessible if you need them; however, the one-to-many relationships are the main focus of the Advanced Calendar feature.
- Users >< Events (Hosts) - If you add more than one host to an event, you’ll see all of the hosts in the Hosts subcollection in event records.
- Contacts >< Events (Guests) - If you add more than one guest to an event, you’ll see all of the guests in the Guests subcollection in the event records.
Calendar views
Back to top
Advanced Calendar gives you three options for viewing your events when you click the Calendar navigation item.
- List View—This view is just like the List View in any other object. Clicking on an event from this view, you can switch between Quick and Detail View for individual records.
- Note that you can't update default fields such as the Start and End Date or Duration when you view an event's record in Quick or Detail View. To edit those fields, edit the event template by clicking on the event from Schedule View.
- Card View—This view is similar to the Card View in any other object. Clicking on records from this view, you can switch between Quick and Detail View for individual records.
- Schedule View—This is the default view for standard calendar events. Clicking on an event from this view, you can edit its event template.
- You can change the event's end date and duration settings when you edit your event's template.
Create new events
Back to top
To create new events, follow the steps for the standard calendar feature. You’ll always see the event template when you create a new event. After filling out the basic information, save your event and click on it using List or Card View to fill in your custom fields.
Recurring events
Back to top
When creating recurring events, you can change the specific details of each instance in the schedule view or manage them together in List or Card View.
Recurring events without an end date will create 730 instances of the event (Google’s maximum number of instances). You must manually extend the event by updating the end repeat settings to create more than 730 instances.
When you change the event's start date, end date, frequency, or duration, you'll create an event split.
Automation for recurring events
Back to top
We recommend that you use event notifications to automate communication before and after your event. However if you need to create custom event automation maps it’s important to use the “Next recurring event start date and time” in your triggers instead of the Start date field.
The start date for recurring events in the event record shows the date and time of the first instance of the recurring event. The “Next recurring event start date and time” will always show the date and time of the next instance of the event. For the first event this will also be the original start time.
It’s also important to select the “Move here when triggered” option from the “If Contact is already on map, then…” trigger setting to ensure that recurring event records are triggered for every instance.
- If you select the “Add here again” option, then you are likely to send duplicate notifications to your guests. Each time that your event is triggered it will increase the number of duplicate messages you’ll send.
Again we recommend that you use notifications on the event template to automate reminders and follow-up regarding recurring events.
Split recurring events
Back to top
When events split, you’ll have two event series, and when you view the record in List or Card View, you’ll see two records. One will contain your original information, and the other will contain your updated event information.
The changes you makes to split event records are intuitive and will work as you expect them to. However, if you would like to see exactly how the values in the event record fields will change, use the chart below.
We use "Original series" and "Updated series" to describe the two event records you'll create.
The original event series is the one before you made any changes to it. The updated event series contains the changes you implemented when you split the recurring event.
There are two ways to split an event. When saving your changes, choose to update:
- This and all following events
- This event only
When an event is split and the original is on an automation, the "Updated series" will be added to the same position.
Below is a chart of what will be different when you split an event and choose to update this event or all the following events. It also includes examples for the use case described below.
“I created a repeating event with six instances starting on 10/4 and repeating every Friday at 9 A.M. for one hour.”
The dates of my events in the original series:
- 10/4
- 10/11
- 10/18
- 10/25
- 11/1
- 11/8
“After setting this up, I changed the 10/25 instance to start at 10 instead of 9, and I chose to update this event and all the following events.”
Original series | Updated series |
| 10/4 | 10/25 |
| 10/11 | 11/1 |
| 10/18 | 11/8 |
Field / | Original series | Updated series |
| Start date | Start date of the first instance in the original series. 10/4 at 9 am | Start date of the first instance in the updated series. 10/25 at 10 am |
End date | End date of the first instance in the original series. 10/4 at 10 am | End date of the first instance in the updated series. 10/25 at 11 am |
End repeat date | End date of the last instance in the original series. 10/18 at 10 am | End date of the last instance in the updated series. 11/08 at 11 am |
Total event occurrences | Updated number of instances remaining in the original series Updated from 6 to 3 | Updated number of instances in the updated series (if there is no end repeat, this number may be close to 730). 3 |
Future event occurrences | Updated number of instances remaining in the original series. 3 | Updated number of instances in the updated series. 3 |
Next recurring event start date | Start date of the next instance in the original series (or blank if no events remain in the original series). 10/4 at 9 am | Start date of the first instance in the updated series. 10/25 at 10am |
Next recurring event end date | End date of the next instance in the original series (or blank if no events remain in the original series). 10/4 at 10 am | End date of the next instance in the updated series (or blank if no future events remain in the updated series). 10/25 at 11am |
Last recurring event start date | Start date of the last instance in the original series. 10/18 at 9 am | Start date of the last instance in the updated series. 11/8 at 10 am |
Event logs | Logs show all events up to the point of the split and any remaining events in the original series. | Logs show only events in the updated series. |
Automation logs | Same as above. | Same as above. |
Tasks | Connected to closed tasks (or to open tasks if there are future instances in the original series). | Not connected to closed tasks from the original series; includes duplicate open tasks from the original series. |
Date added | Remains the same. | Remains the same. |
IP Address | Remains the same. | Remains the same. |
Last Activity | Shows the date of the split. 10/1 | Shows the date of the split. 10/1 |
Date modified | Shows the date of the split. 10/1 | Shows the date of the split. 10/1 |
Unique ID | The original series receives a new unique ID. | The updated series retains the original unique ID. |
Custom object relationships
| Relationships are removed. | Relationships are associated with the updated series. |
Custom object relationships
| Relationships remain the same. | Relationships remain the same. |
There are a few differences when you spit an event by updating "this instance only."
Field / | Original series | Updated instance |
| Tasks | Connected to closed tasks and open tasks. | Not connected to any closed tasks; connected to duplicate open tasks. |
| Unique ID | Retains the original unique ID. | Receives a new unique ID. |
Use cases
Back to top
Here are a few use cases you can accomplish with this feature. This list is not exhaustive; there are endless possibilities to build a system tailored to your business’s unique needs!
1. Create a custom Card View to manage events
Back to top
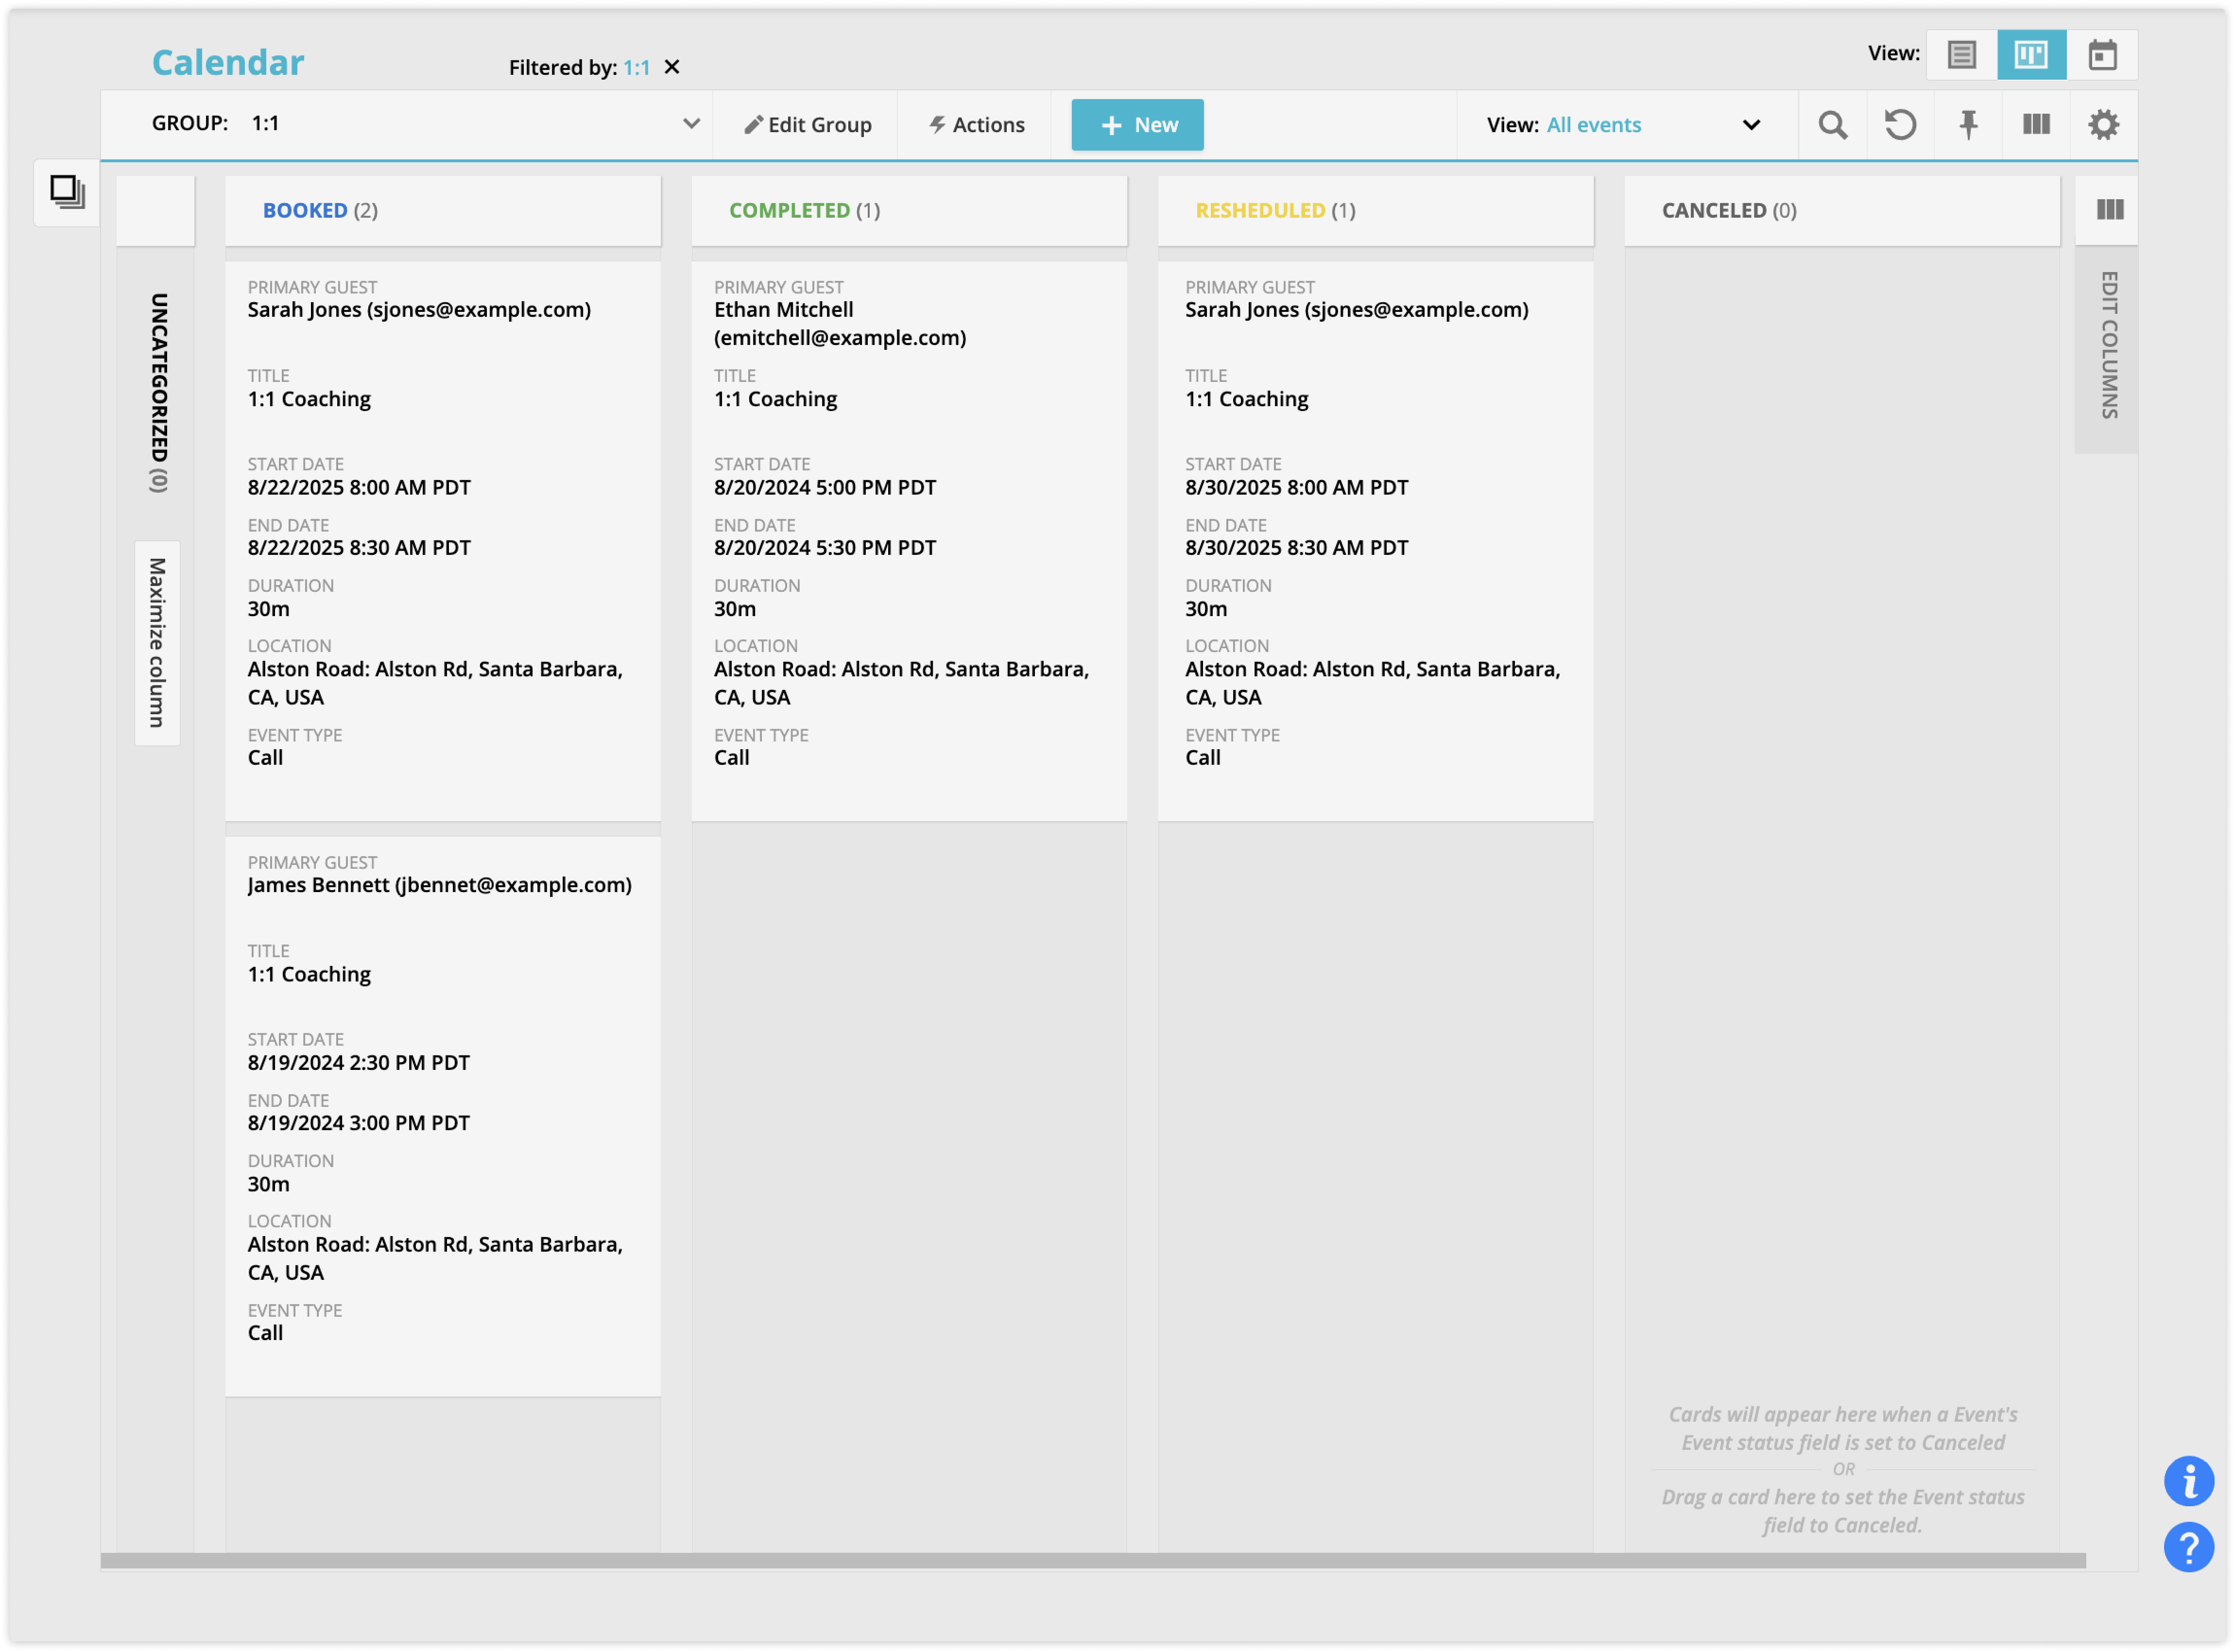
You can use the Pipeline color field as the column in Card View to make a pipeline for your meetings.
Organize them and make updates with a quick drag-and-drop. This setup is excellent for viewing status and priority. It’s ideal for anyone with many events or meetings.
- Go to the Calendar Card View and select the Pipeline field as your columns.
- Create groups for your team to show them today’s calls so they can start managing their schedule and events from the Card View.
- Create an event automation map that updates the status of new events so they appear in the first column of your Card View.
- Use the Event is created trigger to add your new events to the automation.
- Add an Update Event element below the trigger. Select the Event status field and update the value to Booked.
- Add End elements to all your empty What happens next? and publish your automation.
If you have additional follow-up you’d like to automate when events move to different statuses, simply add goals to your original map. These goals move events when the Pipeline field is updated to specific values and create unique lines of automation for each status. For example, when a demo is moved to the completed status, send an email to the client with some follow-up tasks.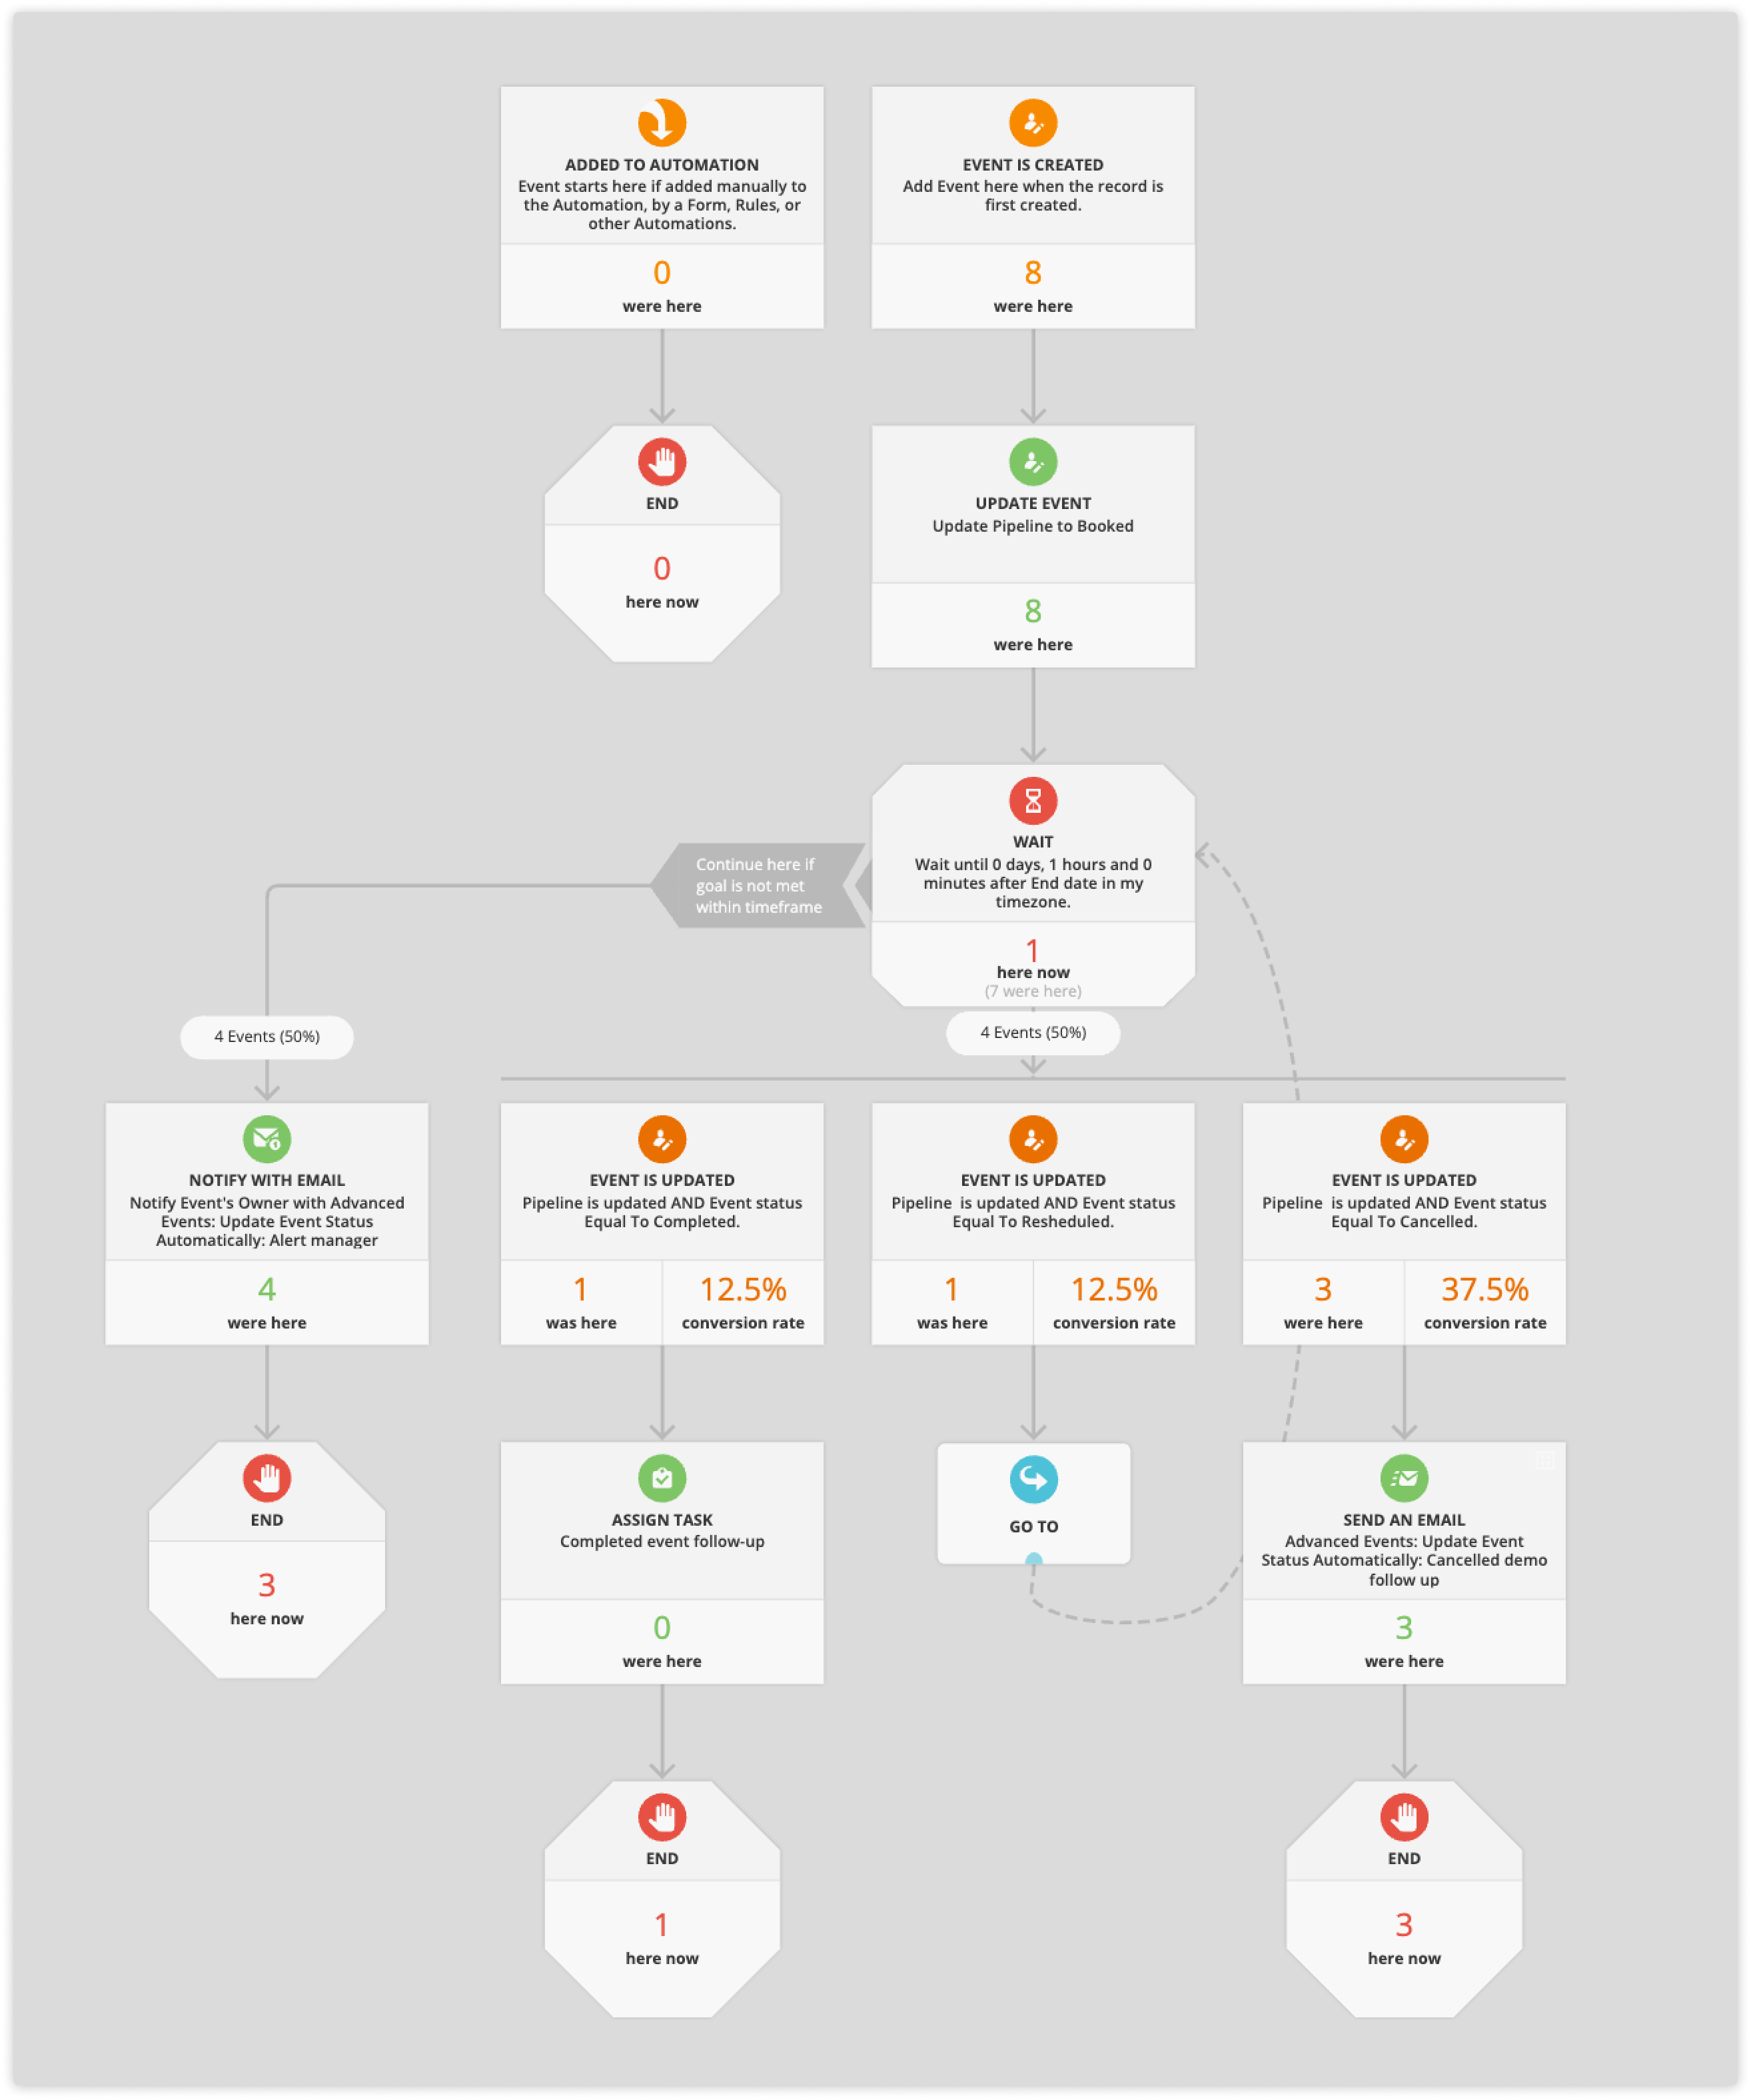
2. Track how many events your contacts have attended or canceled
Back to top
This option is helpful when you want to track things like committed leads or number of deals your sales reps have won. It will give you a better understanding of engagement and help you know when to address ongoing issues. Plus it’s a great tool for managerial oversight of a team of service providers or salespeople.
This use case also builds on the custom status dropdown outlined in the first use case.
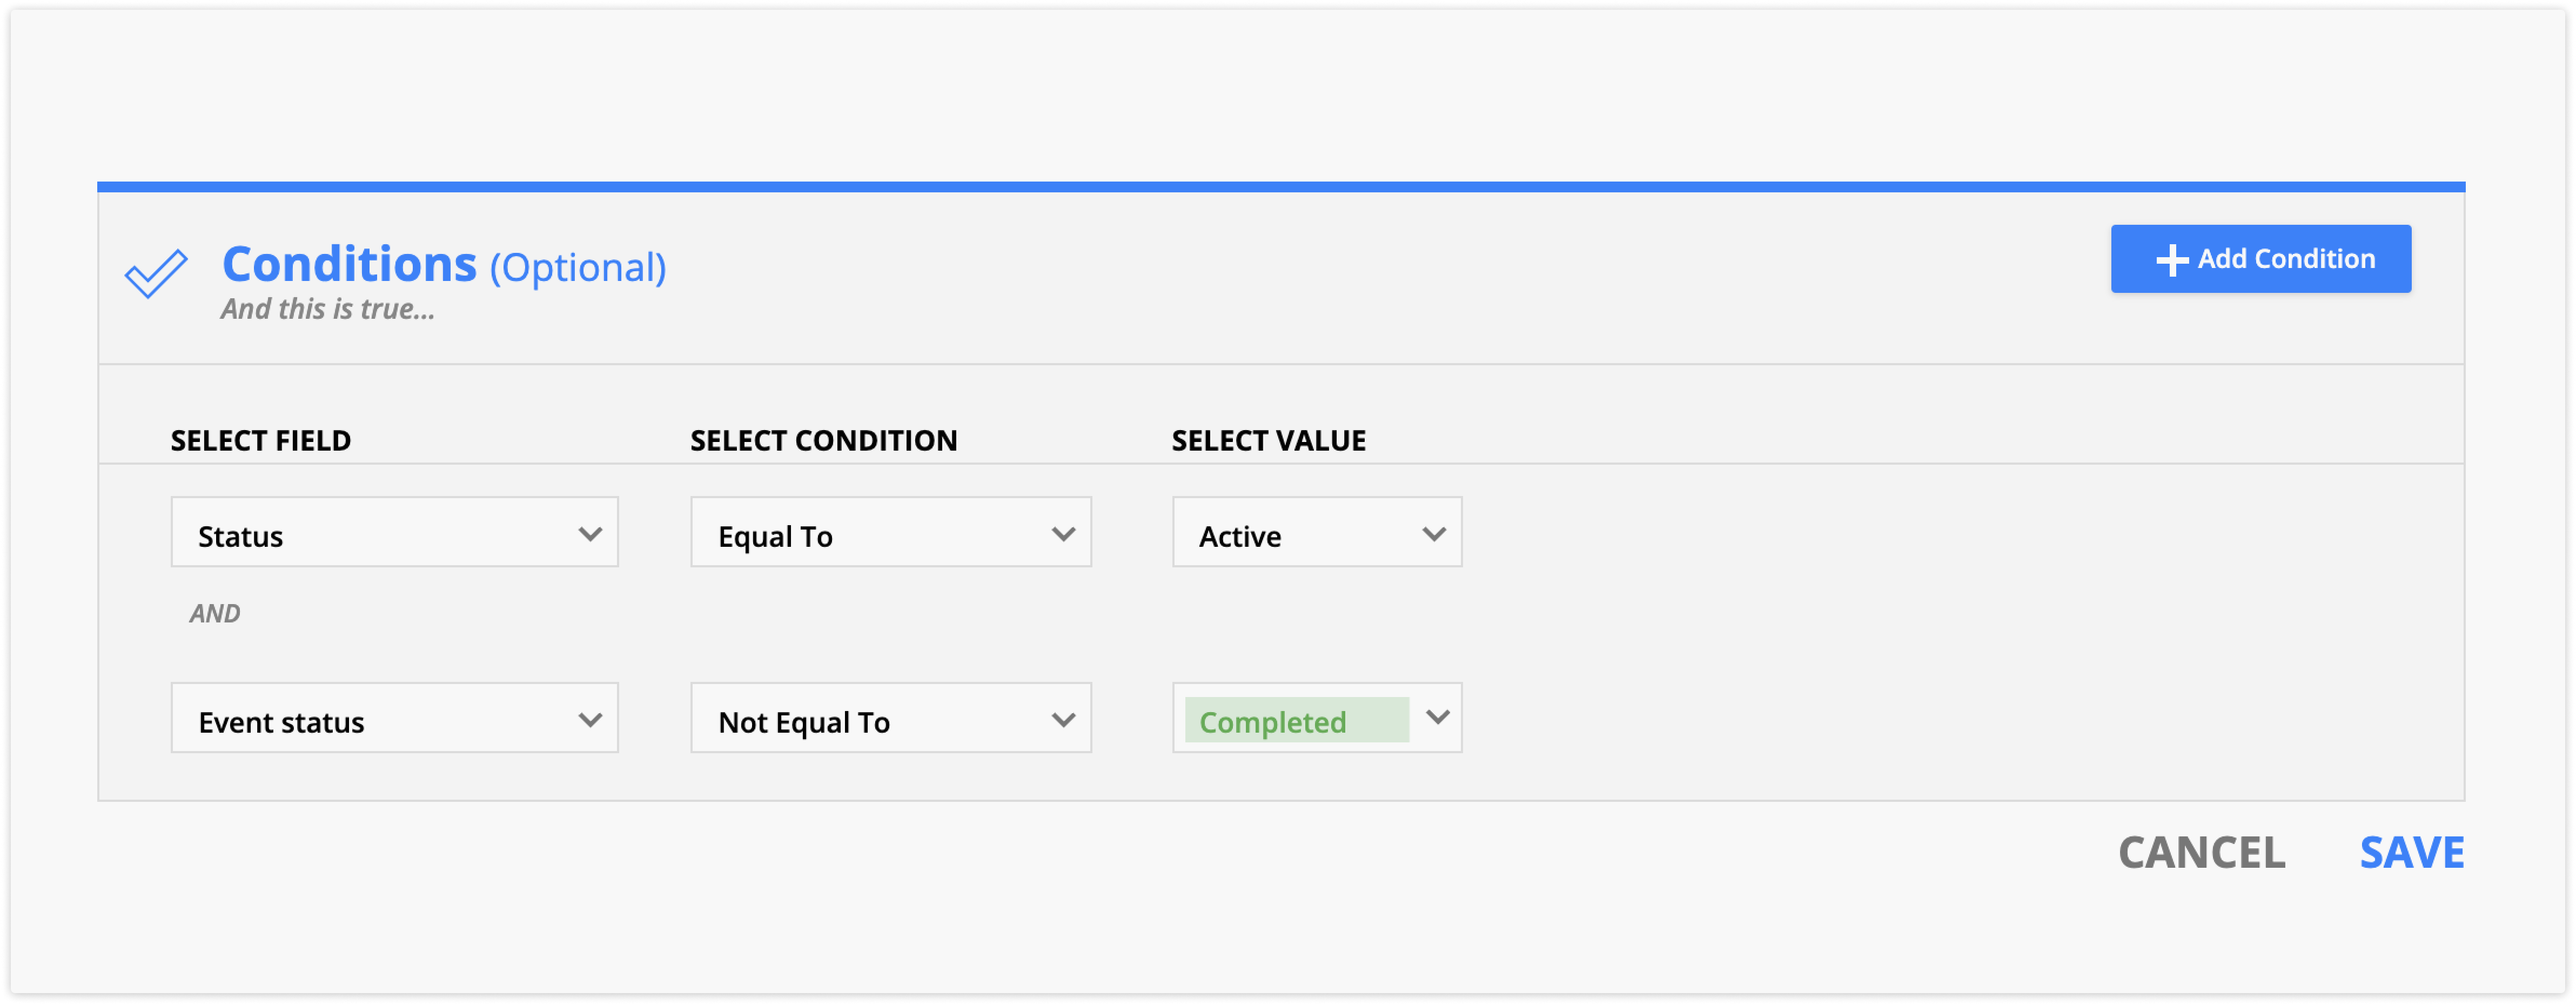
Create a rollup field for attended events
Go to your contacts field editor and create a rollup field.
- Field name: Attended Events
- Field type: Rollup
- Rollup type: Count
- Select a relationship: Contacts < Events (Primary guest)
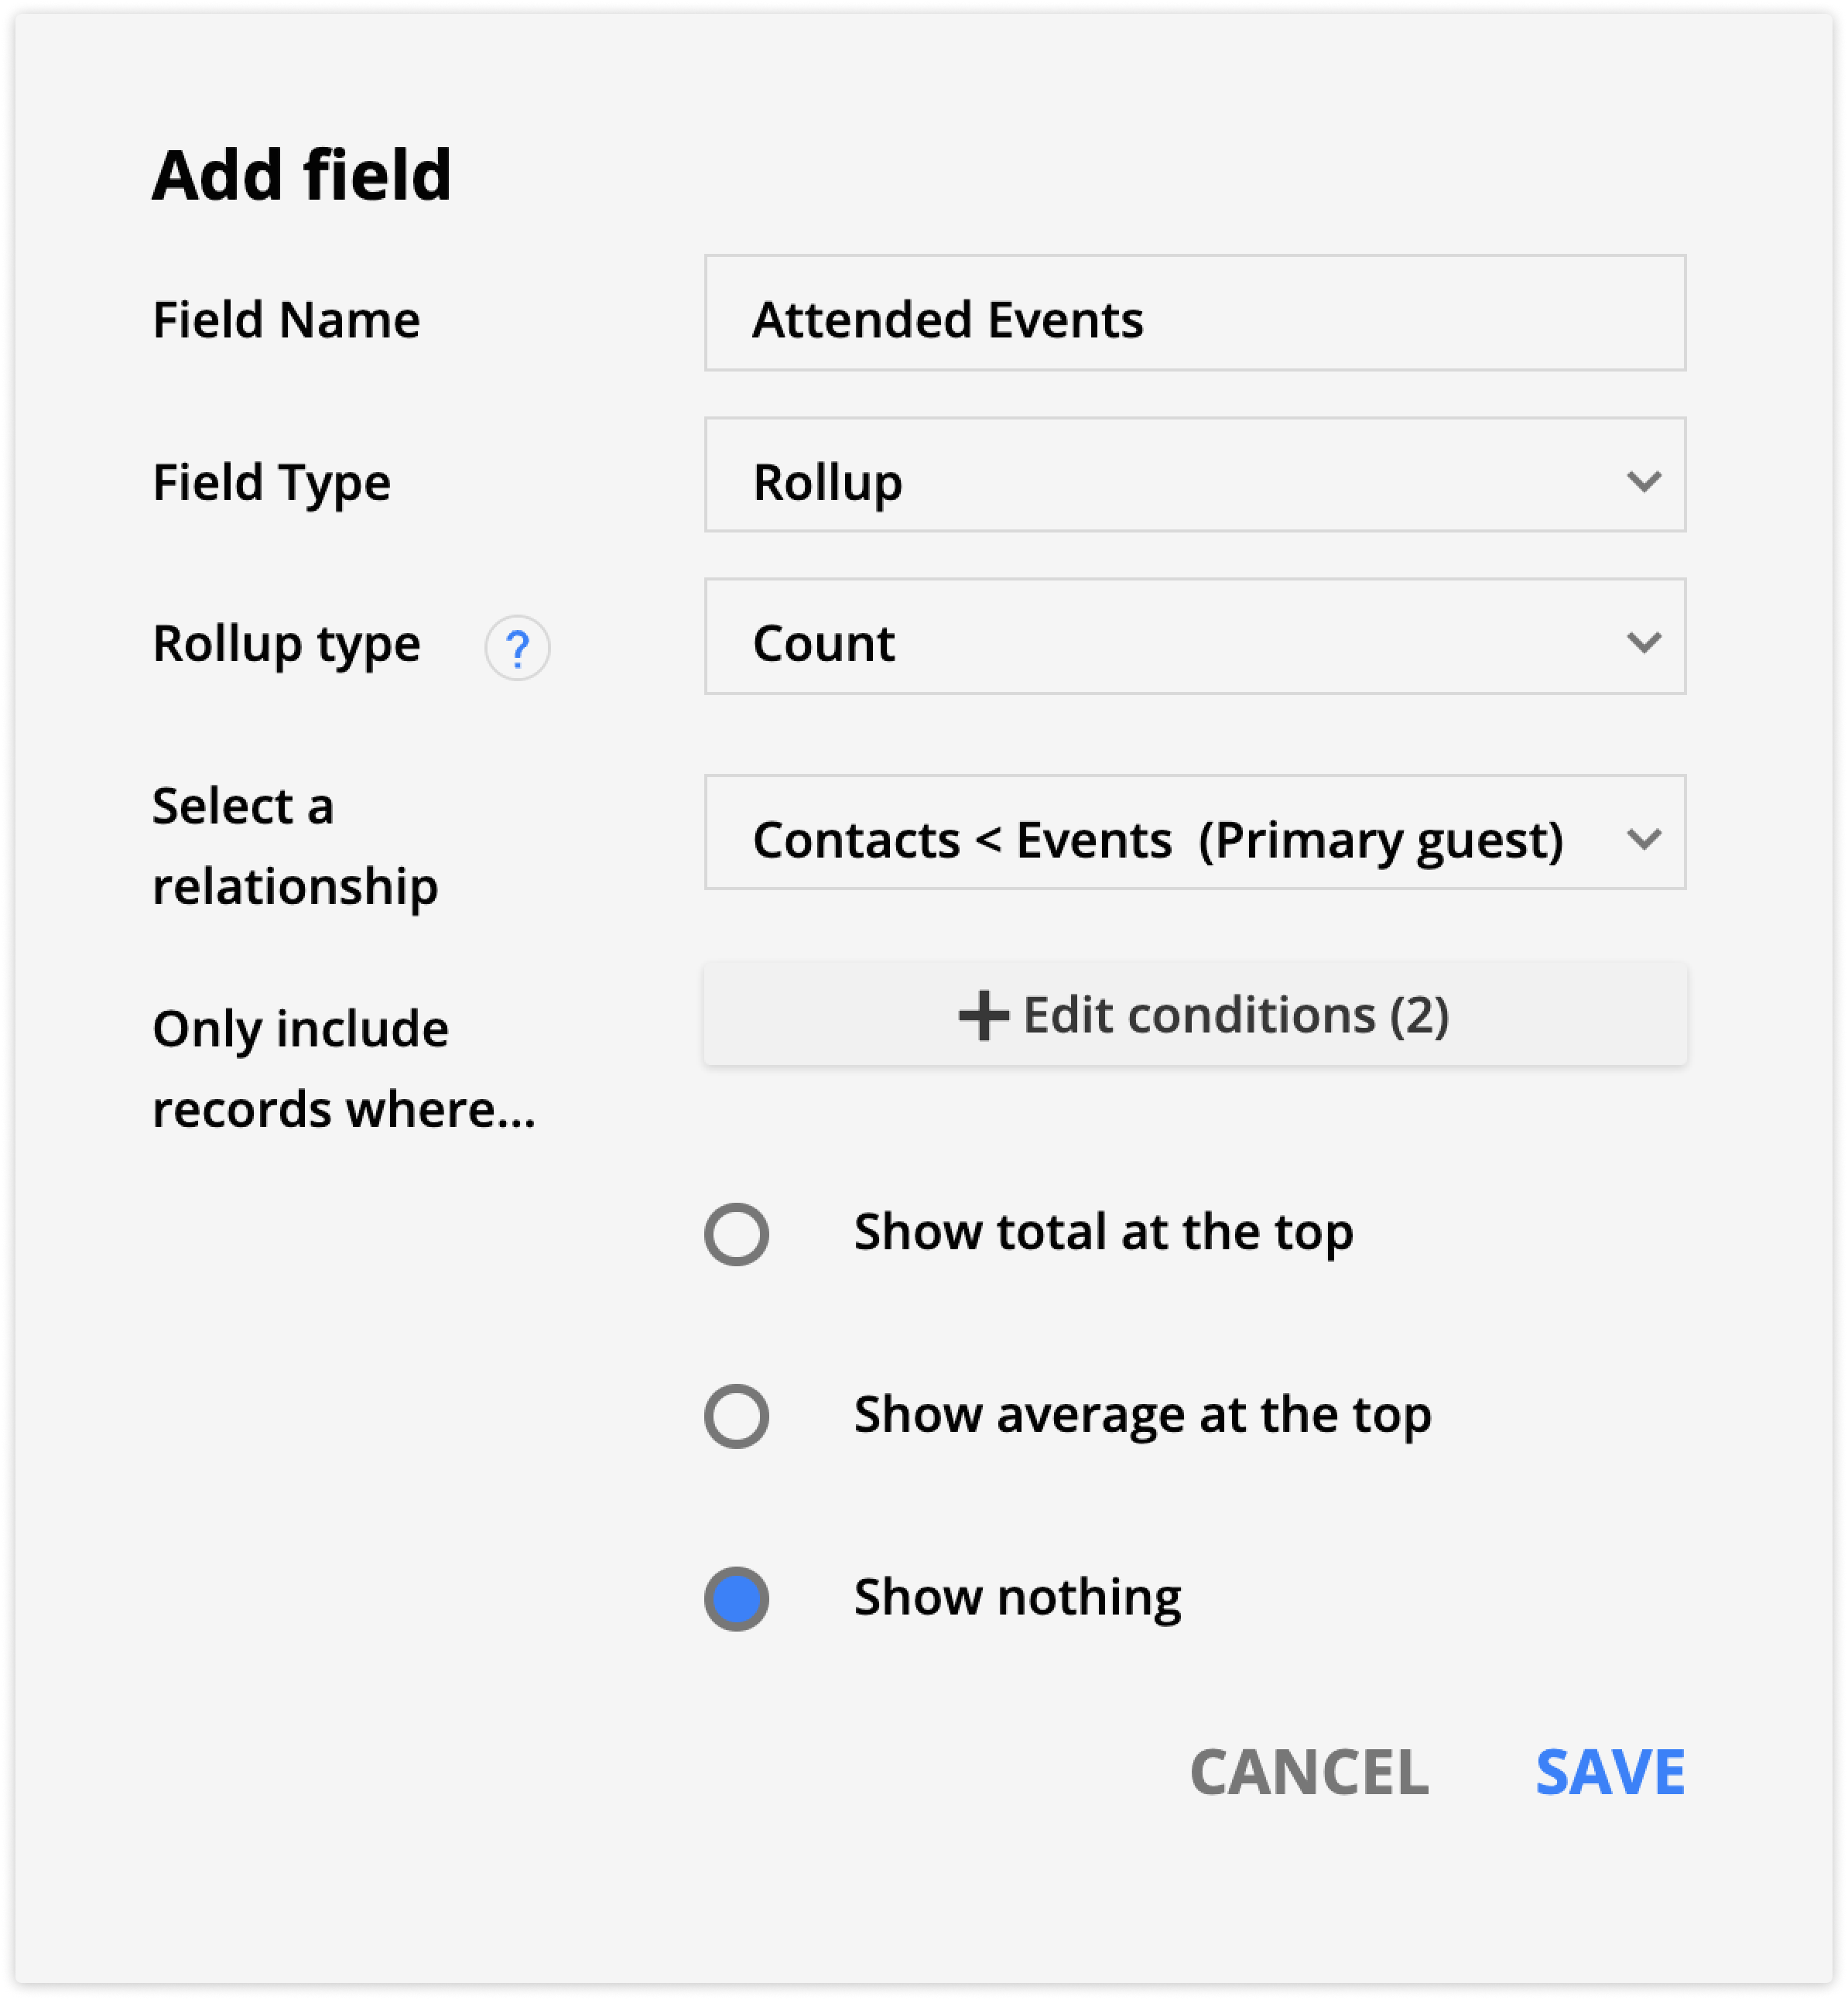
Add two conditions:
- Status equal to Active
- Event status equal to Completed
Create a rollup field for canceled events
Go to your contacts field editor and create a rollup field.
- Field name: Canceled Events
- Field type: Rollup
- Rollup type: Count
- Select a relationship: Contacts < Events (Primary guest)
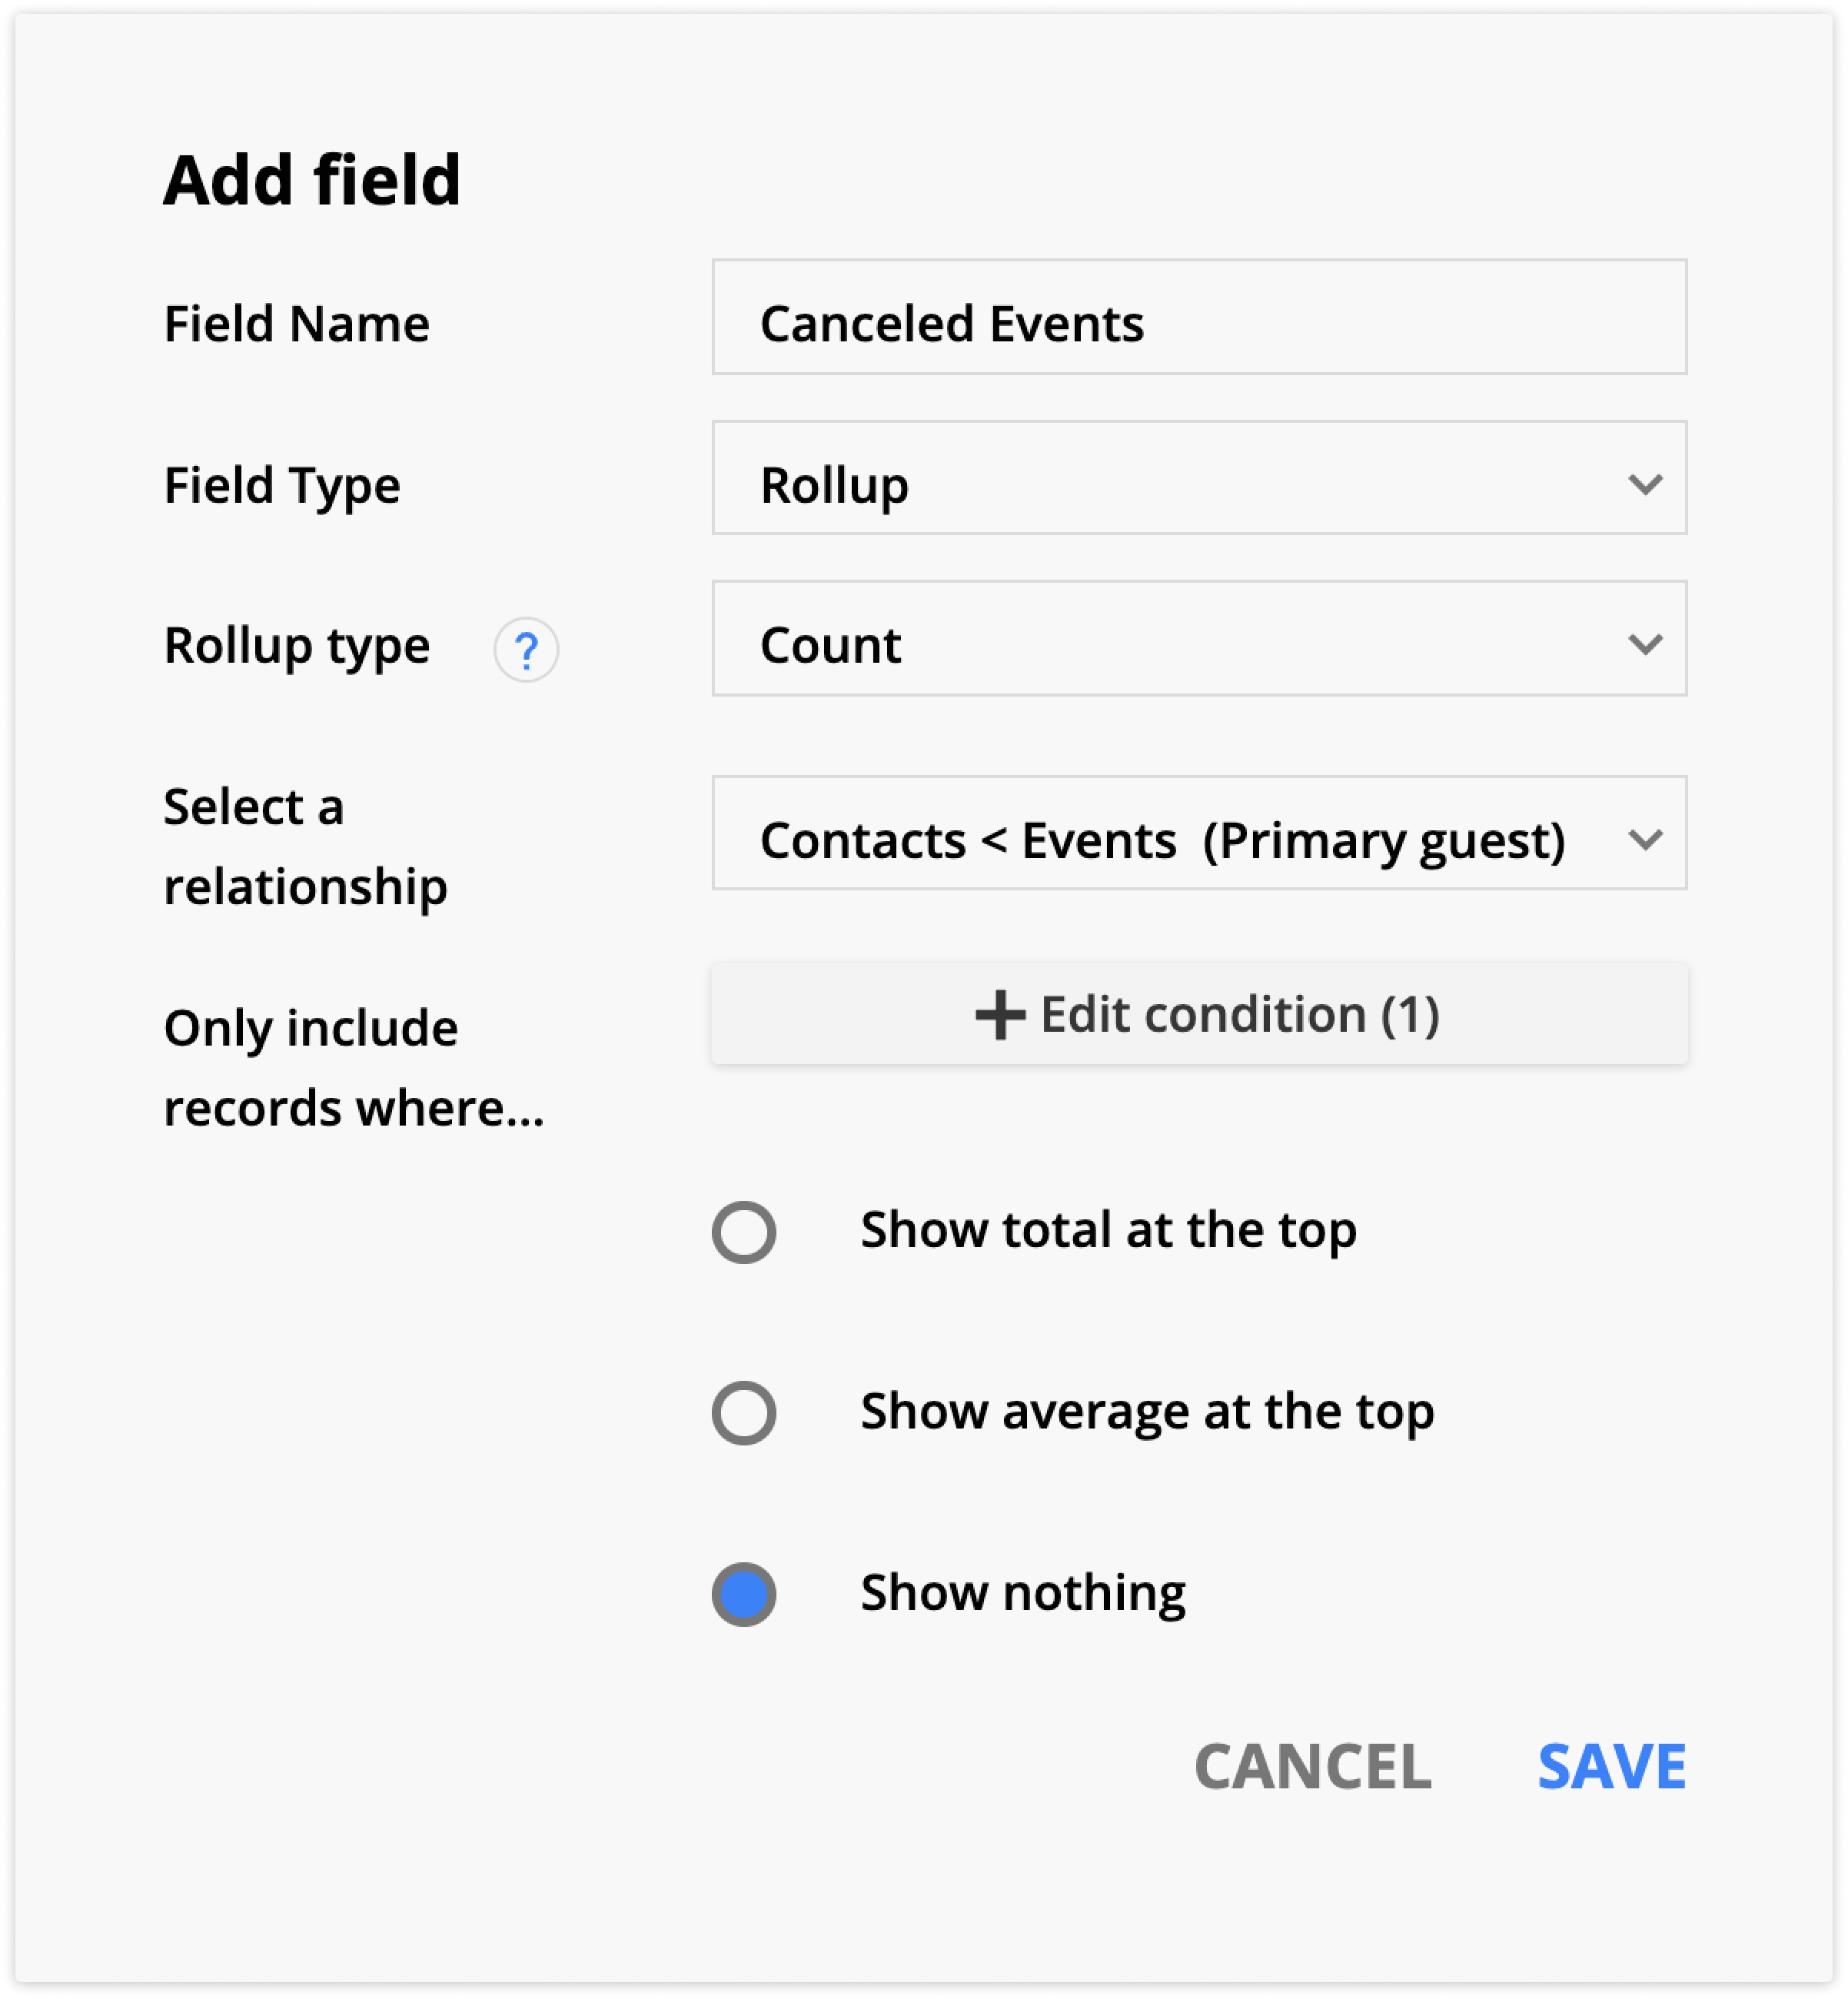
Add a condition:
- Status equal to Canceled

You can use these fields in groups, and add as columns in your contact collection and in your own custom event systems.
3. Add a next meeting section in client portals
Back to top
This section will make it easy for your clients to see the date and time of their next meeting. You can also show a checklist of what they should do to prepare and links to quickly reschedule or cancel.
- First, create a custom rich text field to store the checklist for each of your events. This field will contain the checklist of everything the client should bring to the event.
- Add a dynamic block to your client portal.
- If your portal is an Ontraport page, use the source Events (Primary guest) from the Related to visiting contact section.
- If your portal is a Dynamic Template based on Contact records, use the source Events (Primary guest) from the Related to Contact record this dynamic page is based on section in the sources dropdown.
- Add Text elements and merge in the title, date, location, checklist and any other information you want to display in this section.
- Next, allow visitors to cancel or reschedule.
- Add a button to your dynamic block.
- Open the button settings and select link to a URL or file filed in the link type dropdown. Choose Event Fields >> Modify Event in the Select URL or file field setting. Select if you want to open the link in the same window or open a new tab. Then click Insert link. Finally, change the button text to “Cancel or reschedule” or any other fitting language.
- Organize your information by setting up your dynamic block settings. It’s helpful for visitors to see your events with the closest event at the top.
- Select the Start Date field in the sort records by dropdown and ascending from the order by setting.
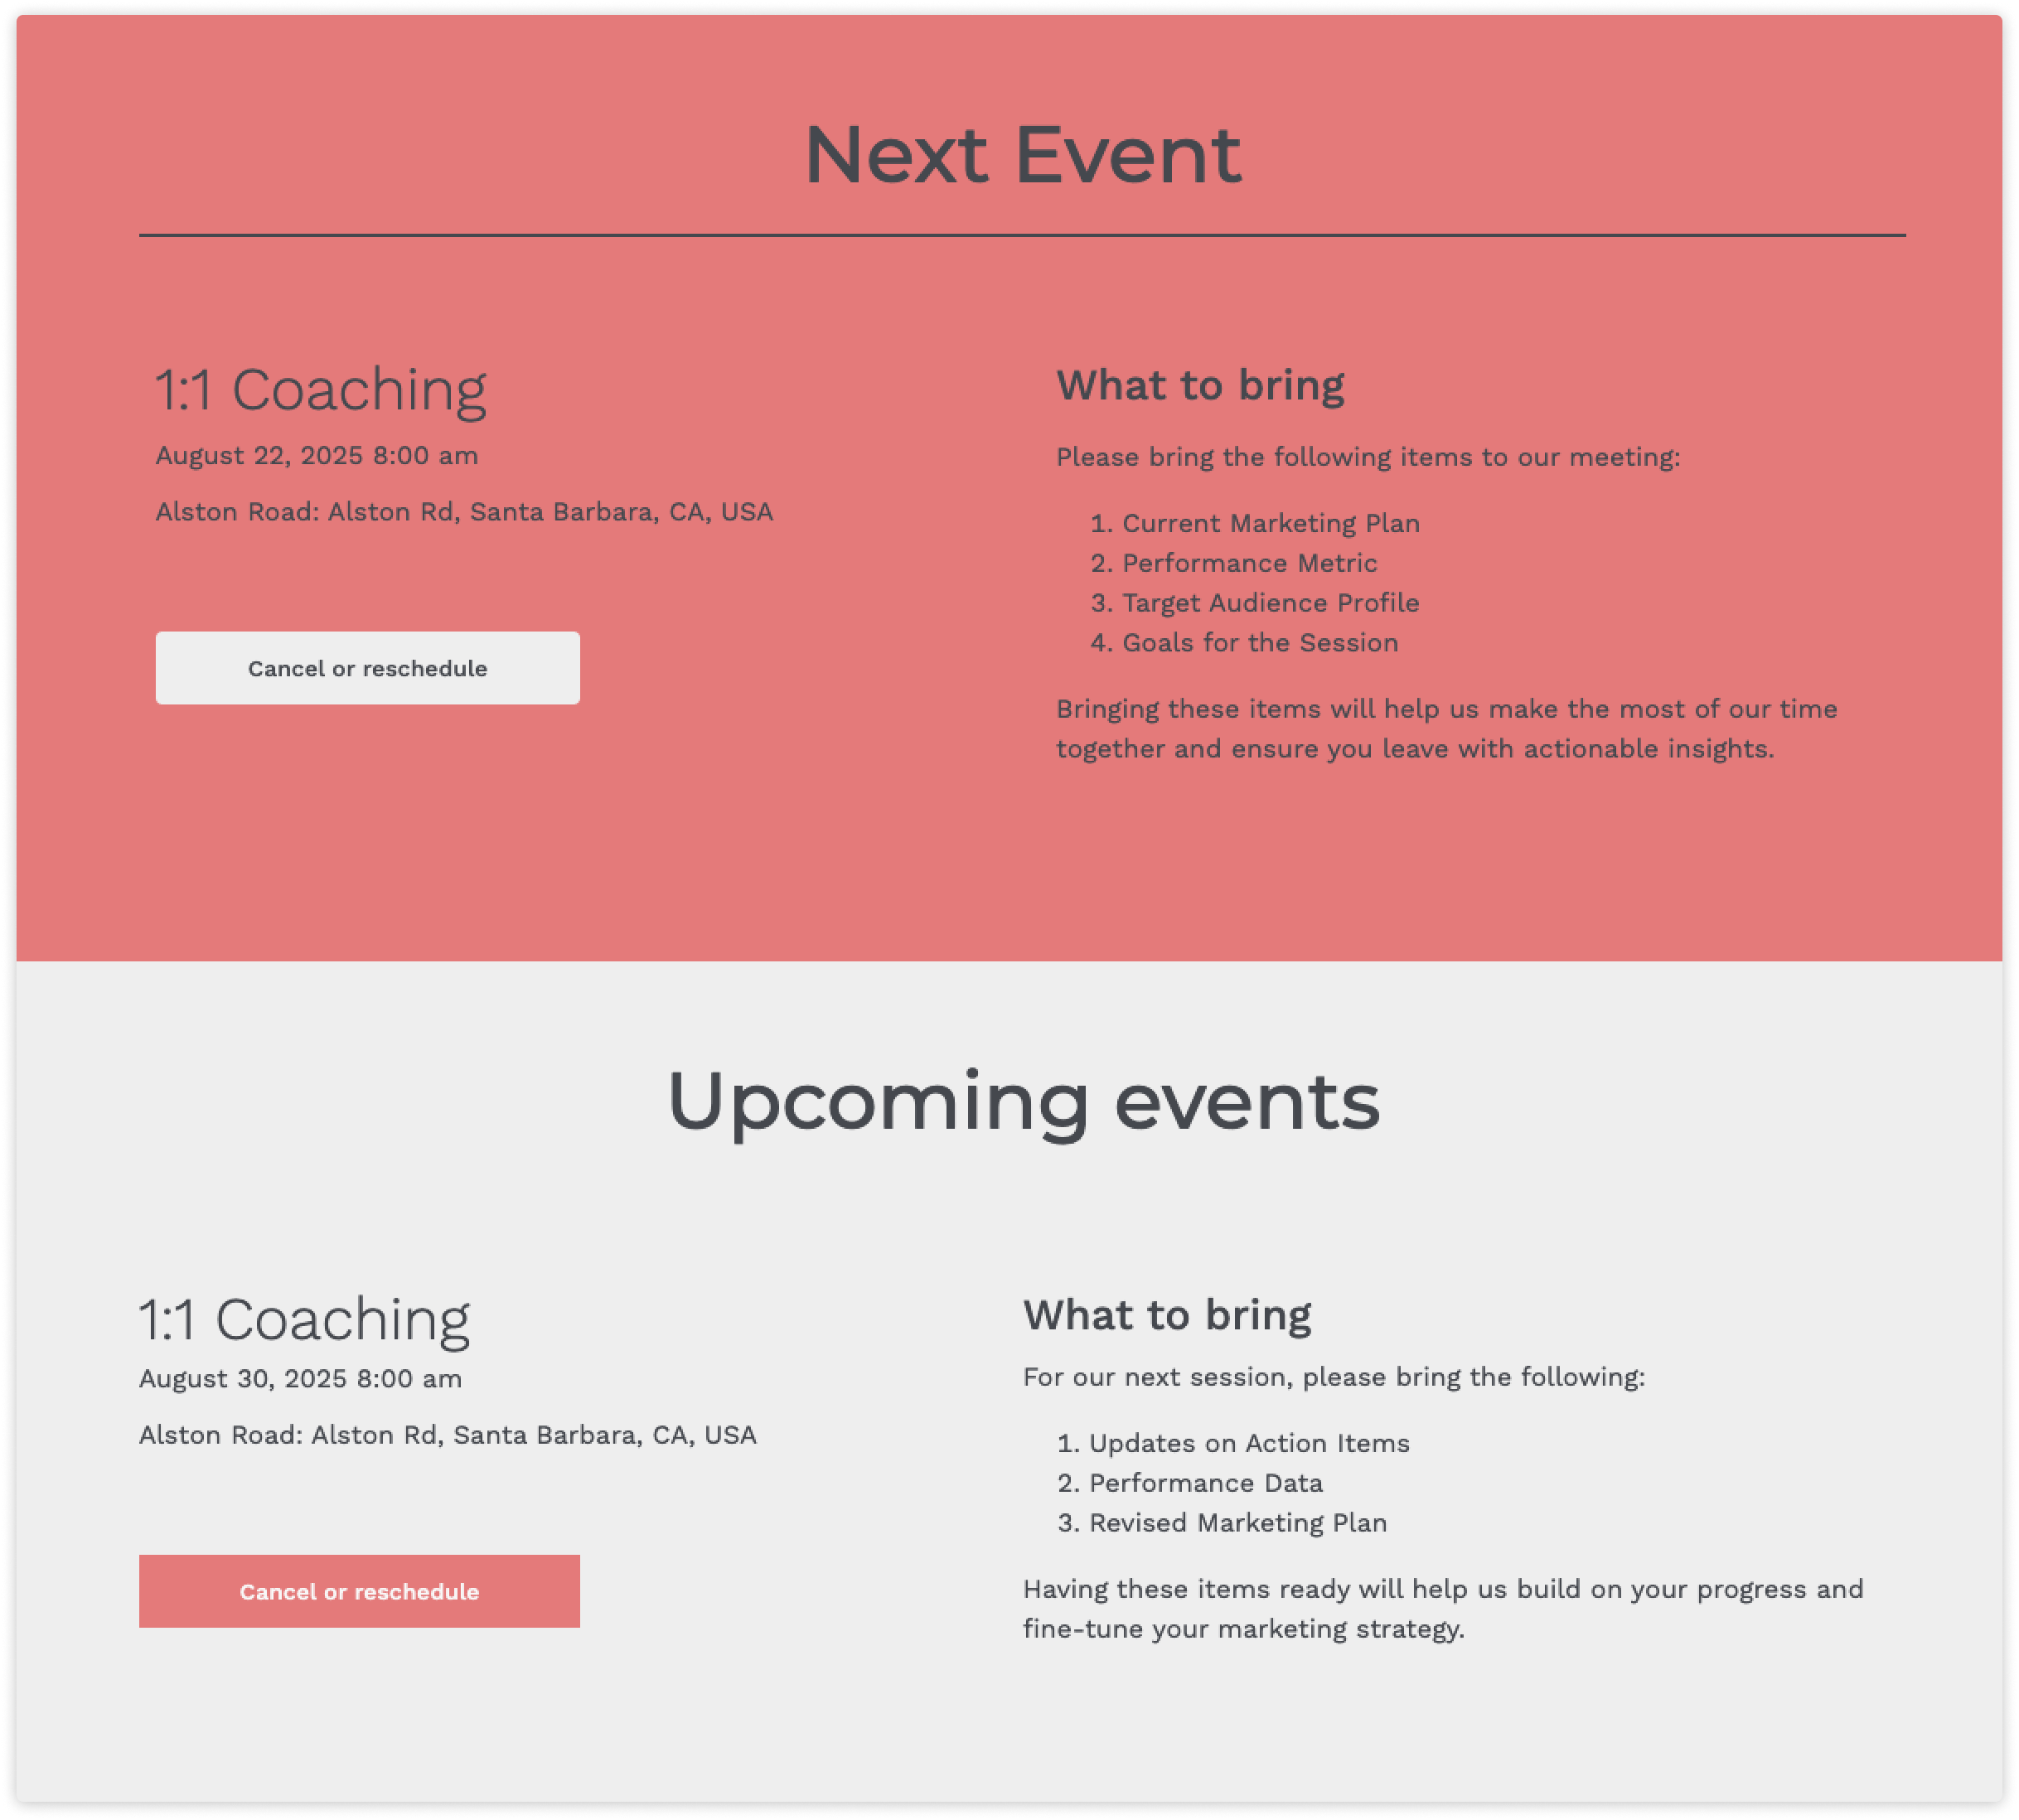
If you want to make the next event stand out on your page, follow the same steps to add two dynamic blocks. Customize the settings in the first dynamic block to display one record on the initial load and start on record number 1. Then, choose how many events you want to display in your second block and set the start on setting to 2.
4. Create an event template
Back to top
Set your guests up for success by creating a dynamic page for their event that tells them what to bring, includes a map of the location, and provides links to reschedule or cancel the event.
- Create a custom event Map URL field to hold your map’s information and a rich text field to save your What to bring instructions.
- Create your new event record and add your data.
- Go to Google Maps and look up your location.
- Click Share → Embed a map → Copy HTML.
- Paste the HTML into your Map URL field.
- Create a new dynamic template with a source of Events.
- Customize your design and merge in the title, location, start time, what to bring and any other information you want.
- Add a Custom HTML element in the location where you want to display the map to your location.
- Edit the source of the Custom HTML element and add the merge field for your Map URL field.
- Add a button to the page.
- Link type: Link to a URL or file field
- Select URl or file field: Event fields (Dynamic page) >> Modify Event
- Open link in: Your choice
