Custom objects allow you to create your own unique records to store information that’s most relevant to your business. You choose the fields you want to add to your unique records, and you’ll get a new collection to store your records.
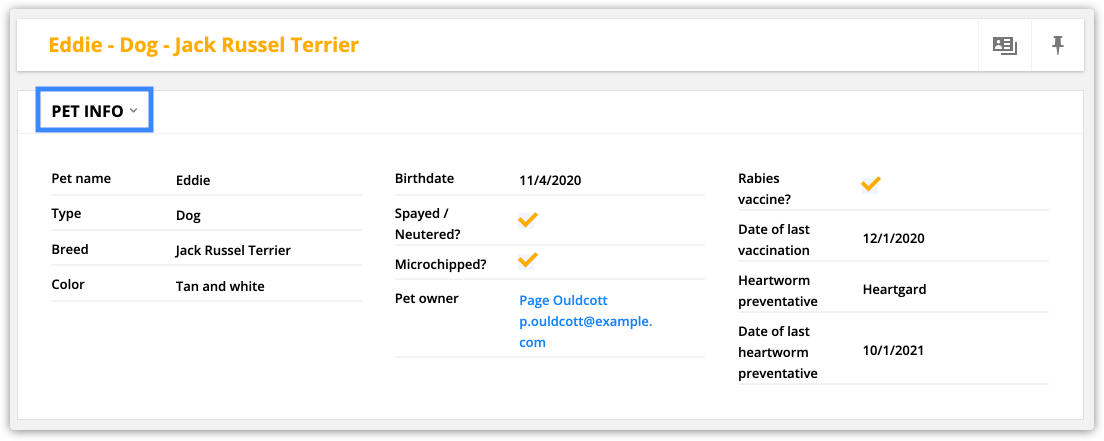
When you create a custom object, you can set up “relationships” between different types of records in your account. For example, you could have a “Pets” custom object that stores information about your contacts’ pets. When a relationship between “Pets” and “Contacts” is set up, you can easily connect and manage the two associated records. With custom objects, it’s also no problem to keep information organized when some contacts have more than one pet.
There are two types of custom objects that you can add to your account:
- Prebuilt objects
Prebuilt objects include the most common types of records you’ll need for your account such as Deals, Companies, Surveys and Virtual Events. These objects are already set up for you, so all you need to do is toggle them on to get started.
- Custom objects
Custom objects allow you to create unique record types that fit your needs, such as a “Pets” custom object for veterinarians, or a “Projects” custom object for contractors. With this option, you name and create your own unique records for your business.
Accounts with Dynamic CMS packages can add new objects to their account.
Check out this Ontraport University overview of custom objects:
Table of contents
Add a Dynamic CMS package
Add prebuilt objects
Understanding custom object relationships
• One-to-many relationships
• Many-to-many relationships
• One-to-one relationships
Connecting records
• Manually
• From form submissions
• With reaction elements
• In automation
• Using a CSV File
• Through the API
Create a new custom object
• Step 1 of 4 — Name your object
• Step 2 of 4 – Set up your fields
• Step 3 of 4 — Create your relationships
• Step 4 of 4 – Dropdown field and navigation settings
• Dropdown Field Settings
• Navigation Settings
Adding relationships between objects and users
Add a Dynamic CMS package
The first step to creating custom or prebuilt objects is to add a dynamic content package to your account.
- Log in as your account’s owner.
- Click here to go to your Account Details page.
- Click Add plan or Start trial next to “Add Dynamic CMS to your account,” and choose the plan that fits your needs.
Add prebuilt objects
Back to top
Ontraport gives you prebuilt objects for the most common use cases. Check out the App marketplace to learn more about the prebuilt object you can add to your account.
Understanding custom object relationships
Before you create your own custom objects, it’s important to understand how the relationships between objects work so that you can determine which is right for your business.
1) One-to-many relationships
In one-to-many relationships (often called parent-child relationships) you can store a list of your related records in one place — the parent object’s record.
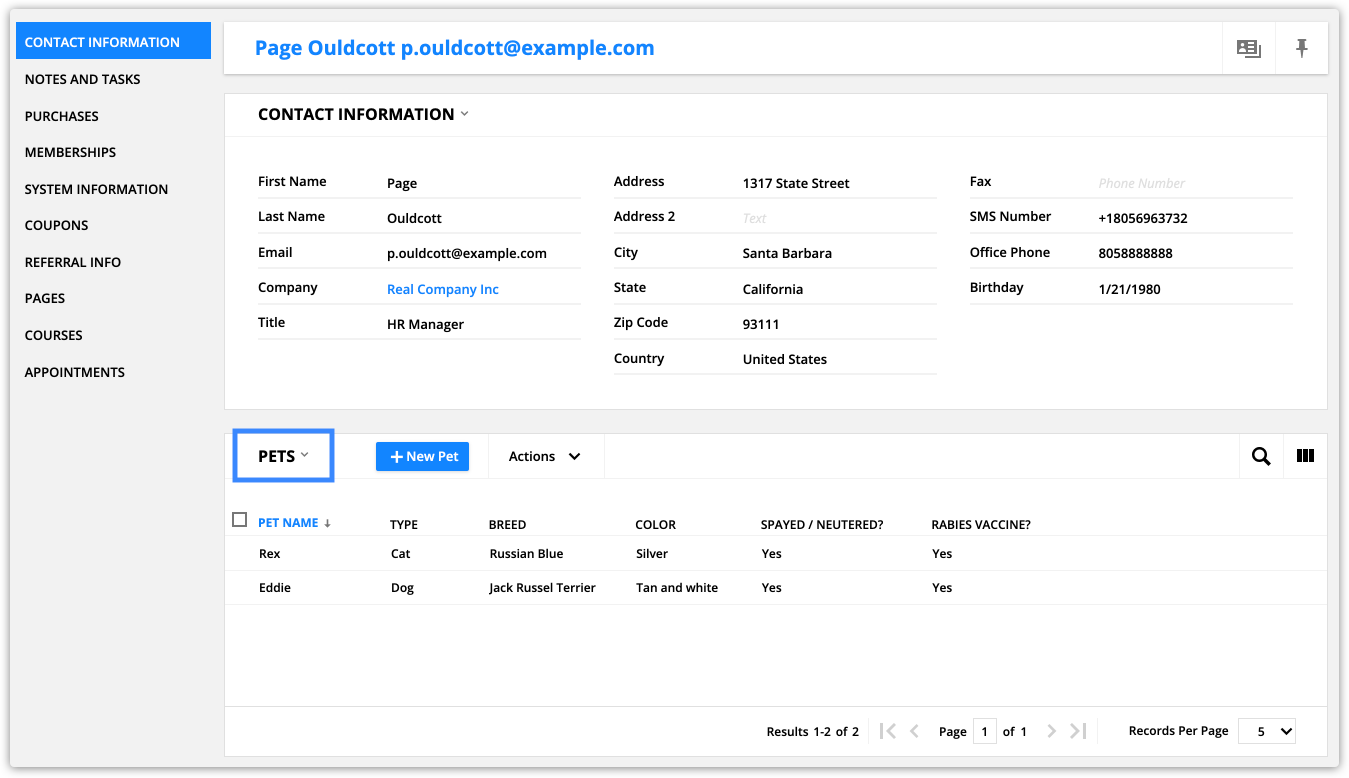
Consider the prebuilt custom object “Companies.” The Companies object is the parent in a one-to-many relationship with Contacts, which means when you click into a company’s record, you’ll be able to see the info about that company and a list of all the contacts who work for that company.
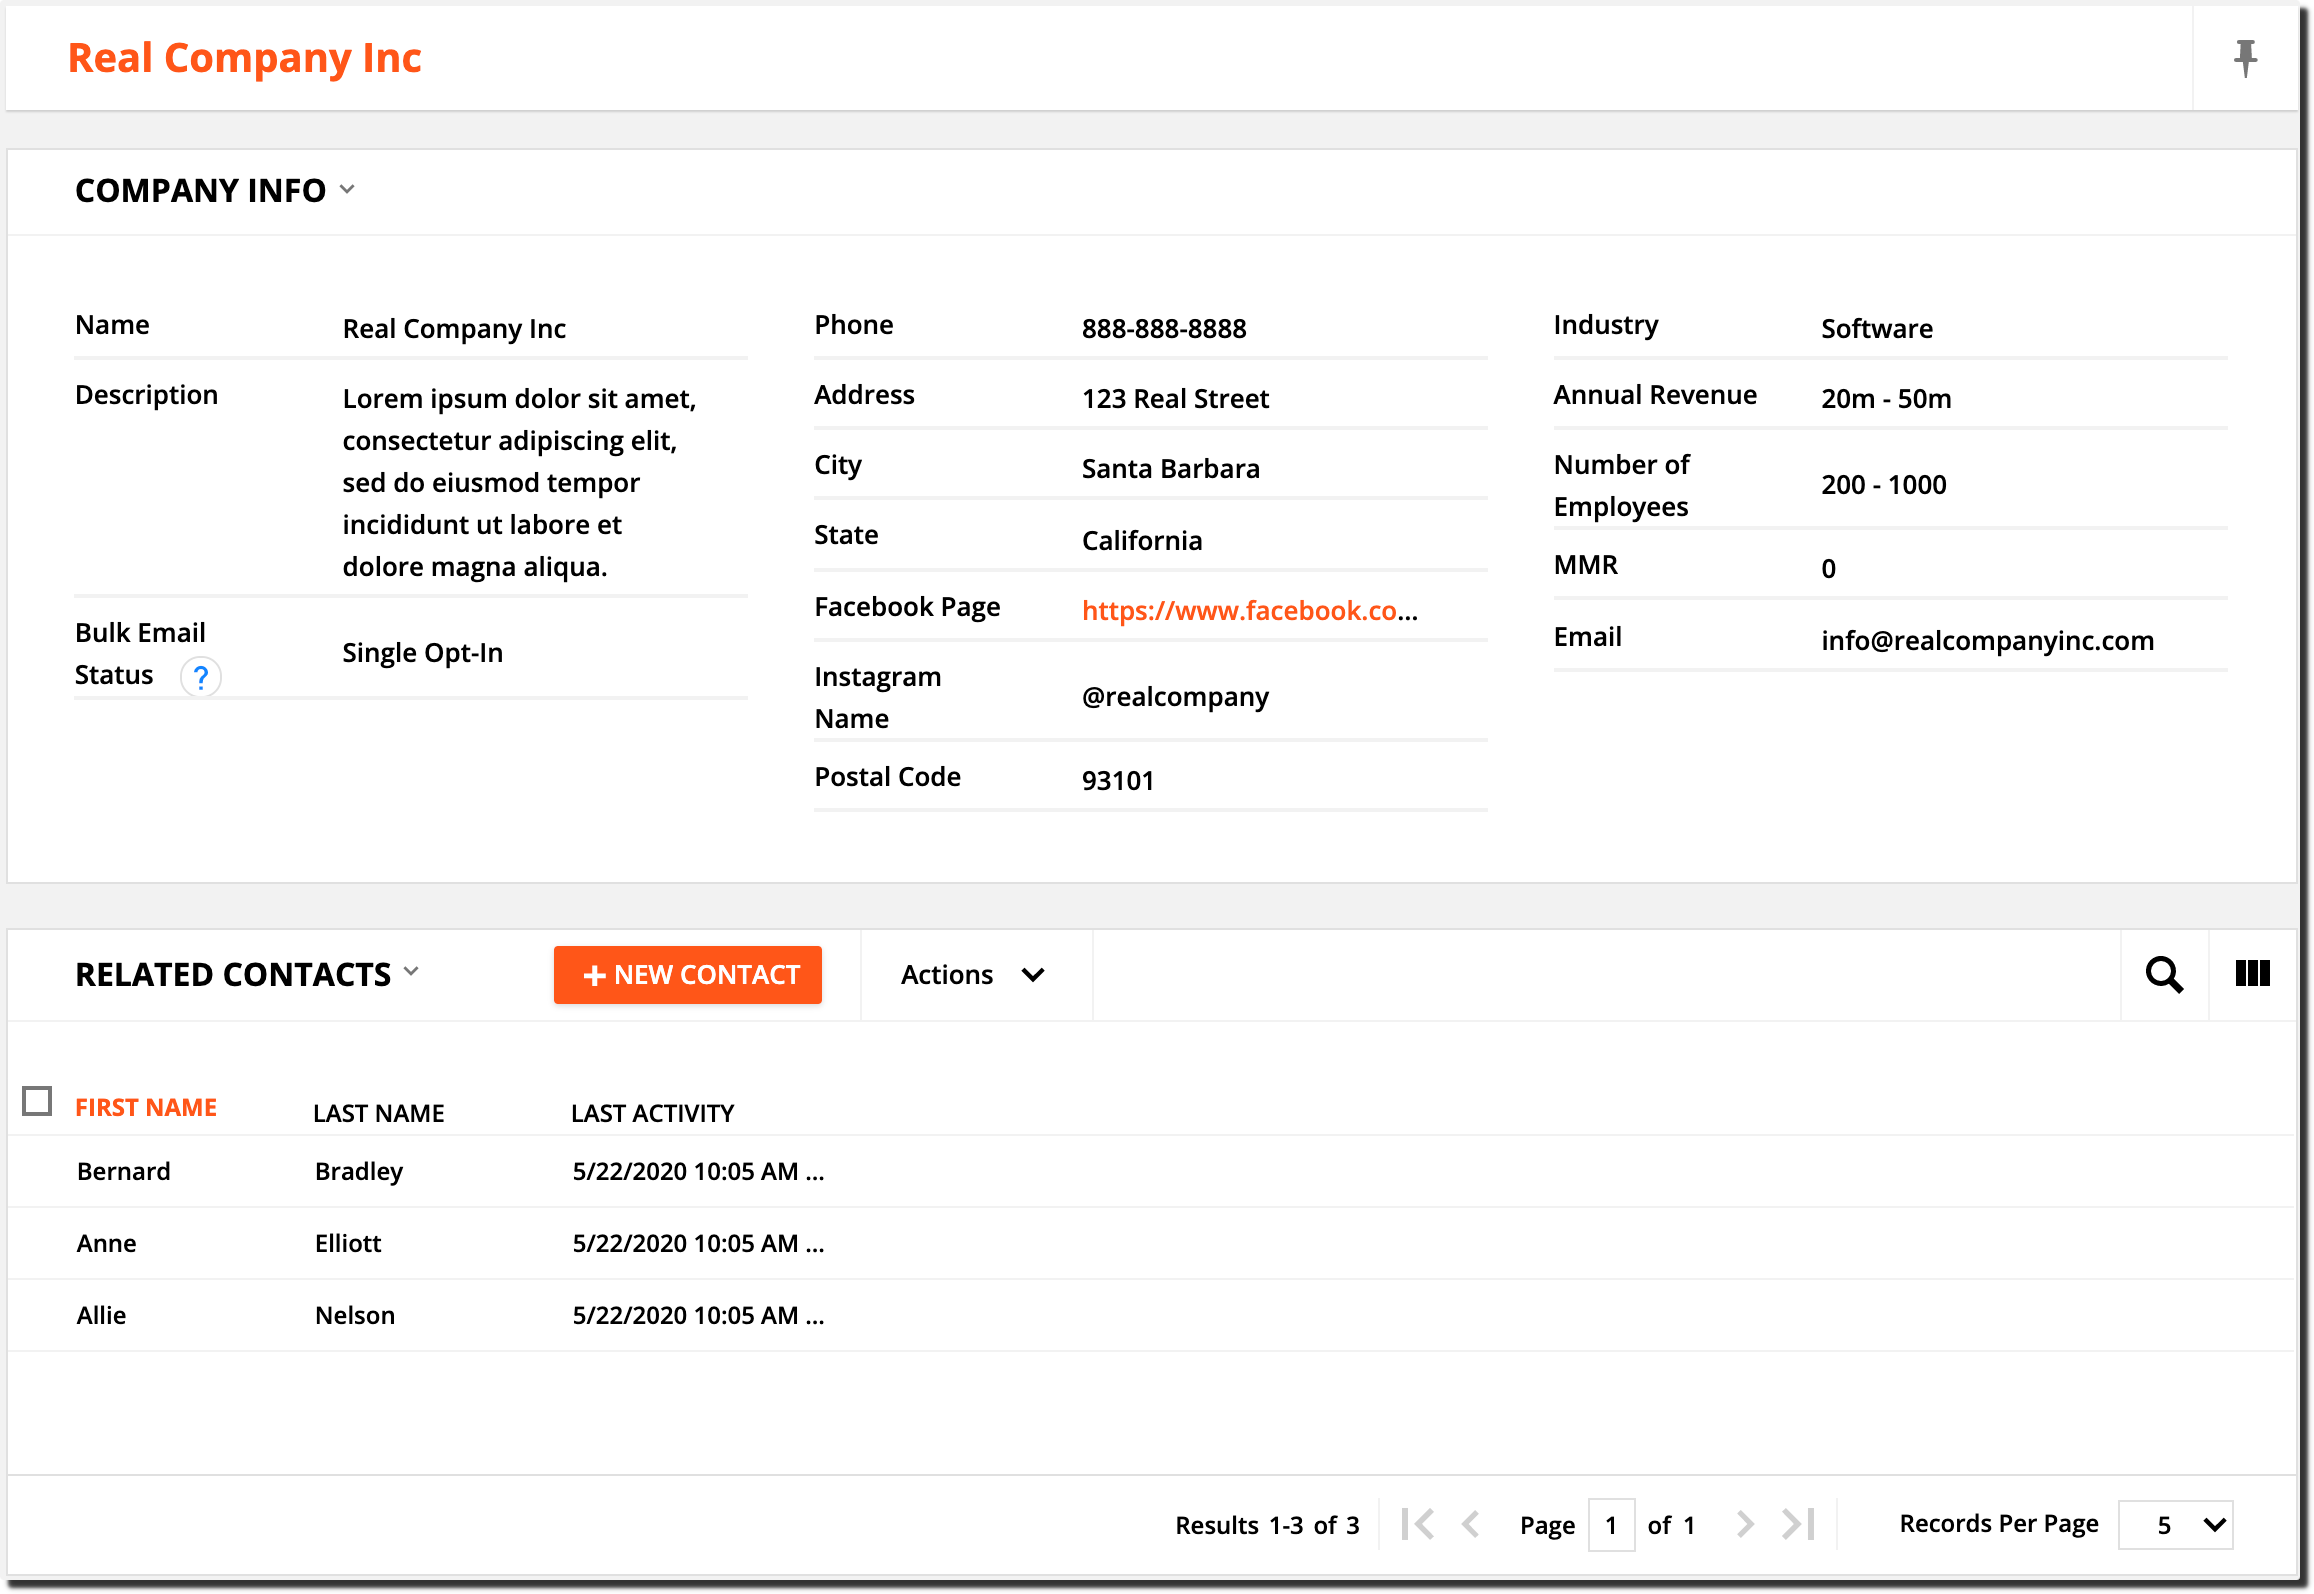
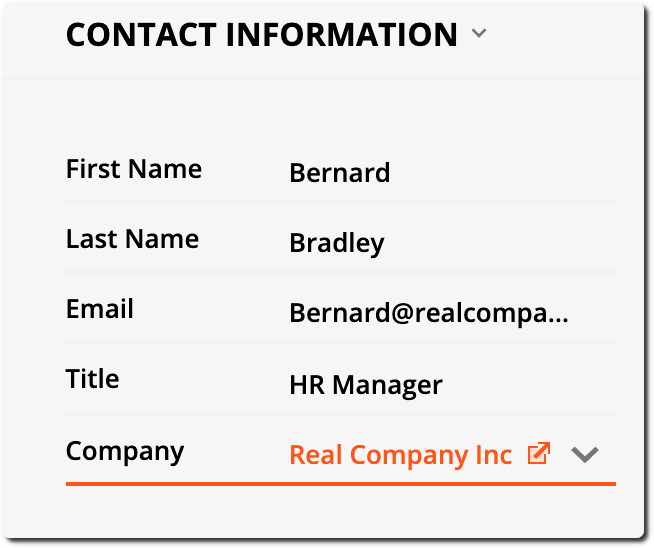
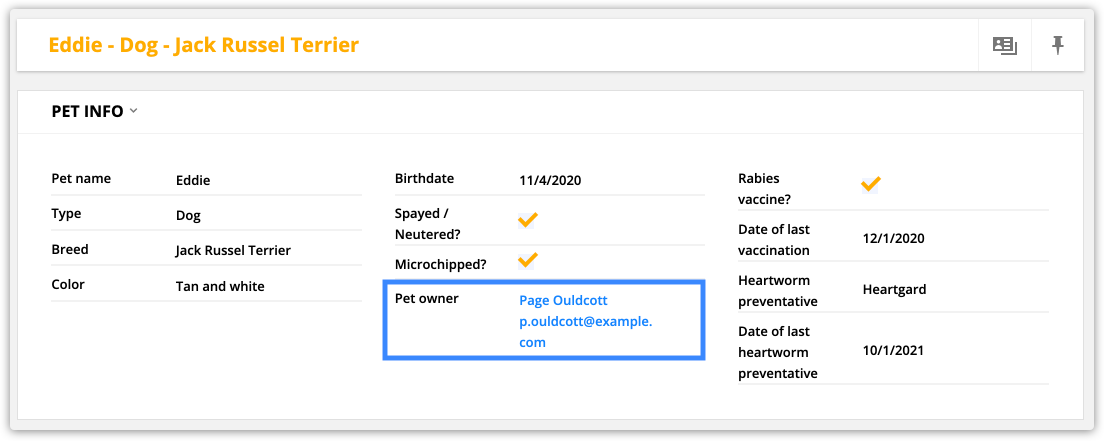
Then when you look at each individual contact’s record, you’ll see they simply have a dropdown field for “Company” because the contacts object is the child.
Let’s take a look at a more custom one-to-many relationship.
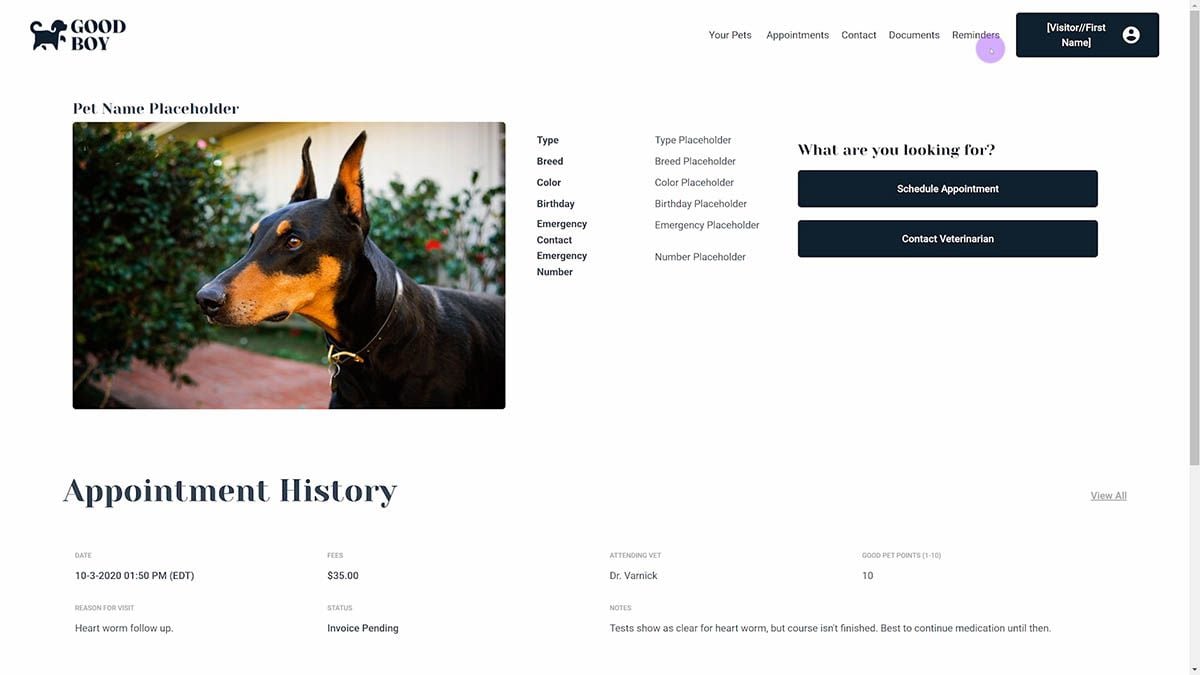
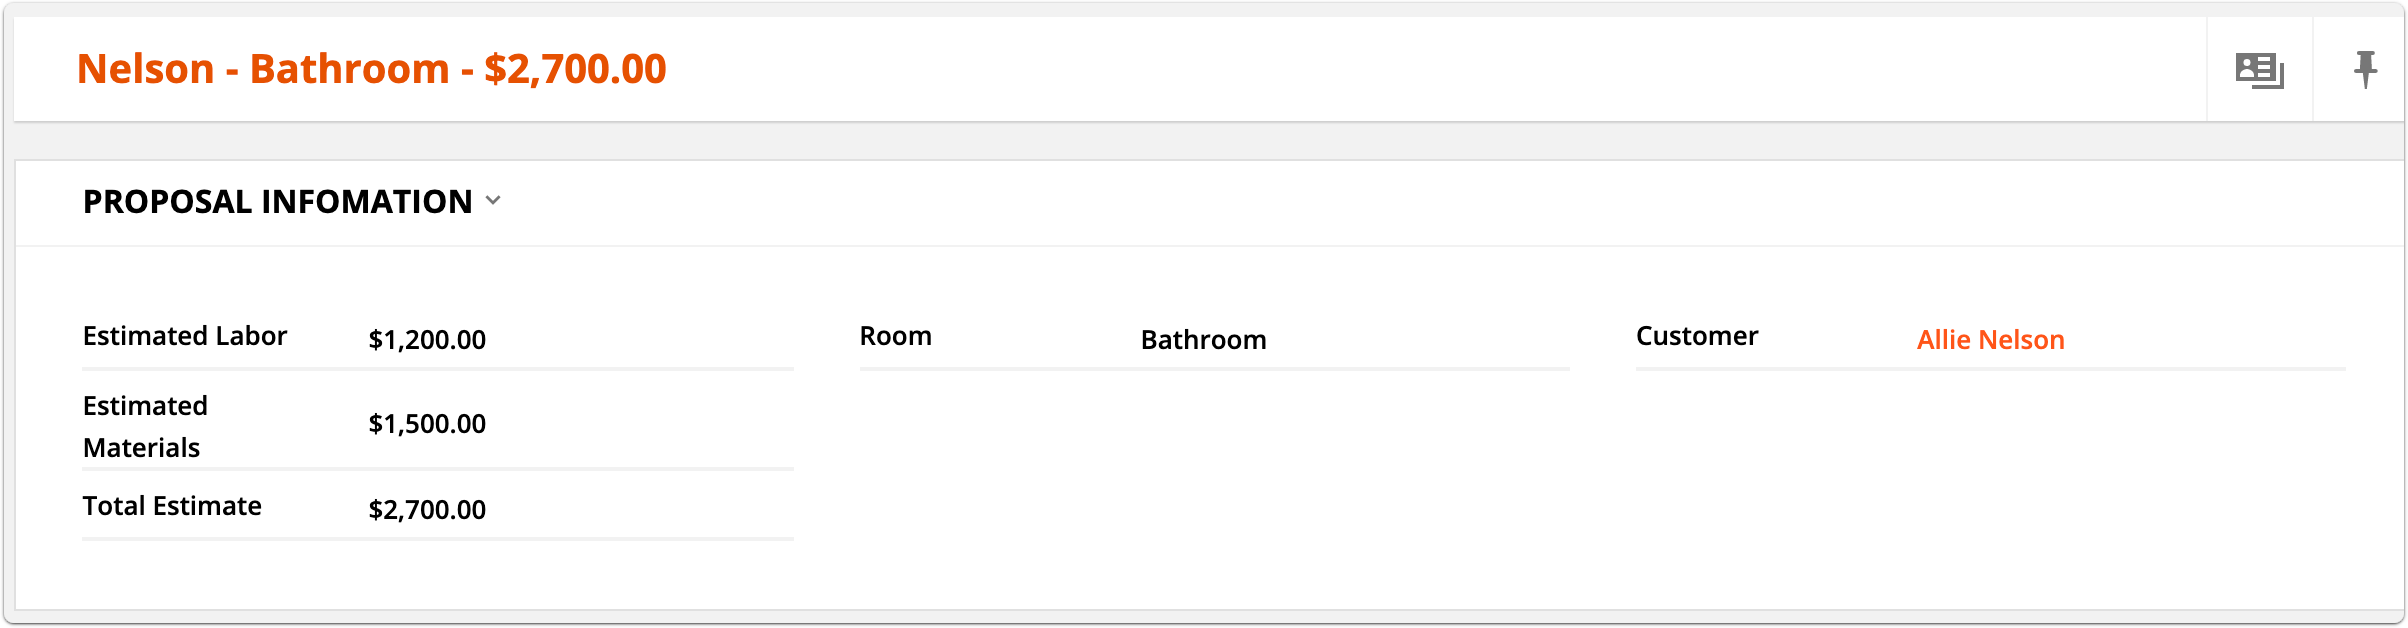
Say you’re a contractor who does kitchen and bath remodels, and you need a custom object to keep track of your proposals. Your proposal records include information about the project like your estimated costs for labor and materials.
When you create a “Proposals” custom object, you’ll get proposal records for storing all of the information about your proposed project. You’ll create a one-to-many relationship between the contacts object and the proposals object, where the contacts object is the parent. This relationship will give you access to a list of proposed projects in your contact’s record:
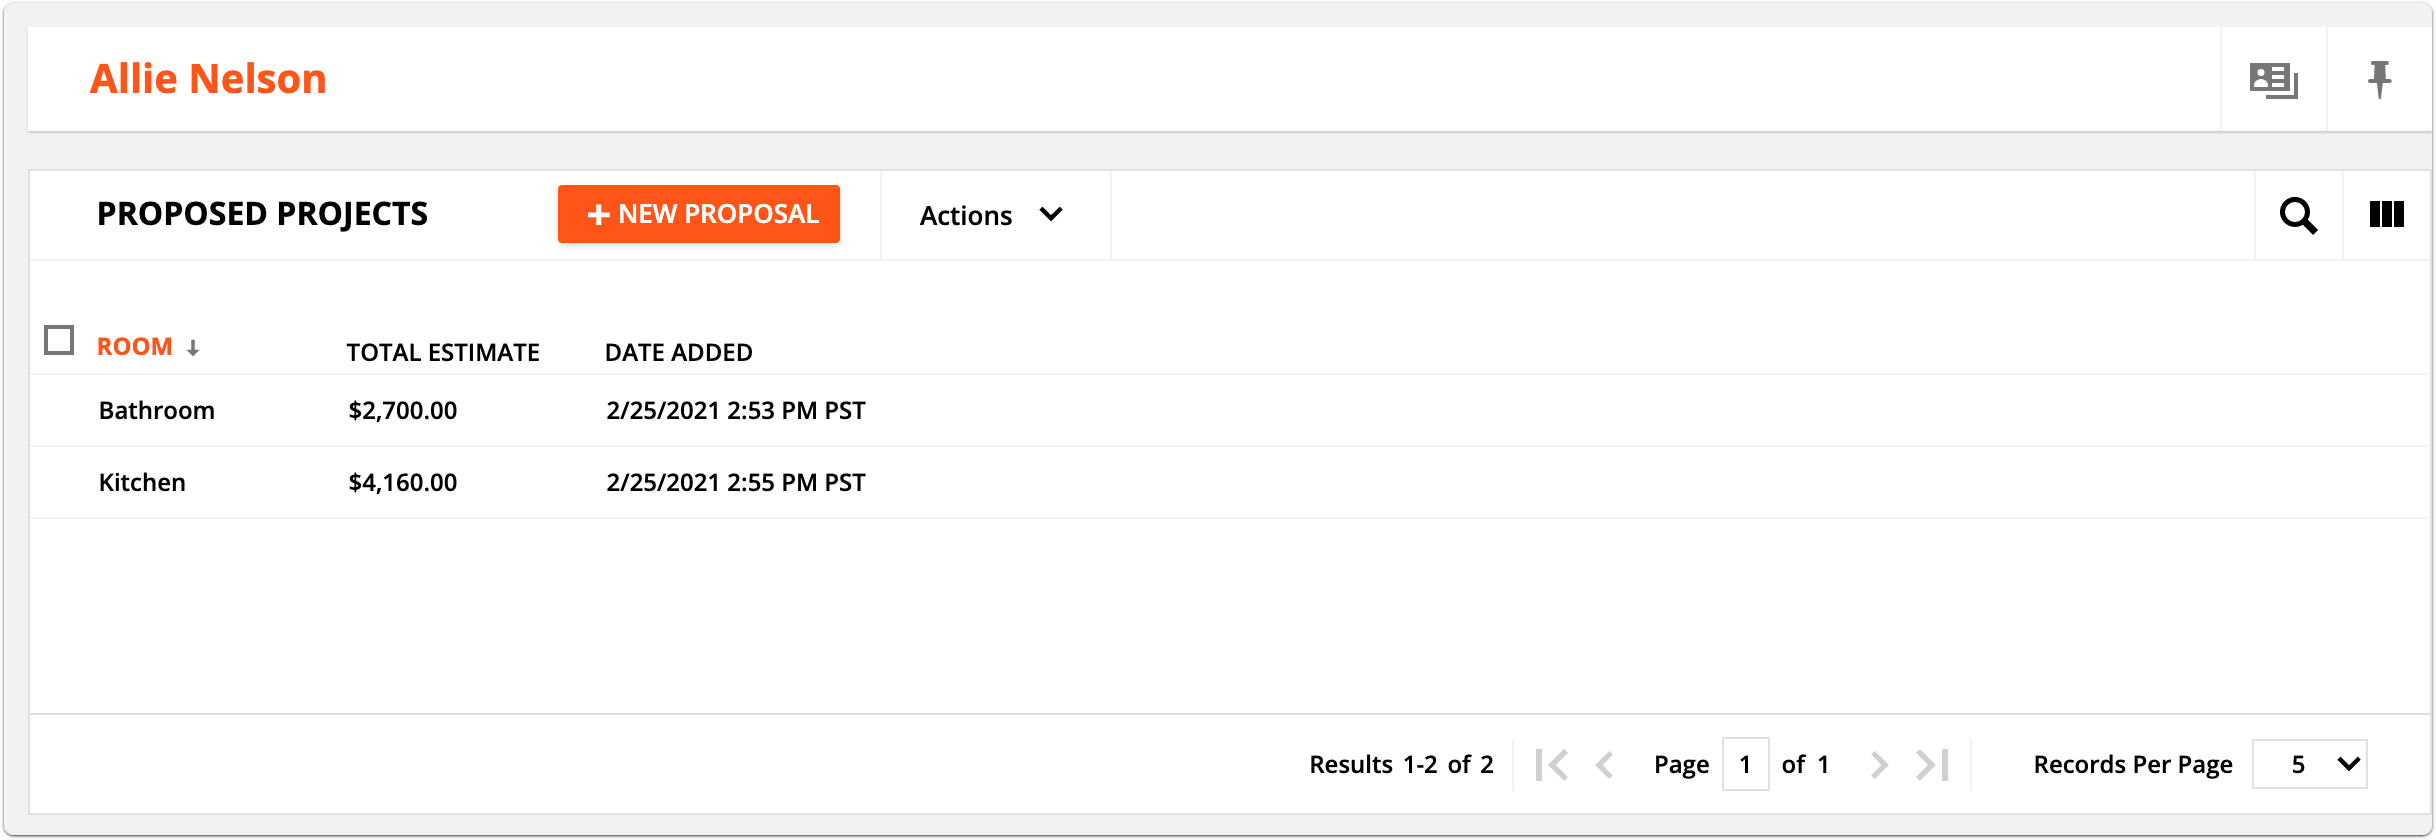
And in your proposal record you can see all of the details of that proposed project.
2) Many-to-many relationships
Many-to-many relationships create a list of all your related objects in both records. There are certain situations where this configuration will be beneficial.
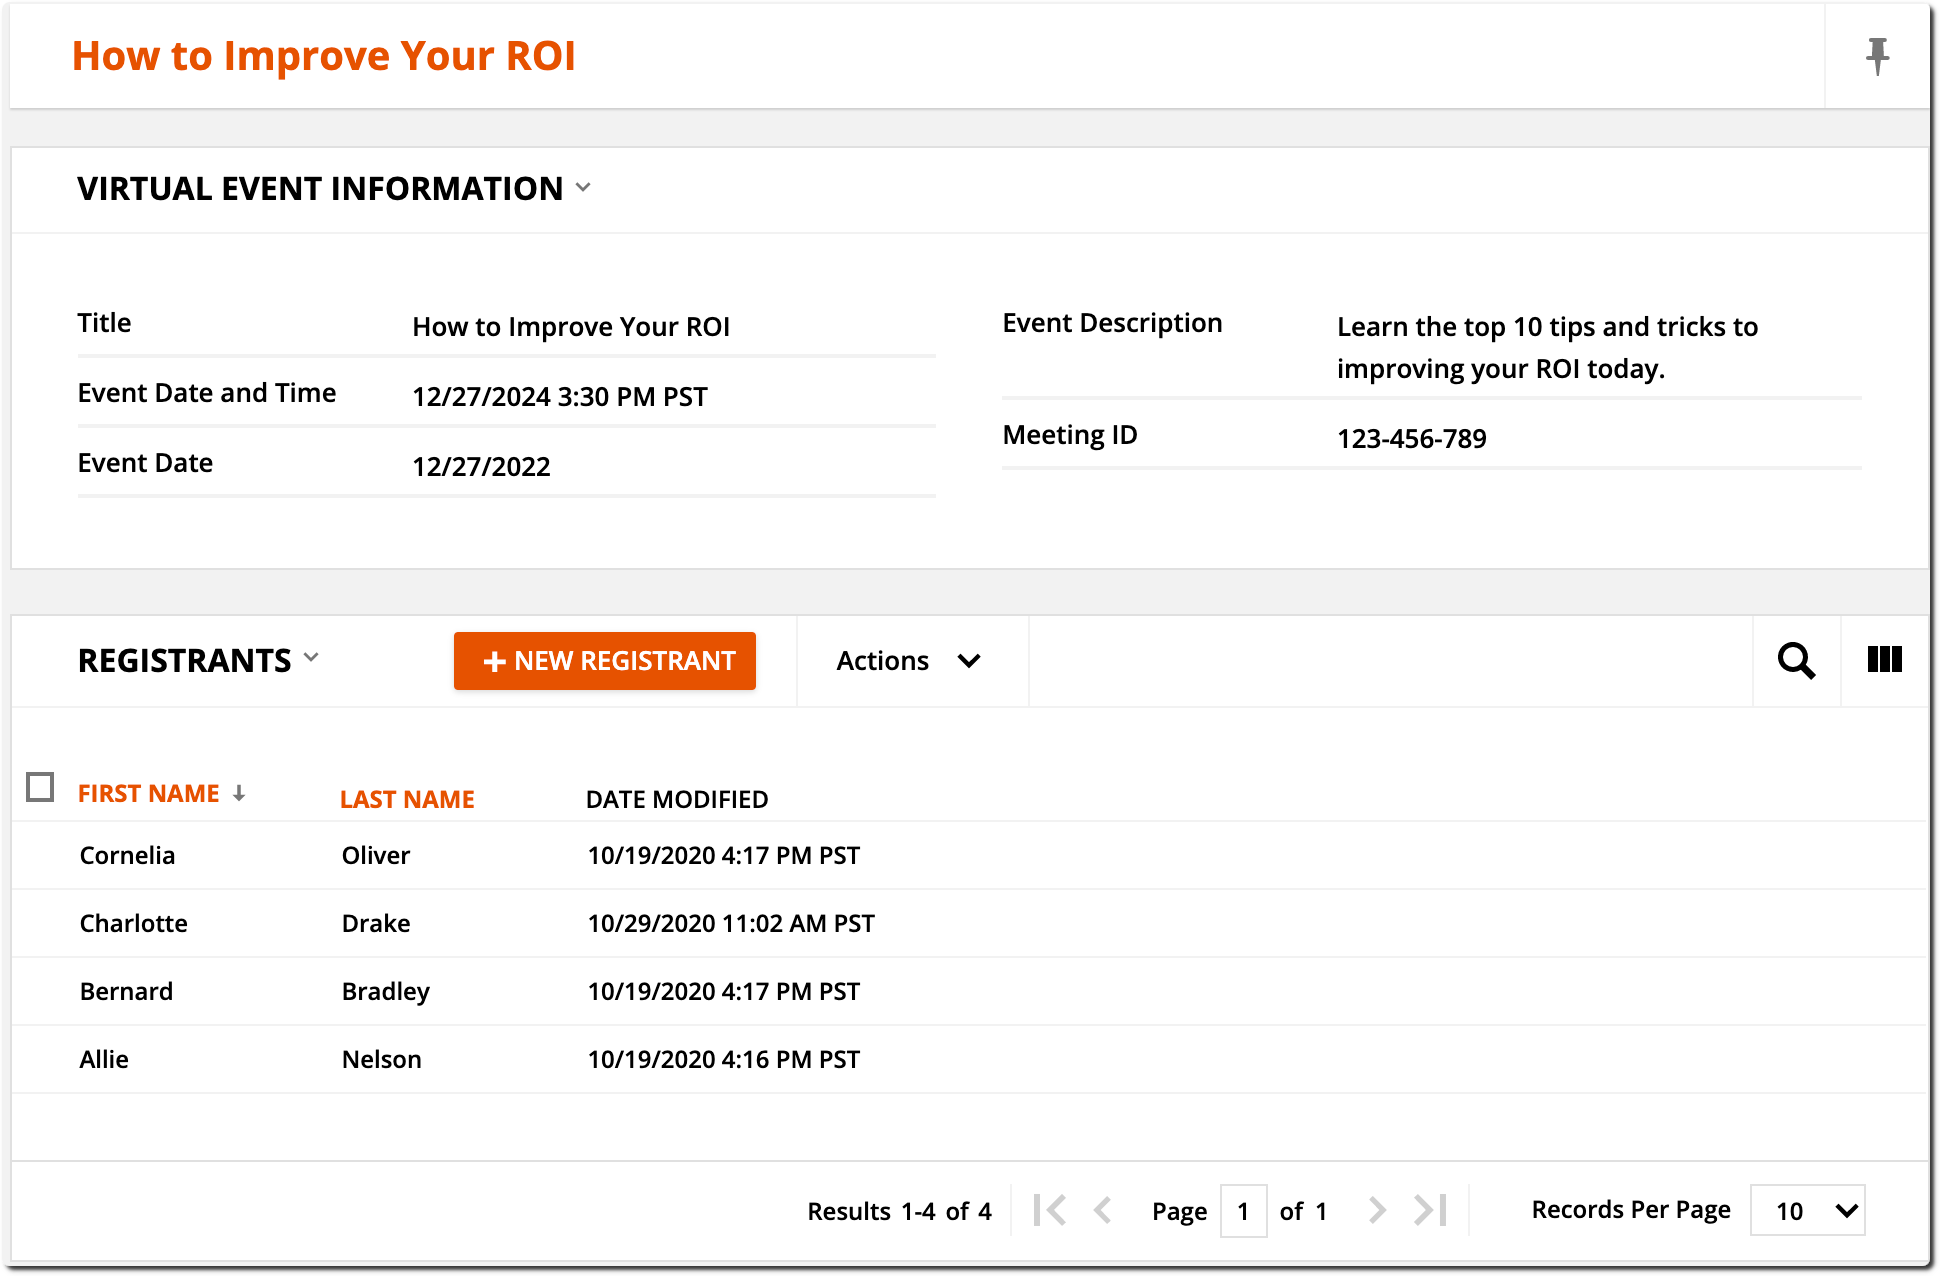
Let’s use the prebuilt object “Virtual Events” to understand this relationship type. If you’re running a lot of webinars, online meetings, etc., you’ll want to track which contacts have registered for those events, and at the same time be able to see which events each of your contacts are registering for.
With a many-to-many relationship, you can see all of the registrants for an event inside of that event’s record.
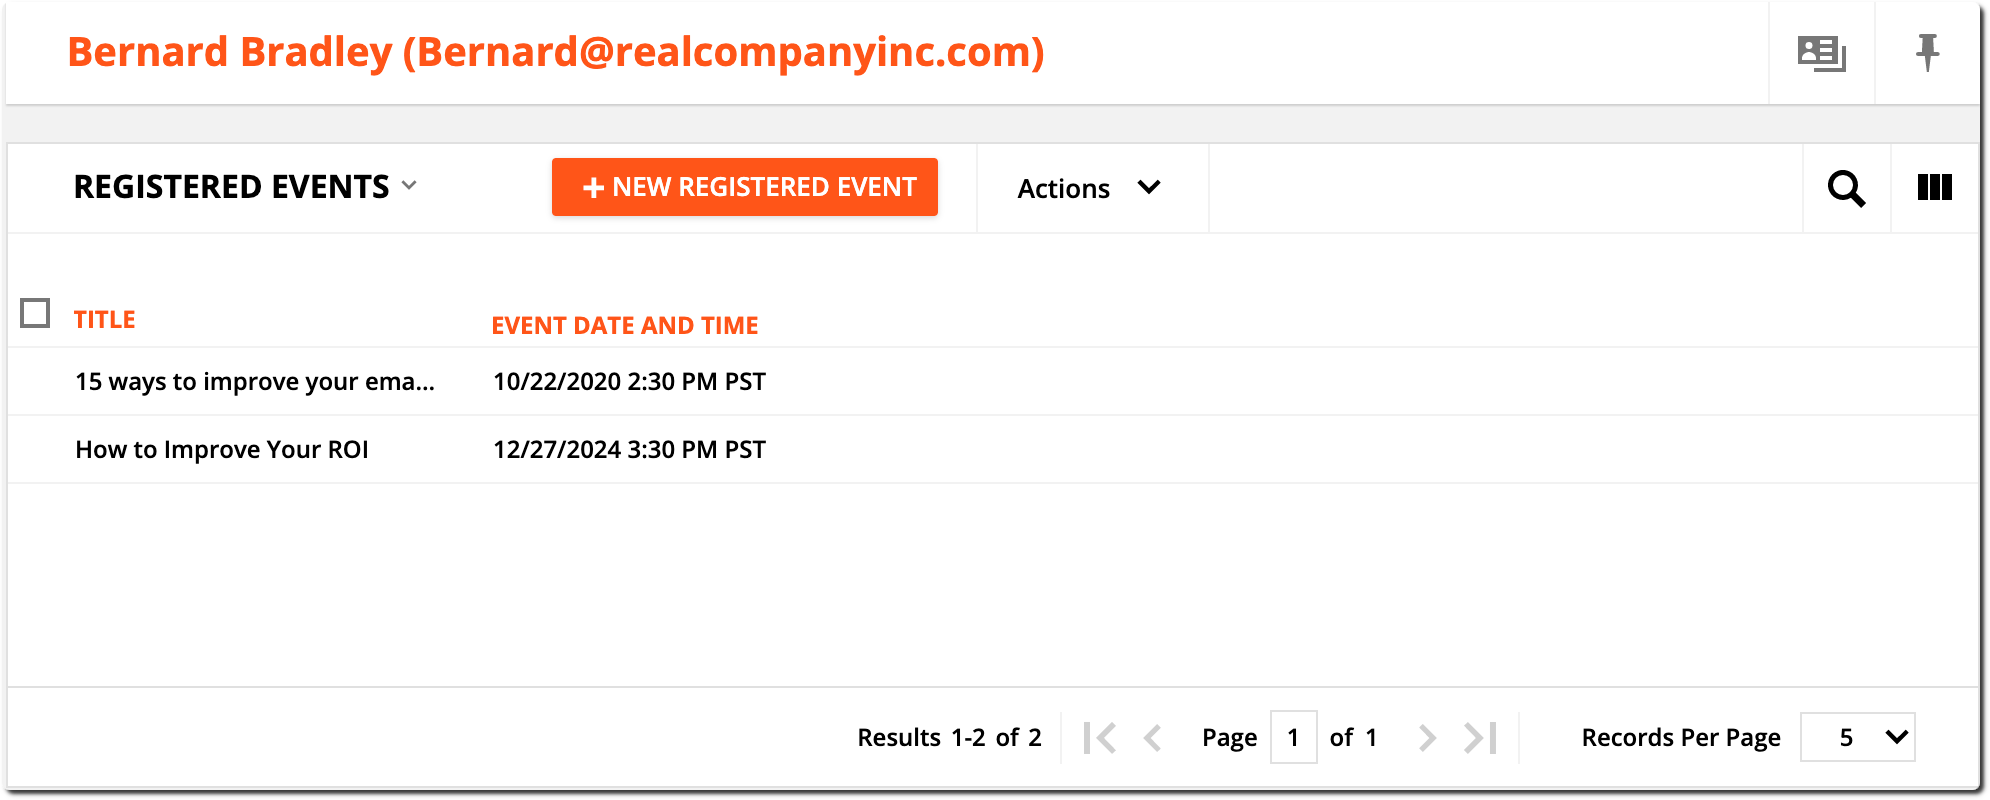
And you can also see all of the events a specific contact has registered for inside of their contact record.
3) One-to-one relationships
A one-to-one relationship means one record in one object can be linked to only one record in another object. One-to-one relationships are often useful as a supplementary relationships.
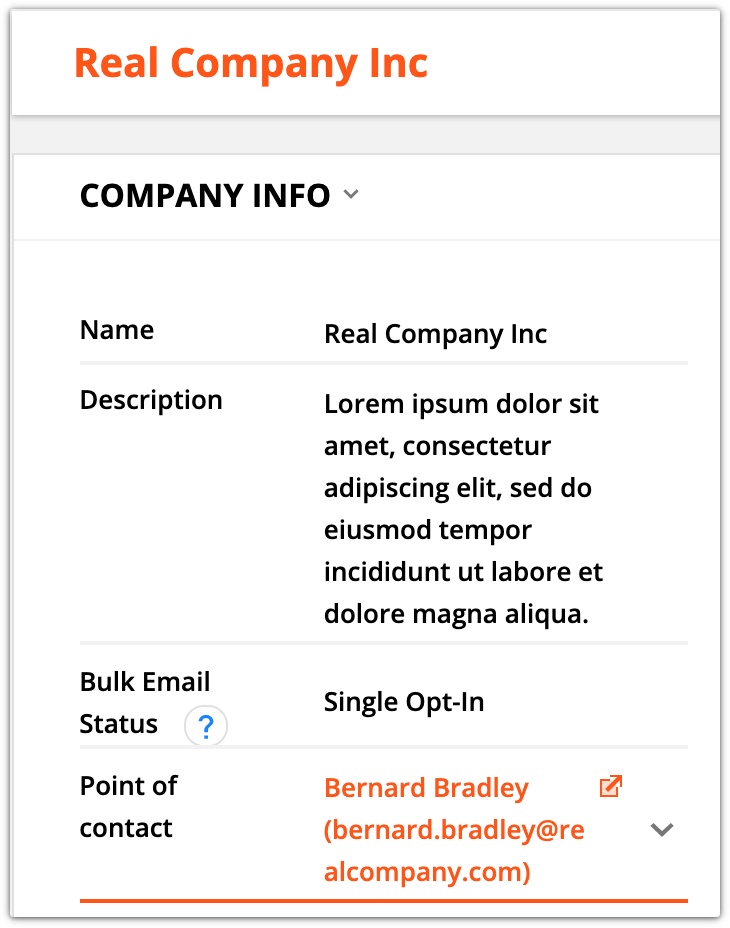
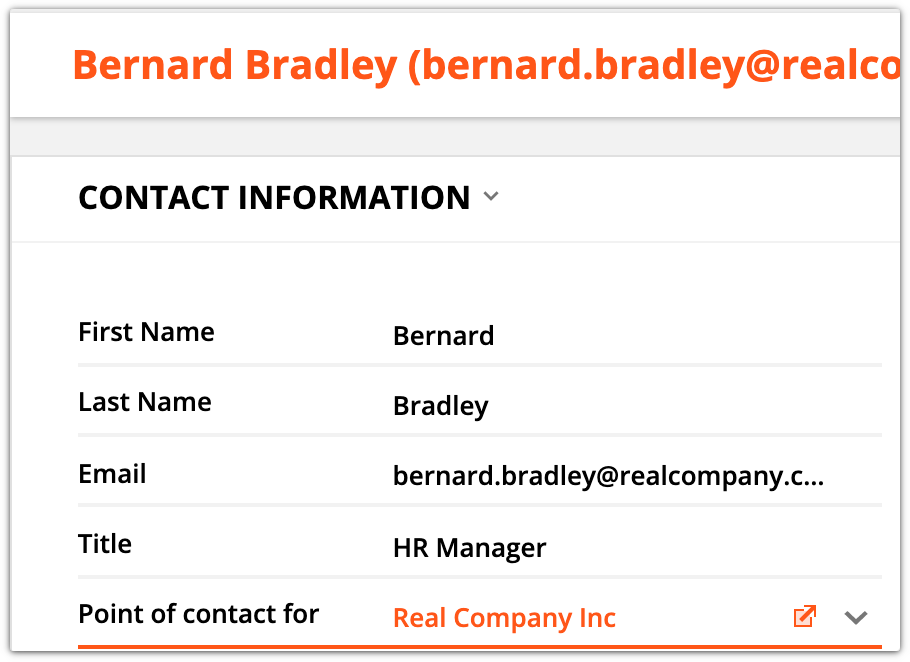
Let’s say you wanted to store a point of contact for each company record and be able to see if a contact is a point of contact for any of the companies stored in your database. In this situation, you can use a one-to-one relationship to accomplish this.
Connecting records
Back to top
Once you’ve created relationships between your objects, you can connect records in several ways, and various methods will work for each relationship type.
Manually
Back to top
Manually relate any records by clicking into the corresponding relational field in a child record or clicking Add in a subcollection in the parent record, then selecting the specific record you want to connect.
One-to-one relationships
Since one-to-one relationships add a relational field to both records, you can follow the same steps to connect records from either side.
- Click into the relational field and select the record you want to connect.
One-to-many relationships
One-to-many relationships have a subcollection in the parent record and a relational field in the child record.
- From the parent record - Click Add from the subcollection and select the record you’d like to connect.
Many-to-many relationships
Many-to-many relationships will have subcollections for all connected records.
- From the object collection - Select the records you want to connect, then click Update relationships from the action menu. Then choose the relationship you want to update, and then select the specific records you want to collect.
- From subcollections - Subcollections created by one-to-many relationships are added to the parent record and allow you to take action on the child records. Connect records from subcollections in the same way as from the object collection.
- You can’t update relationships from subcollections added by many-to-many relationships.
- From either record - Click Add from the subcollection and select the record you’d like to connect.
From form submissions
Back to top
You can connect records with one-to-one and one-to-many relationships using forms and adding fields from your other object.
When you access related objects fields on forms, we refer to that as "drilling in" to the other object's fields. When you do this, you can create and relate two records simultaneously.
You can do this with both visible fields on your forms and hidden fields.
One-to-one relationships
When you select either object in the relationship, you can drill into the related fields to connect records.
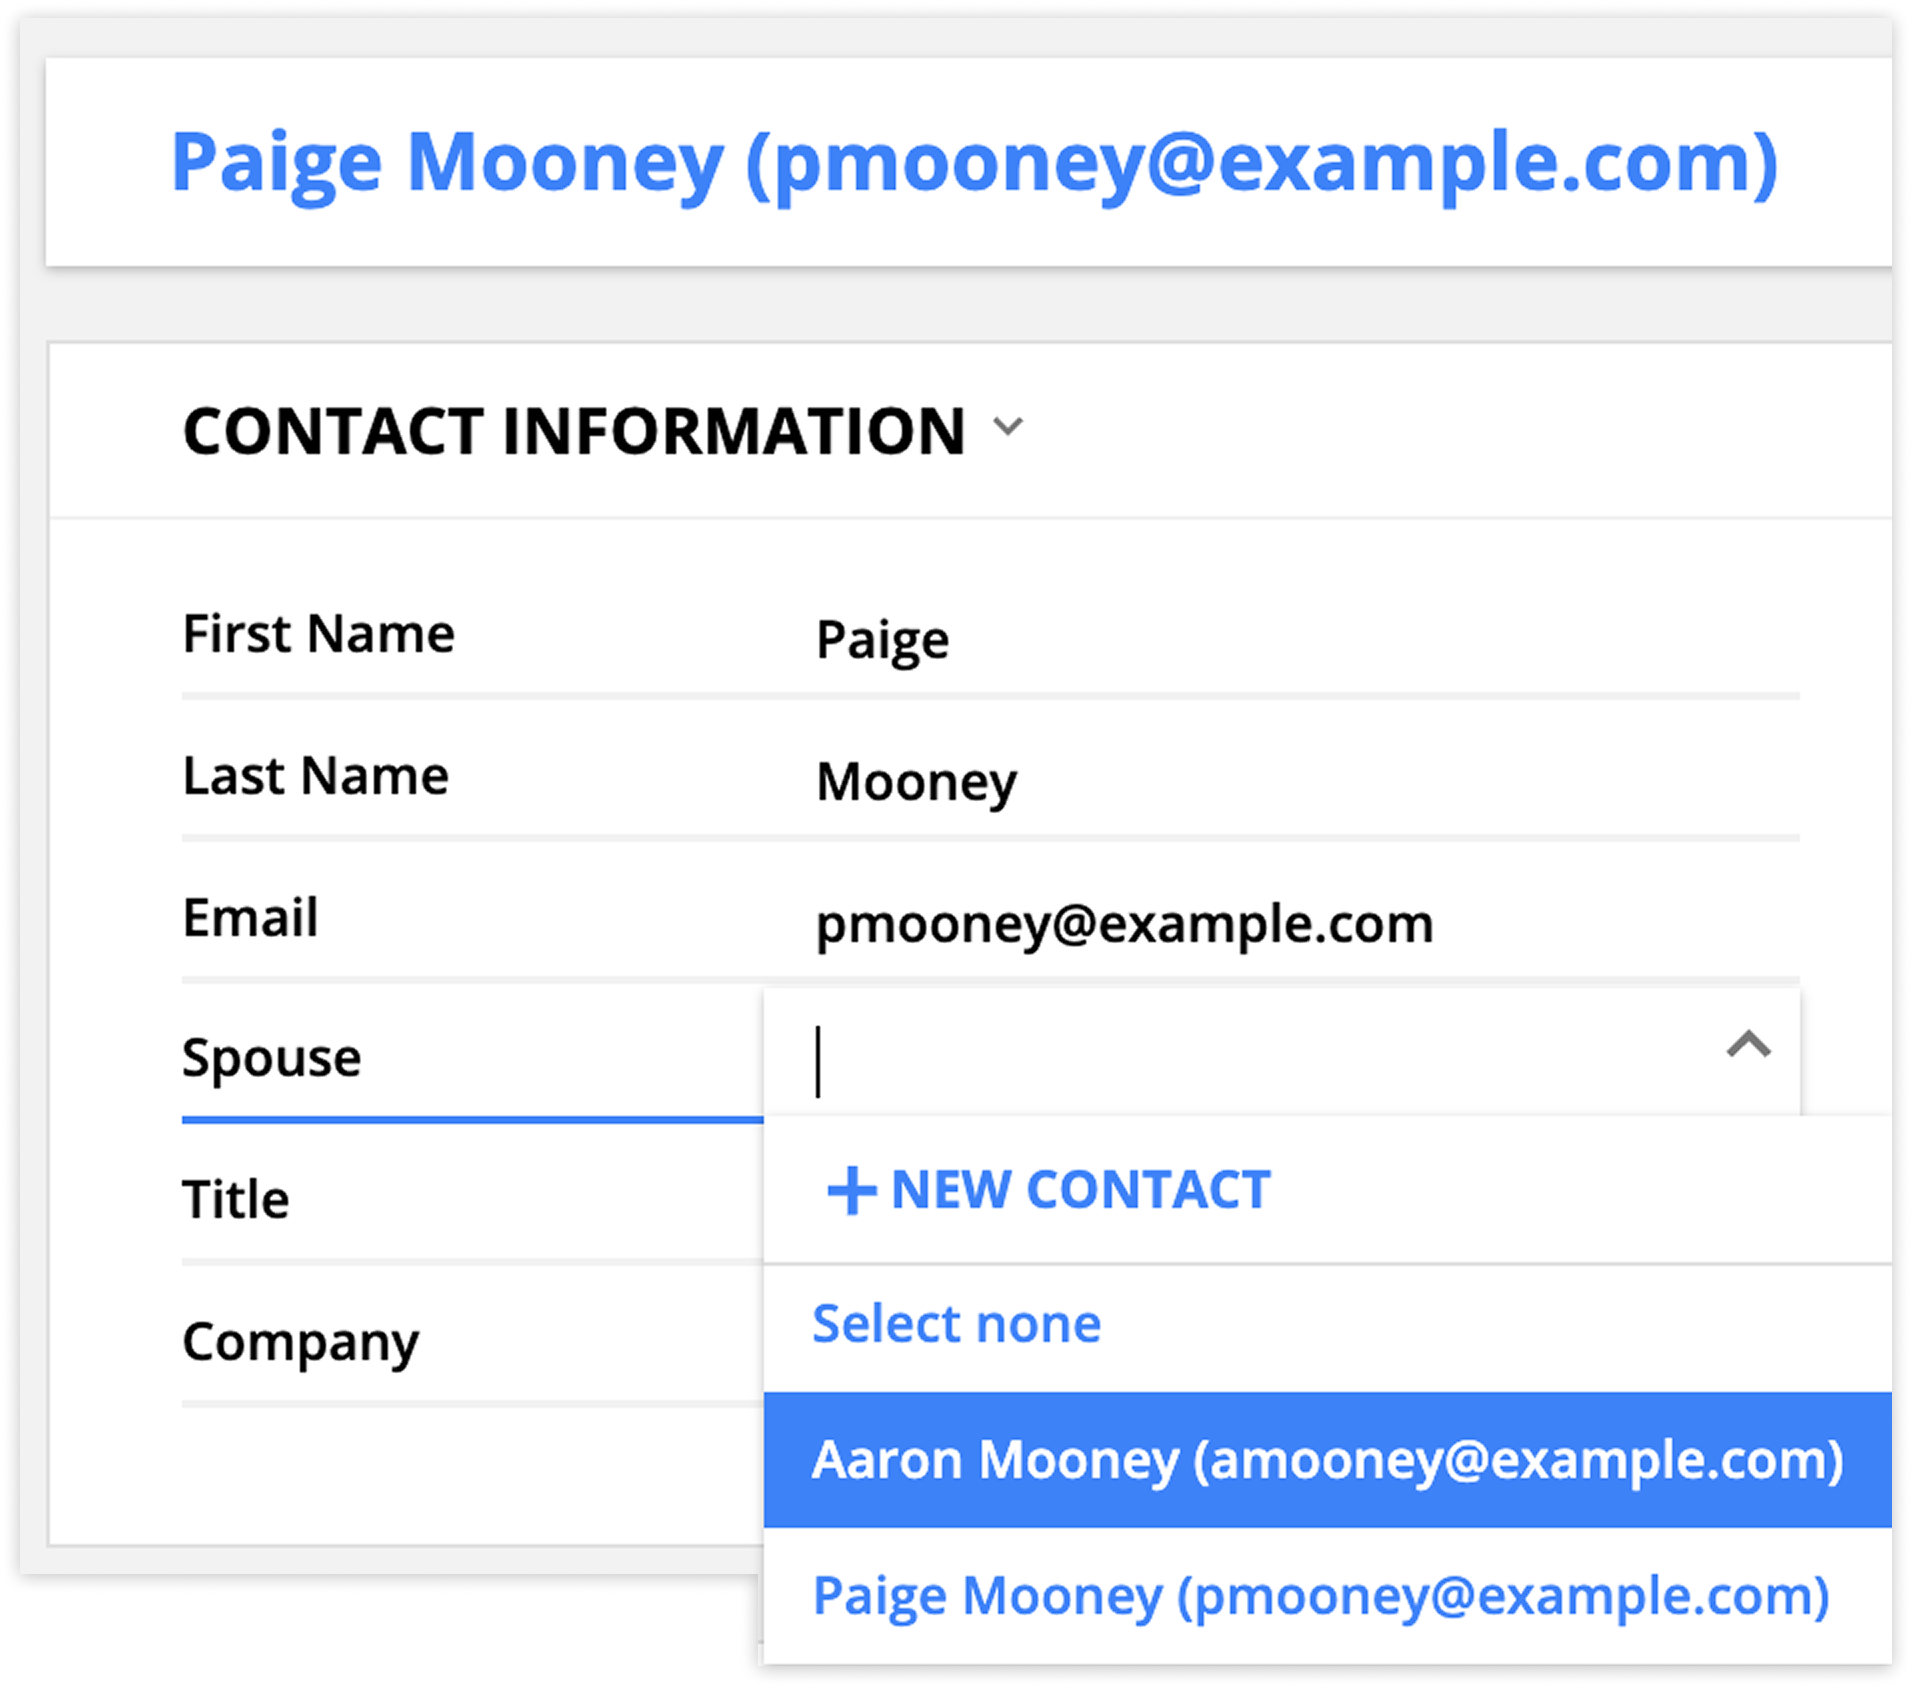
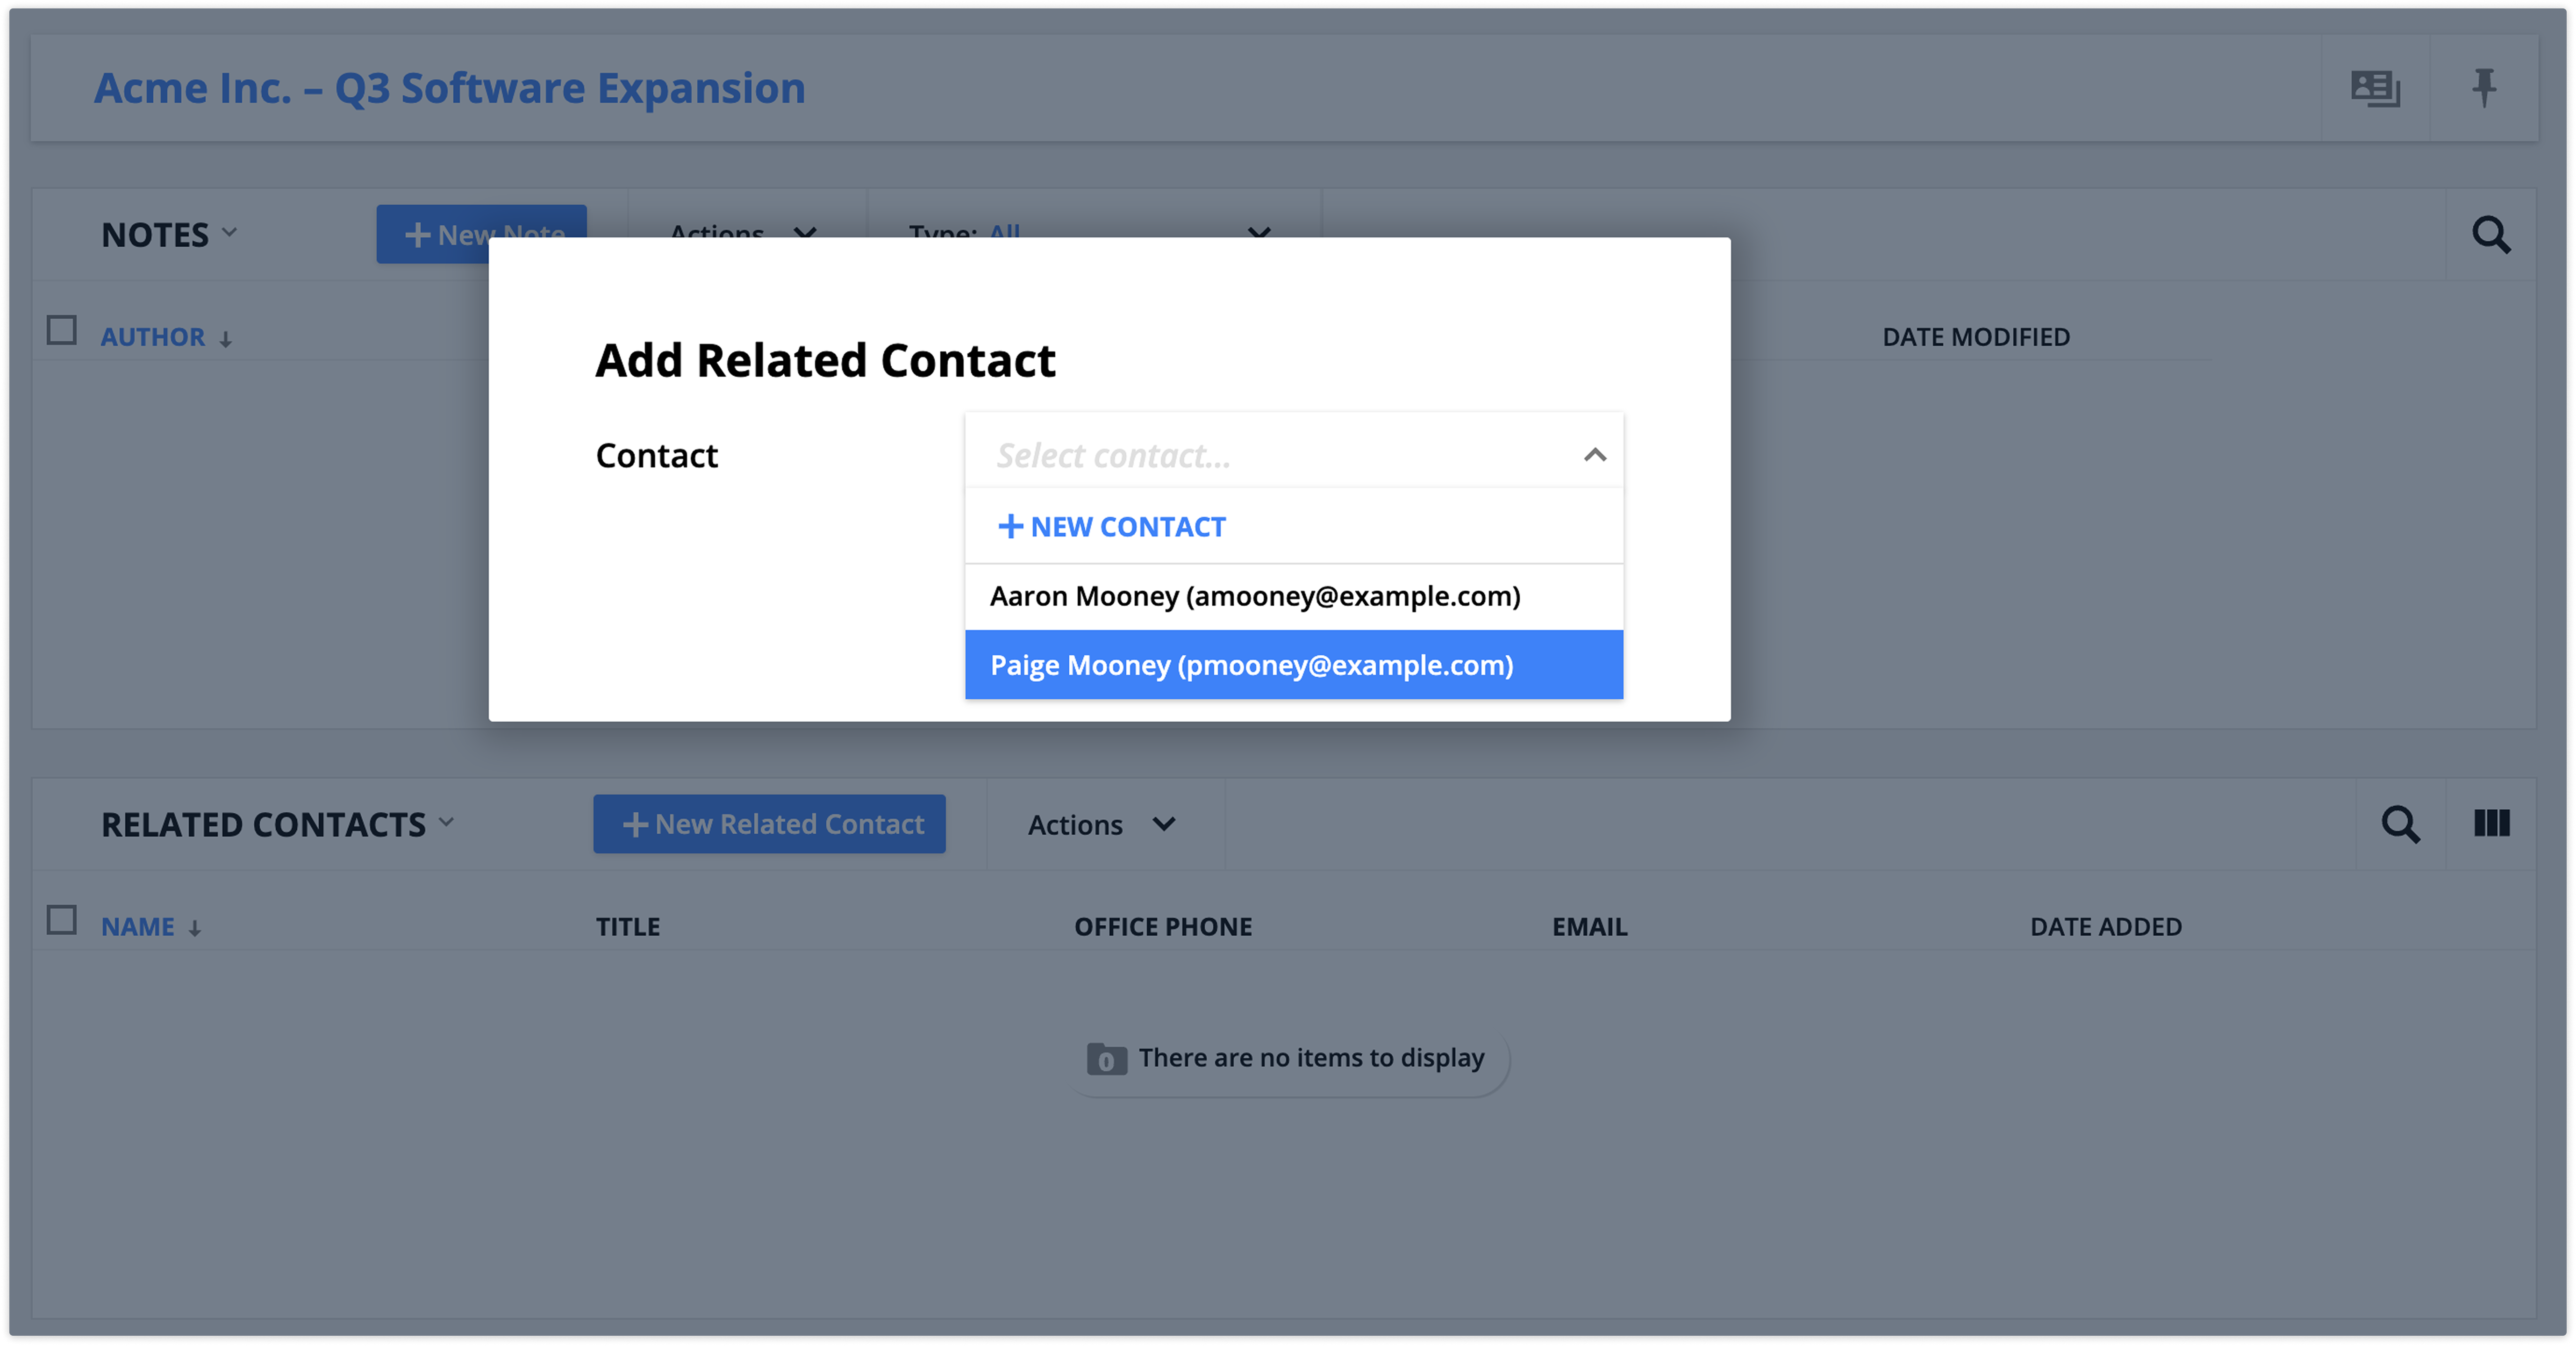
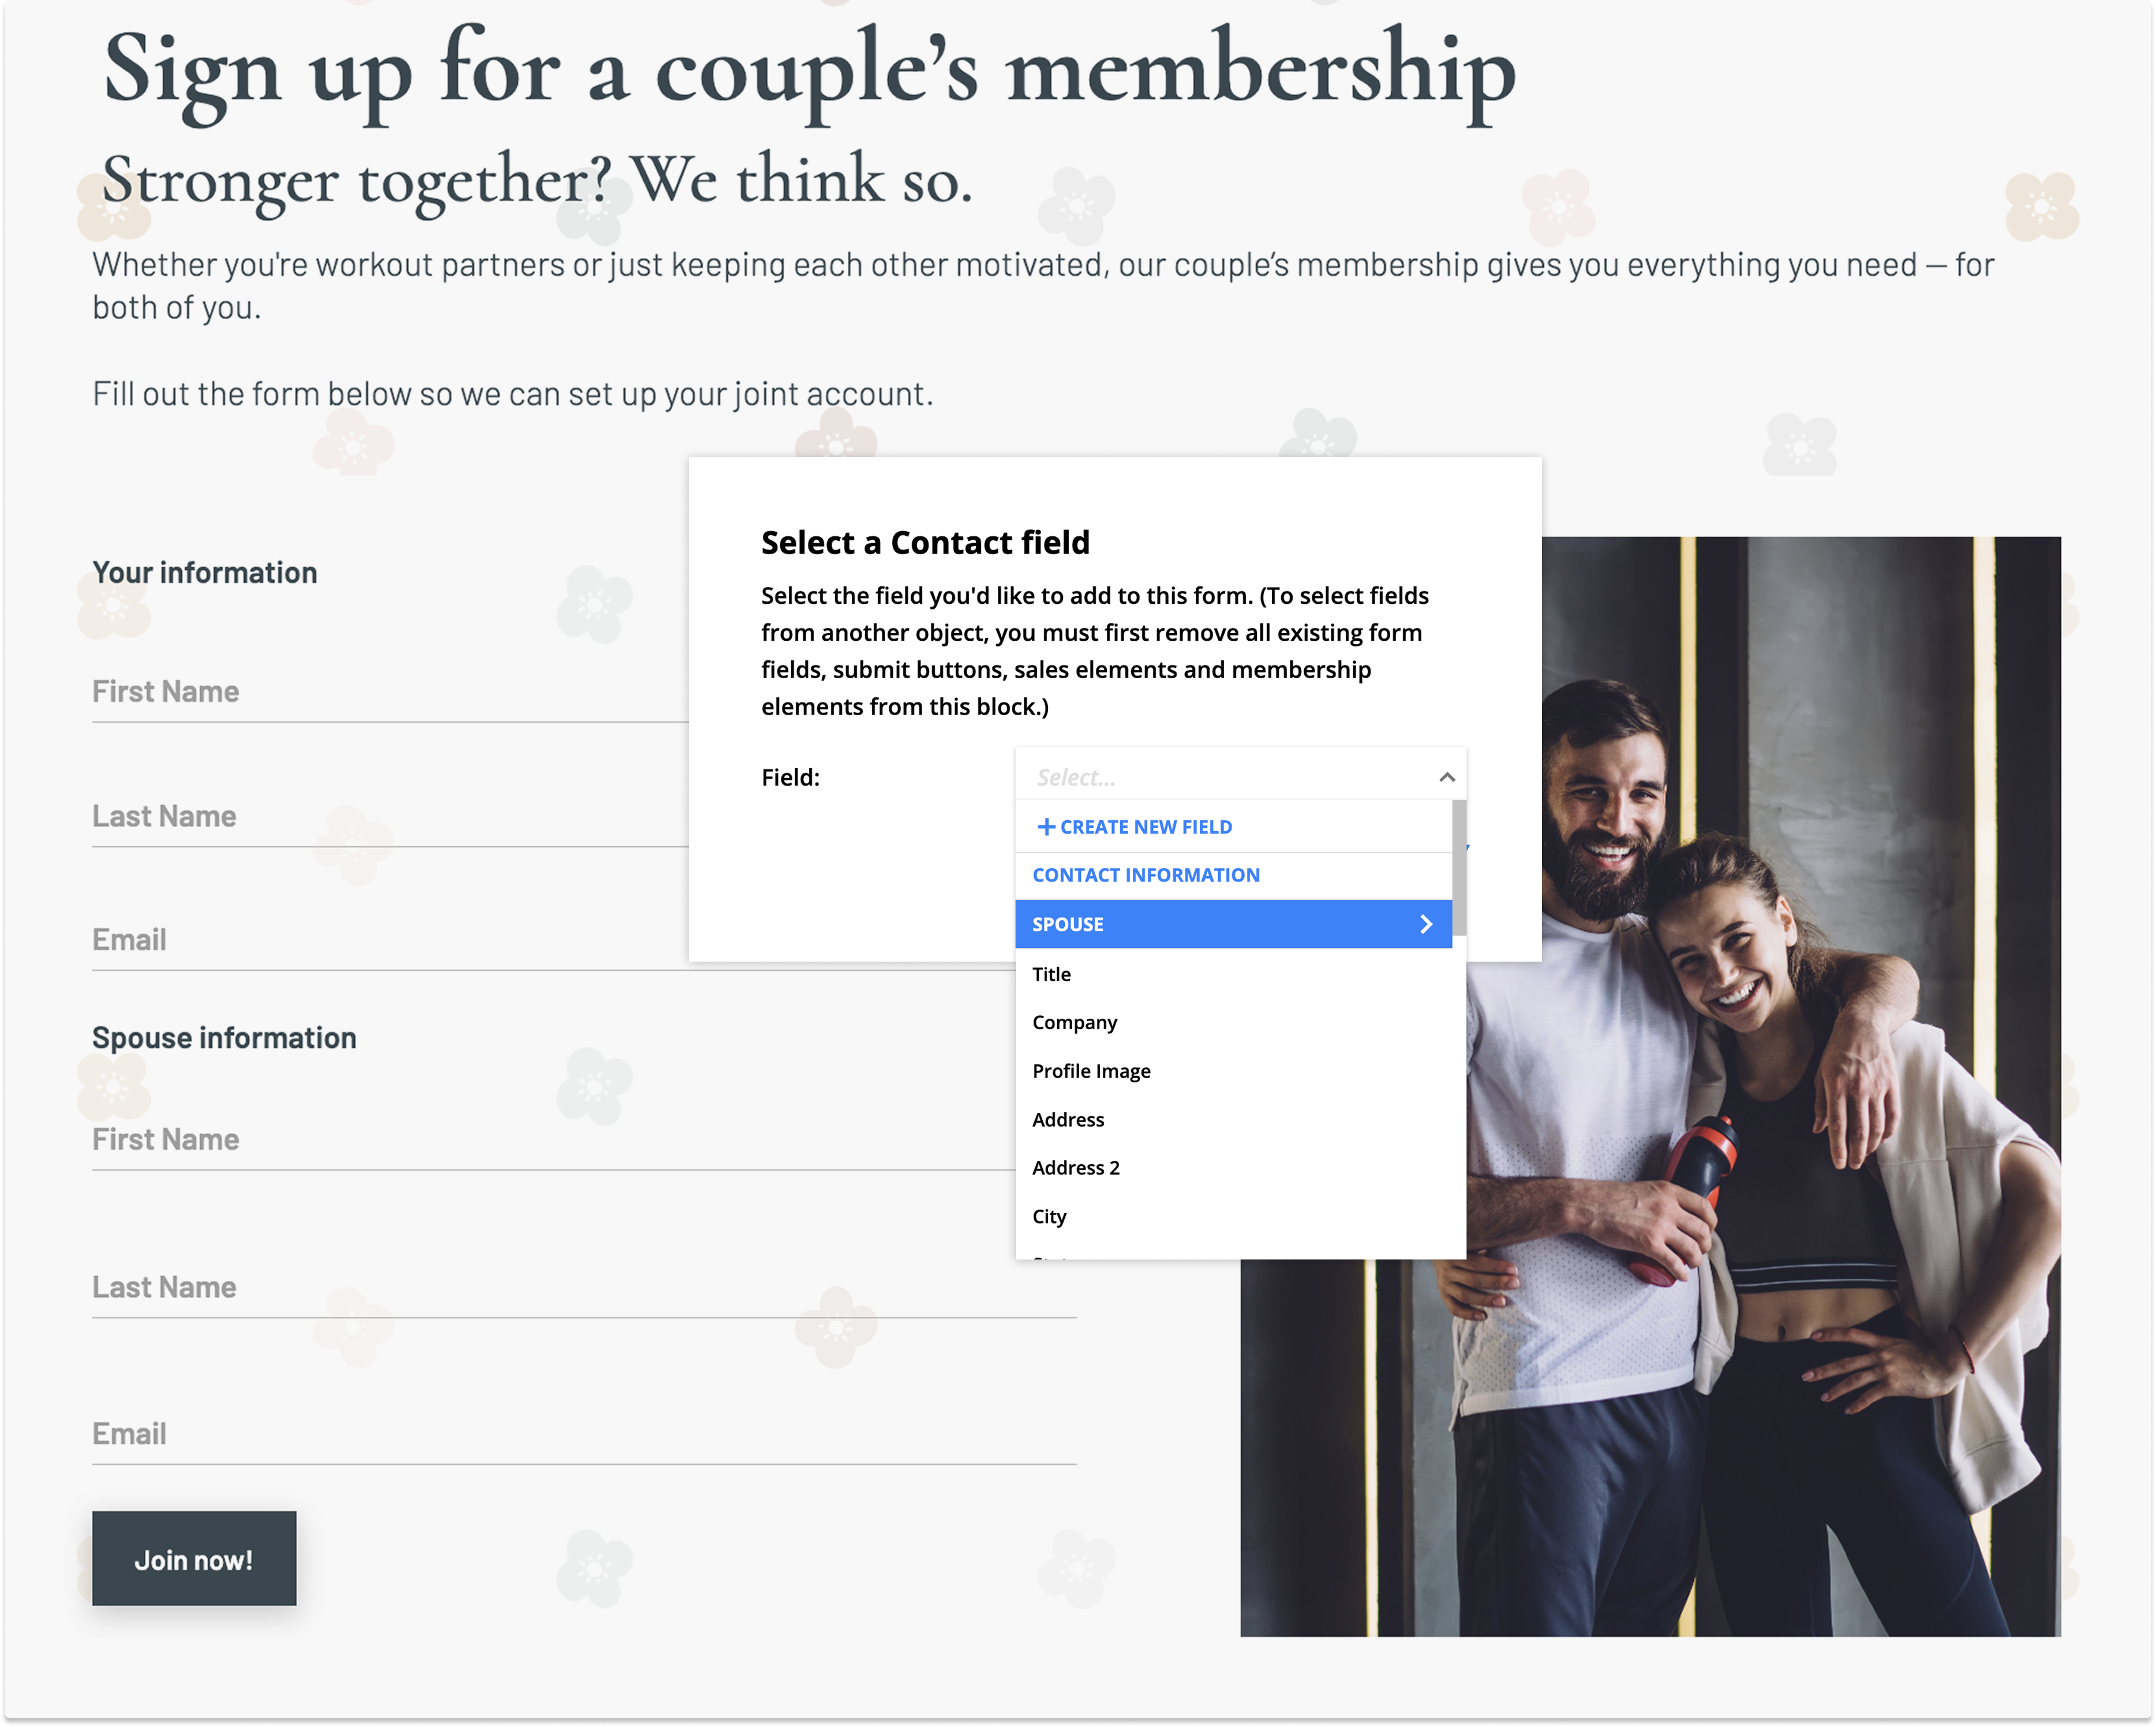
Use case | "I want to collect a contact's and their spouse's information on the same form and automatically link their records together." |
How | Create a contacts form and drill into the spouse fields to add the first name, last name, and email of the contact's spouse. |
Result | When my new contact submits a form, my account creates two contact records for each spouse and connects the records with the Spouse relational field. |
One-to-many relationships
Back to top
When you want to relate records with one-to-many relationships, your form's source must be the child object.
- When the form's source is the child in a one-to-many relationship, you can drill into parent fields to connect records.
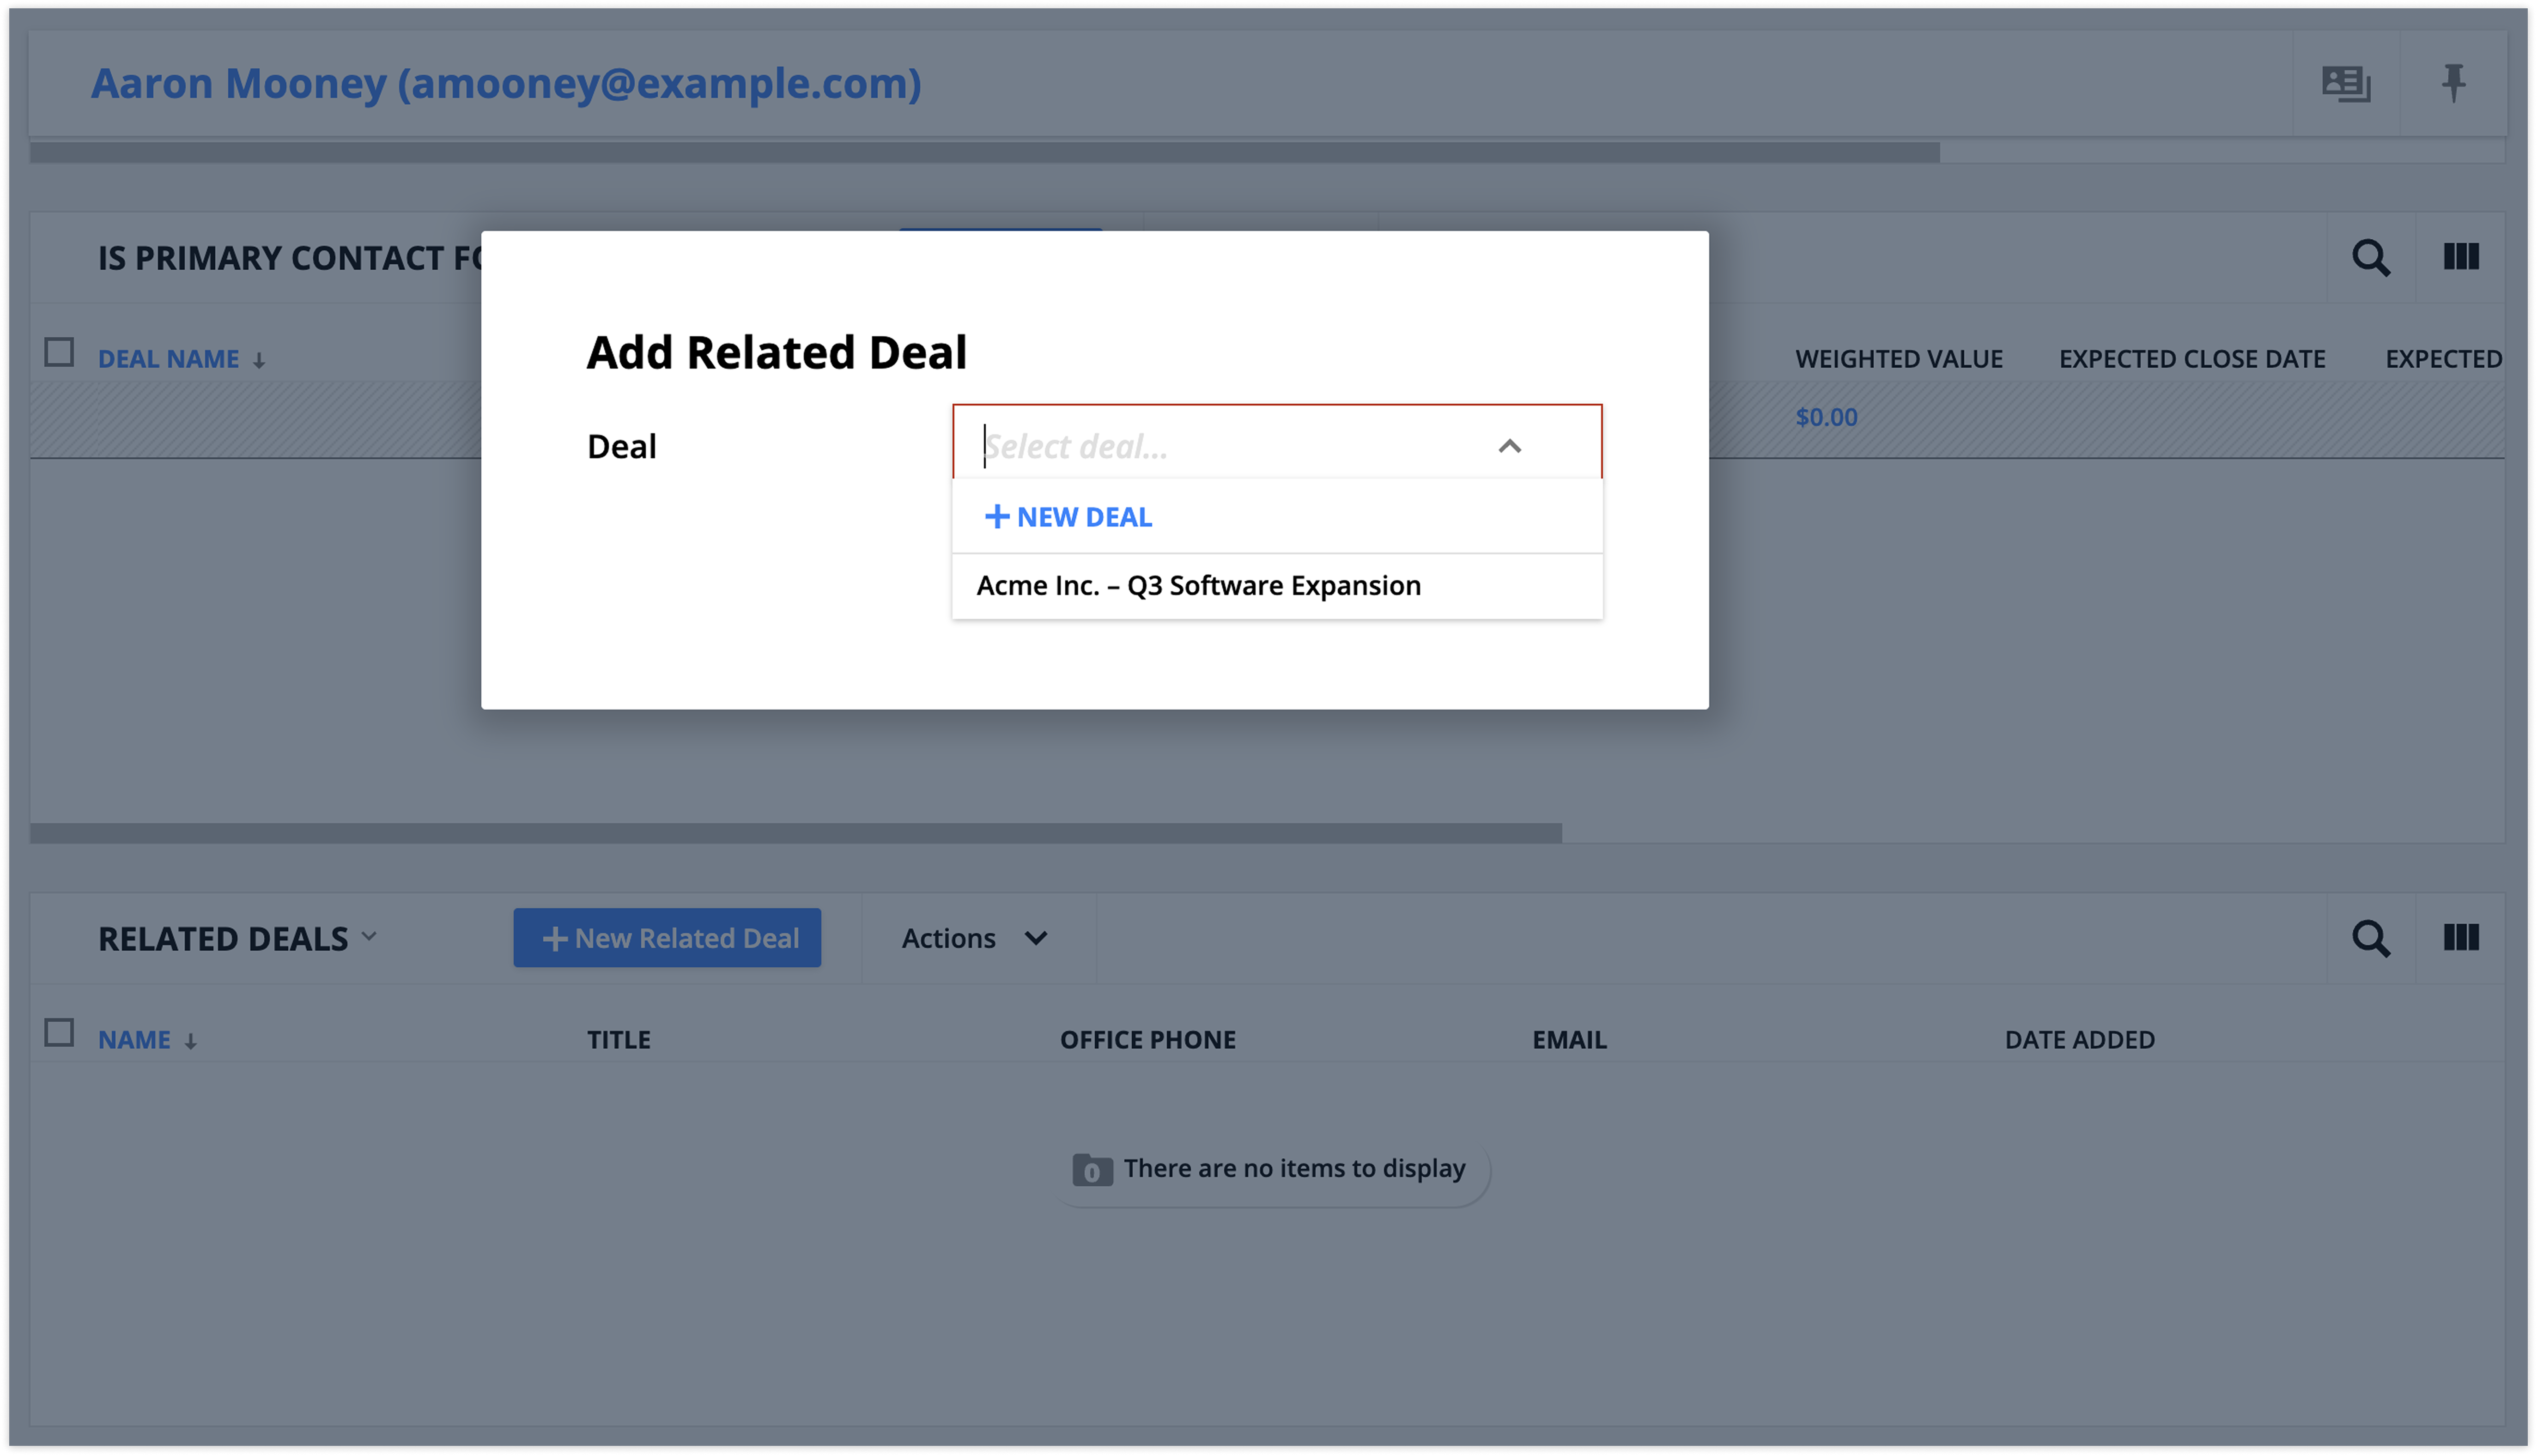
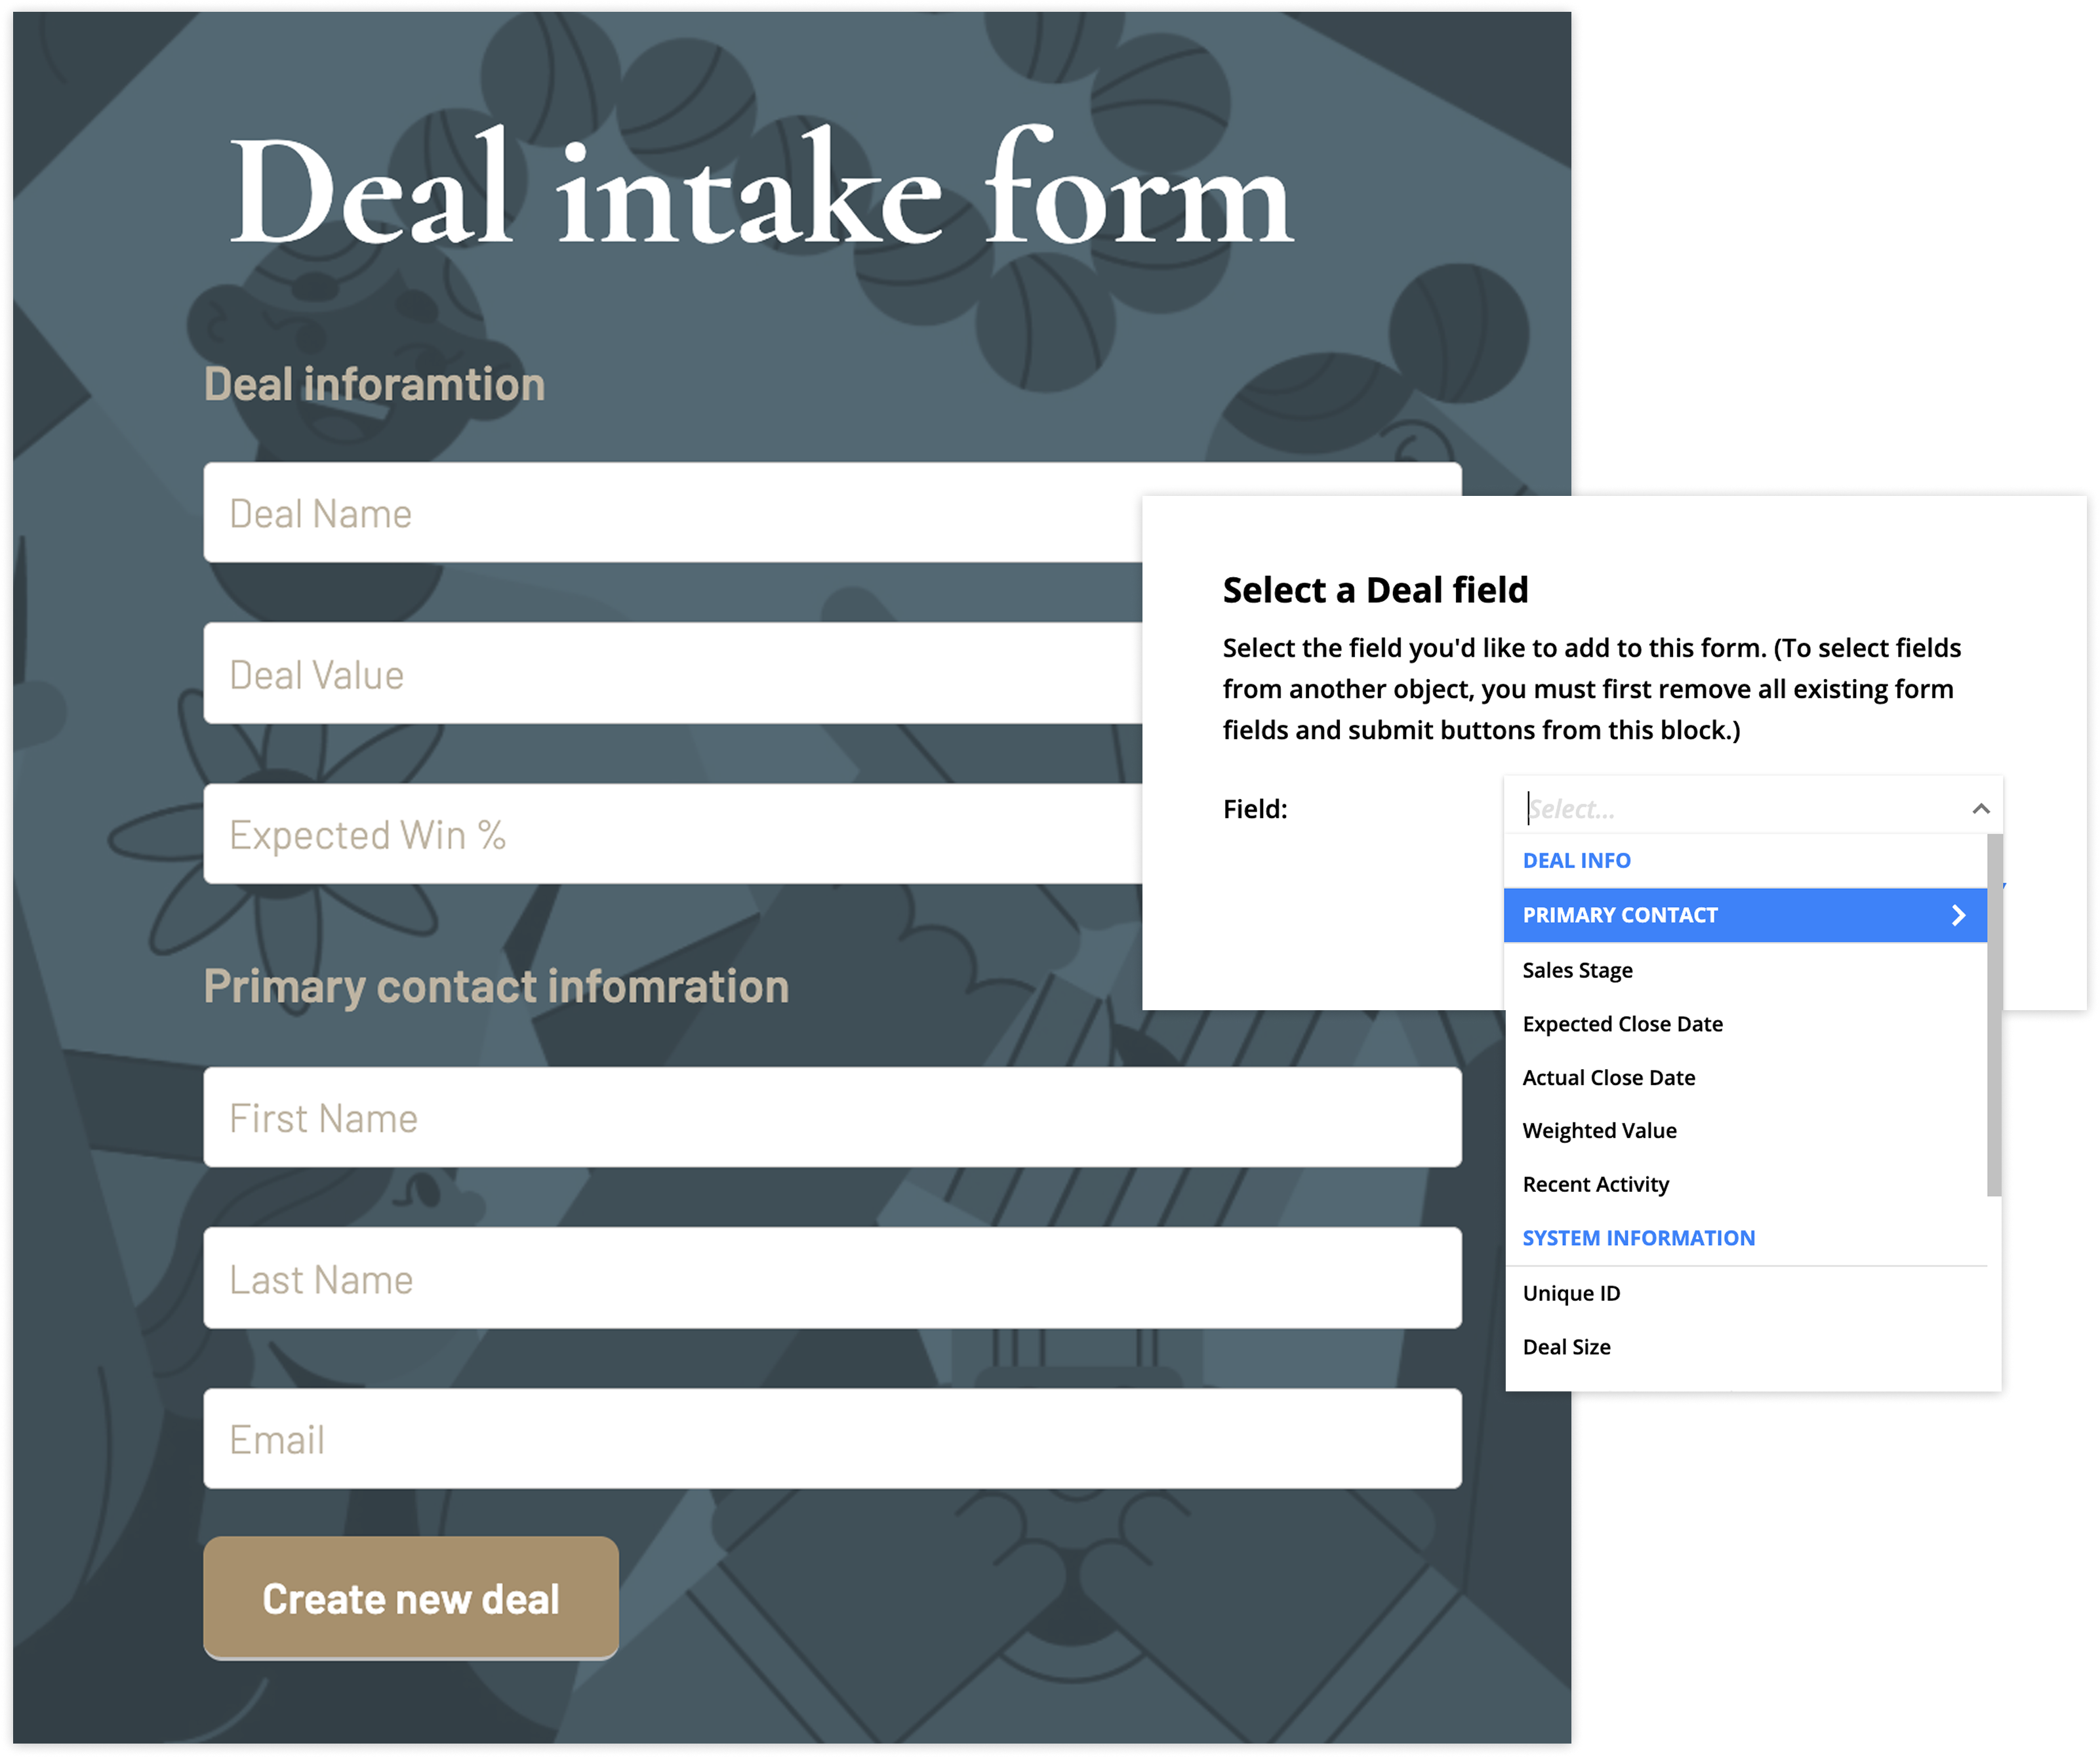
Use case | "I want my team to be able to create new deal records by filling out a form. I want to capture the information about the primary contact from that form and connect my records." |
How | Create a deals form and drill into the related contact fields to add fields for name and email. |
Result | When my team fills out the form, my account creates a deal record and a contact record. I will see the contact is added to the Primary contact field in my deal record, and in the contact record, the deal will appear in the Primary contact for these deals subcollection. |
Many-to-many relationships
It's not possible to connect many-to-many relationships by drilling into related fields because there are multiple records on each side of the relationship. So, you need to tell your account the specific records that you'd like to connect. You'll use an advanced form setting instead of drilling into related fields.
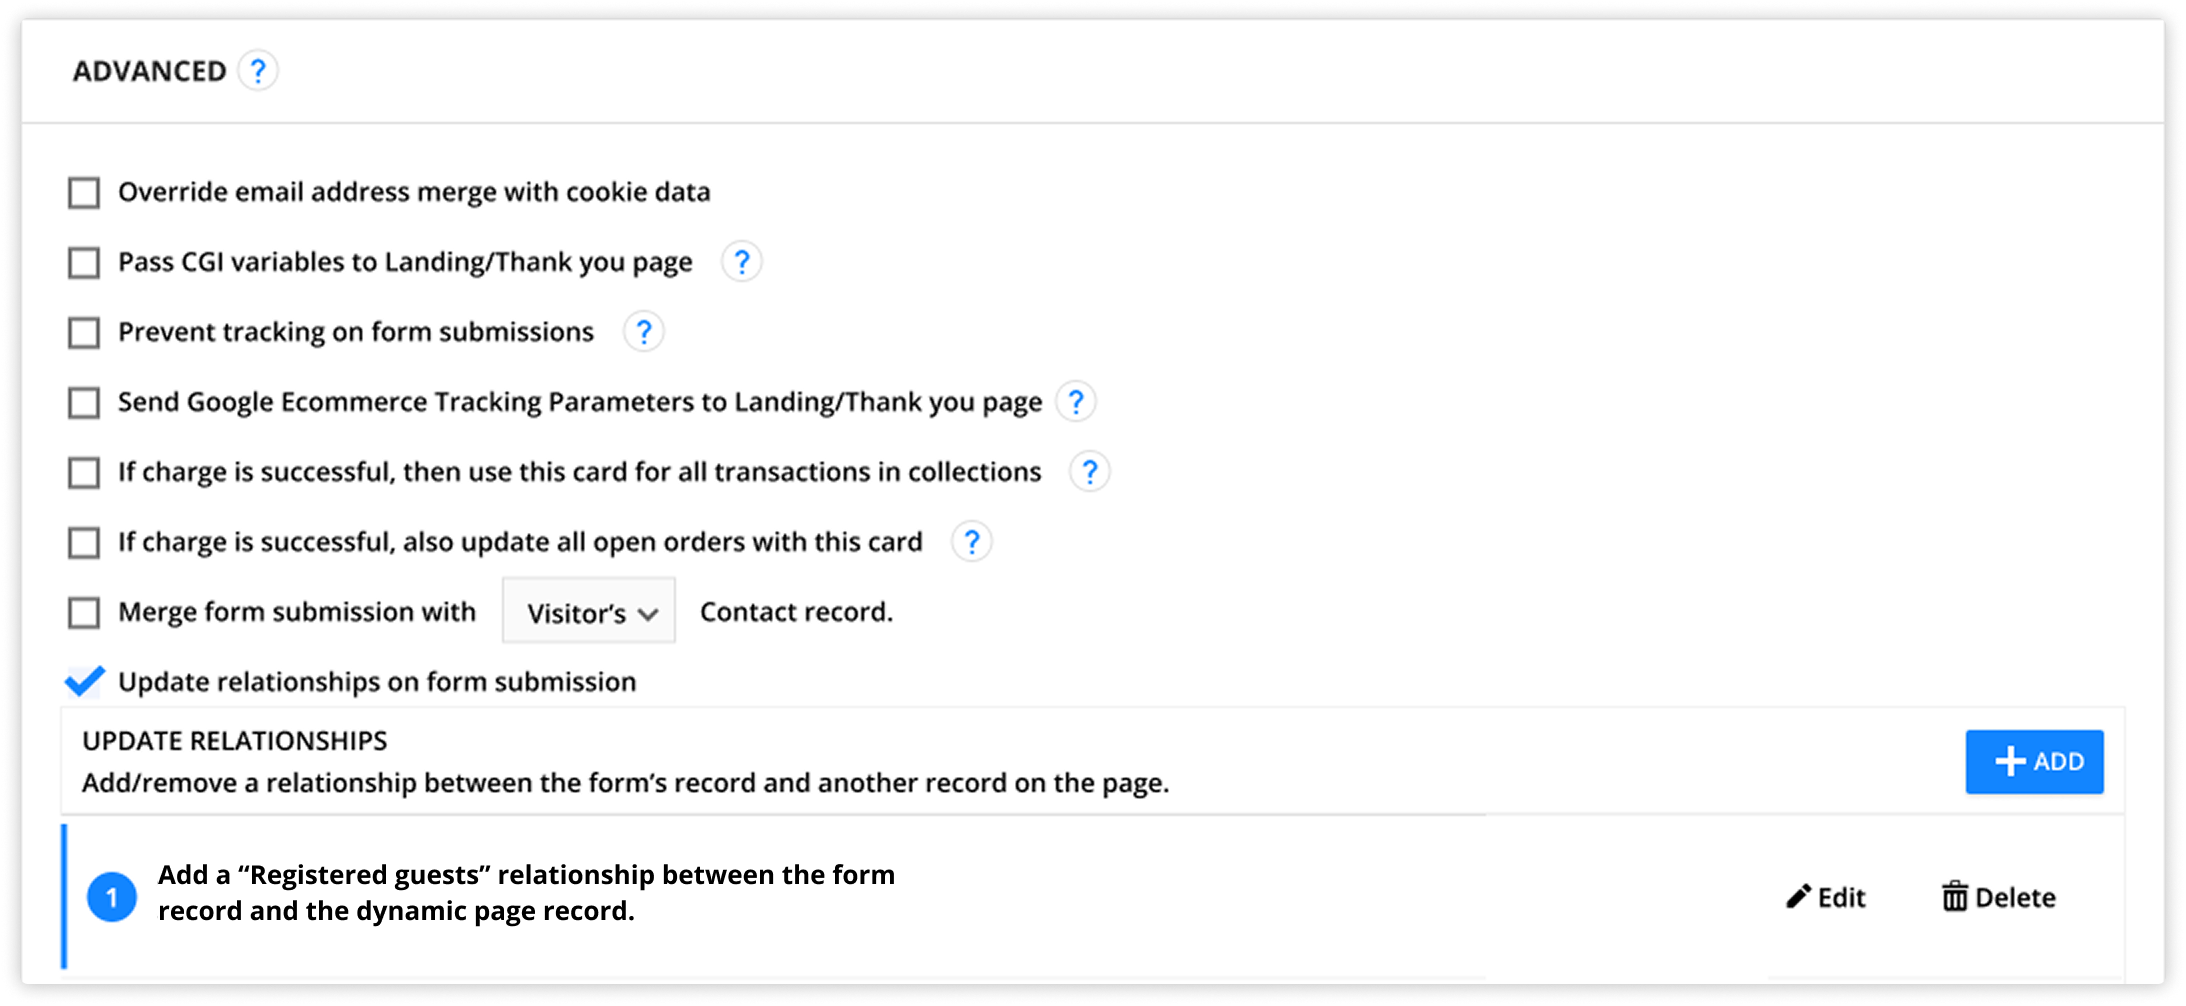
- Open your form’s settings and scroll to the advanced section.
- Check the “Update relationship on form submissions” option.
- Click Add and select which relationship you want to update:
- The relationships you can choose from are based on relationships between visiting contacts, dynamic block records, page records and form records. Here’s what each of those mean:
- Visiting contact: The identified cookied contact visiting your page
- Dynamic page record: The data source (record) for the dynamic page.
- Dynamic block record: The data source (record) for a specific row or column of the dynamic block.
- Form record: The record that is created or updated when the form is submitted.
- The relationships you can choose from are based on relationships between visiting contacts, dynamic block records, page records and form records. Here’s what each of those mean:
Use case | “I have a dynamic template for my live events, and I want to allow visitors to fill out a form to register as guests for my event.” |
How | Create a live events dynamic template and add a contacts form to it. Check the "Update relationship on form submissions" option in your form's settings. Then, add a relationship using the option "Update a relationship between the form record and the dynamic page record. |
Result | The contact that’s created or updated by filling out the registration form will be added to the event’s Registered guests subcollection. |
With reaction elements
Back to top
Reaction page elements only work for many-to-many relationships. They allow your site members to create relationships with a click. For example, favorite blog posts or upvote forum posts.
Learn more about reactions here.
In automation
Back to top
Similar to updating relationships with forms, the method to create one-to-one and one-to-many relationships is the same, and there is a special element that allows you to update many-to-many relationships.
One-to-one relationships
Updating one-to-one relationships in automation maps is easy. However, you can’t set relationships dynamically. When you set up the update automation element, you can select from existing records in your account.
- Add an Update automation element.
- Click on the element to open its settings, then click into the Update this field dropdown.
- Locate your one-to-one relationship and click on the name.
- Don’t drill into the related records fields unless you want to update specific fields instead of creating a relationship.
- Select the other record you’d like to relate.
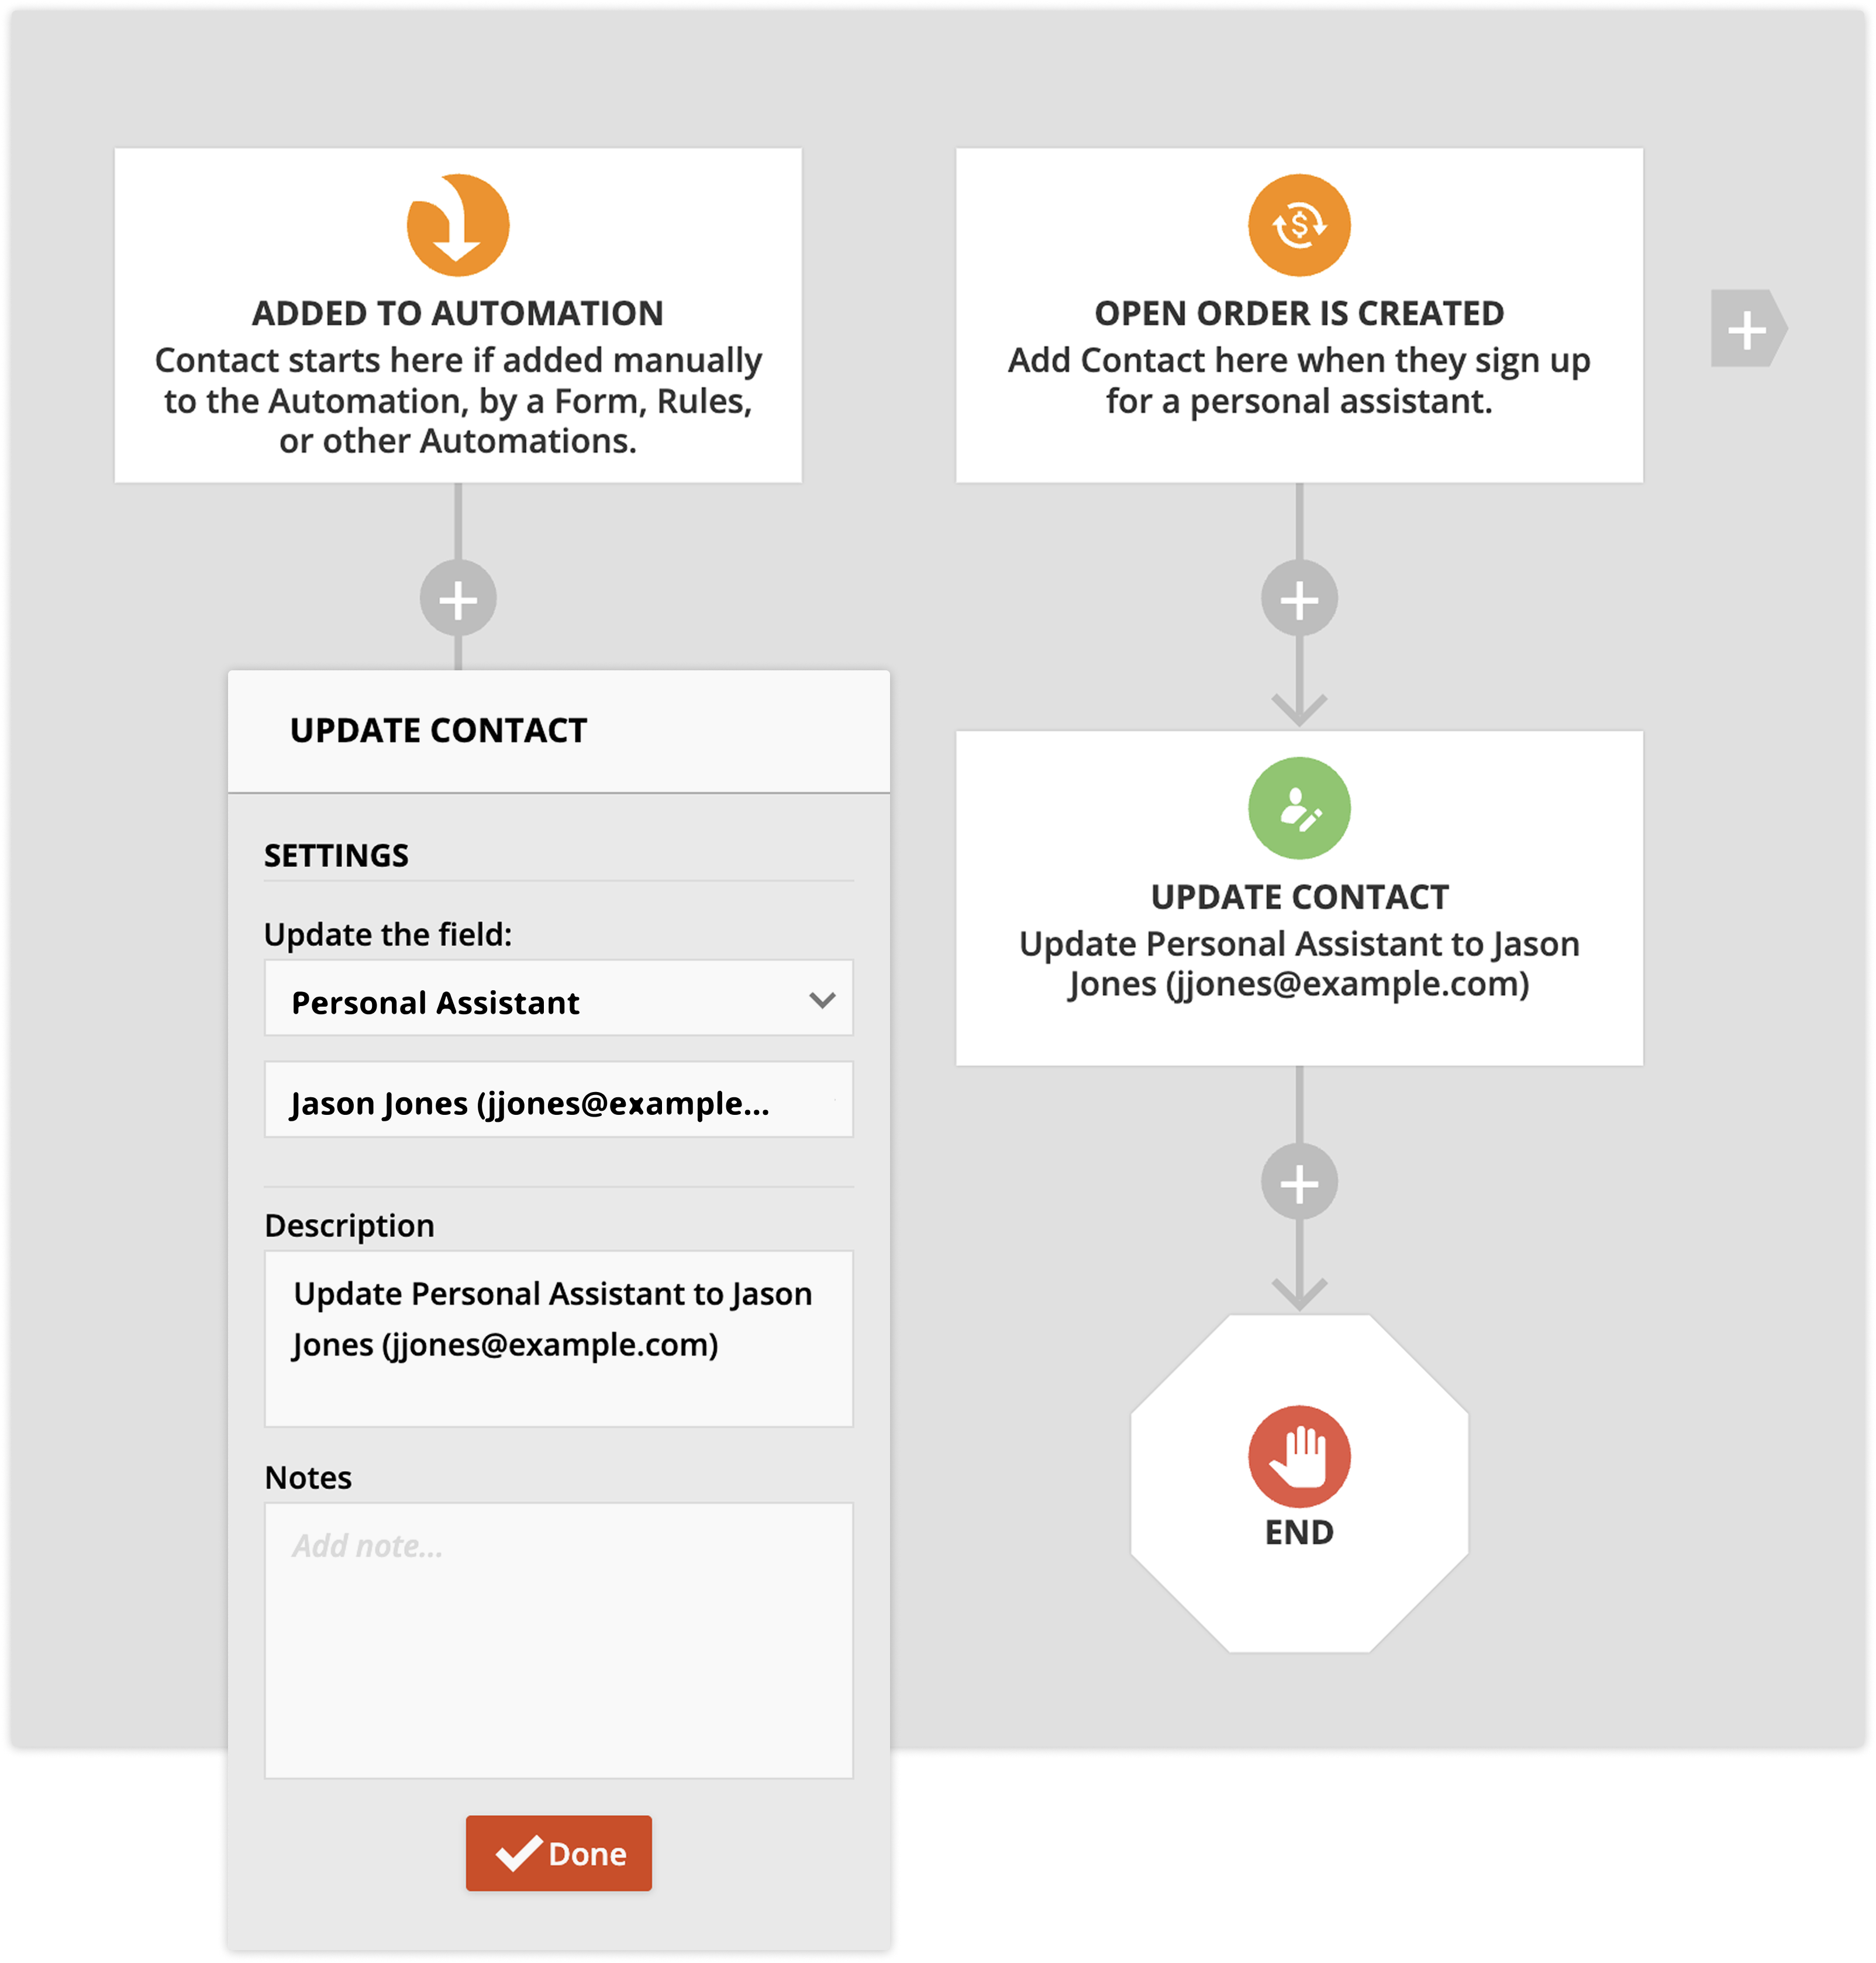
Use case | “I run an agency for personal assistants. When a new client signs on, I want to assign my onboarding specialist as their interim personal assistant while they get set up.” |
How | Create an automation map that adds new clients when they sign up for a personal assistant. Add an Update contact element, click on the Personal Assistant relationship, and then select your onboarding specialist. |
Result | All your new clients will get their first experience with your onboarding specialist. |
One-to-many relationships
Updating one-to-many relationships in automation maps is easy. However, you can’t set relationships dynamically. When you set up the update automation element, you can select from existing records in your account.
Use case | “I want to assign my VIP account manager to new high-value contacts when they sign a contract.” |
How | Create an automation map with a trigger and condition that will only add high-value new clients. Add an Update contact element and update the Account manager relationship with your VIP rep. 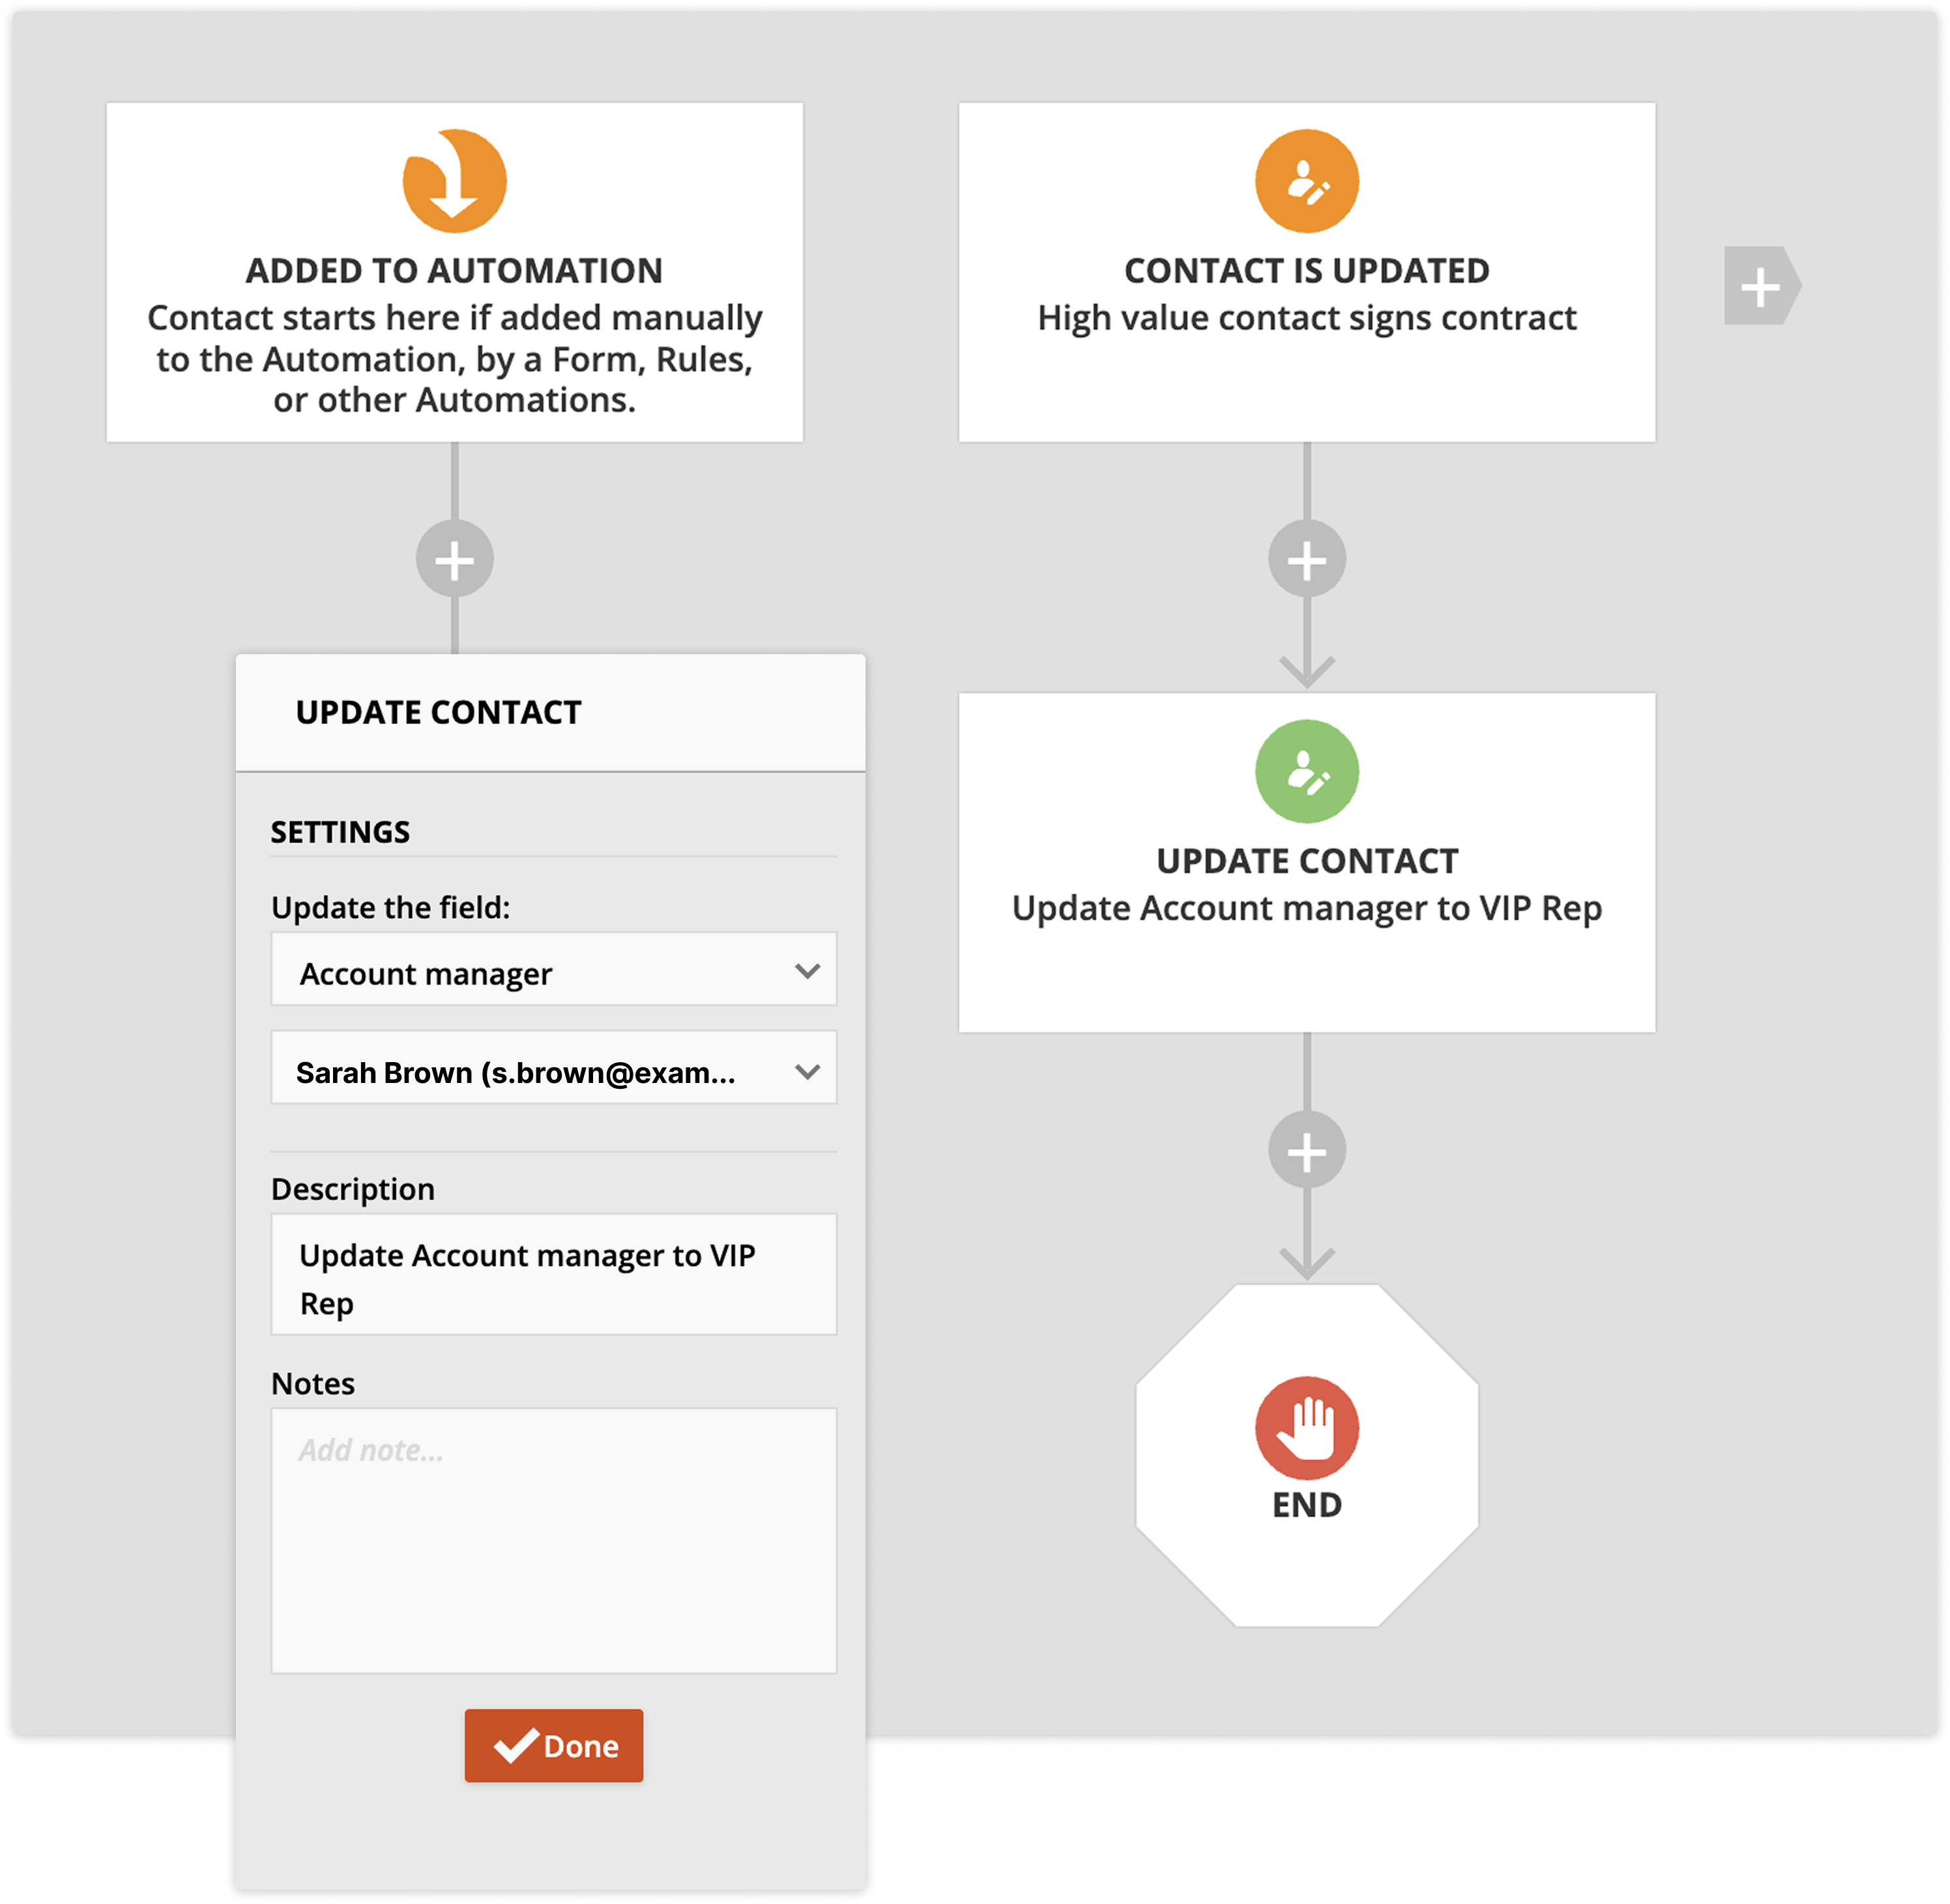 |
Result | Whenever new high-value clients sign a contract, their account manager will be your VIP rep. |
Many-to-many relationships
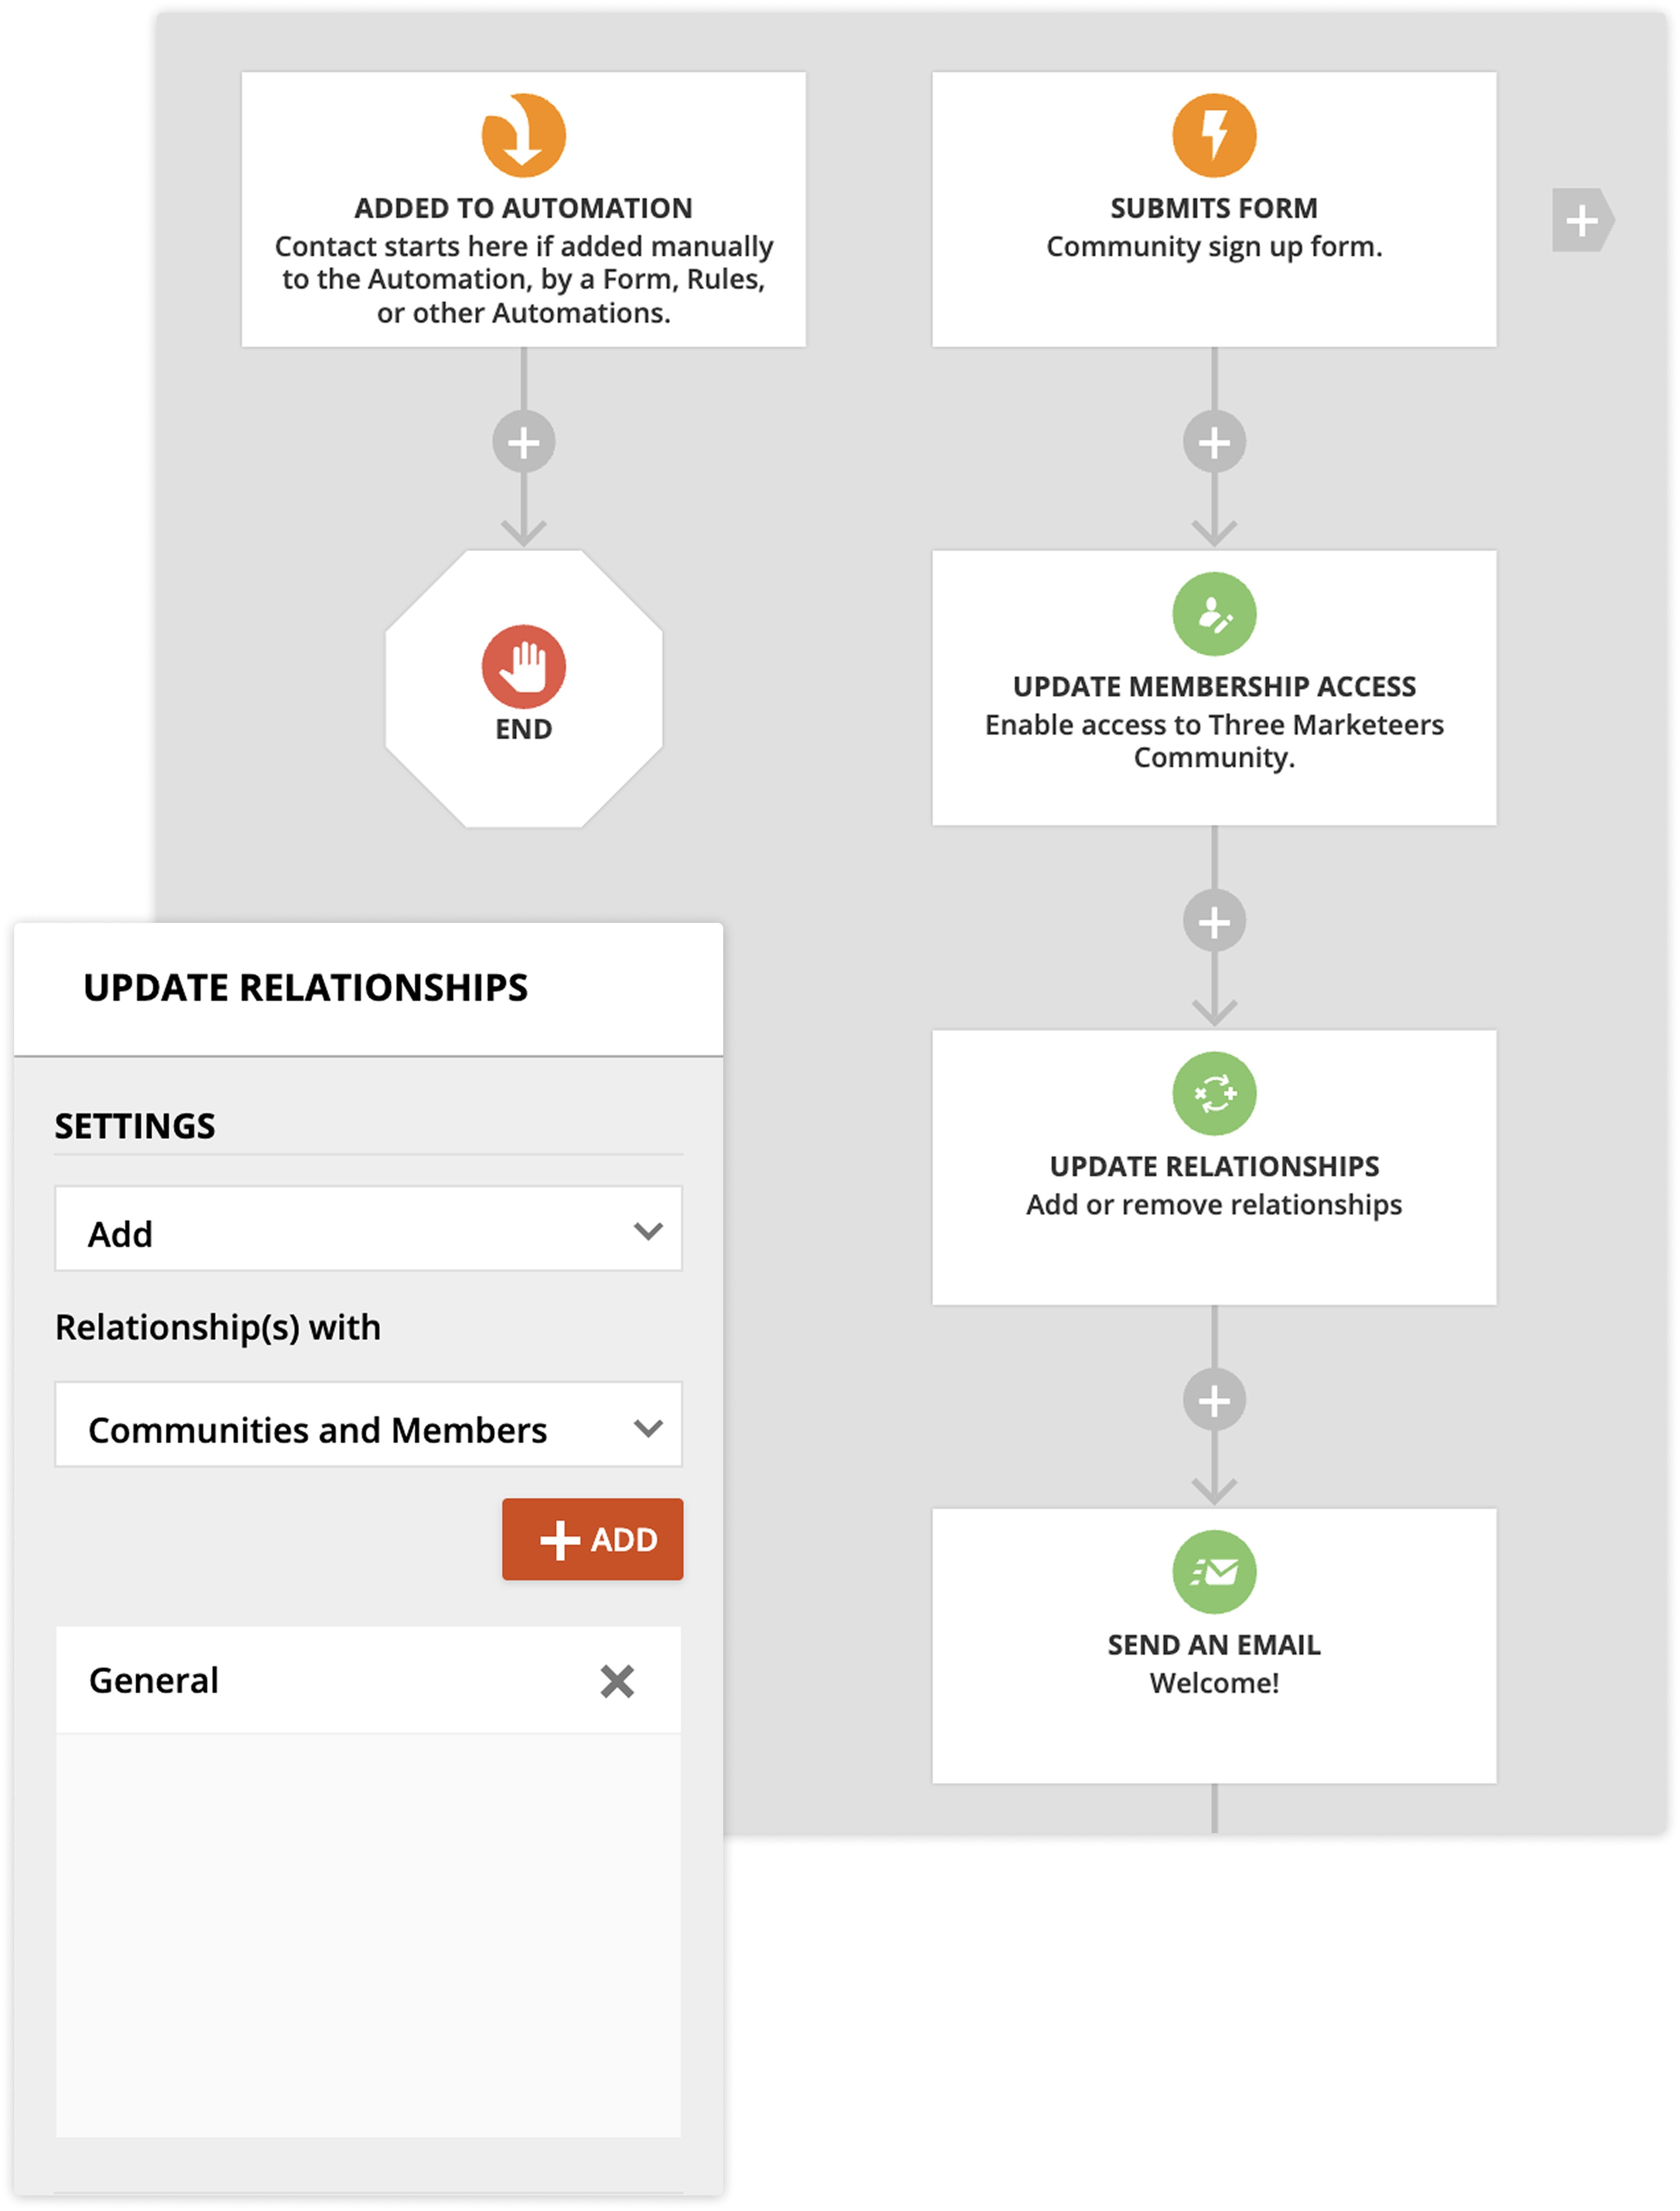
Many-to-many relationships need to use a special automation element to update because there are multiple records on each side of the relationship. So, you need to be able to designate the specific records that you’d like to connect. To do this, you’ll use the Update relationship automation element.
- Add an Update relationship element.
- Click on it to open its settings and click into the “Relationship(s) with” dropdown and select the relationship you want to add.
- Then click Add and select the specific record(s) you want to connect.
Use case | “When people join my community, I want to add everyone to the general group and let them pick the topics they’re interested in.” |
How | Create an automation map that adds contacts when they submit the community sign-up form. Give them membership access, then add an update relationship element to add everyone to the general group. |
Result | All of your members will automatically be added to your general community when they sign up. |
Using a CSV File
If you’d like to mass import records into your new object, you’d use the same process to import contacts but access it from your object instead of contacts.
- Hover over your object in the main navigation bar and click Settings → Import.
- Follow the steps to import contacts.
- If you want to import records with established relationships, follow these steps.
Through the API
View our article on using Ontraport’s API article for information. This functionality is advanced and should be used by experienced developers or programmers.
Create a new custom object
First, make sure you’ve added a dynamic content package to your account. Here’s how:
- Click here to go to your account details page.
- Click Add plan or Start trial next to “Add Dynamic CMS to your account,” and choose the plan that fits your needs.
Once custom objects are enabled in your account, you can follow the steps below to create your own custom object. The process is broken up into four steps to create your own unique record type for your business.
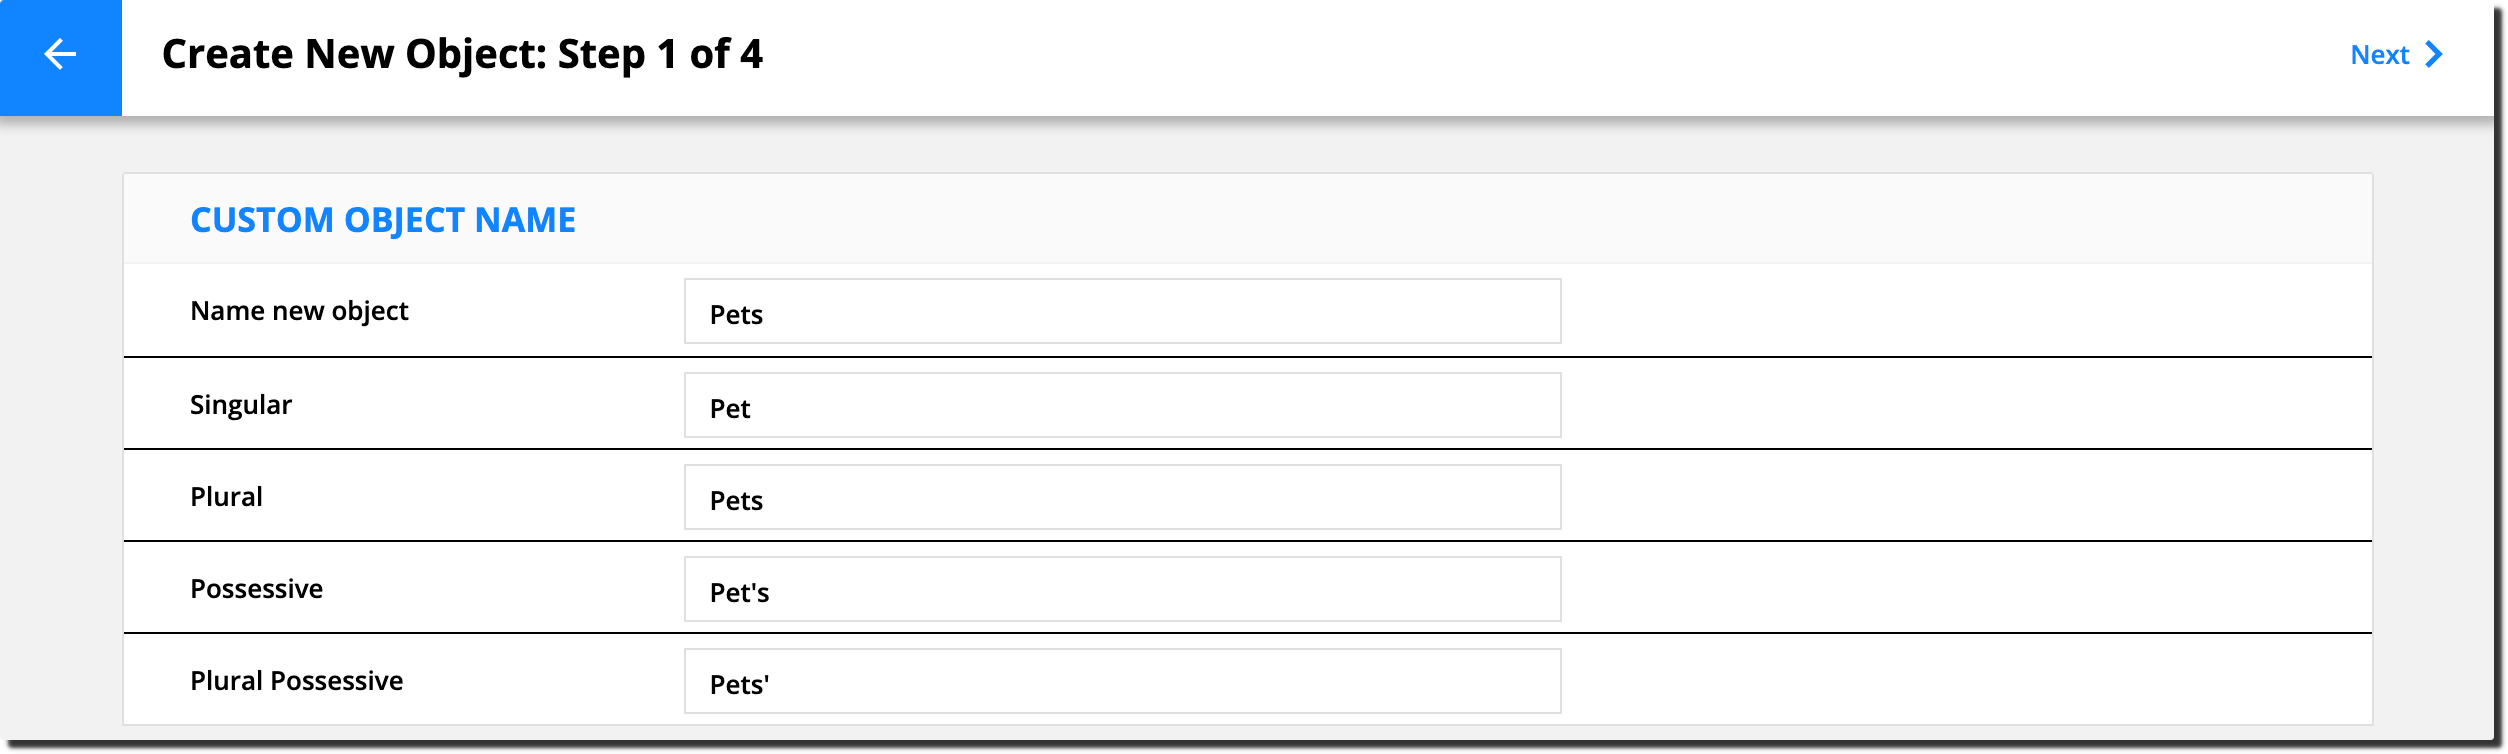
Step 1 of 4 — Name your object
- Click
.png) → Administration → Data → Custom Objects.
→ Administration → Data → Custom Objects. - Click New Object.
- Name your custom object, and add the singular version of the name — the rest of the fields will autofill based on what you enter.
- Click Next.
Step 2 of 4 – Set up your fields
Next, you’ll add the custom fields, sections and tabs you’d like in your custom object records. This is exactly like creating custom fields for your contact records.
Note: if you add an email address field to the custom object record, it will count toward your contacts limit even if you never populate the email address field (just as a contact record without an email address counts).
- Click Add Field to add any custom field
- Click Add New Section to add a custom section to your record
- Click Add Tab to add a new tab to your record.
When you’re done, click Next.

Step 3 of 4 — Create your relationships
In step 2, you created the custom fields you want to have in your records. Creating relationships between your objects is a lot like setting up those custom fields. These settings let you add information from one record to another related record. You choose where your data will live and what labels you want to use.
- Click New Relationship.
- Select the relationship you’d like to set up, where you’d like your data to be stored, and add the label you’d like to add to that section or field.
- Click Save.
- Repeat steps one through three if you’d like to set up another relationship. Otherwise click Next.
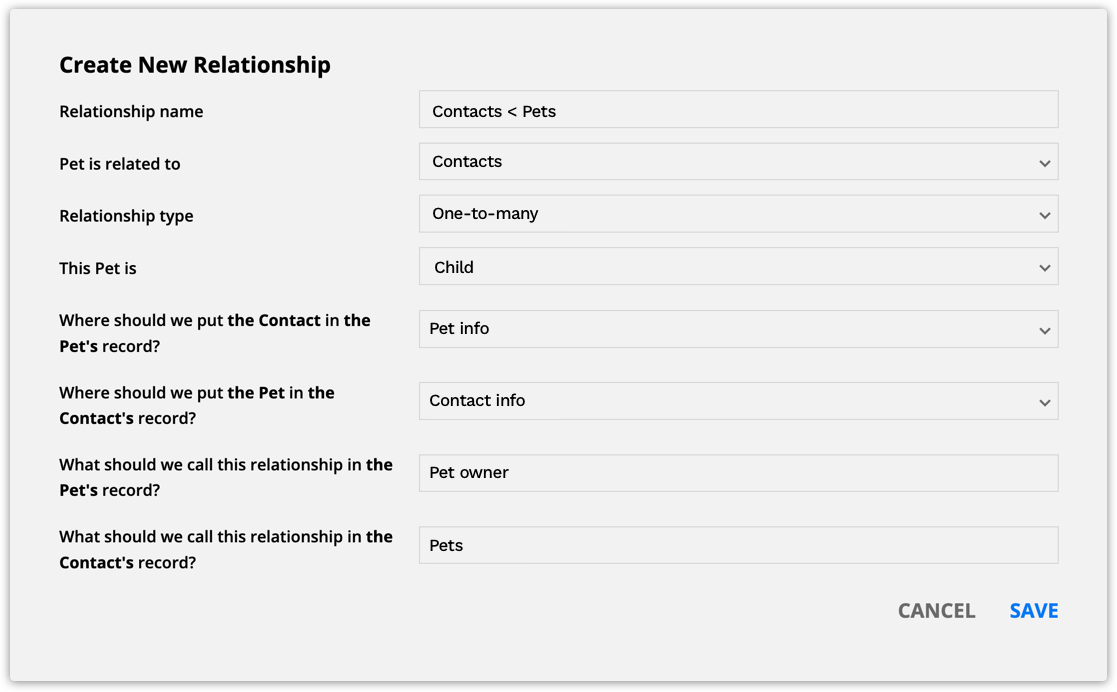
Let’s unpack this “Pets” custom object example to understand what each of these fields mean.
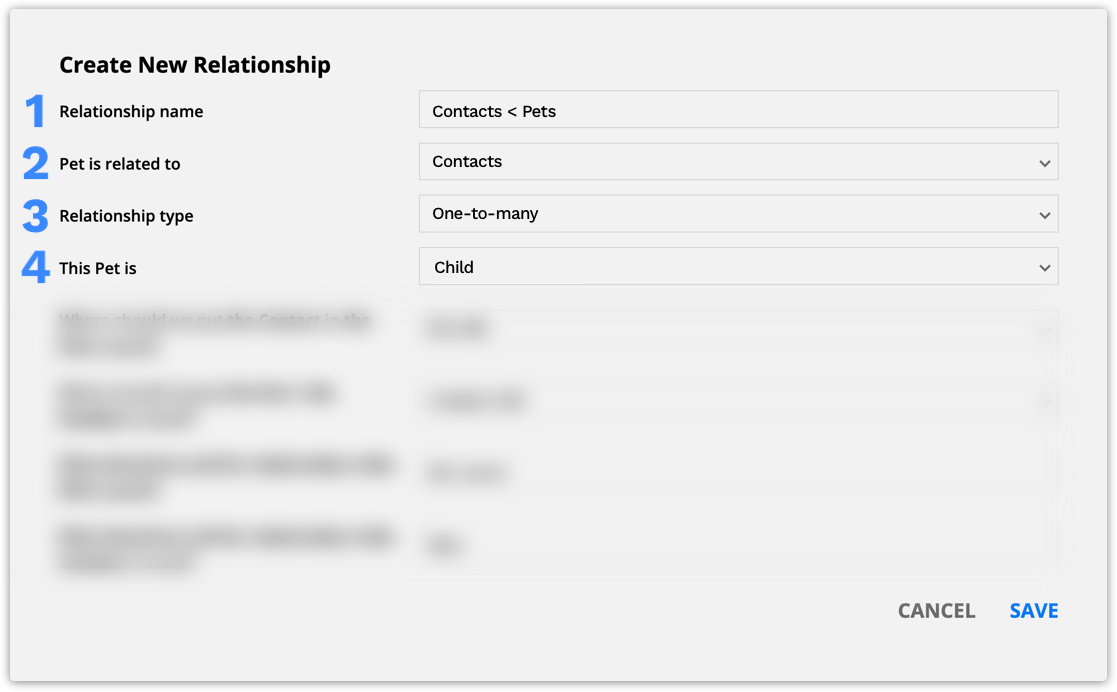
The first four fields determine the objects you’ll connect and identify the relationship structure that connects your records.
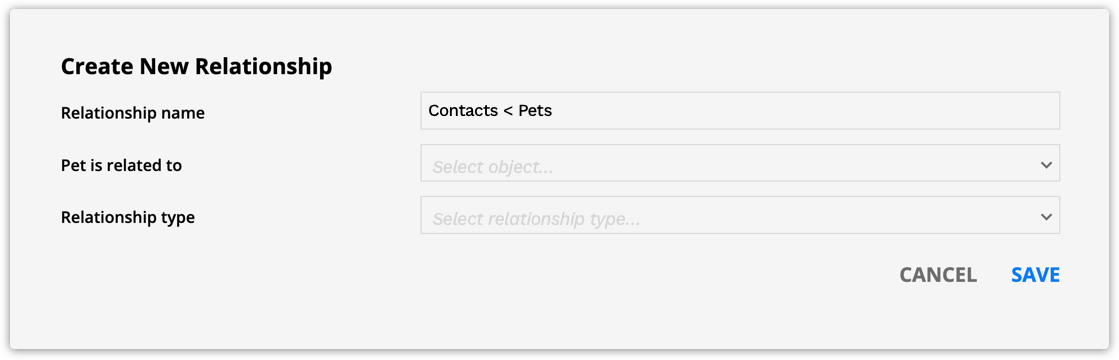
1. Relationship name
- Name your relationship so it’s easy to identify. Either add your own custom name or follow Ontraport’s recommended naming structure. You can edit your relationship’s name at any time.
- Note, any relationships created before August 30, 2022 have automatically generated names.
- (Optional) Describe the purpose of the relationship in the description field.
Recommended naming structure | ||
|---|---|---|
| Relationship type | Description | Example |
One-to-one | Relationships are separated with a dash in the middle of the two object names | Deals – Contracts |
One-to-many | Relationships are separated with a “>” between the object names. The symbol points away from the “many” object — also known as the “child” object. The “one” object — also known as the “parent” record — is on the left side. | Companies < Contacts
|
Many-to-many | Relationships are separated with a “><” symbol between the object names. | Contacts >< Events |
2. Pet is related to Contacts
- The Pet object is related to the Contacts object. We’re adding pet info to your contact records and vice versa.
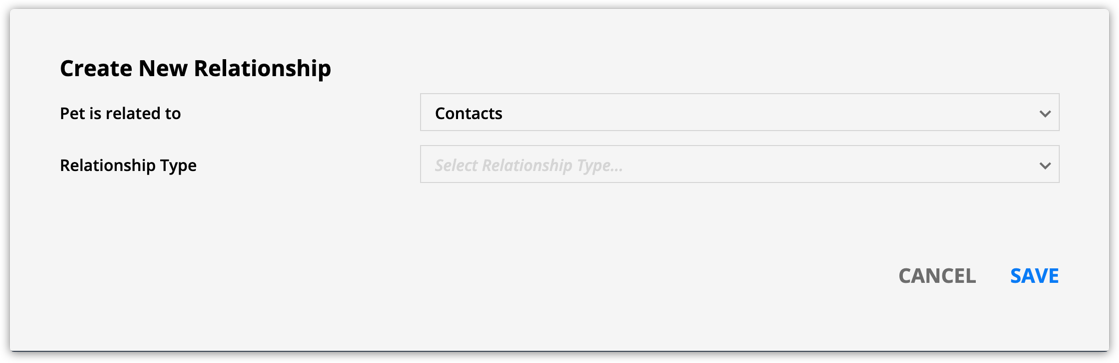
2. Relationship Type is One-to-many
- This adds a list of related records in the “Parent” object record. The “Child” object records have a field that links to the “Parent” record.
- You’ll choose which object is the “Parent” and which is the “Child” in the next step.
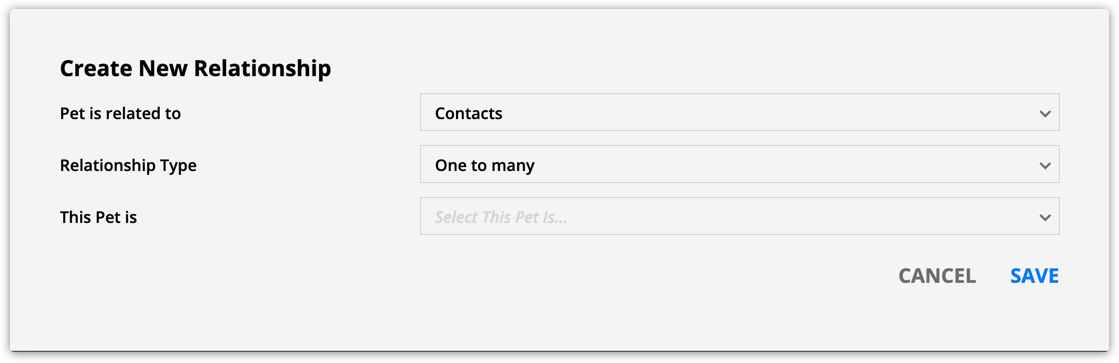
3. This Pet is the Child
- The new “Pet” object is the “many” side of this one-to-many relationship. Each pet record is related to one contact, and each contact can have multiple pets.
- In this case, you’d see the “Parent” pet owner and a list of their pets in their contact record.
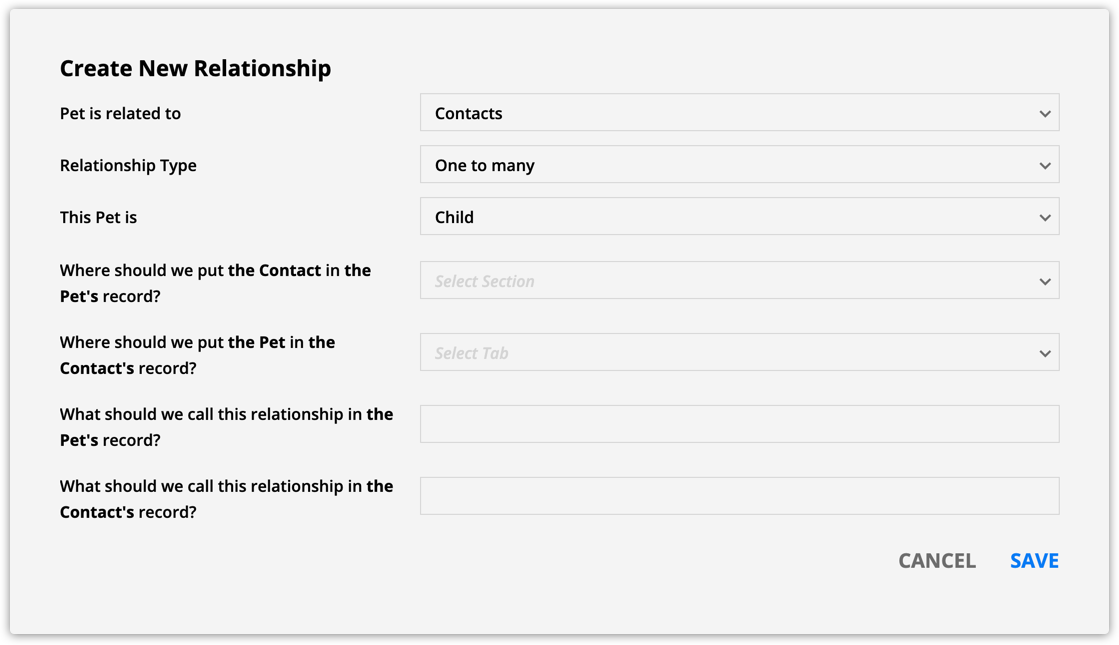
The next four fields determine where you’ll save the new info for each of your records and the labels for each field or section.
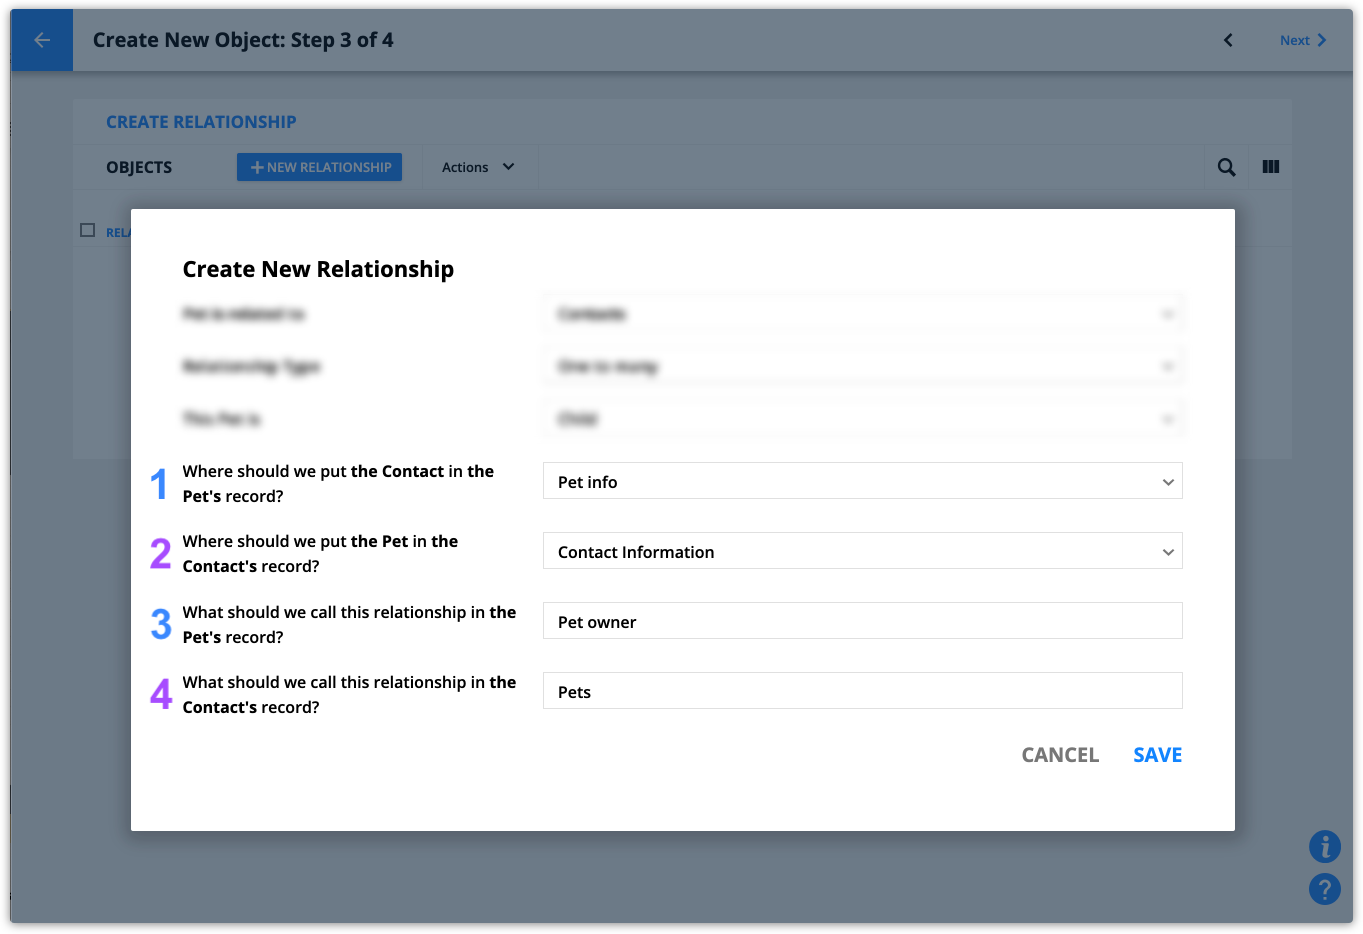
1. Where should we put the Contact in the Pet record? Pet Info
- The dropdown field that contains the pet owner’s name will be added to the “Pet Info section” of pet records.
2. Where should we put the Pet in the Contact record? Contact Information
- The section that contains each contact’s list of pets will be added to the “Contact Information” section of contact records.

3. What should we call this relationship in the Pet record? Pet owner
- This sets “Pet owner” as the name of the new field added to the pet records.
4. What should we call this relationship in the Contact record? Pets
- The name of the new section added to the “Contact Information” tab will be named, “Pets.”
Step 4 of 4 – dropdown field and navigation settings
Dropdown Field Settings
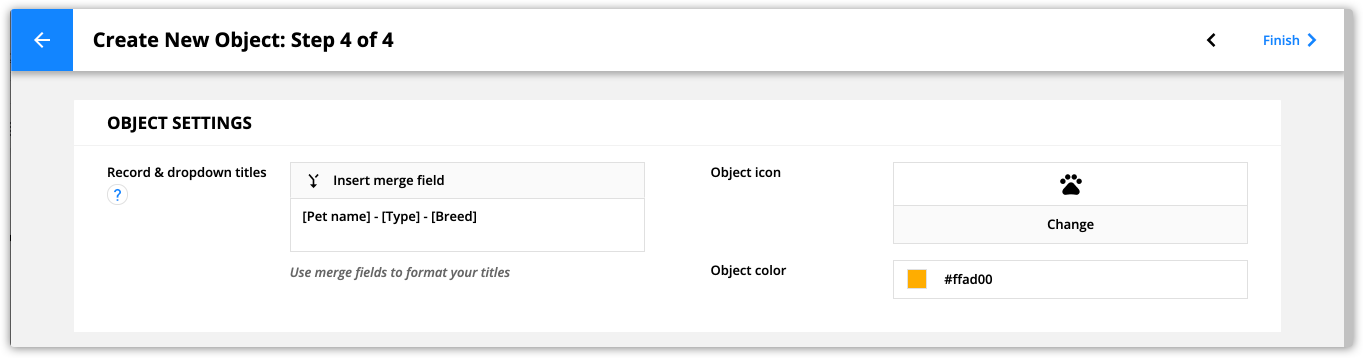
This section lets you customize your record title by selecting the fields you want to display at the top of each of your records. You can choose from any of the default fields or custom fields you added in step two.
- Click the “insert merge field” dropdown and select the fields you’d like to display at the top of each record.
- Remember to add spaces between each of your merge fields if you add more than one!
- (Optional) add a description of your object to give context to your team.
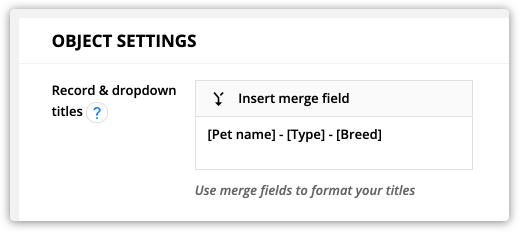
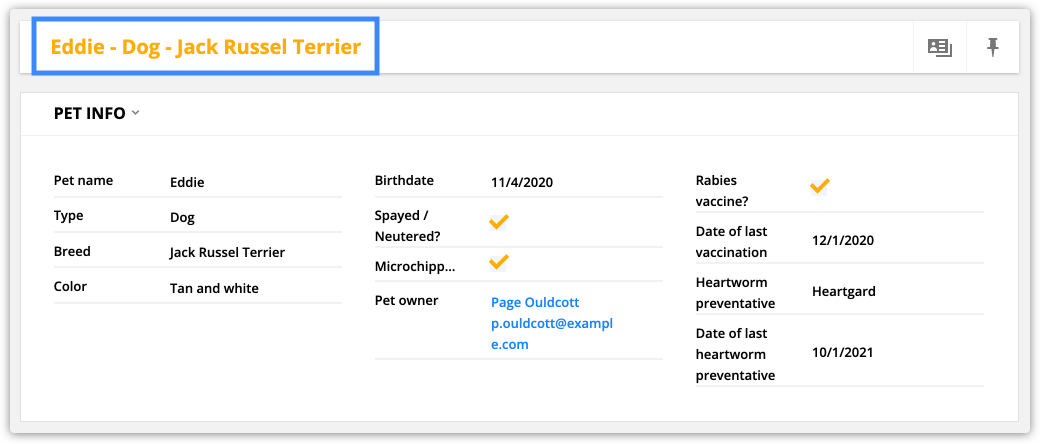
Here’s what those dropdown field settings look like on the “Pets” record:
Navigation Settings
This section allows you to manage your main navigation bar. From here you can:
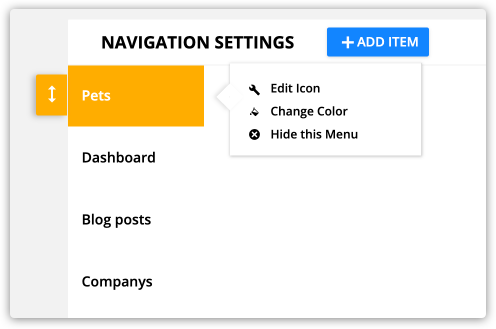
- Reorder your navigation menu — click and drag
.png) to the right position.
to the right position. - Edit icons of your custom objects — click Edit Icon.
- Change the color of your custom object tabs — click Change Color.
- Hide custom objects from your navigation — click Hide this Menu.
Note: if you hide a custom object from your navigation, you can re-add it from the “Custom Objects” dropdown menu in the top right corner.
When you’re done, just click Finish.
Adding relationships between objects and users
You can create custom relationships between your objects and users in addition to the default “Owner” relationship that’s added to records.
Custom relationships are helpful when multiple employees in your organization provide services to your leads and customers. For example, you may have a sales representative, onboarding representative and an account manager that all have a relationship with your customer. Creating custom relationships between contacts and users makes it easy to keep track of all employees who work with a customer and send messages to them.
You can create relationships between prebuilt or custom objects, and all you need to do is set up a new relationship:
- Go to → Administration → Data → Custom Objects.
- Click on the object you want to add a relationship with users to.
- Click on the “Manage Relationships” tab then follow the steps above to create your relationships.
- You’ll select “Users” from the dropdown where you choose the related object.