One of the first things you’ll do as a new Ontraport user is move your existing contact list into your Ontraport account so that you can market and sell to them with Ontraport. You can also import other records such as importing a list of companies.
Note, Ontraport provides excellent options for importing contacts yourself, but some information cannot be imported or exported through your administration login. Our Concierge Services team provides custom import and export services for these situations. Please email concierge@ontraport.com so we can determine the best method for importing your data. Please do not send any credit card data to us.
Table of contents
Import review
Prepare your spreadsheet
Import records
• Step 1 – Upload CSV file
• Step 2 – Verify information
• Step 3 – Import settings
• Step 4 – Select the fields to be imported
• Step 5 – Add rules (optional)
To import data as relationships
• Importing complex relationships
Addresses that will be imported as “transactional only”
Import review
To ensure that the lists you import into your account are contacts who adhere to our anti-spam policies, all imports go through an approval process, and some lists are pulled for a manual review. These list reviews protect the health of the IP address used to send messages by not allowing lists that are likely to result in complaints or bounced messages. If your list is selected for manual review, you can expect:
- An email sent to your account administrator asking additional questions
- To receive a confirmation email from our email delivery team within 24 hours of receiving your request informing you of whether or not your list was approved
Once your list is approved, your contacts’ bulk email statuses are updated to “single opt-in.” Please email support@ontraport.com if your list has been in review for 24 hours or more.
Prepare your spreadsheet
Before importing your data, it’s important to prepare your spreadsheet so your data is clean and formatted correctly.
- Export your records from your previous software.
- Organize your data into clearly labeled, separate columns.
- Then save the file as a comma-separated values (CSV) file.
Any custom field set as required in the field editor must be included in your import. Missing required fields will cause the import to fail. |
Check out the video about editing columns in Excel to learn more.
CSV formatting tips:
- If you want to import contacts with multiple tags, create a column for tags in your CSV file, and separate the names of your tags with commas within the same cell in your spreadsheet.
- To import dates and times, format your data as a UNIX timestamp or use a 24-hour format to import correctly. These values will be imported based on your account’s timezone setting.
- UNIX timestamp example: 1736525343
- 24 hour format example: 1/10/2025 16:09
- When importing dates, the date format in your CSV must match the preferred date format selected in your localization settings. To access your localization settings, go to
.png) → Administration → Data → Localization.
→ Administration → Data → Localization.- To convert dates on an Excel spreadsheet, follow these steps; to format Google Sheets, follow these steps.
Import records
In Ontraport, go to Contacts → Settings → Import Contacts.
- To import records to another object, such as Deals or Companies, hover over your object’s name on your main navigation bar then click Settings → Import [Object name].
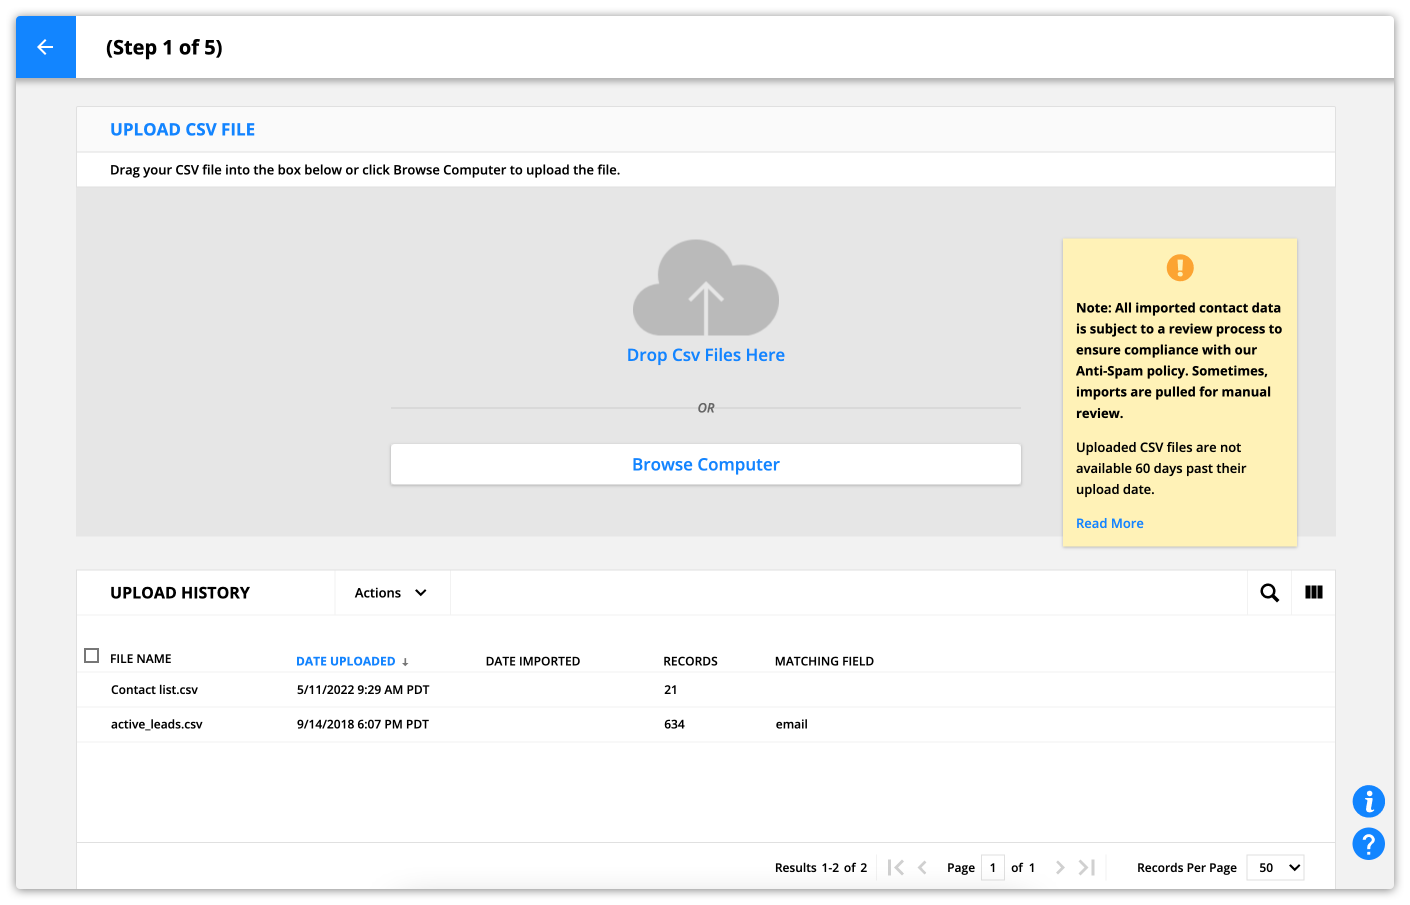
Step 1 of 5 – Upload CSV file
First upload your CSV file.
- Upload new CSV files by dragging and dropping them into this page, or click Browse Computer and select your file.
- To reimport any of your previously imported lists, click on the name of your CSV file from the “Upload History” section.
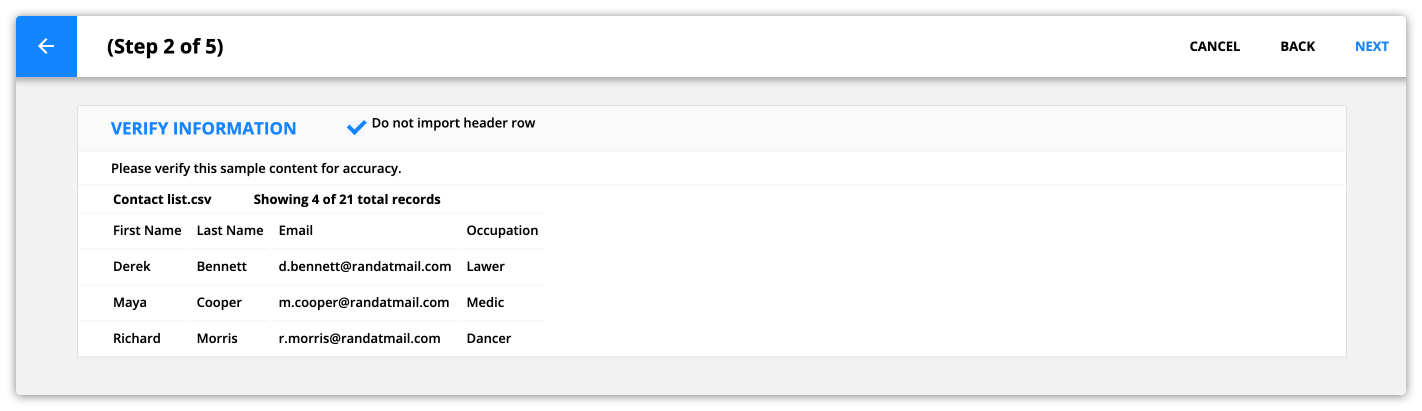
Step 2 of 5 – Verify information
The second step is to verify your information.
- If the first line of your CSV file includes header rows such as First Name, Last Name, etc., check the “Don’t include header row” checkbox.
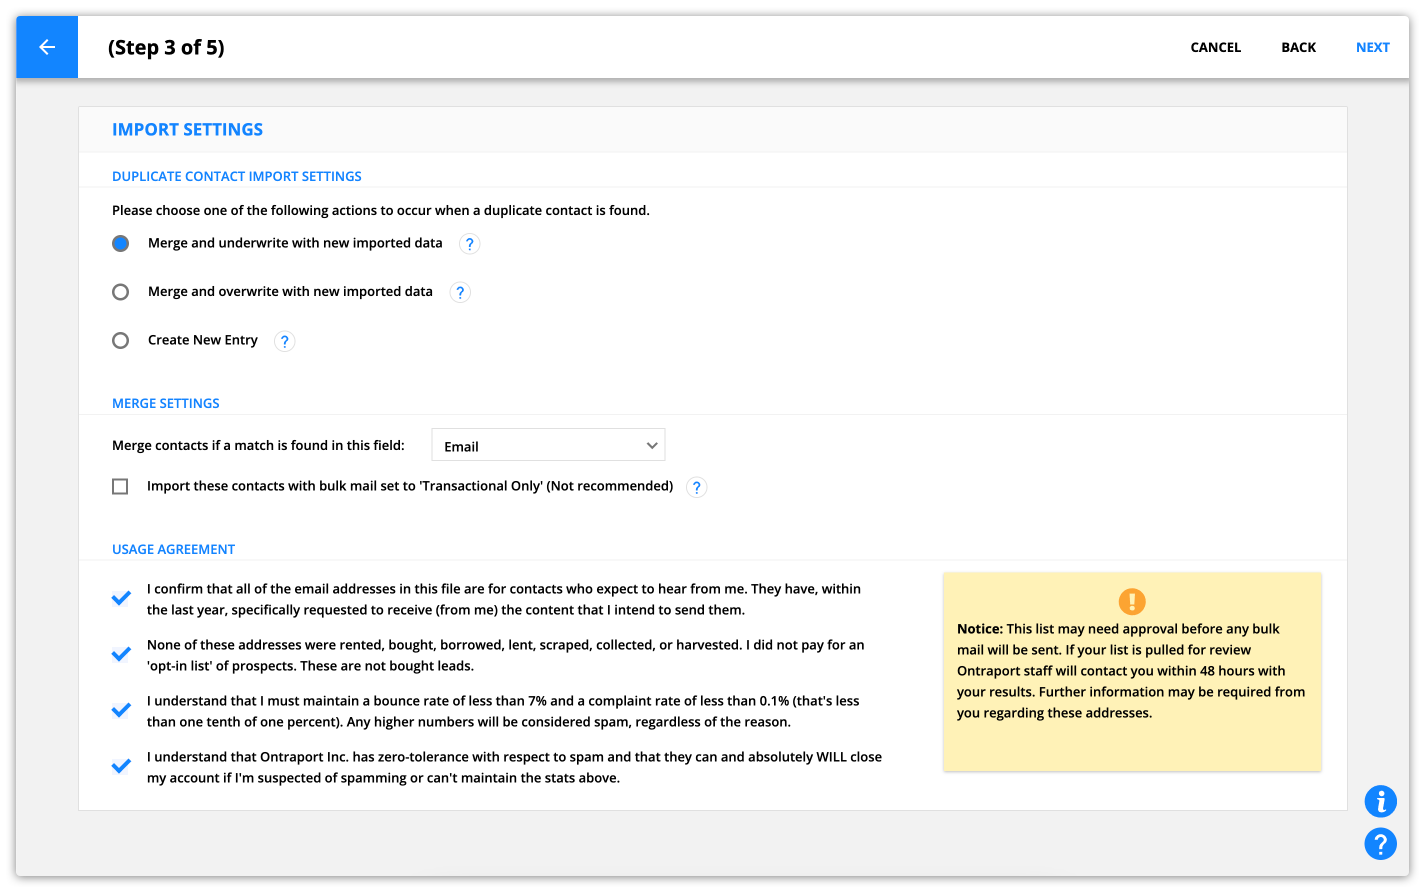
Step 3 of 5 - Import settings
The third step of the import process is to to configure your import settings. There are three important sections on this page:
- Duplicate contact import settings
- Choose how you want to manage duplicate records.
- Merge and underwrite with new imported data (default): This setting doesn’t change any existing data in your record, but it adds new data. For example, if you have a contact record that doesn’t have an office phone number saved, you can import data to fill in that blank field. This is the best setting for most use cases because you won’t duplicate or overwrite any info.
- Merge and overwrite with new imported data: This setting replaces the information saved in your records with your imported data. For example, if your record has a phone number saved and you import another, your import will update that phone number. Use this option with caution because it’s possible to overwrite data that you didn’t intend to.
- Create new entry: This setting always creates a new record in Ontraport for every row in your CSV. Since this option doesn’t merge any data, it can lead to duplicate records. You can always find and merge duplicate contacts, but that is a manual process.
- Choose how you want to manage duplicate records.
- Merge settings
- Select the field you would like to use to identify duplicate contacts; we recommend choosing “Email.”
- The “Import these contacts with bulk mail set to ‘Transactional Only’” check box makes it possible to import contacts who can’t receive marketing emails. This creates a “suppression list” which allows you to store lead information without sending emails to people who haven’t asked for them.
- Usage agreement
- In order to move on to the next step, you must sign the usage agreement. To do that, check each of the requirements in the “Usage Agreement” section.
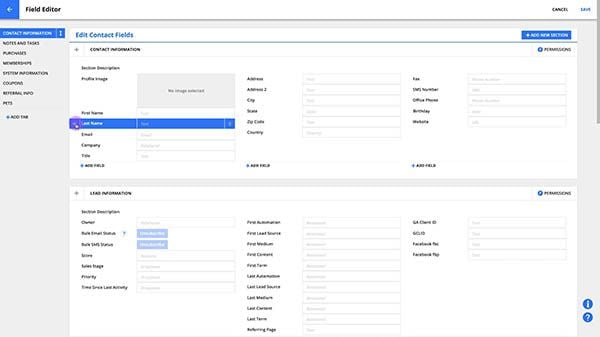
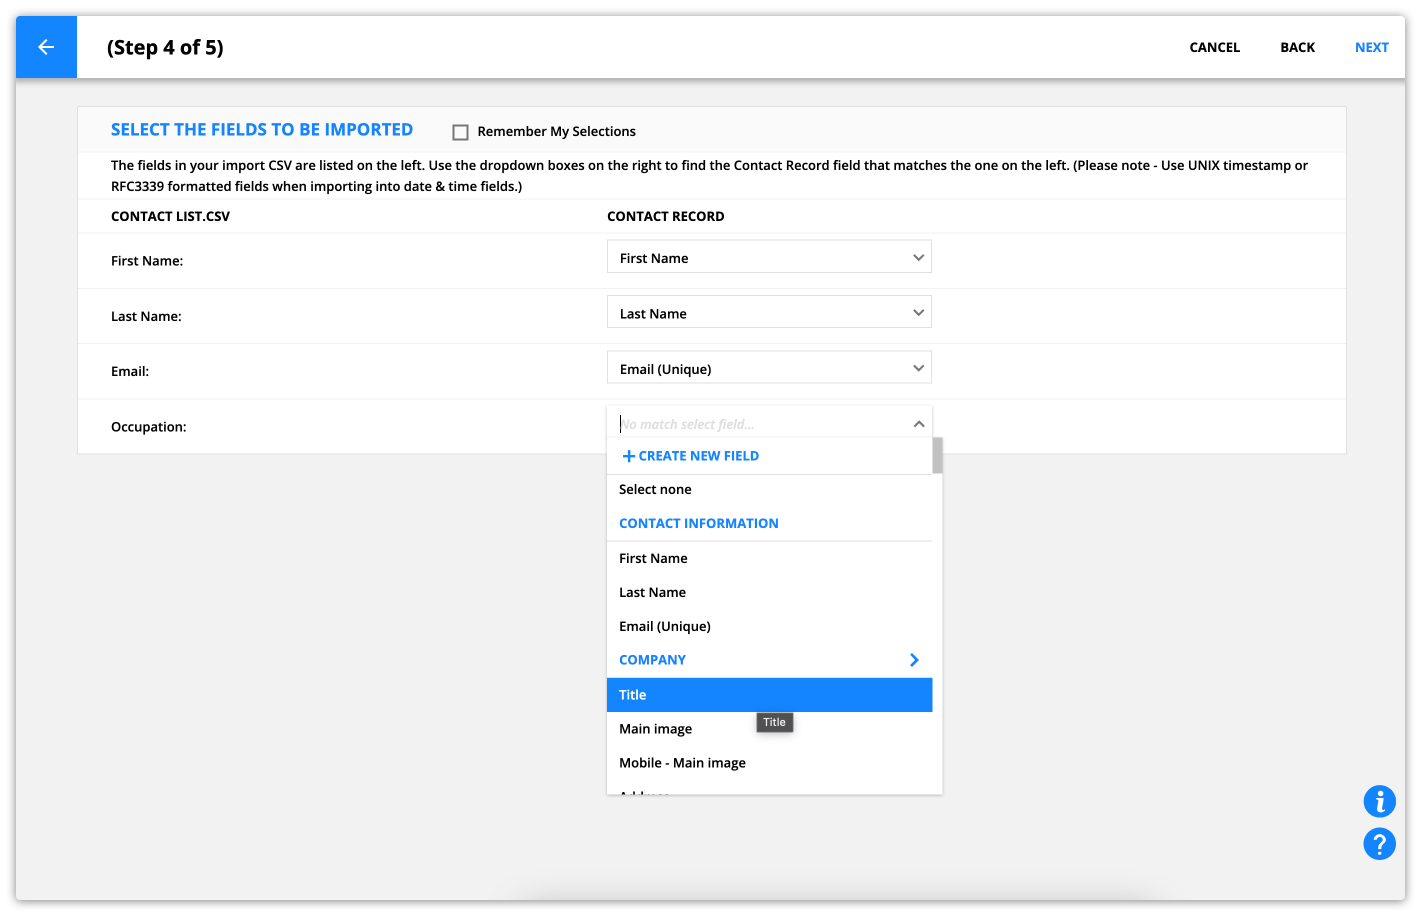
Step 4 of 5 – Select the fields to be imported
Select the fields you will import.
- If the columns on your CSV file match field names in your records, the corresponding fields will be automatically selected for you.
- For CSV columns that do not match an existing field name, select the field you want to import data into from the dropdown.
- Or click + Create New Field to create a new custom field to store your data.
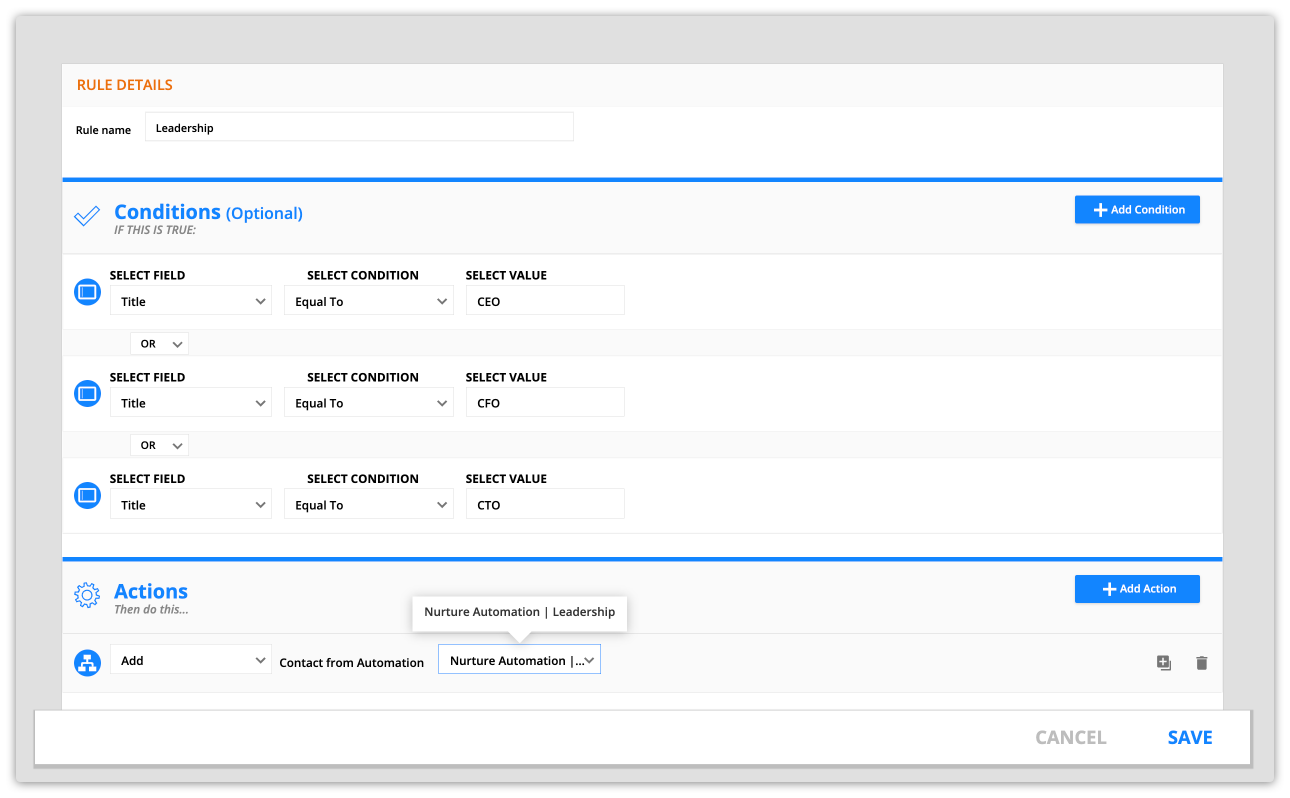
Step 5 of 5 – Add rules (optional)
The final step of the import process is optional. It adds automation rules that perform actions on your new records as you import them. This is helpful if you want to add a tag to your new contacts or add them to automation as soon as they’re imported. You can add as many automation rules as you’d like.
- Click Add to create a new rule.
- Enter your rule’s name.
- (Optional) Add a condition.
- Click Add Condition.
- Conditions allow you to perform actions on a segment of your list instead of the whole group.
- For example, you can add your contacts to different automations based on their titles. Conditions can funnel all of your C-level contacts to your leadership automation and contacts with sales roles to your sales automation.
- Add an action.
Click Submit to finish the process.
- Click Add Action to select the action to take on your new records.
- Click Save.
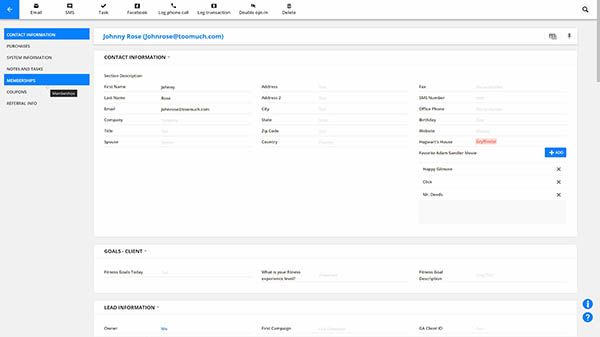
You’ll be taken back to your collection, where you’ll see your imported records.
- Note: To ensure compliance with our anti-spam policies, our Email Delivery team reviews each import before you can send bulk email to your imported contacts. This approval process is typically completed within one business day.
To import data as relationships
To import contacts or object records with established relationships, follow the steps below. This is not necessary for users who only want to import contacts; it is for those interested in importing associated deals and companies (Plus accounts and above) or other custom objects (Pro accounts and above).
- Add a column to your CSV for the name of the record you want to create a relationship with. For example, if you want to connect contacts to companies, add a column for “Company Name” in the CSV file.
- Follow the steps above for importing contacts until you reach step 4 of 5 in the import process.
- Select an Ontraport field to match your object’s name column, and click it to drill into that object’s data then select its name field.
.png)
- Click Next and select if you would like to merge duplicates or create new records.
.png)
- Continue your import process normally.
Importing complex relationships
When you import contacts or object records with established relationships, you can only create relationships that are one level deep at a time. This means that you can import contacts and relate them to the company they work for, like this:

But if you drill in deeper than one level, that specific data won’t be imported.
You’ll know that you selected a related field incorrectly if you see two sets of “>>” in your field selector. This mistake looks like this:

Instead, if you want to import more complex relationships, you need to import your list in two steps.
- To import a list of contacts and their corresponding companies, import your CSV from your contacts collection.
- Then to add a point of contact for every company record, import your CSV from your Companies object.

Addresses that will be imported as “transactional only”
Role-based email addresses are generally associated with a job or position instead of a specific person and are managed by several people. Mailing these addresses often leads to high bounce rates, spam complaints and other email delivery issues, which is why the following role addresses are imported with the bulk email status of “transactional only.”
info@
webmaster@
sales@
marketing@
abuse@
spam@
postmaster@
accounting@
billing@
admin@
compliance@
devnull@
dns@
ftp@
hostmaster@
inoc@
ispfeedback@
ispsupport@
list-request@
list@
maildaemon@
noc@
no-reply@
noreply@
null@
phish@
phishing@
privacy@
registrar@
root@
security@
support@
sysadmin@
tech@
undisclosed-recipients@
unsubscribe@
usenet@
uucp@
www@
Note: Contacts with role-based addresses can opt in through forms and can be added to your account through Ontraport’s API with an opted-in BES.