Ontraport includes e-commerce tools that allow you to sell products through order forms, manually log and charge transactions and request payment for outstanding invoices.
This article focuses on sending and receiving payments through unpaid invoices. You'll learn what customers see when they receive an invoice, how to manage invoices and payments in their collections, how to adjust invoice settings, and how to use automations to send billing reminders.
Invoicing is available to some account levels. Check out our pricing page to learn more.
Table of contents
How does invoicing work in Ontraport?
• How to use invoicing for your business
Automatically generated invoice pages and emails
• Unpaid invoice email
• Invoice page
• Payment page
• Refund receipt email
• Invoice receipt
Invoices collection and subcollections
Payments collection and subcollections
Request payment with an invoice
• Send draft invoices
• Past due invoices
Request payments through automation
Invoice settings
Invoice automations
• Invoice messages
• Send an upcoming payment reminder
How does invoicing work in Ontraport?
Invoicing is a great option for one-on-one sales and service-based businesses that want to send bills and collect payments easily.
When you create an unpaid invoice and send it to your customer, they’ll receive an email that includes your branding and a View & Pay button. Clicking the button sends them to a professional invoice page, where they can review the details, print the invoice if needed and pay their balance.
Once they click Pay, they’ll be directed to a secure payment page to enter their payment information. When the payment is complete, the system automatically sends them a receipt.
This is the built-in invoicing flow, but if you want more control, you can customize the process using automation and messages. Learn more below.
How to use invoicing for your business
There are many ways to use invoicing in your business, but it all comes down to creating a simple, professional way to bill clients and get paid on time.
After purchase or service completion
When you’ve delivered a product or finished a service, sending an invoice ensures the client has a clear record of what’s owed and how to pay. This creates a professional close to the transaction and sets expectations for timely payment.
For deposits or retainers
Many businesses require partial payment up front. Sending an invoice for a deposit or retainer secures commitment before work begins and helps protect your cash flow.
Milestone billing
For larger projects, breaking costs into phases makes payments easier for clients and steadies revenue for you. Sending an invoice at each project milestone documents progress and keeps payment schedules on track.
Automatically generated invoice pages and emails
Back to top
When you request payment with invoices, Ontraport automatically generates pages and emails for your customers to view their invoice details and make payments. You can customize these in your account’s invoice settings to match your branding.
Let’s start by looking at the pages and emails Ontraport creates and how your customers will use them.
Unpaid invoice email
Back to top
When you first send an unpaid invoice to your customers, they will receive an unpaid invoice email.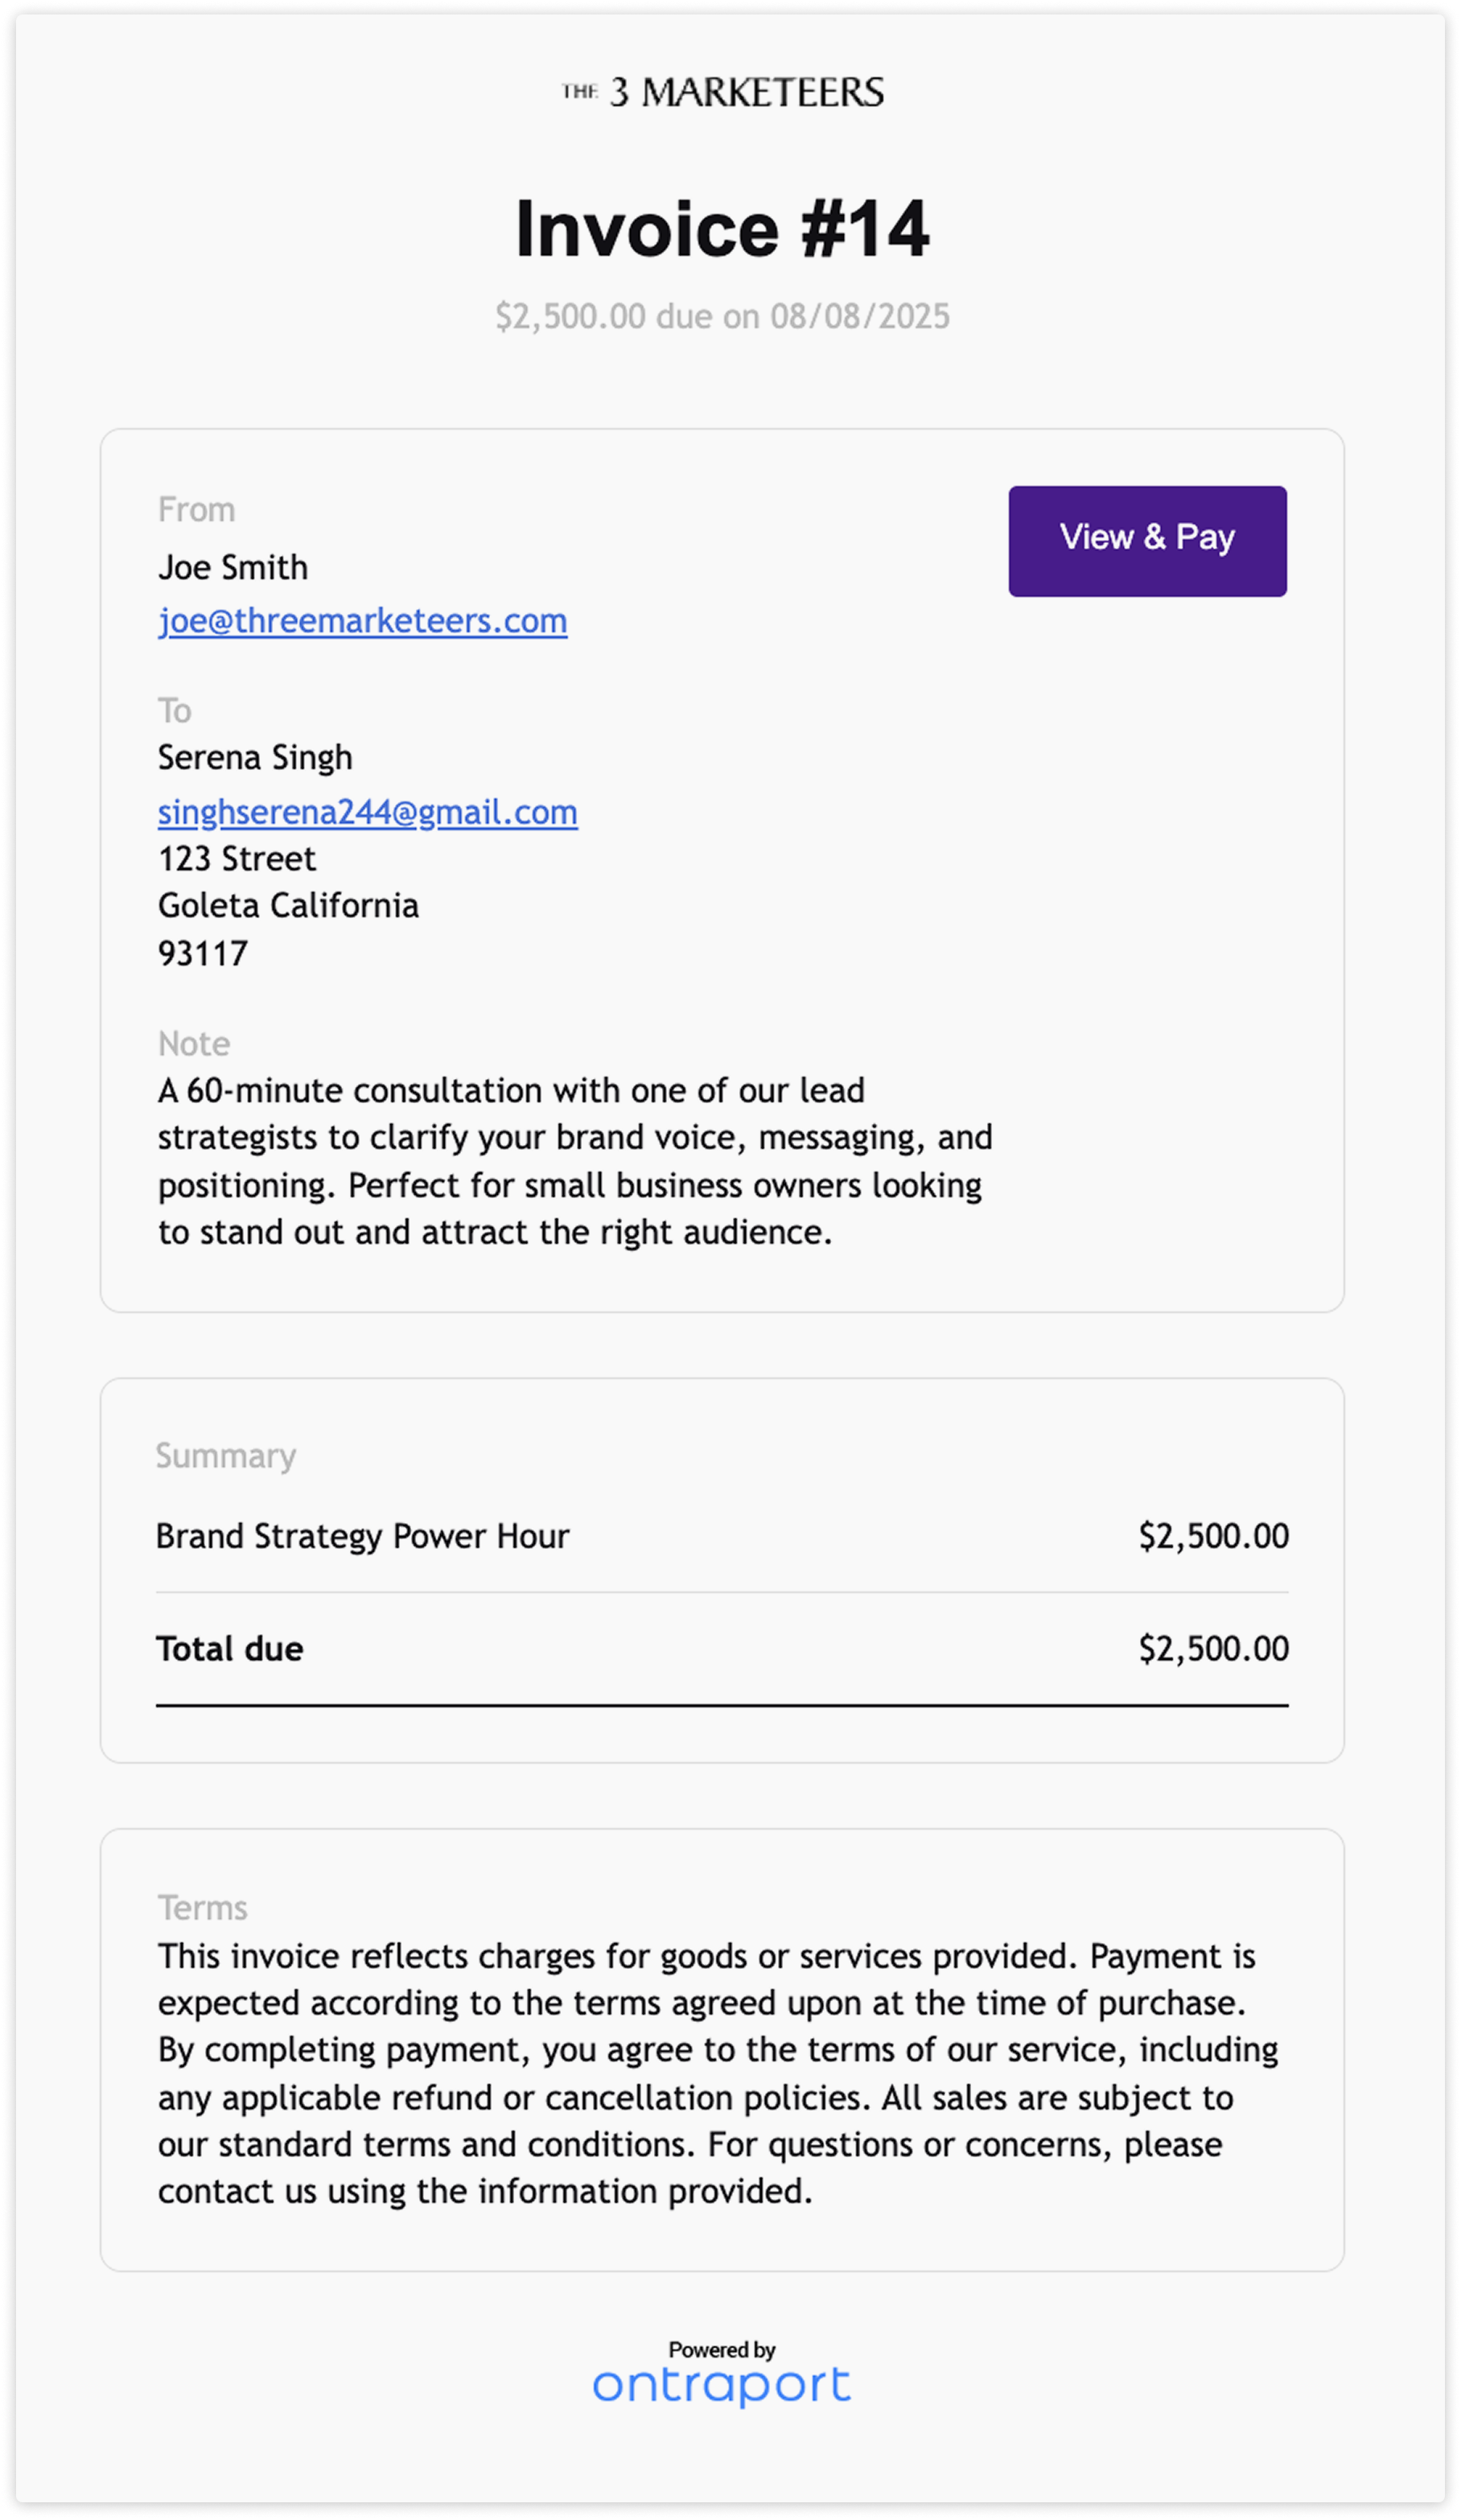
This email provides your customers with important information, including their invoice number, the amount due, the due date, a customer note (if included), product information, and terms (if specified in your invoice settings).
This email also contains a View & Pay button that leads to the invoice page.
Invoice page
Back to top
The invoice page includes more details about the purchase.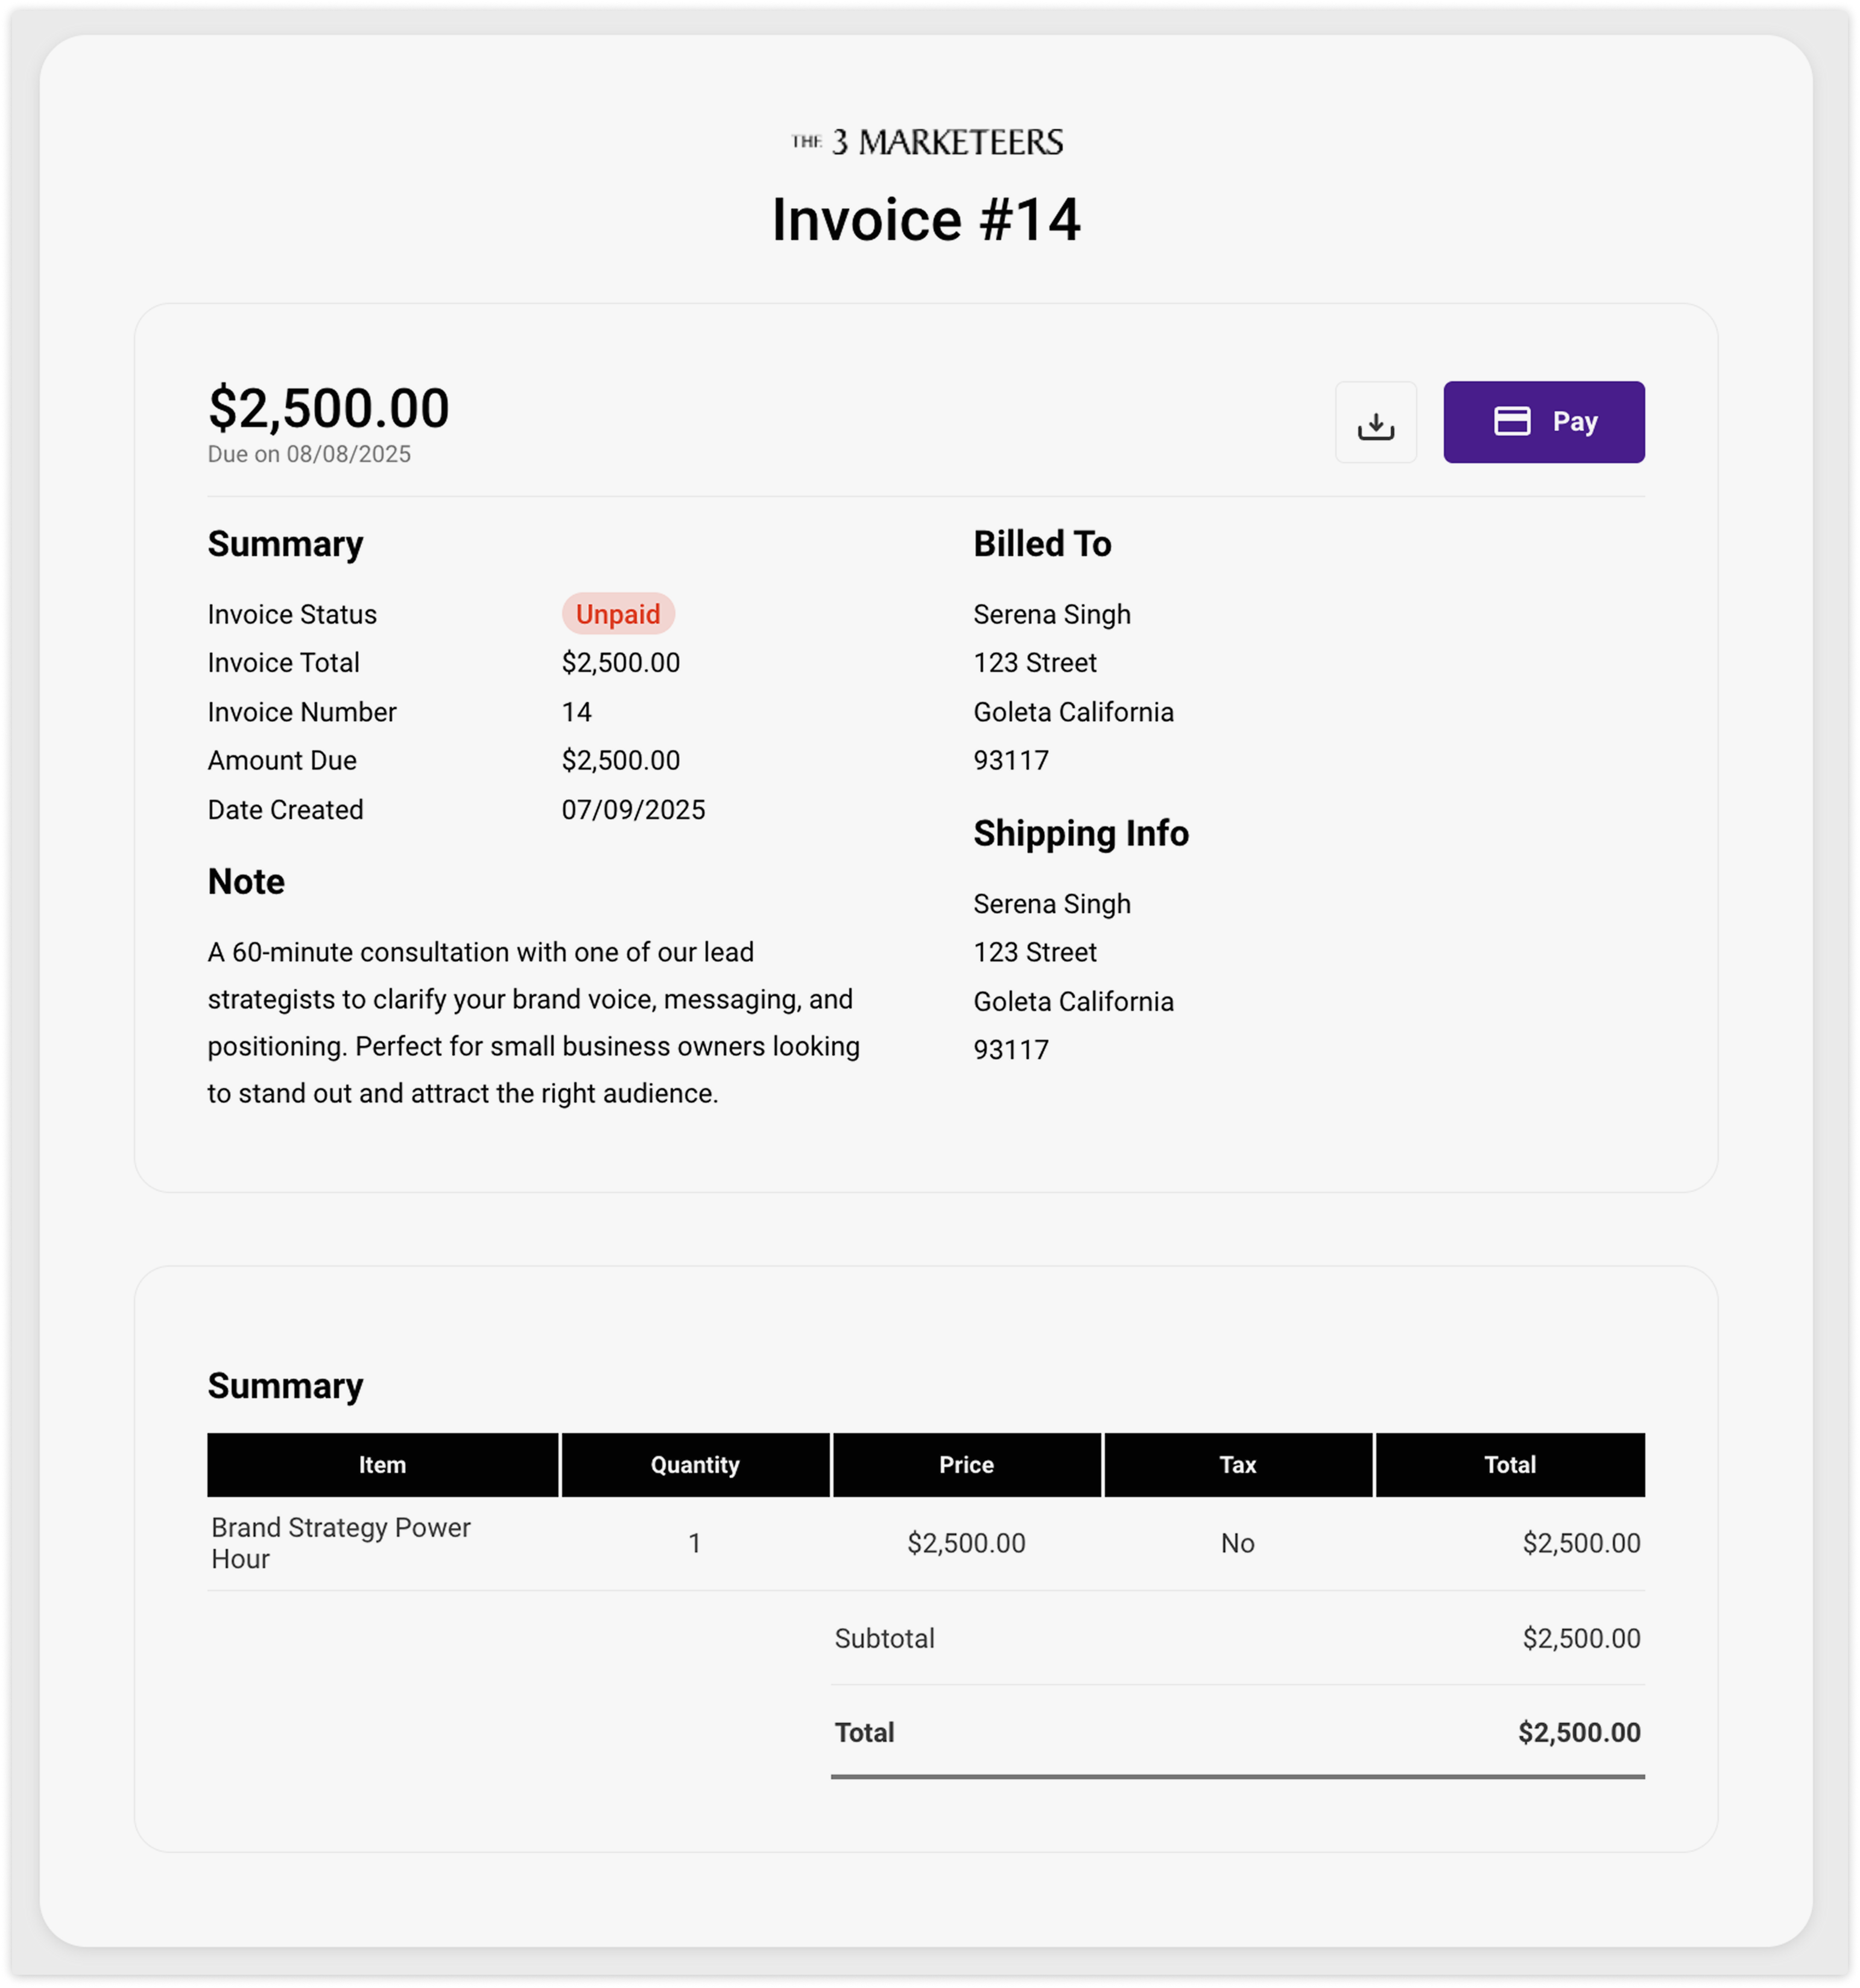
Customers can print a copy of the invoice for their records. They can also click Pay to go to the payment page.
Payment page
Back to top
This page allows your clients to pay their balance by entering their billing and card information. Once the payment is processed, they’ll receive the invoice receipt you selected when you created the invoice.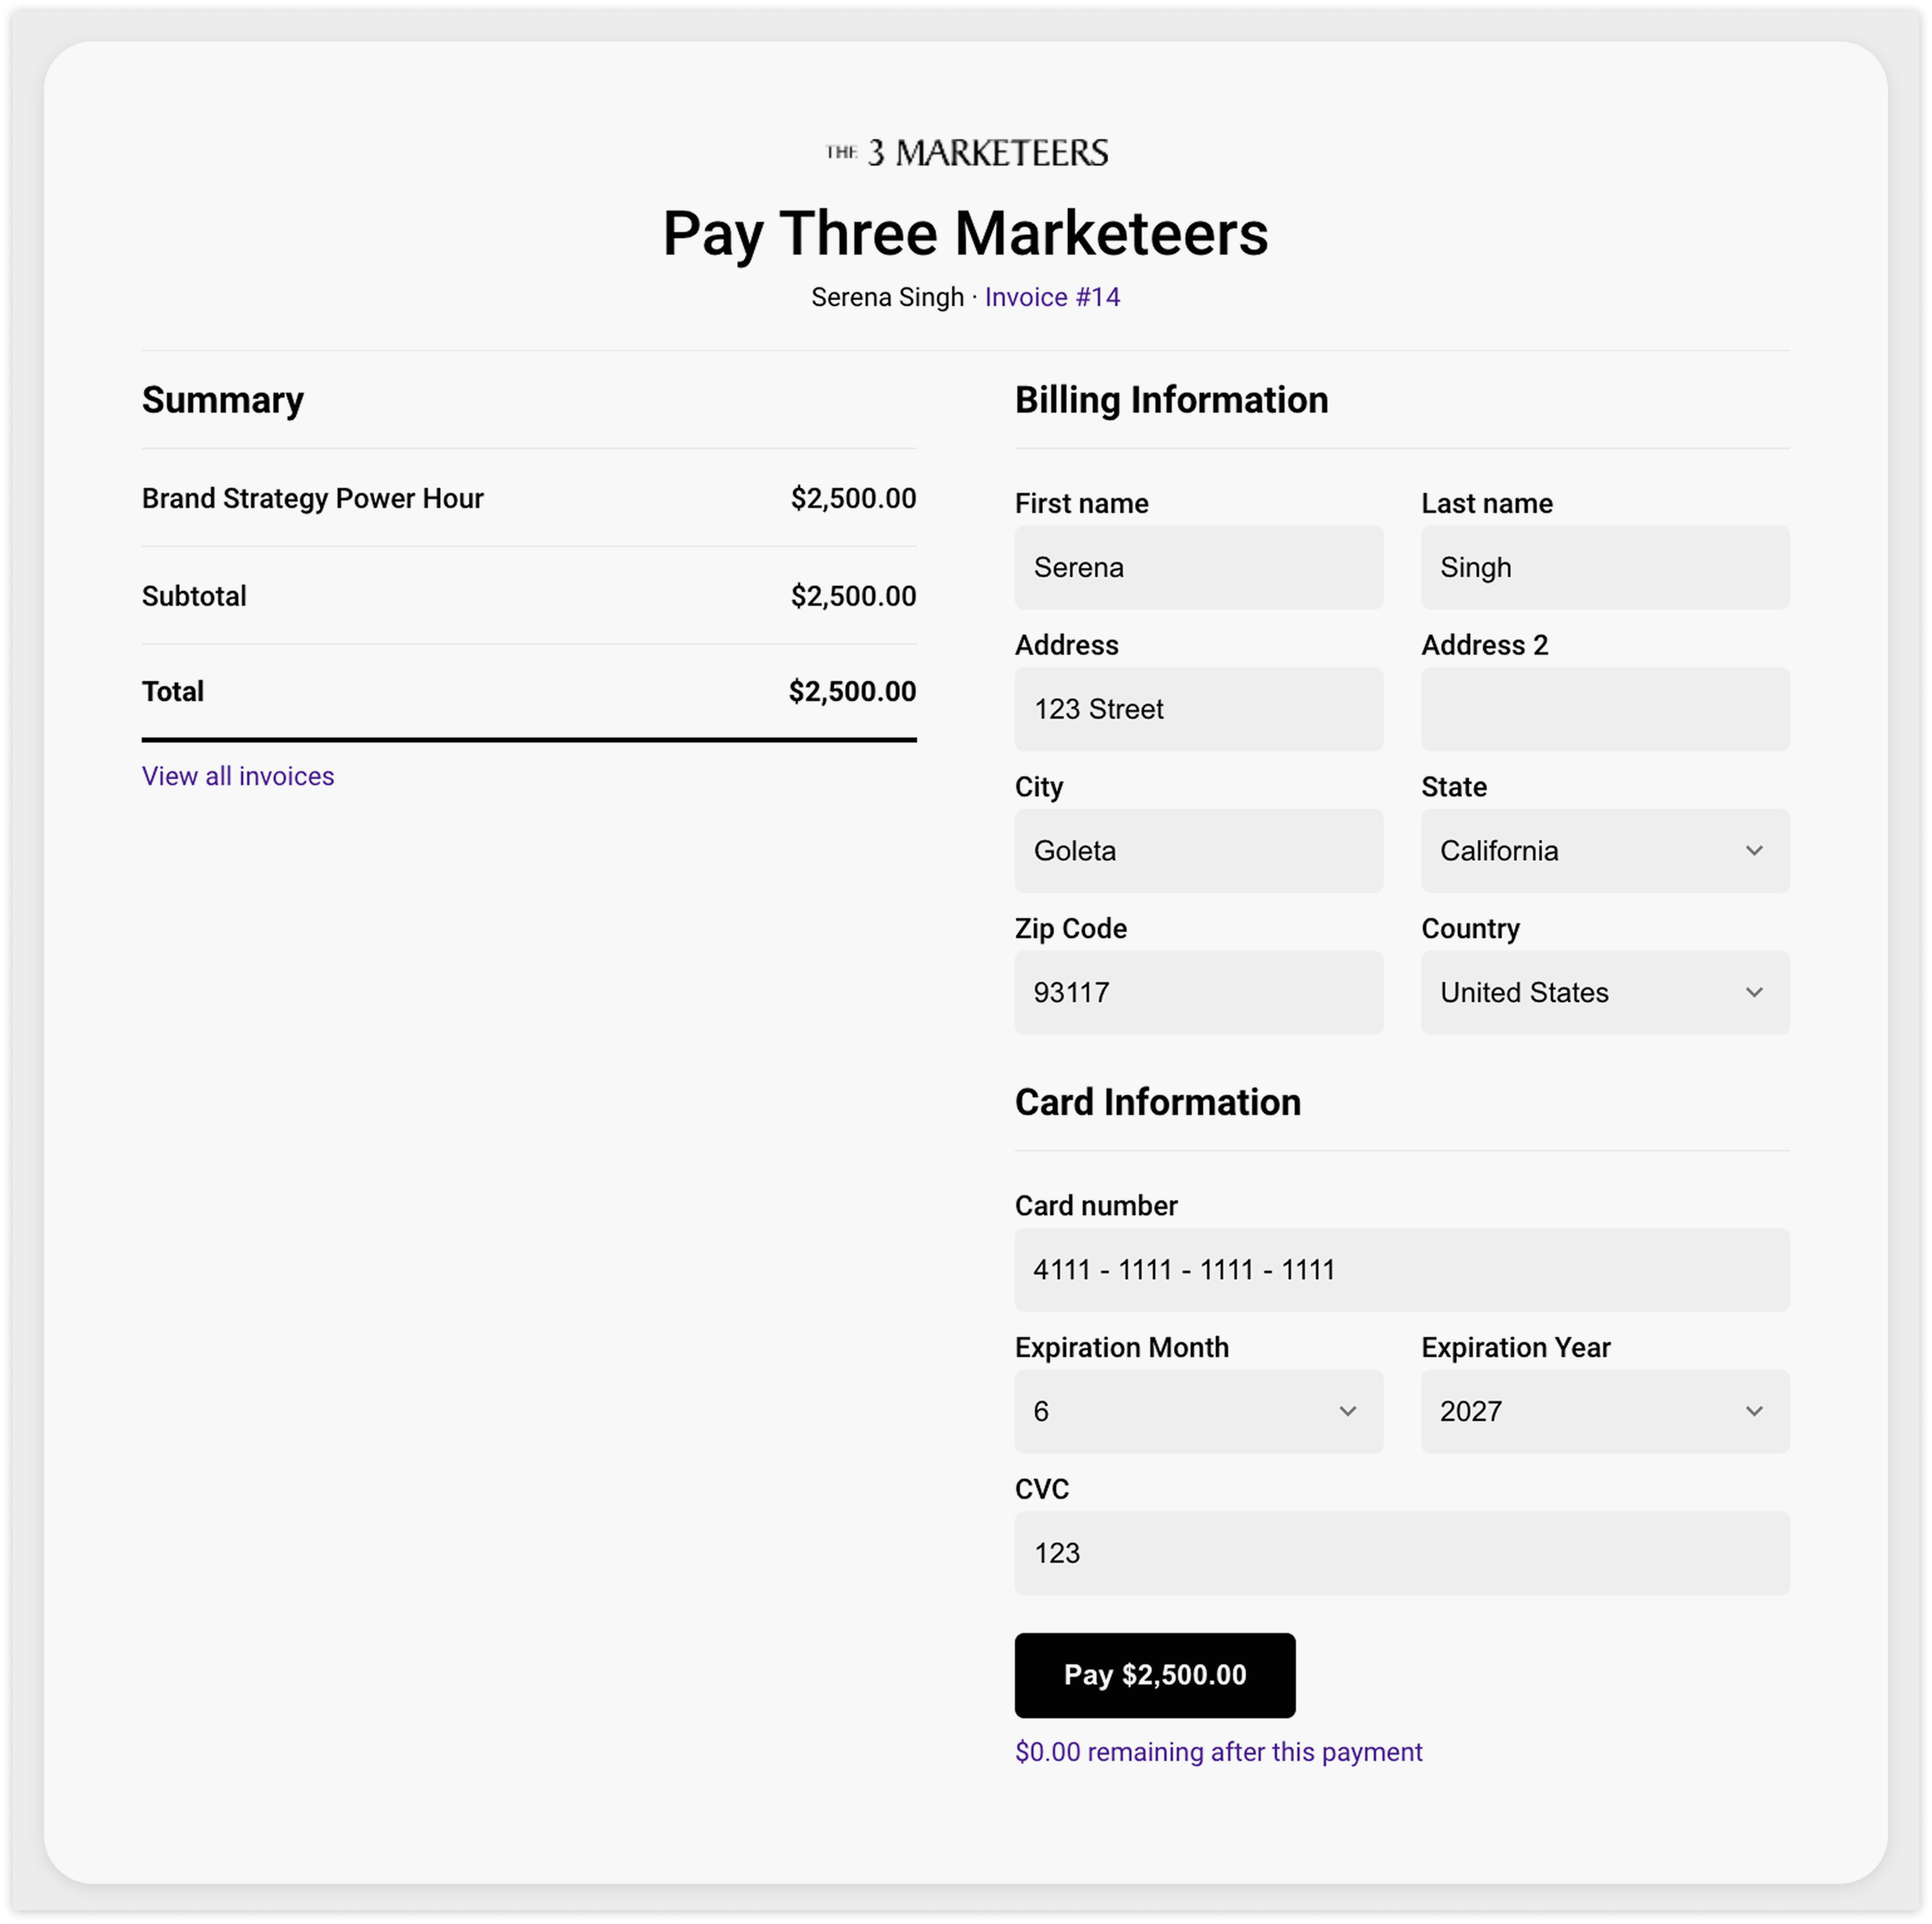
Refund receipt email
Back to top
When you refund an invoice, you can choose to send a refund receipt email to inform your customer and give them access to view the refunded invoice details.
Invoice receipt
Back to top
When customers pay their invoices, your account automatically sends them an invoice receipt for their records. When setting up order forms, you can also choose the specific receipt template to send.
Learn more about invoice receipts.
Invoices collection and subcollections
Back to top
Whenever you create an invoice, it is saved in your Invoice collection and the Invoices subcollection in the related contact’s record. From those collections you can view details of the invoice and also take action on them.
To go to your Invoices collection:
- Go to Sales → Invoices.
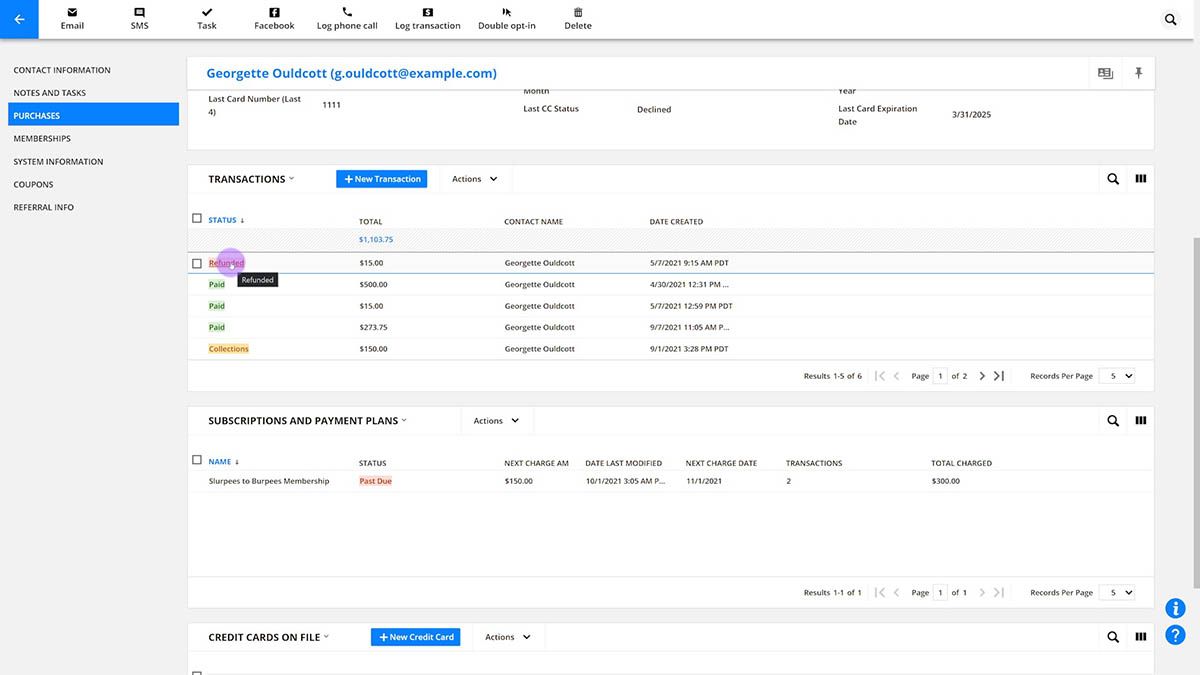
To go to a contact’s Invoices subcollection:
- Go to the Contact’s record in detail view.
- Click on the Purchases tab.
- Scroll down until you see the Invoices subcollection.
You can perform actions from either of these locations. Most actions’ availability depends on the invoice’s status. For example you can refund a closed invoice and void draft invoices.
Invoice statuses always indicate if you are still attempting to collect payment or not.
However you can manually add any invoice to automation:
- Automations - Add the invoice to an automation map using the default trigger.
Outstanding invoices can have three statuses:
- Open - Sent to the customer but not yet paid.
- Draft - Created but not yet sent to the customer.
- Collections - Payment failed and the invoice was added to collections after manual attempts.
Closed invoices can have four statuses:
- Refunded - Payment for the invoice was refunded.
- Only for accounts created before September 2025. See pro tips.
- Closed - Payment for the invoice was collected or refunded.
- Voided - The invoice was canceled.
- Write off - Collection efforts for the invoice were stopped.
Learn more about taking action on invoices here.
Payments collection and subcollections
Back to top
When customers make a payment, a payment record is created and saved in the Payments collection and in the Payments subcollection of the related contact’s record. From these collections, you can view payment details, issue refunds, and export records.
To go to your Payments collection, go to Sales → Payments.
To go to a contact’s Payments subcollection, go to the Contact’s record in detail view and click on the Purchases tab. Scroll down until you see the Payments subcollection.
Payment records have two types:
- Payment
- Refund
And payment records can have one of two statuses:
- Applied - The payment has been collected or refunded. Refunded payment records will show a negative value.
- Declined - The payment failed.
Request payment with an invoice
Back to top
When you create an invoice to request payment, you can send it right away or save it as a draft to send later. Once sent, your customer will go through the workflow described above.
- Go to Contacts and select the client you want to send an invoice to.
- If you’ve set your account to open records in quick view, click View details.
- Click on the purchases tab and scroll down to the Invoices section.
- Click New invoice.
- Add at least one product and customize as you would on an order form.
- Select “Request payment” In the “I would like to” dropdown.
- Customize your invoice details such as:
- Invoice date
- Due on
- Payment gateway
- Invoice receipt
- Customer note
- Internal note
- Click Send to send the invoice email immediately, or click Save draft to send it later.
Send draft invoices
Back to top
If you've saved an invoice as a draft, follow these steps to send it:
- Go to your client's Invoices section.
- Select the draft invoice.
- Click Edit.
- Click Send.
Request payments through automation
Back to top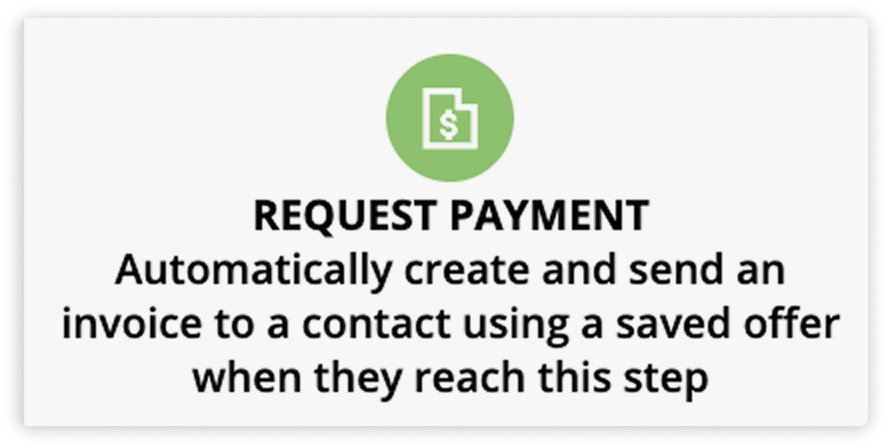
The Request Payment element allows you to automatically generate and email invoices to contacts at specific points in your automation maps. This element gives you the opportunity to invoice your clients after important events, such as right after a deal is closed or a service is completed, without needing to manually draft and send each bill.
When a contact reaches this step, the system creates a real invoice record in their financial history and sends them an email with a link to pay, just as if you had sent it manually.
Before setting up this automation, check that you have:
- Saved offers: You must use an existing offer (a pre-saved set of line items and prices). You cannot create new offers inside the automation builder. To create an offer, draft a manual invoice in a Contact Record and save the offer there first.
- A connected payment gateway: You must have a gateway configured to process the payments.
To set up automated invoicing:
- Create a new automation map, or edit an existing one.
- Add a Request Payment element to your map.
- You’ll commonly place this element below a trigger or a goal that targets the event that you want to kick off your invoice.
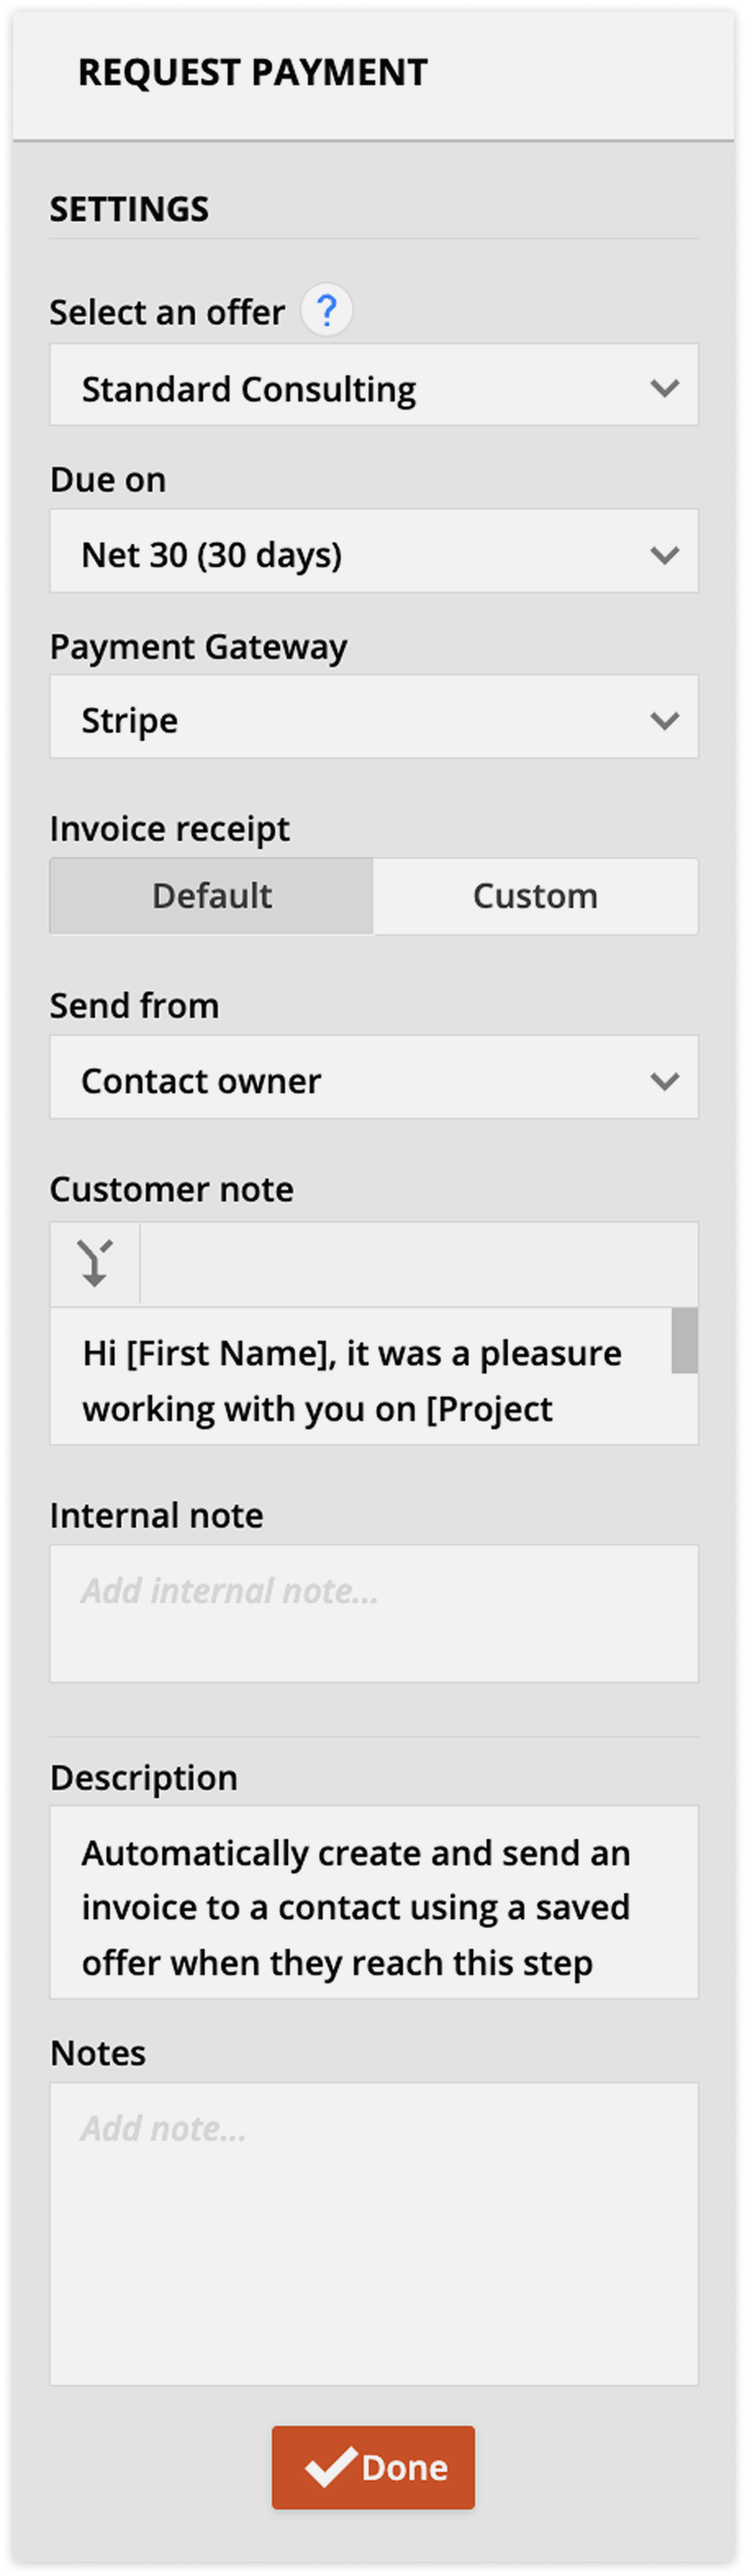
- Click on the element to open its settings.
- Select an offer: Choose a saved offer you want to bill for.
- Due on: Choose when the invoice is due. The dropdown has your account’s default selected automatically. Choose “Custom” to add a specific number of days.
- Payment gateway: Select the payment gateway you’d like to use to process payment.
- Invoice receipt: Send the default receipt or select Custom to choose a specific receipt template.
- (Optional) Customer note: Use merge fields here to personalize the message with the contact's name or other details.
- (Optional) Internal note: Leave a note to your team regarding the automatically generated invoices.
- Click Save.
Past due invoices
Back to top
When an invoice becomes past due, its status remains “Open.”
You can set up automation to alert you when invoices are past due and create groups to view all past-due invoices in your account, helping your team follow up and collect payment.
Past due automation alerts
1. Trigger a day after the due date
Use a “Today is relative to Invoice’s date field” trigger.
- Set it to fire 1 day after due date.
- Add a condition so only invoices with the status, “Open” OR “Collections” are triggered.

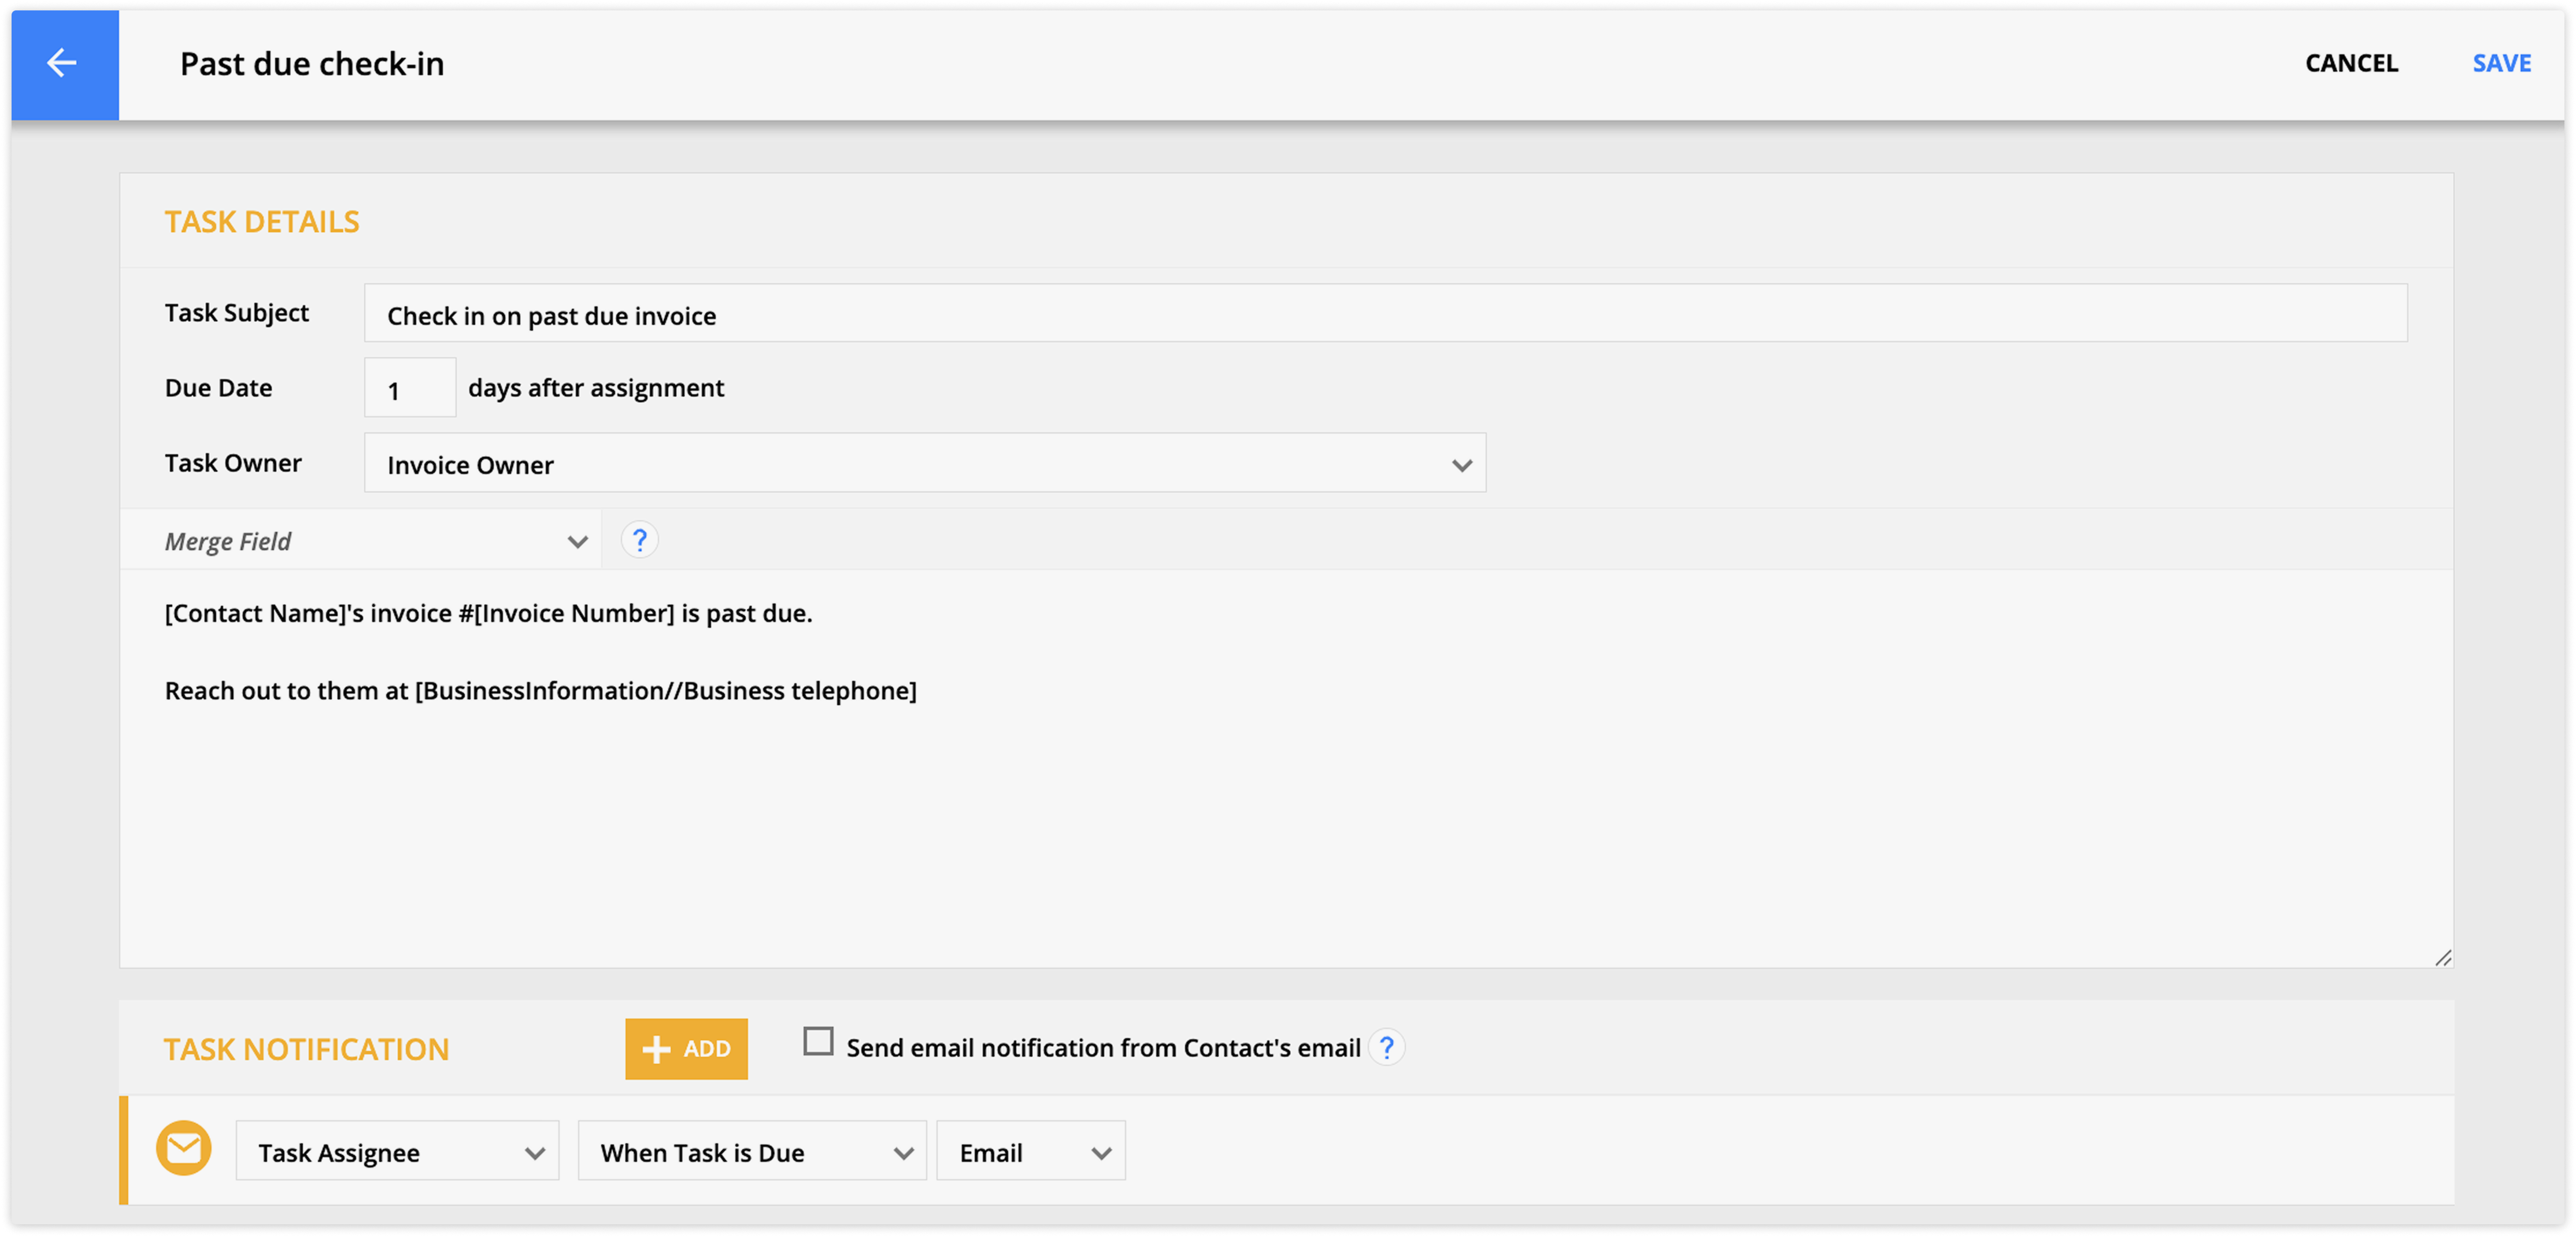
2. Notify a member of your team
Add an “Notify with Email” element below the trigger.
- In the element settings, choose the user that should receive the notification.
- Customize the email with invoice and contact information so your team member can reach out.
3. Put it all together
Complete your automation map by adding End elements to all empty spaces.
Then publish your map.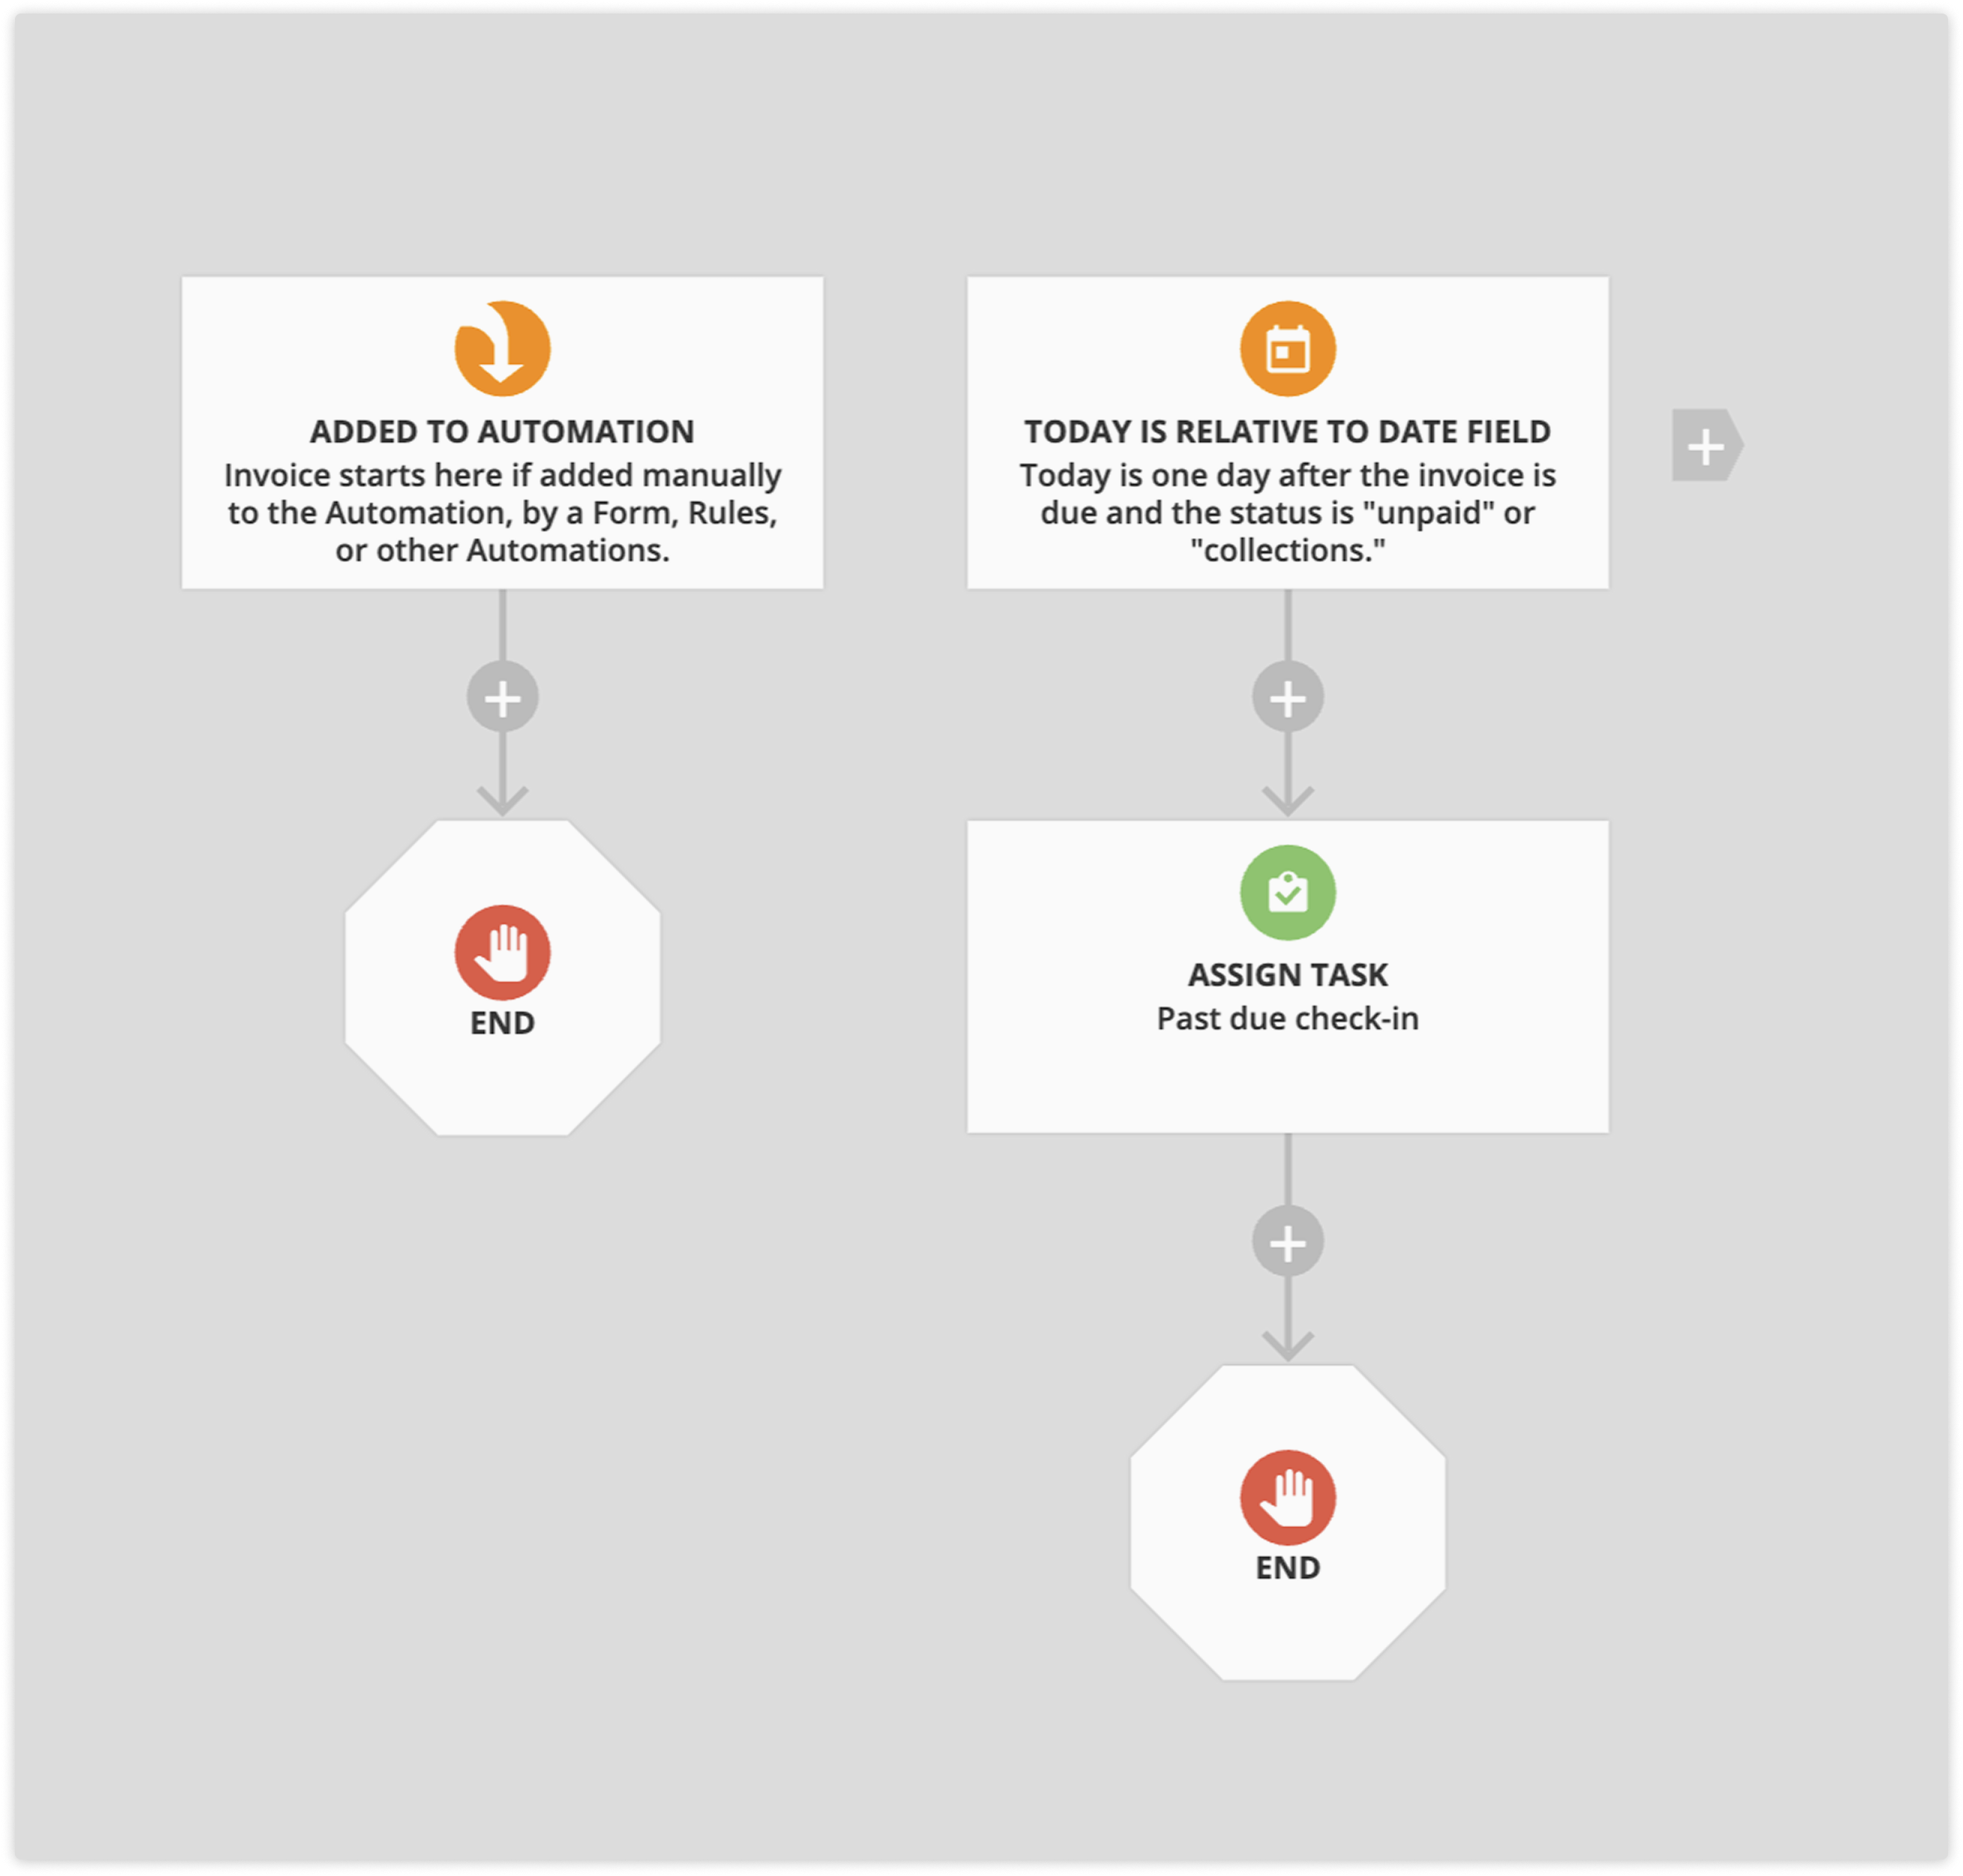
When your team contacts a customer, they can either process the transaction manually on behalf of the customer, or send an invoice or payment link to allow the customer to make the payment independently.
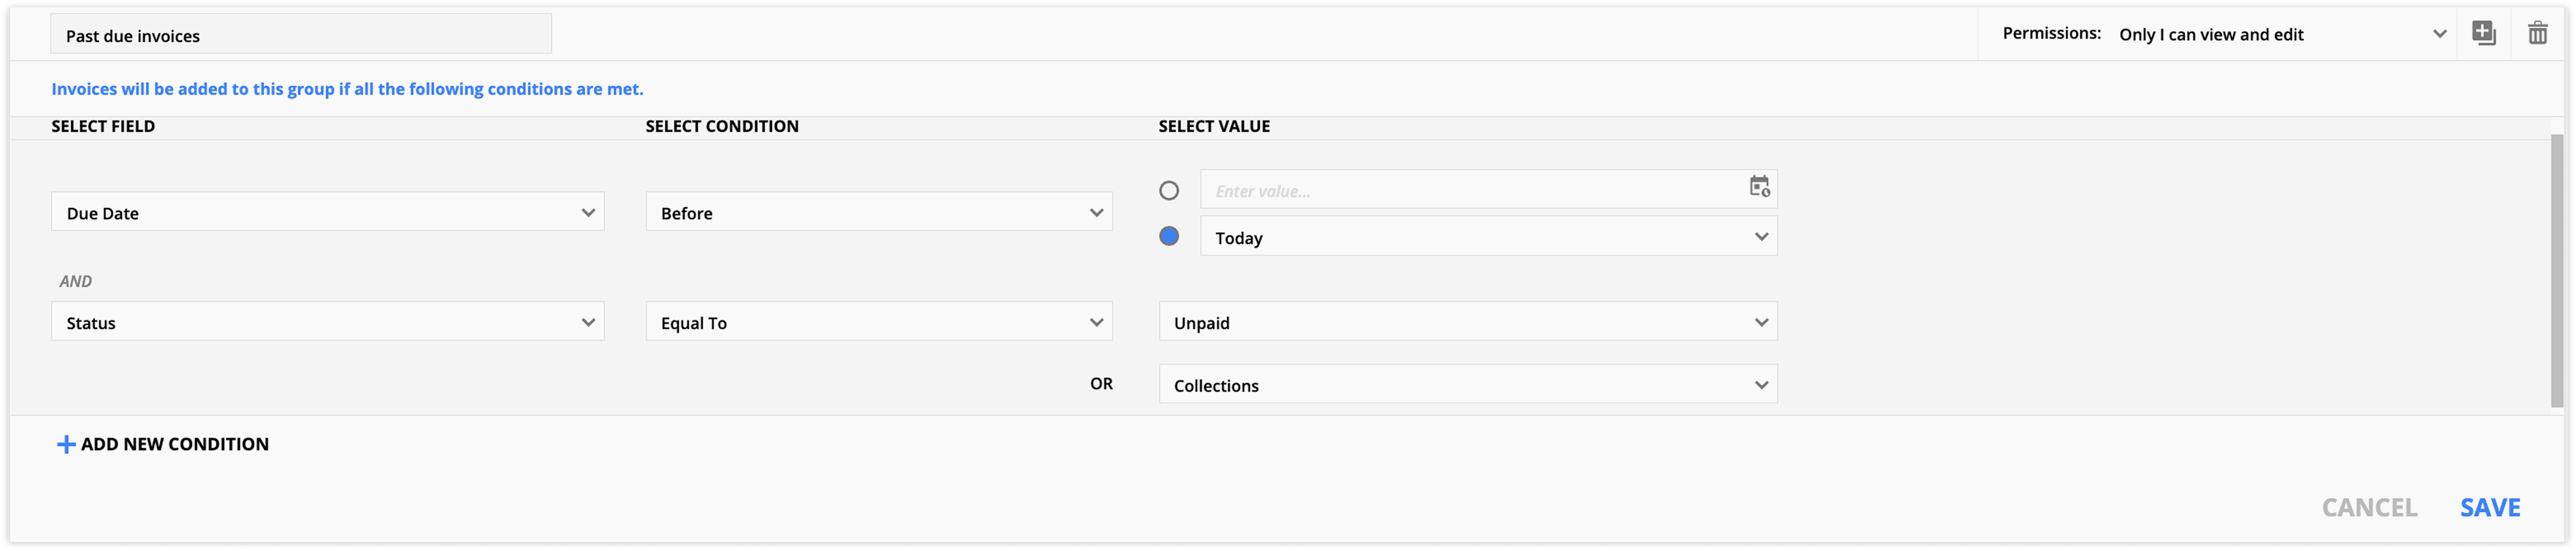
Past due invoice group
Another way to pull up your past due invoices is to create a group in the invoices collection.
- Go to Sales → Invoices.
- Click New group from the top of the collection.
- Name the group, “Past due invoices.”
- Add the condition, “Due date is before today.”
- Add a second condition, “Status equal to open or collections.”
- Save your group. And whenever you view the group, it will show you all of the past due invoices in your account.
Invoice settings
Back to top
Invoice settings let you customize the appearance and terms of your invoices. You can add your business logo, set a default due date, and specify invoice terms. Once saved, these settings apply to all future invoices.
This is also where you’ll set the hosting for your invoice and payment pages, which customers use to review and pay their open invoices.
- To access your invoice settings, go to Sales → Settings → Invoice settings.
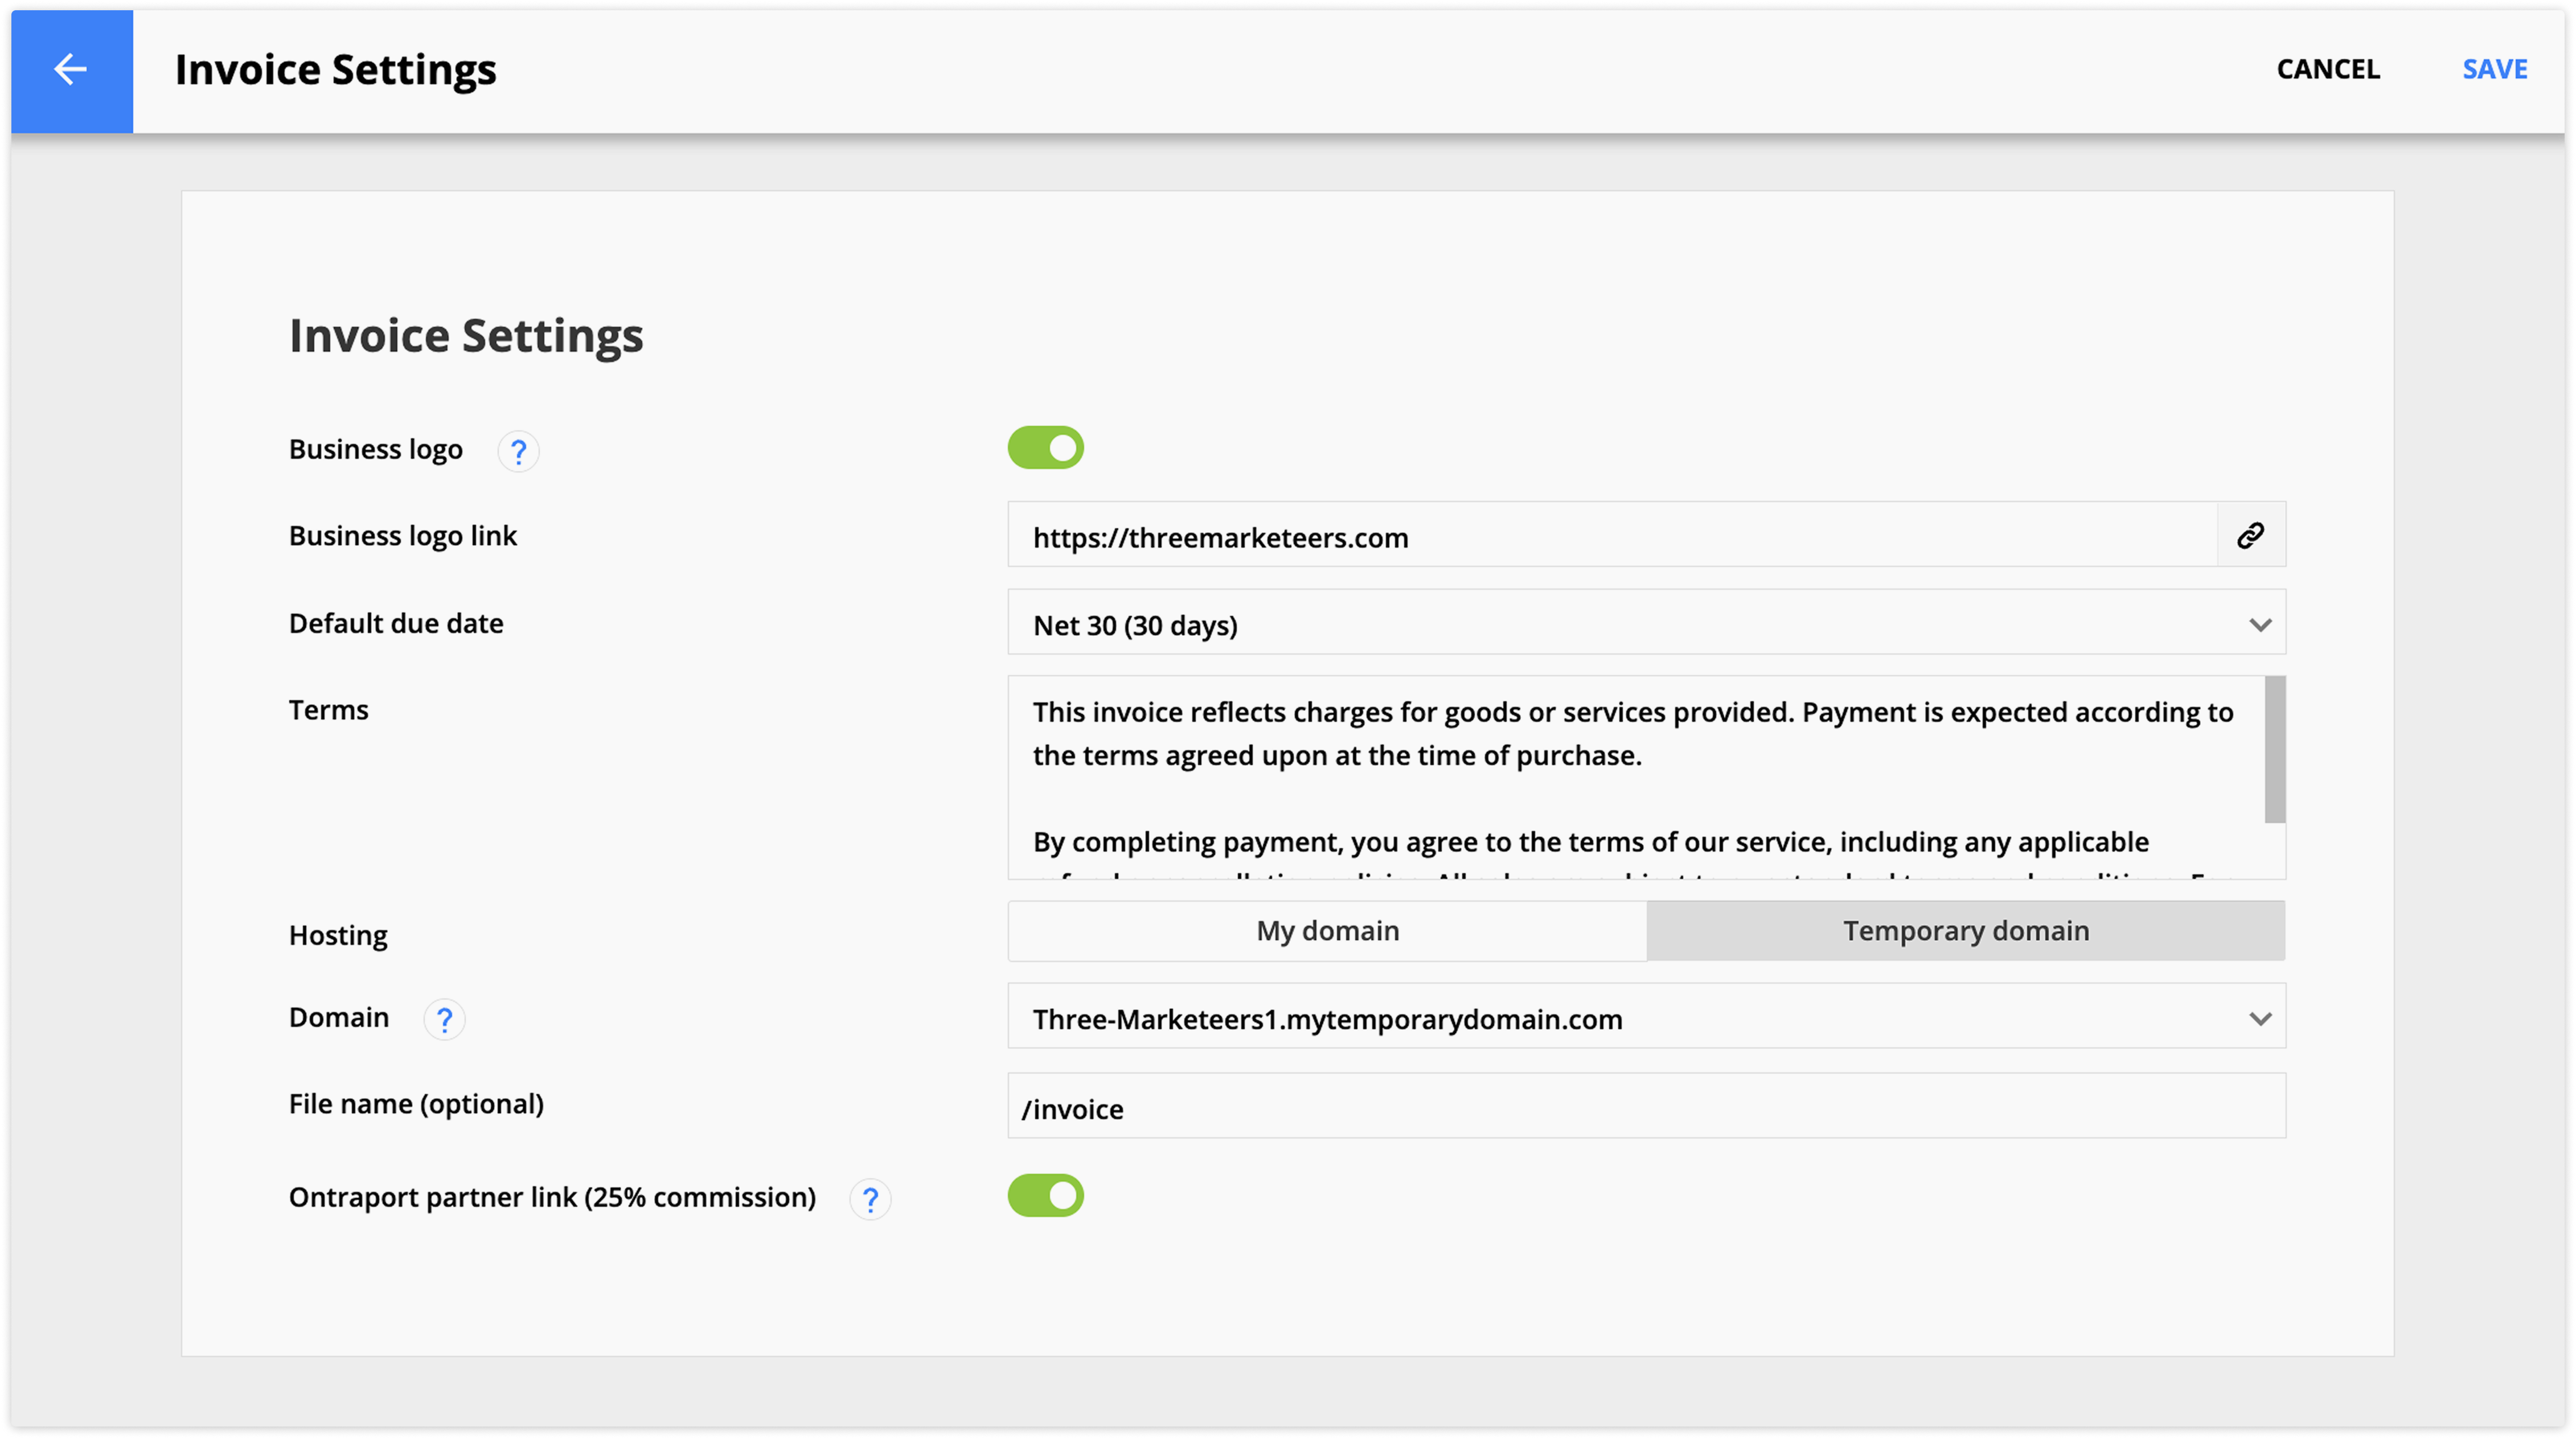
From this page, you can customize the following optional settings:
Business logo
Toggle on the business logo setting if you’d like to add the logo saved in your account’s Business information to your invoices.
Business logo link
If you turn on the business logo setting, you will see the logo link option. This setting allows you to add a link to your logo, such as your homepage.
Default due date
Set the default due date for new open invoices. You can still change the due date on each invoice if needed.
Choose from:
- Due on receipt
- 15 days
- 30 days
- 60 days
- Custom
- Set how many days after the invoice date the payment is due.
Terms
Add the terms and conditions you want to appear on all of your invoices.
Hosting
Choose if you want to publish your invoice and payment pages on your domain or a temporary domain.
- We highly recommend only using temporary domains for testing purposes.
Domain
Select the domain you want to publish your invoice pages to.
Filename
Add the filename you want to customize your domain with.
Ontraport partner link
Toggle on this option if you want to display the “Powered by Ontraport” logo to your invoices and invoice pages. If a customer purchases an Ontraport account after clicking on your link, you can earn 15% commission on their subscription.
Default language
Set the default language used for system-generated invoice and payment pages. This translates all text and headers on your automatically generated invoice and payment pages.
Choose from:
- Contact's browser language
- Default option. Automatically detect the visitor's language and use that as the language for the page.
- English
- Spanish
- French
- Chinese
- Japanese
- Hebrew
- Arabic
- Russian
- Portuguese
- German
Invoice automations
Back to top
Here are some of the common use cases that you can set up in your account to send the messaging you care about regarding your invoices.
Navigate to your Invoice automations by going to Sales → Settings → Invoice automations. Then click New automation to create a new map.
Invoice messages
Back to top
To create the messages described in the use cases above, you need to create Invoice messages. To do this navigate to Sales → Settings → Invoice messages.
You can create email and SMS messages as well as create tasks.
Navigate to your Invoice automations by going to Sales → Settings → Invoice automations.
Invoice merge fields
When you create invoice messages you can merge in important information from invoice records to communicate with your customers.
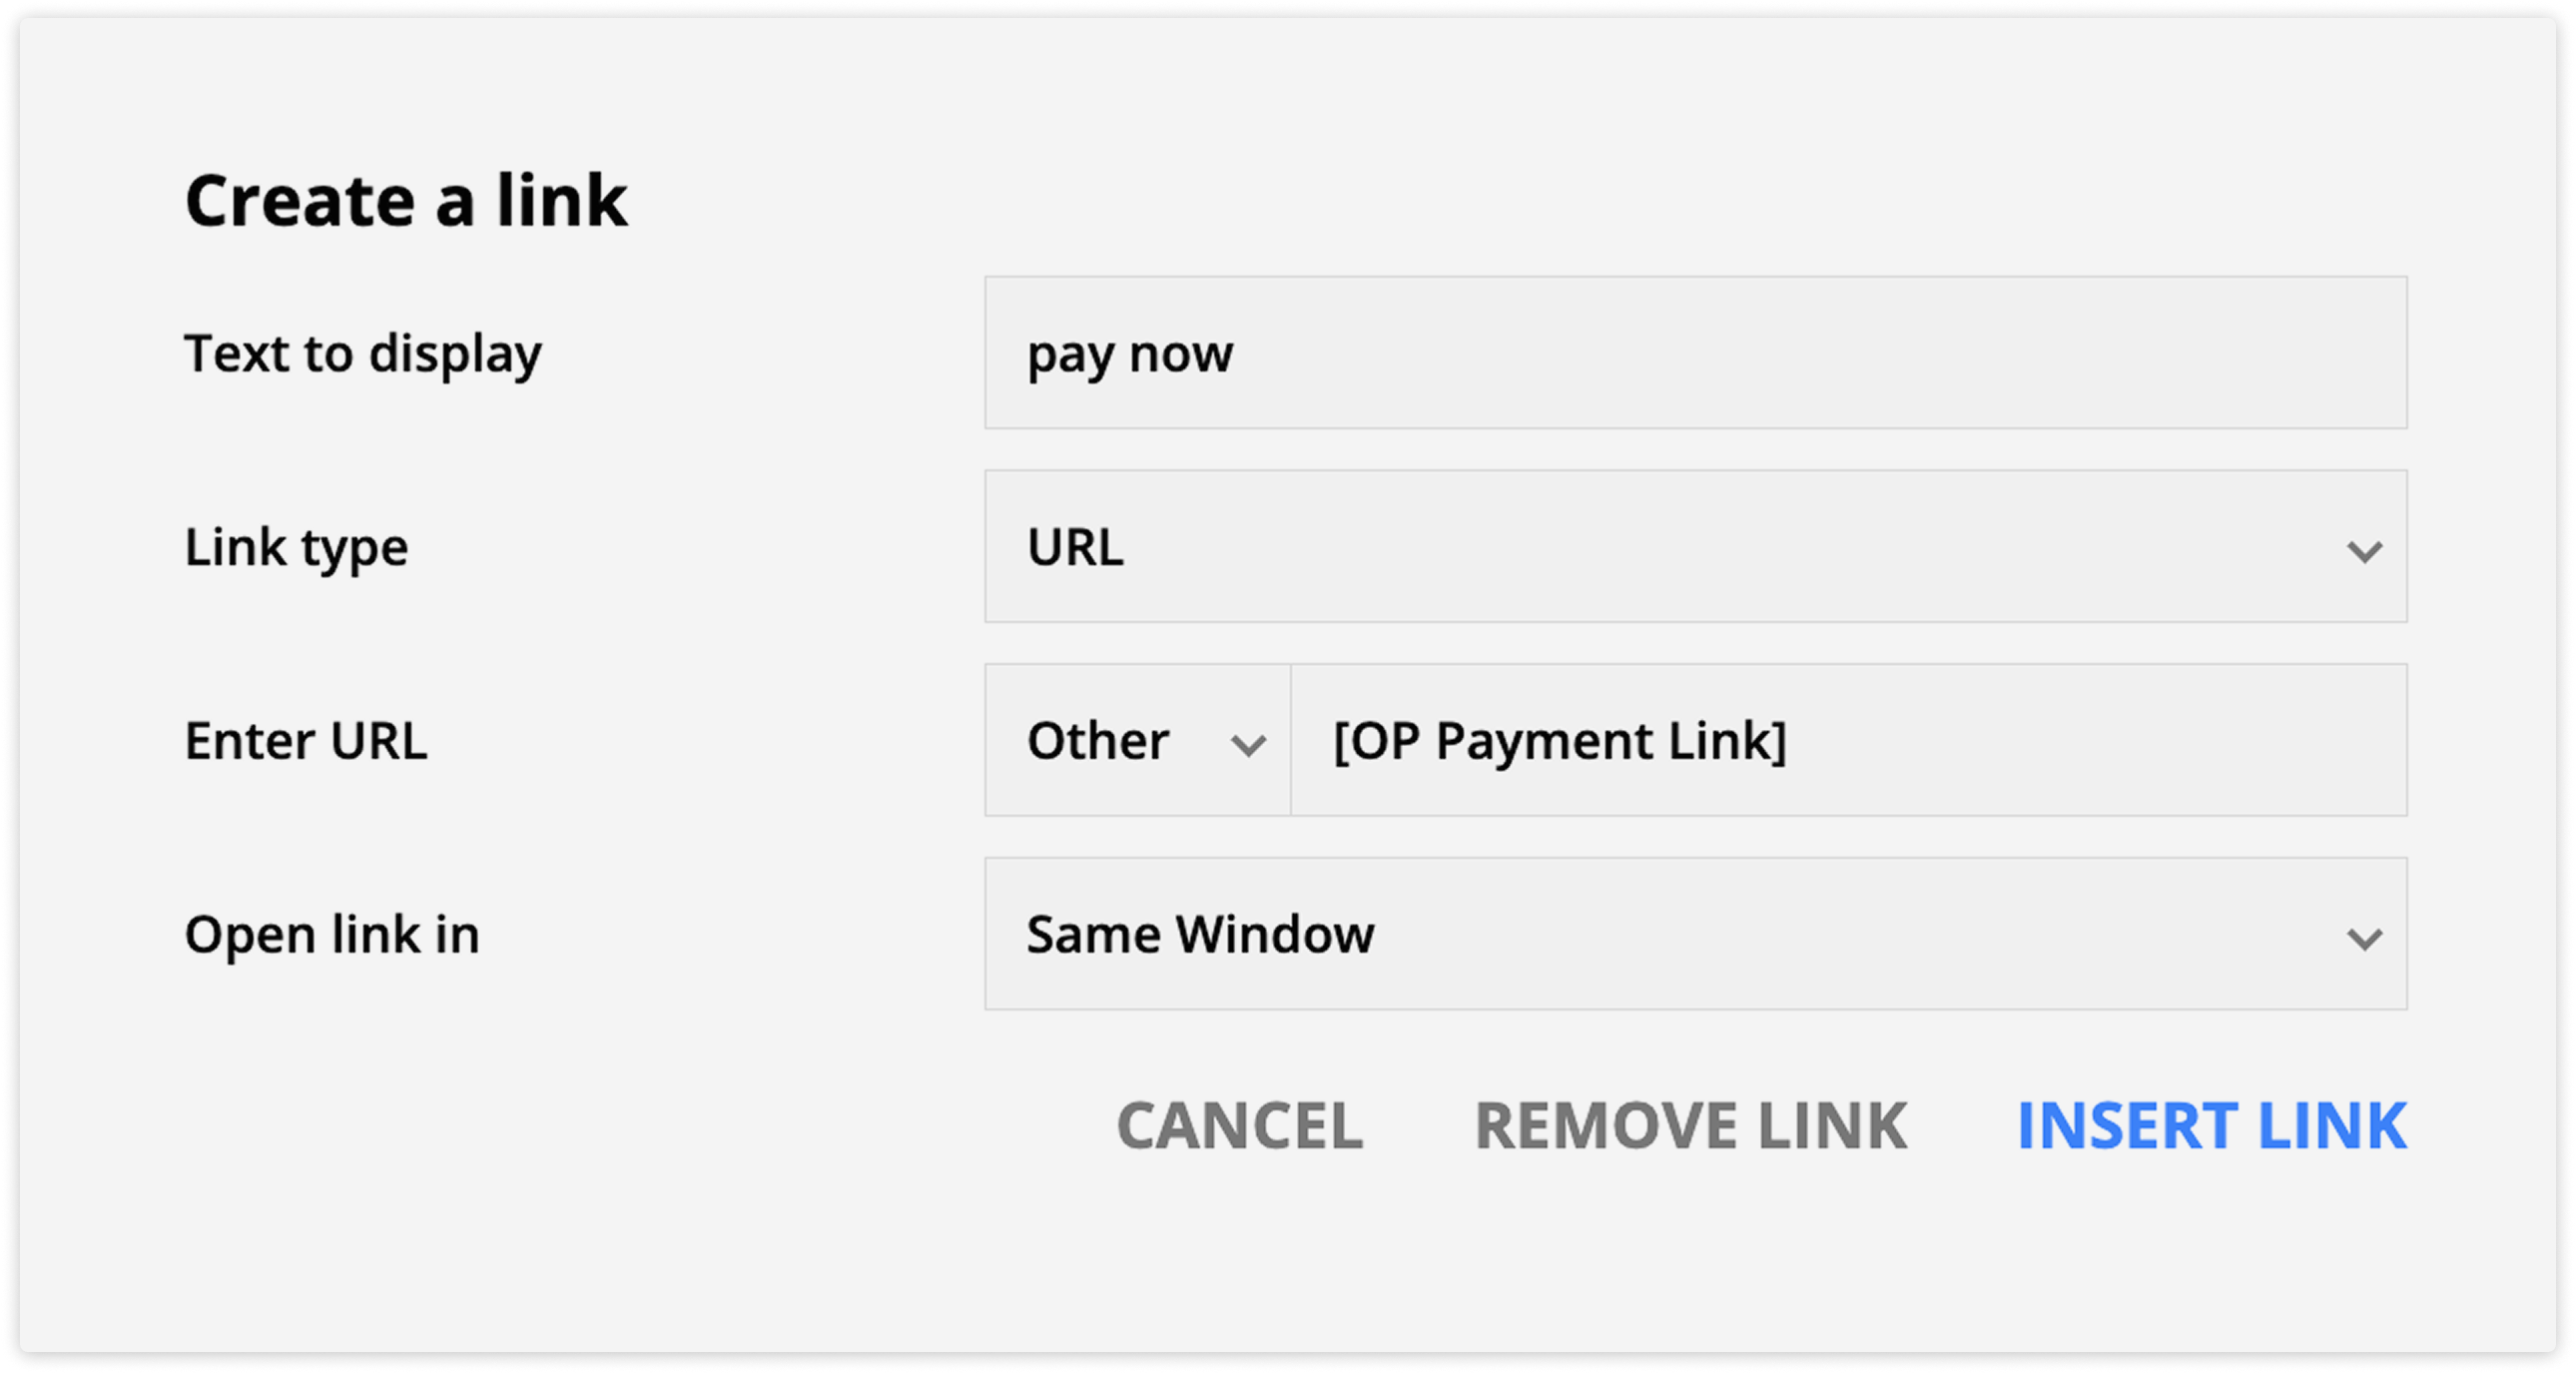
Two of the available merge fields can be used to create links to the Invoice and Payment pages:
- OP Invoice Link
- OP Payment Link
Follow these steps to create hyperlinks with those merge fields:
- Insert the link merge field into the body of your email, then cut it.
- Highlight the text you want to hyperlink and click the link icon.
- Use a URL link type and select the “Other” link protocol.
- Paste the link merge field.
- Click Insert link.
Send an upcoming payment reminder
Back to top
Send a heads-up to your customers before their invoice is due. This is great for both one-time invoices and payment plans.
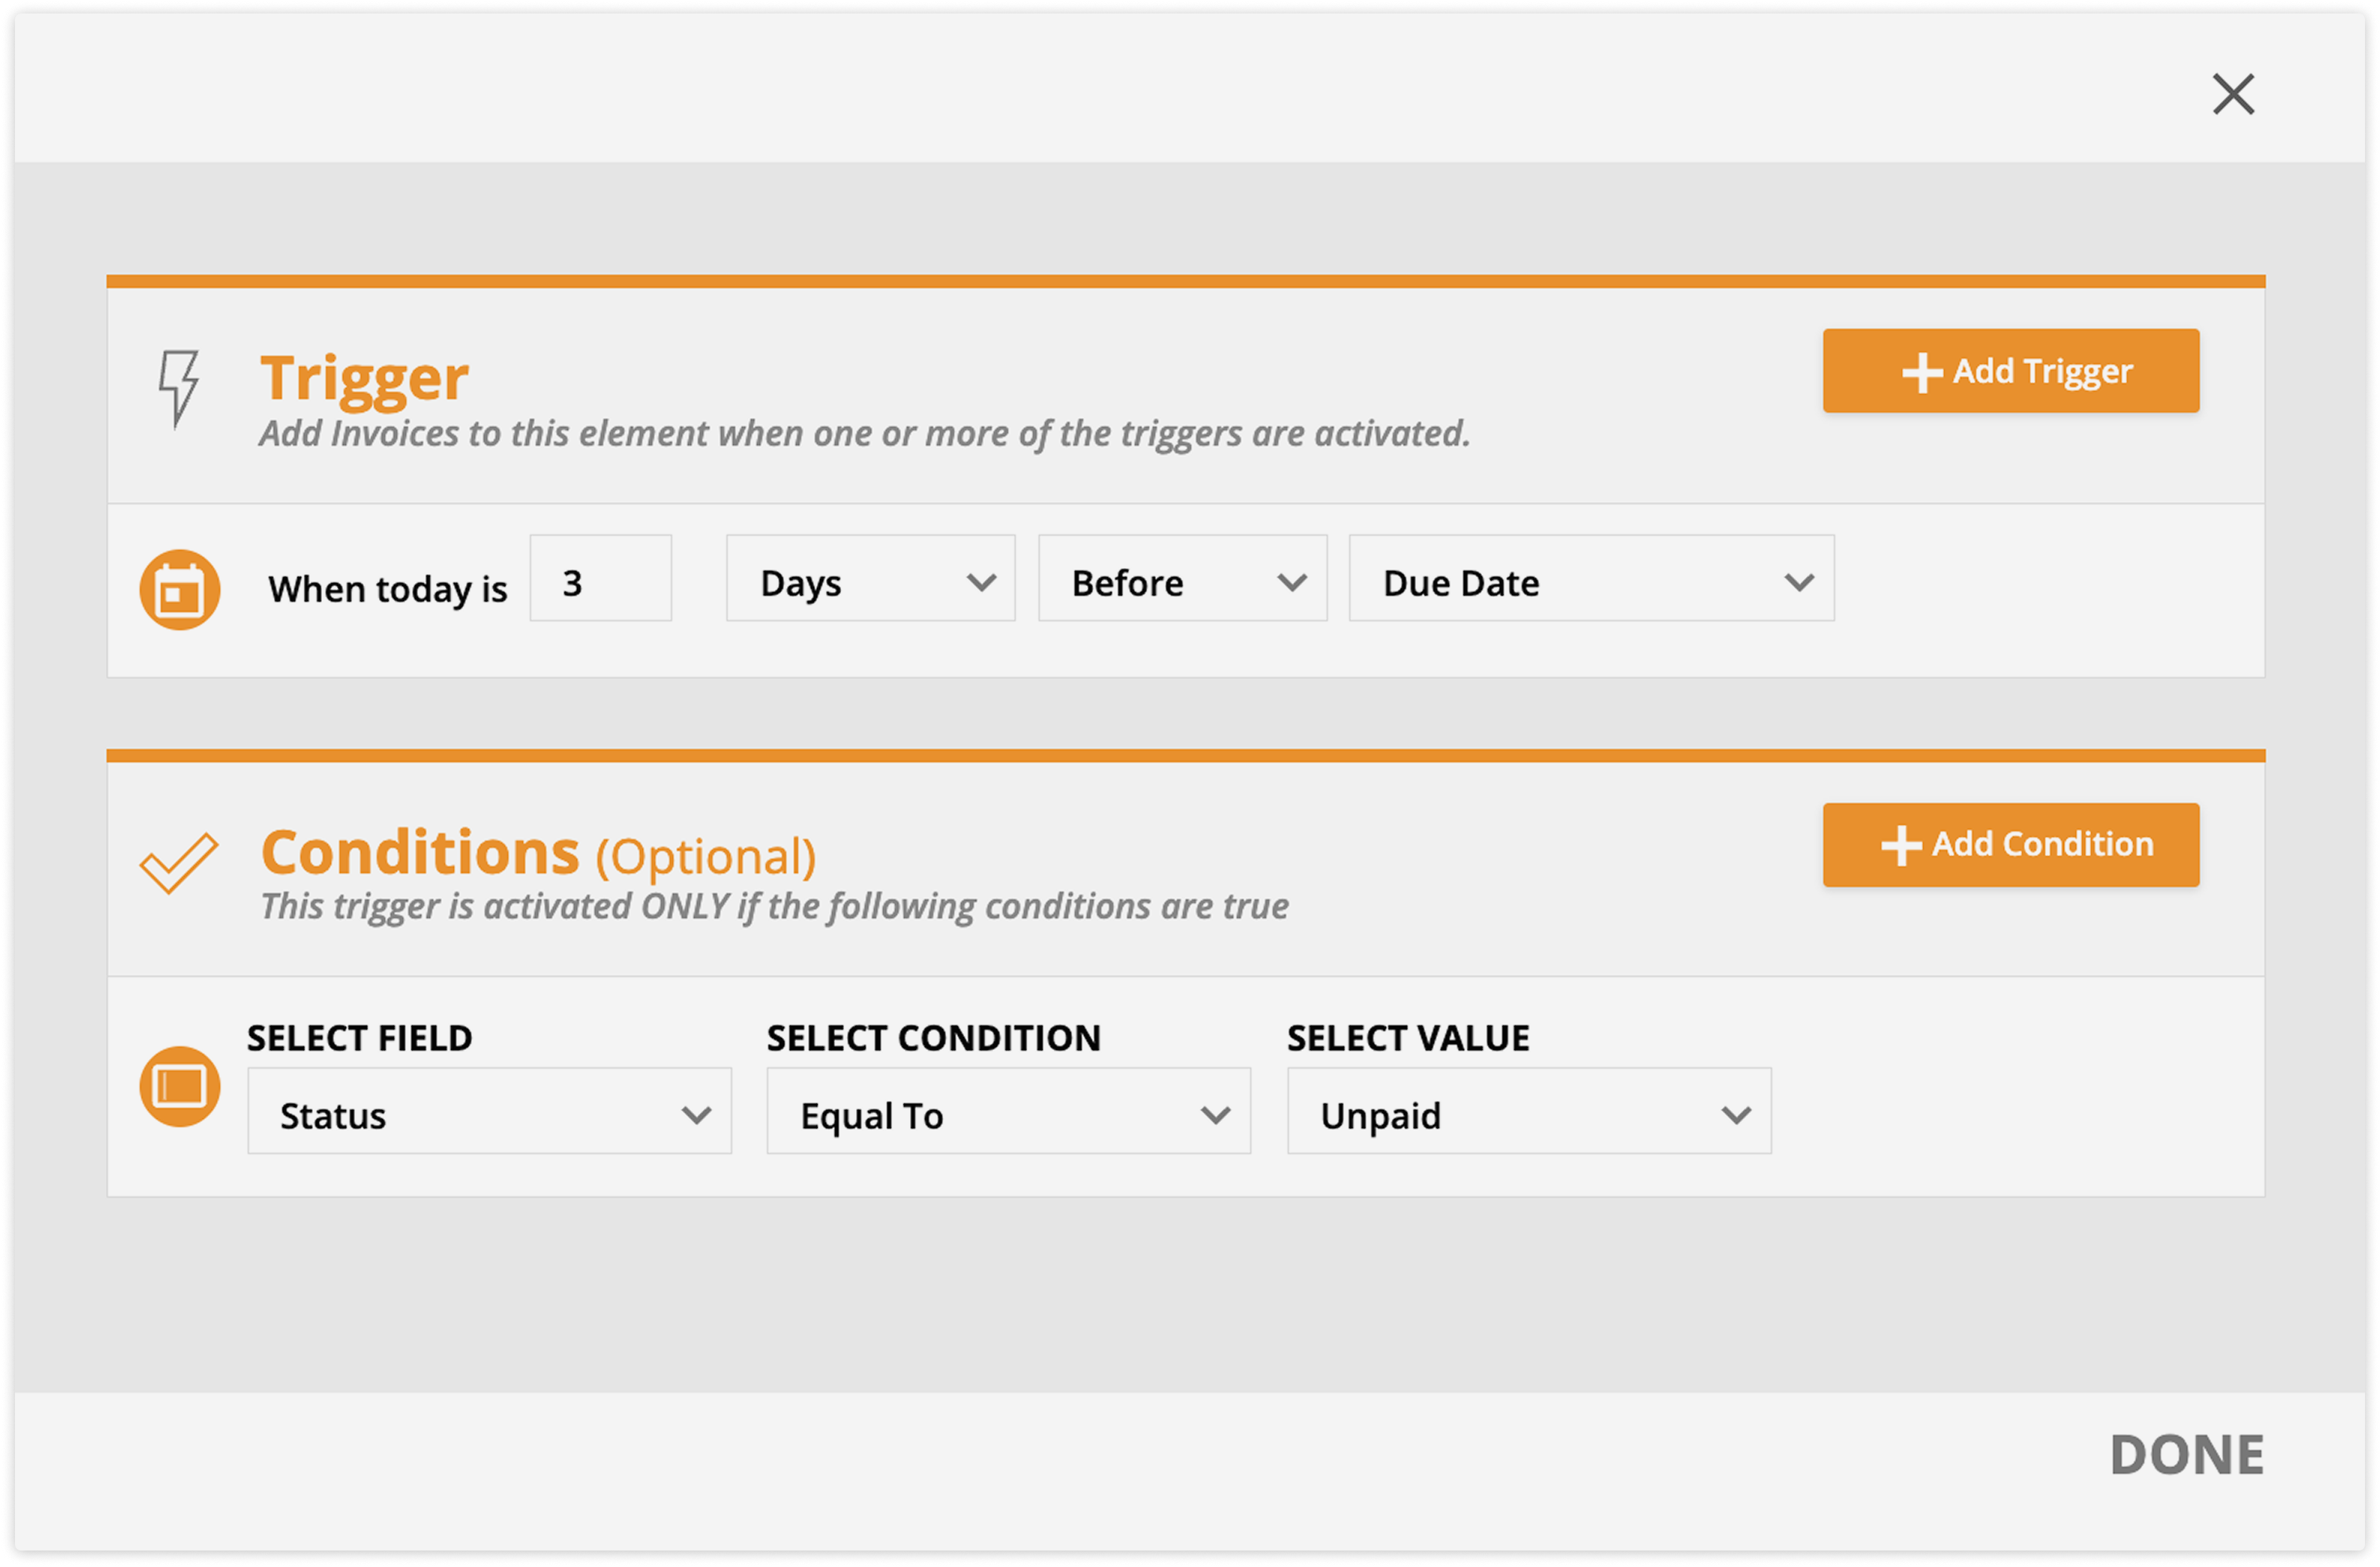
1. Trigger before the due date
Use a “Today is relative to Invoice’s date field” trigger.
- Set it to fire [X] days before the due date, such as “3 days before due date”
- Add a condition so only invoices with the status, “Open” are triggered.
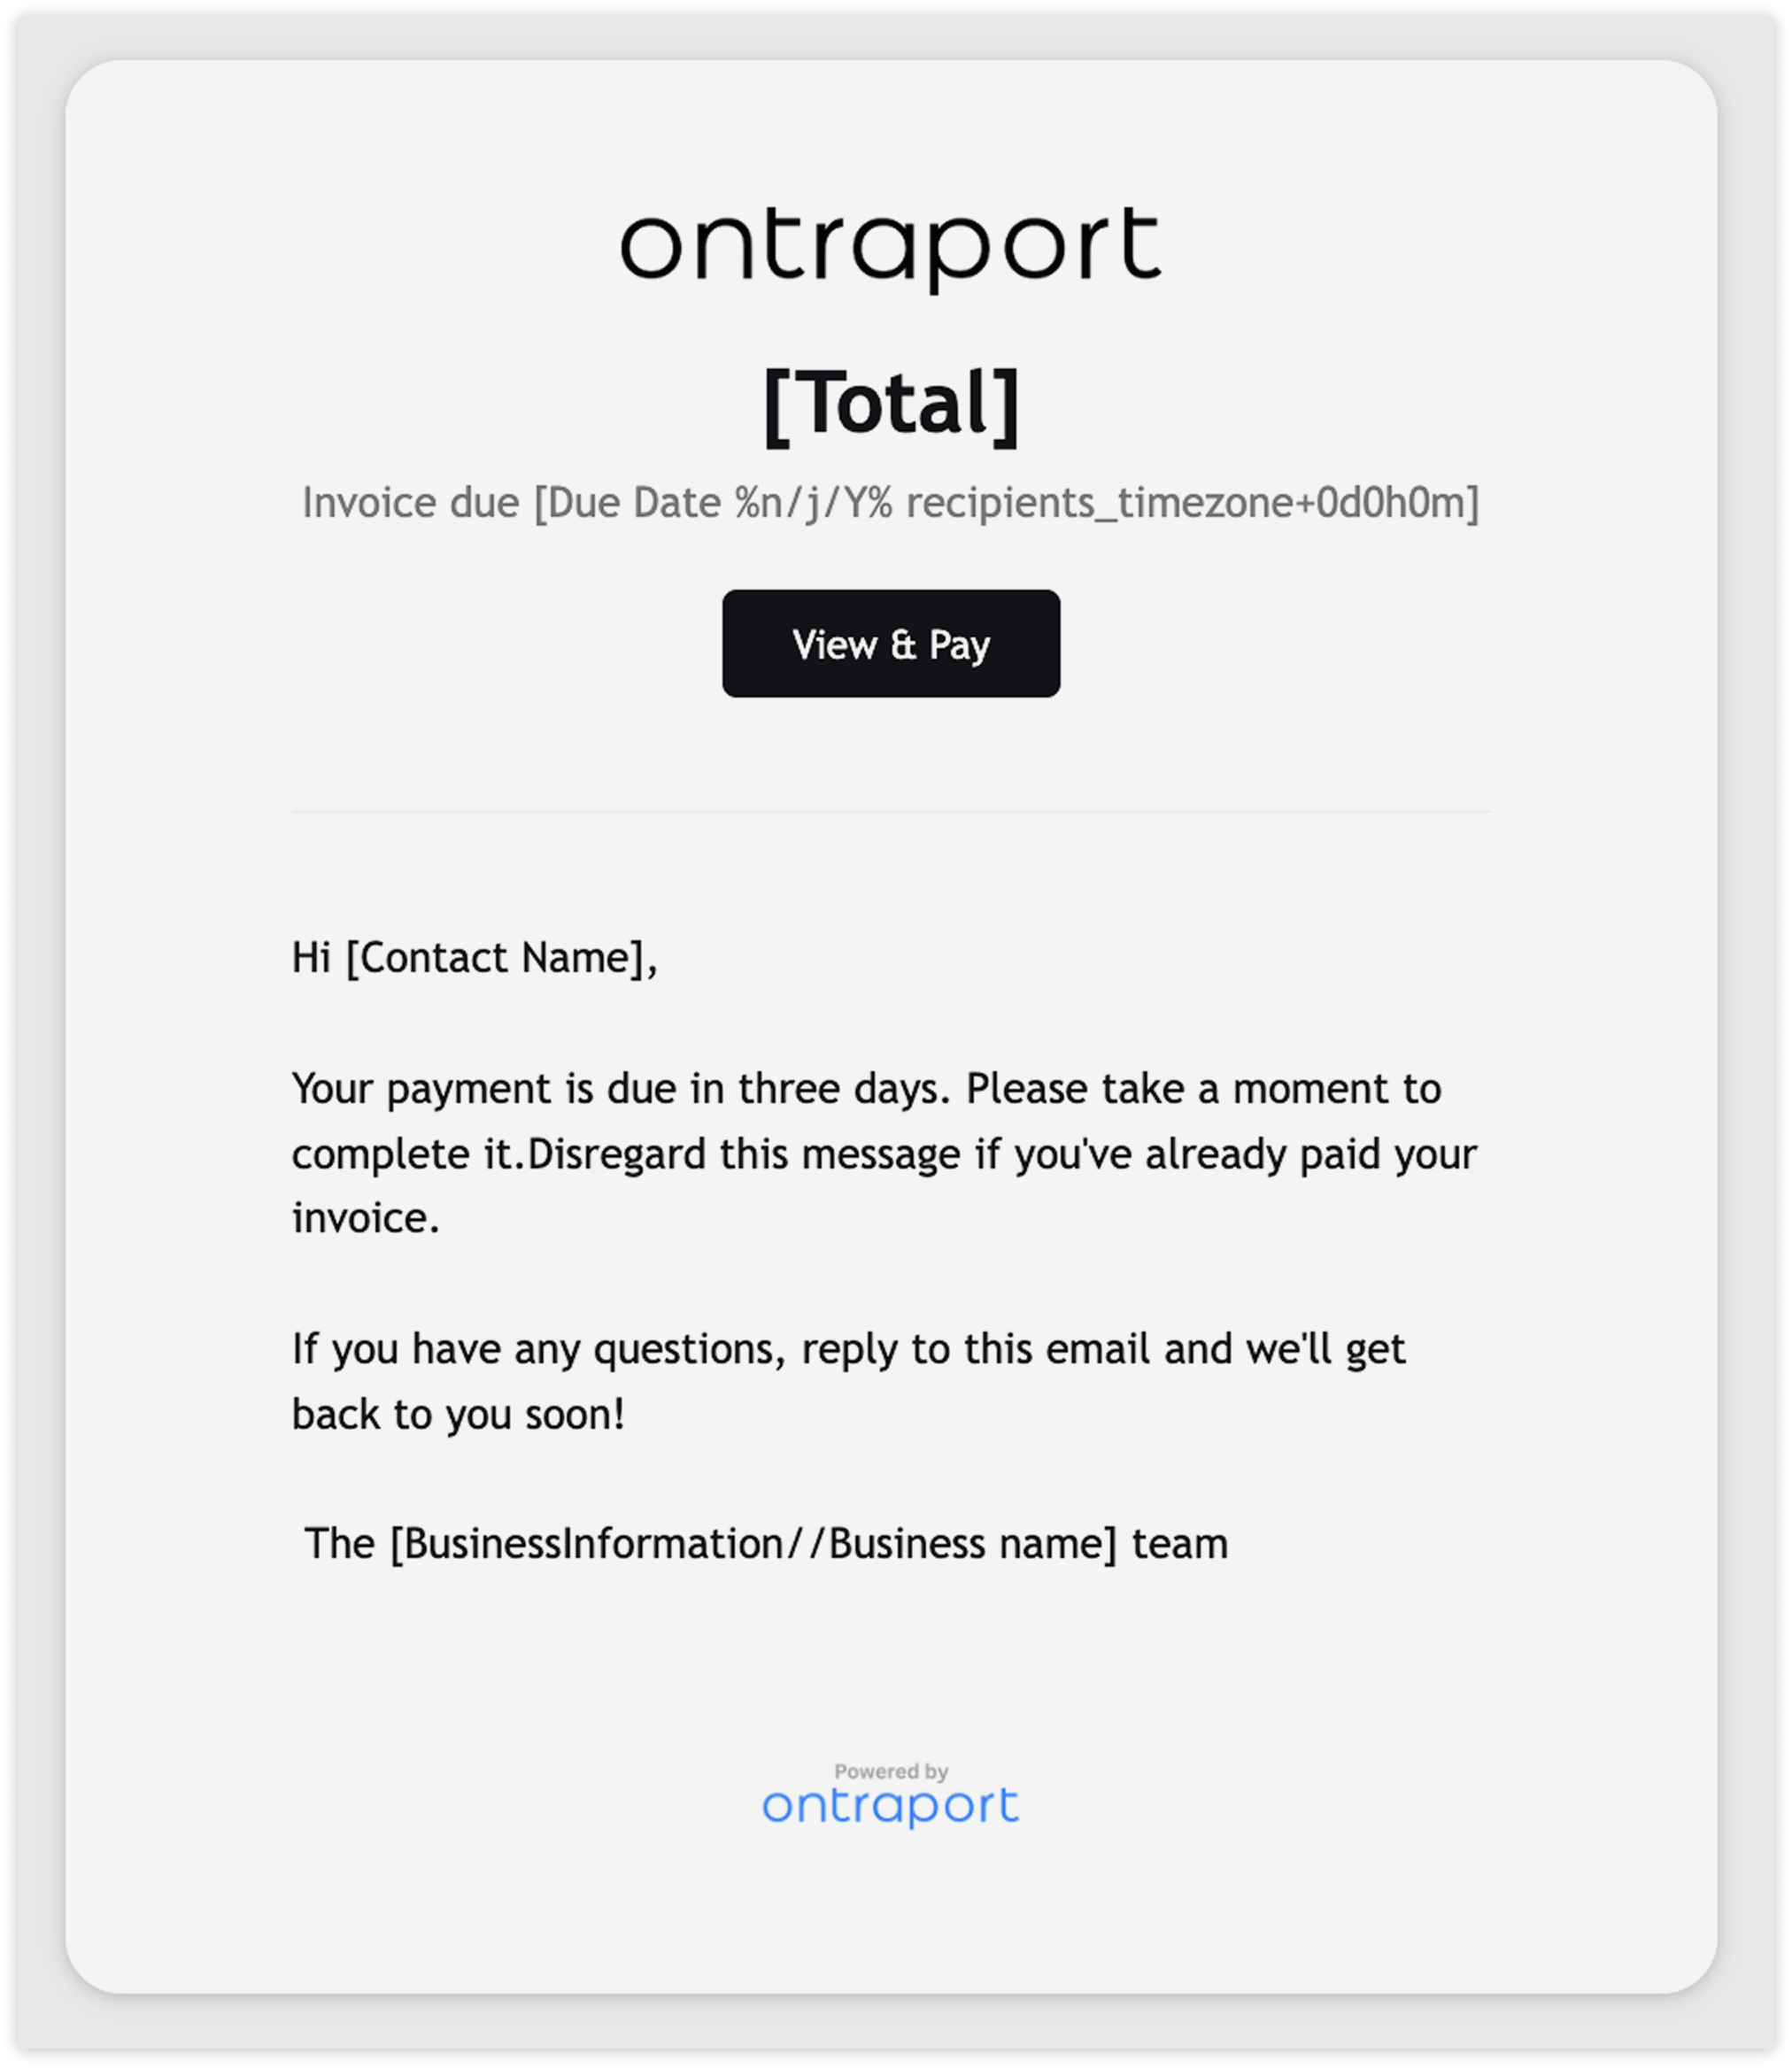
2. Send a reminder email
Add a “Send an email” element below the trigger.
- Include invoice details using merge fields to give your customer more information about what they owe, when it’s due and give them a link to the invoice or payment pages.
3. Put it all together
Complete your automation map by adding End elements to all empty spaces.
- You may also want to control the time of day that your email sends by adding a Wait element above your email and set it to “some time passes” then check “Then wait until the time of day is…” and select the time you want to send your message.
Then publish your map.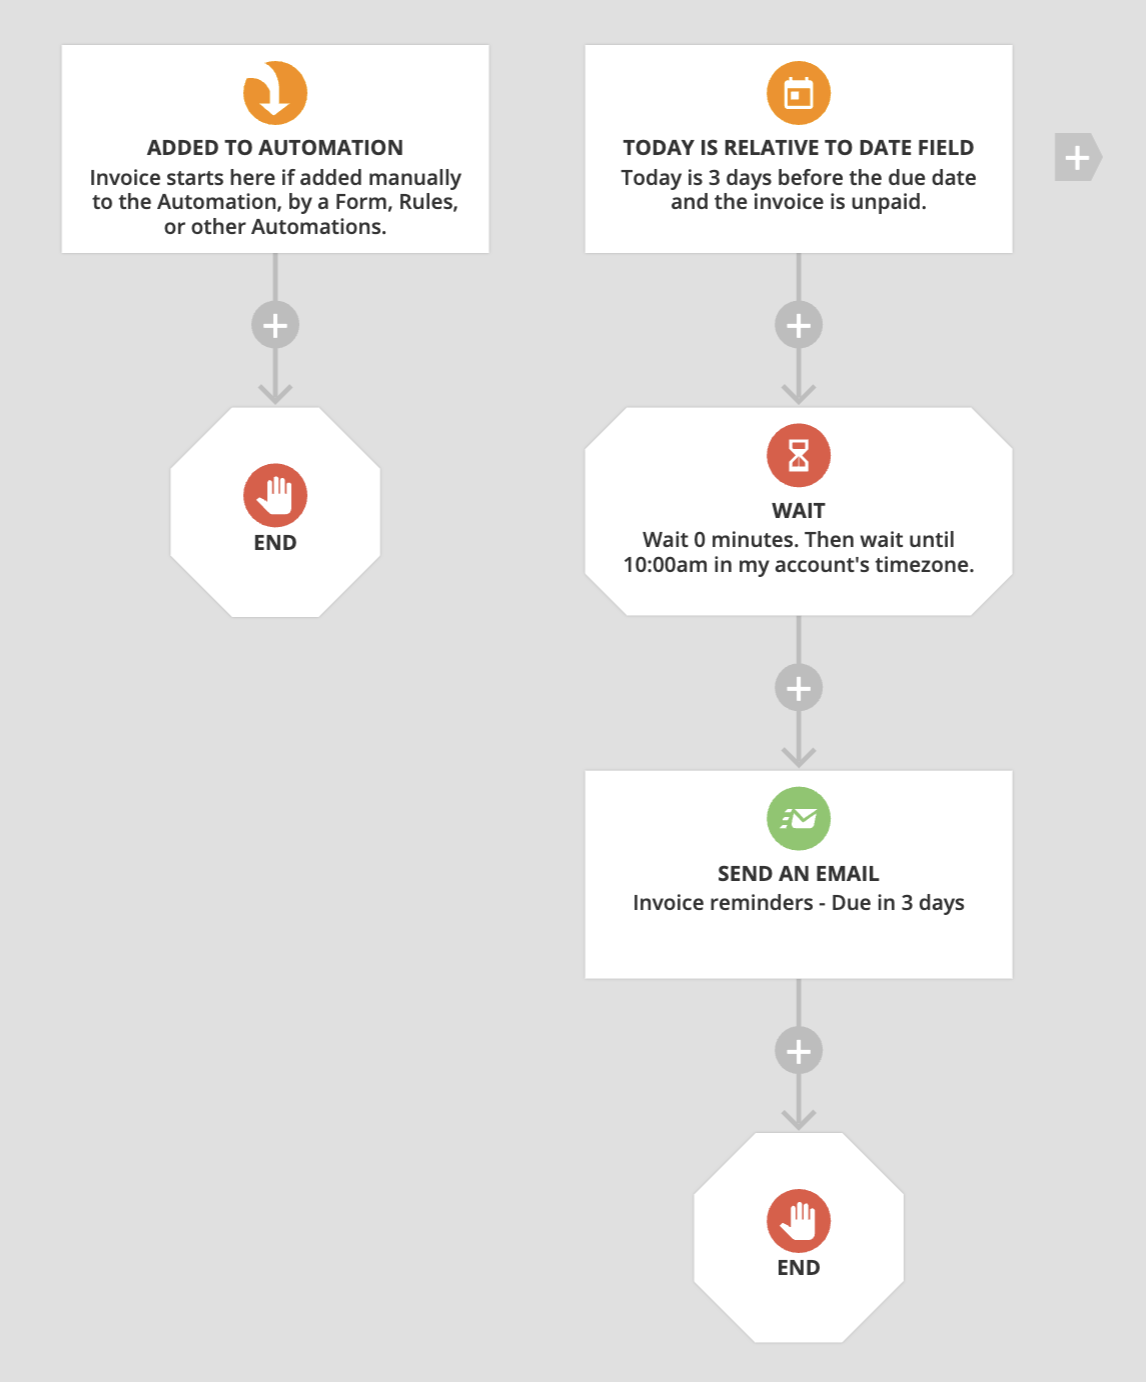
Alternatively, you can send a reminder on the day that the invoice is due by using the “Today matches Invoice’s date field” trigger and selecting the due date field.

.png) → Administration → Legacy features and toggle on the “Update refunded invoices to closed” option. After you do this, you cannot revert to the “refunded” status, and this option will be removed from your legacy features.
→ Administration → Legacy features and toggle on the “Update refunded invoices to closed” option. After you do this, you cannot revert to the “refunded” status, and this option will be removed from your legacy features.