GDPR (General Data Protection Regulation) is a set of rules imposed by the European Union (effective May 25, 2018) on all organizations worldwide that collect or process data about EU citizens. For information about how Ontraport supports our clients in complying and our responsibilities as a data processor, please see the GDPR, Privacy Shield and Ontraport section of our Legal page.
For information and advice about how to comply with GDPR in your business and country, please contact an attorney or professional advisor.
Table of contents
Applying GDPR strategies in Ontraport• Add a checkbox to your forms
• Link to your Privacy Policy
• Collect IP addresses
• Disable Ontraport's geolocation feature
• Add a cookie notification bar
• Delete or show contacts' personal data
Applying GDPR Strategies in Ontraport
Your advisors and other experts may recommend various strategies for complying with GDPR; here’s how to accomplish some of those strategies using Ontraport.
Add a checkbox to your forms
Adding a checkbox to your opt-in forms assures that your leads have given you consent to correspond.
First, you’ll create the checkbox field in your account:
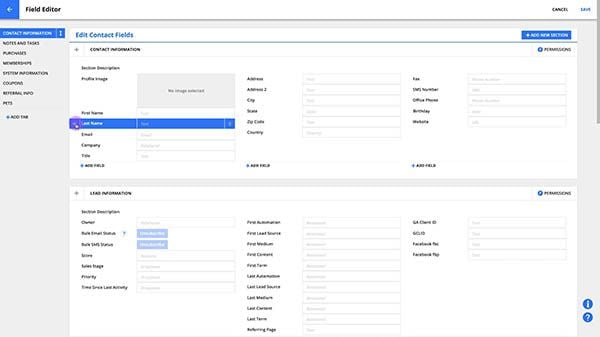
- Go to Contacts → Settings → Field Editor.
- Click Add Field at the bottom of the Contact Information section.

- Name the field and select “Checkbox” for the type. Leave the checkboxes for “This field is unique” and “This field is required” unchecked if you have them. Click Save.
- Click Save at the top right.
Next, you’ll add the checkbox field to your forms.
- Go to the form block on your Ontraport Form, and select it for editing.
- For order forms, click the Contact Fields section in the palette. On Smart Form blocks, select the Form section to expose the contact fields for editing.

- Click the Add button at the bottom of the palette to add a field to the form. Select the checkbox field you just created.
/forms+-+edit+contact+fields+-+gdpr+checkbox+(example).png)
- If you are working with a form on the Ontraport Pages builder, simply drag a form field from the palette, select the field and add it to the current form.
- Configure the checkbox:
- For situations where you’d like the checkbox to be optional (such as “Also send me email” or “permission to use your data for marketing”), do not check the “Required field” checkbox.
- For situations where your contact must click the checkbox to continue submitting the form (such as agreeing to your Terms of Service or Conditions of Sale), click the “Required field” checkbox.
/forms+-+edit+field+-+required+field.png)
- Save the checkbox field, then click Done in the palette. Save the Ontraport Page or Ontraport Form and publish it.
Link to your privacy policy
Another option recommended by many consultants is linking to your official privacy policy on every opt in or order form.
Once you’ve created or edited your policy to be in compliance with the GDPR, simply use any of the footer blocks in Ontraport Forms or Ontraport Pages to add the link to that policy. Several of the footer blocks have text for the privacy policy already built in.
Collect IP addresses
No additional steps are needed for this since Ontraport automatically records the IP address the browser provides for any opt-in form.
Note, in some cases the browser does not provide an IP address and the field is left blank. The IP address field may also be blank if you import contacts, add them via API or enter them manually. IP addresses can be found in the contact record under the System Information tab.
Disable Ontraport’s geolocation feature
Some consultants advise not to use IP address geolocation to estimate the contact’s city, province or state and country because the person hasn’t provided that data to you on a form.
You can email our Support team at support@ontraport.com if you’d like to have geolocation turned off in your account.
Add a cookie notification bar
Some countries require you to notify visitors that you use cookies on your website and link to your privacy policy that has information about the cookies or a separate cookie policy. You can create a lightbox Ontraport Form to act as a Cookie Notification Bar. Check with your local authority to verify what must be in your cookie notification; this example may not include all the elements.
- Create a new Ontraport Form and select a text block or callout block you can edit for this purpose.
- Edit the block to reflect how you use cookies. If you have a WordPress membership site using our PilotPress plugin, and don’t use any other tracking or marketing scripts such as Google Adwords or Facebook Marketing Pixel, you may be able to use the simple example below.
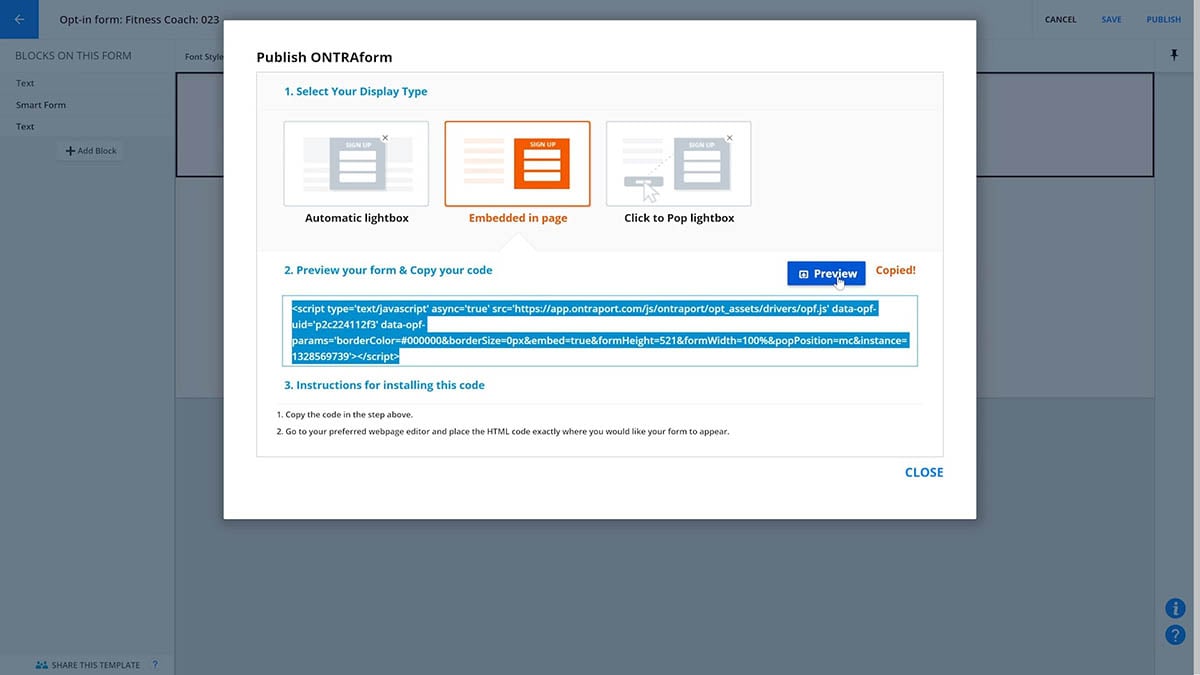
THIS SITE USES COOKIES: Cookies and related tracking scripts are used to assist with logging in and navigating from page to page and for customizing your experience. By continuing to use this site you explicitly agree to the use of these cookies. Read our Privacy Policy for more information on the use of cookies. - Publish the form and select “Automatic Lightbox.” Select the popup position. Choose to have it trigger after two seconds, and select the checkbox for “If popup has been closed or filled out, don’t show to this visitor again.”
/forms+-+publish+form+settings.png)
- Copy the form code and insert it on your landing pages.keyboard_arrow_downkeyboard_arrow_up
Delete or show contacts’ personal data
- Delete all of someone’s personal data: To delete someone’s personal data, simply delete their contact record. Their data will no longer be available to anyone. Ontraport will also delete their data using our normal processes.
- Delete some of someone’s personal data: Go into their contact record and manually delete the data in the fields. Ontraport will also delete the data using our normal processes, and it is not stored anywhere else.
- Show someone their personal data: You may wish to give your contacts access to the data you have collected from them. There are two suggested methods to achieve this.
- Use the Export function in Contacts to export all of the data fields for their contact record. This is provided in standard CSV format and meets most requirements.
- Create an Ontraport Page with all of the contact fields displayed as merge fields. Send the Ontraport page link in an email as a PURL to have the merge fields populated with the contact record values.keyboard_arrow_downkeyboard_arrow_up