Ontraport offers a two-week free trial so you can explore the software and start building without any pressure to buy. Every new account comes with ready-to-use systems to help you make the most of that time. These aren’t just placeholders — they’re practical examples that show you how things work behind the scenes and how your data is organized.
Seeing real setups in action can make understanding how to create processes in your account easier.
In this article, you’ll learn how to sign up for a free account, what comes with it, how to troubleshoot common issues, and how to get the most out of your two-week trial.
Table of contents
How to get started with your free trial
• Sign up for a free trial
• Set up your custom domain
• Add Dynamic CMS to a free trial
• Add an Inbox plan to free trial
• Activate your account
Troubleshooting
What you get
• Prebuilt website
• Booking page and event template
• Automated actions
• Example data
How to get started with your free trial
Starting a free trial is a great way to test Ontraport’s functionality for two weeks without putting a credit card down.
Your free trial comes with prebuilt assets and sample records, so it’s easy to get started. Check out the What you get section below to learn more about what comes with your free trial.
If you create a free trial from Ontraport’s home page, you’ll have a Pro-level account by default.
However, if you sign up for a free trial from the pricing page, you can select the specific account level and add-ons you’d like to test.
Sign up for a free trial
Back to top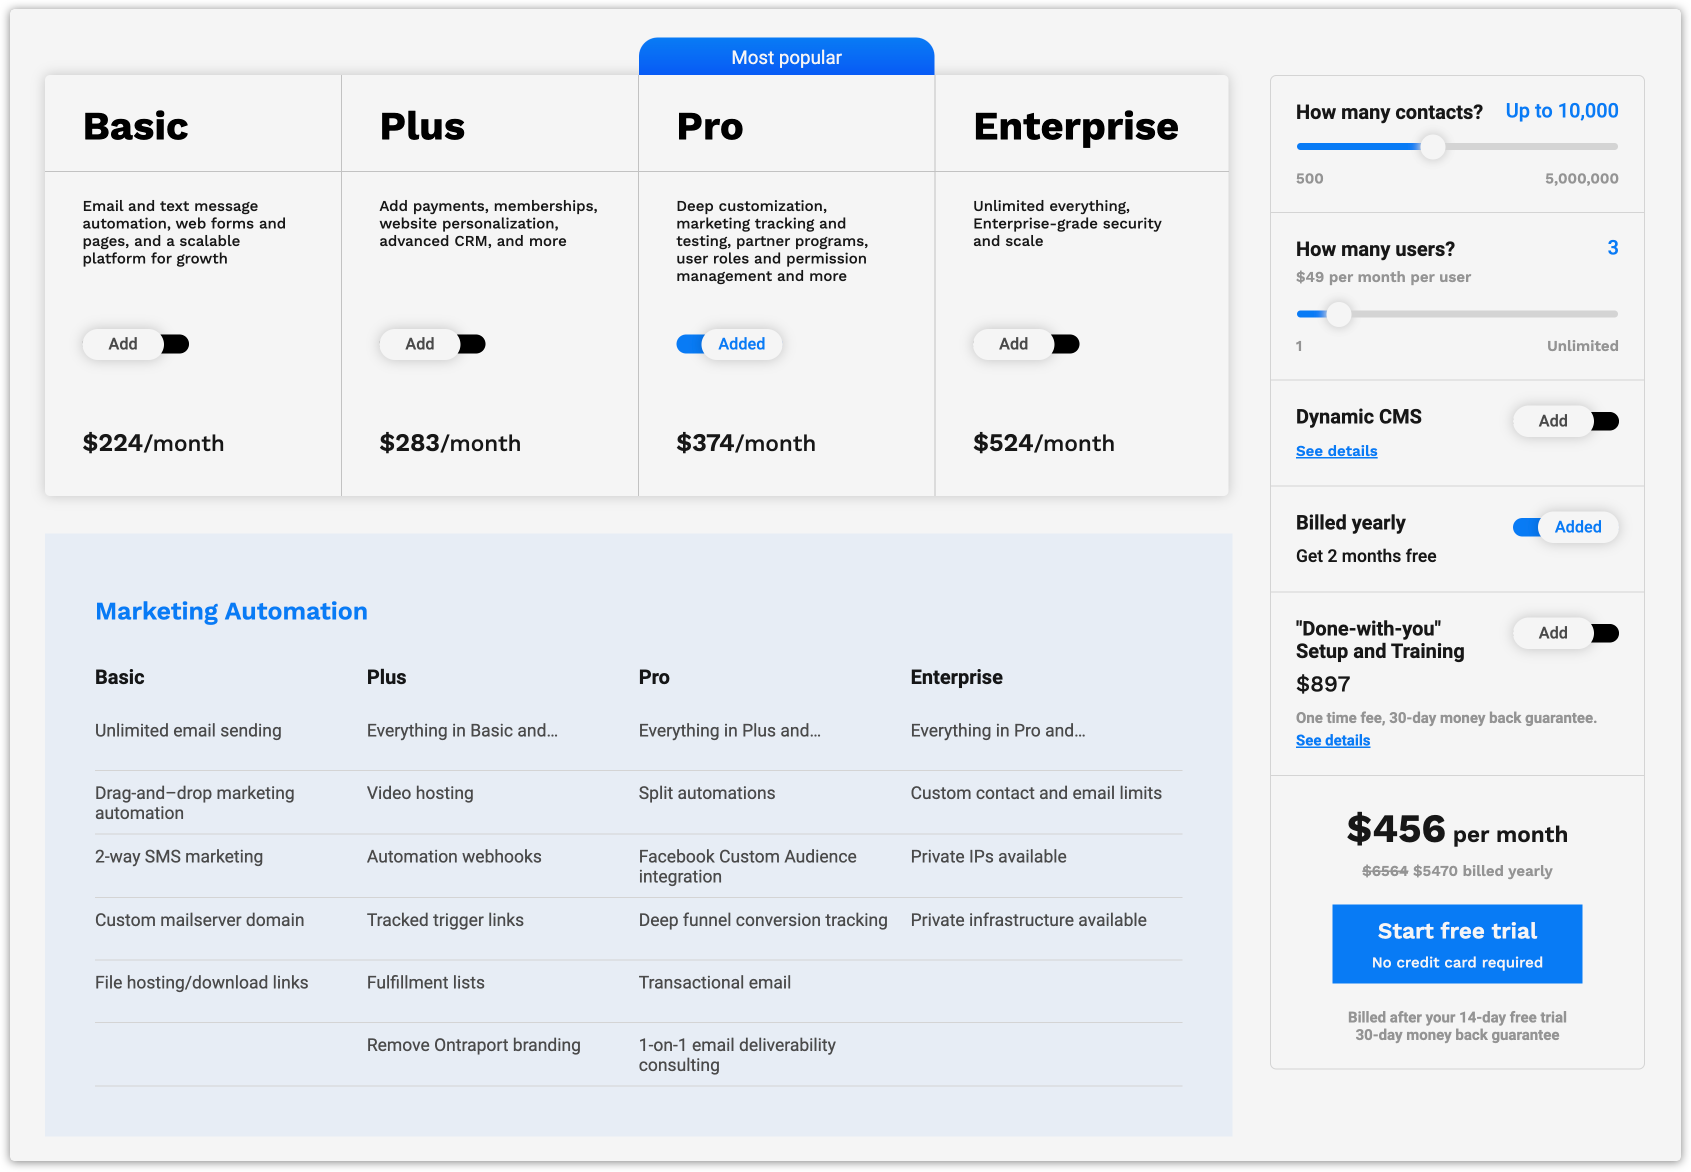
You can create a free trial by going to Ontraport's home page and clicking Start free trial in the top left corner. That will always create a pro-level account, but if you want to customize your free trial package, start your free trial from the pricing page.
Follow these steps to customize your free trial:
- On the pricing page, choose the plan you want to sign up for.
- In the right-hand column, customize the add-on options you want for your trial.
- Click Start free trial located at the bottom of the right-hand column.
- You’ll be redirected to the sign-up page. Fill out the sign-up form with your personal and business information to get started using Ontraport.
Set up your custom domain
Back to top
Your domain lets you publish branded pages and send branded emails, even while you’re on a free trial. You can configure your custom domain to fit your specific needs.
No matter if you already have a website, you’re starting fresh, or you just need a subdomain for your trial, we’ve got you covered. Most users set it up to publish pages, send emails, and enable click tracking.
Click here to learn how.
Add Dynamic CMS to a free trial
Back to top
If you don’t sign up for a Dynamic CMS package when you first create your free trial, you can add it at any time.
- Log in as the account’s owner.
- Go to
.png) → Account.
→ Account. - Click Change plan next to your account in the Plan settings section.
- Add the Dynamic CMS option in the top right corner. Then choose your level then click Change plan.
To learn more about what’s possible with Dynamic CMS, check out this article.
Add an Inbox plan to free trial
Back to top
If you don’t sign up for an Inbox plan when you first create your free trial, you can add it at any time. The Inbox plans come with their own free trial, so if you have a paid account, you can still try Inbox for free.
- Log in as the account’s owner.
- Go to → Account.
- Click Change plan next to your account in the Plan settings section.
- Add the Inbox option in the top right corner.
- Click Change plan.
When you add an Inbox plan, an email channel will be added to your account by default so you can start messaging right away.
Activate your account
- Check your inbox for an activation email.
- Inside the email, click Verify my email.
- Fill in your business information, add your branding and then click Complete setup.
Once your free trial account is all set up, the first thing you’ll see is a welcome page with tips for getting the most out of your account.
Troubleshooting
If you have not received your activation email:
- Check your spam folder.
- If you still can’t find your email, add Ontraport emails to your allow list.
- Log in to your Ontraport account with your email and password.
- Click Resend the email.
- If you still haven’t received your activation email, reach out to Support to have a team member activate your account for you.
If the activation link in your email takes you to an error message:
This means your link has expired. Reach out to Support to activate your account.
What you get
Back to top
To help you get started quickly, we’ve prebuilt some assets in your account. You do not need to keep any of the sample records and prebuilt systems, and there is no limitation to your ability to customize them.
Plus-level accounts, above all, have the same systems and settings. However, Basic accounts will only include the features that belong to that account level. If you upgrade from a basic account, you will get full access to all prebuilt systems.
Prebuilt website
Back to top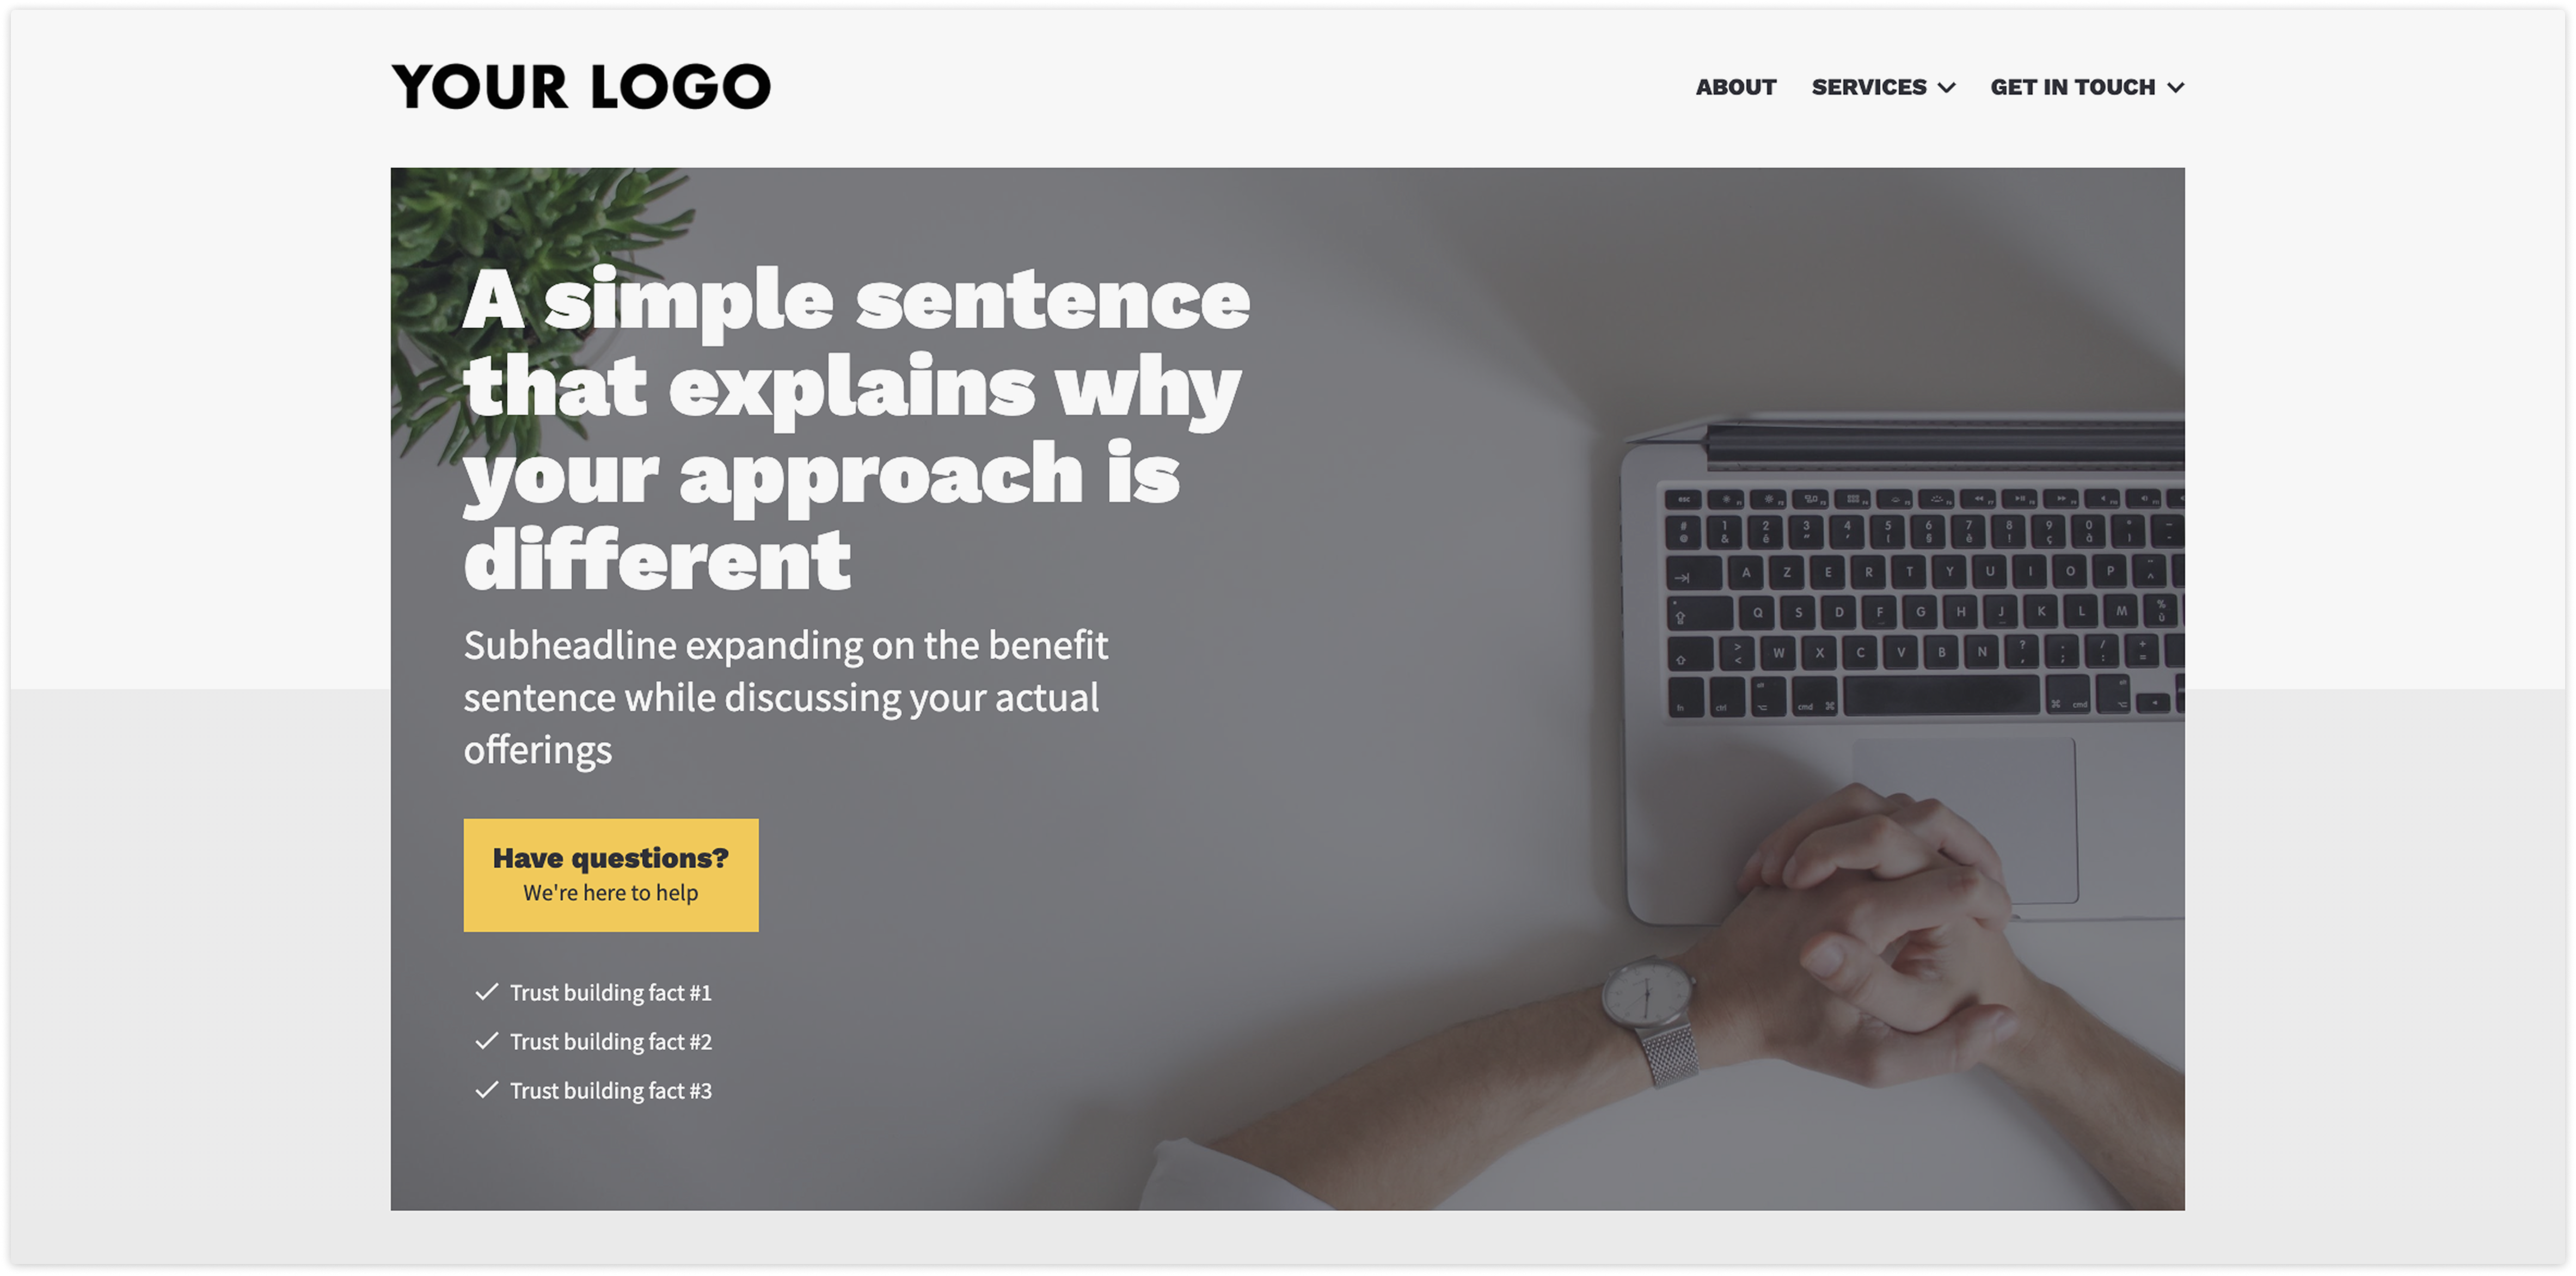
Every new account has a ready-made website to help you get started fast. There is no need to build from scratch — we've set up the essentials for you so you can focus on running your business instead of designing a site.
Your new account comes with a simple website template that's ready for you to customize. The pages on your website are all linked to each other. Each page also has SEO and placeholder text, making adding your own content easy.
Your prebuilt website includes these pages:
- Home page
- Services overview
- 3 service detail pages
- About us
- Contact us form and thank you
- Booking page and thank you
We recommend navigating your new website to see what you've got. All your pages are already linked up, so you just need to add your content, brand colors and fonts to make it your own.
Booking page and event template (Plus-level accounts and above)
Back to top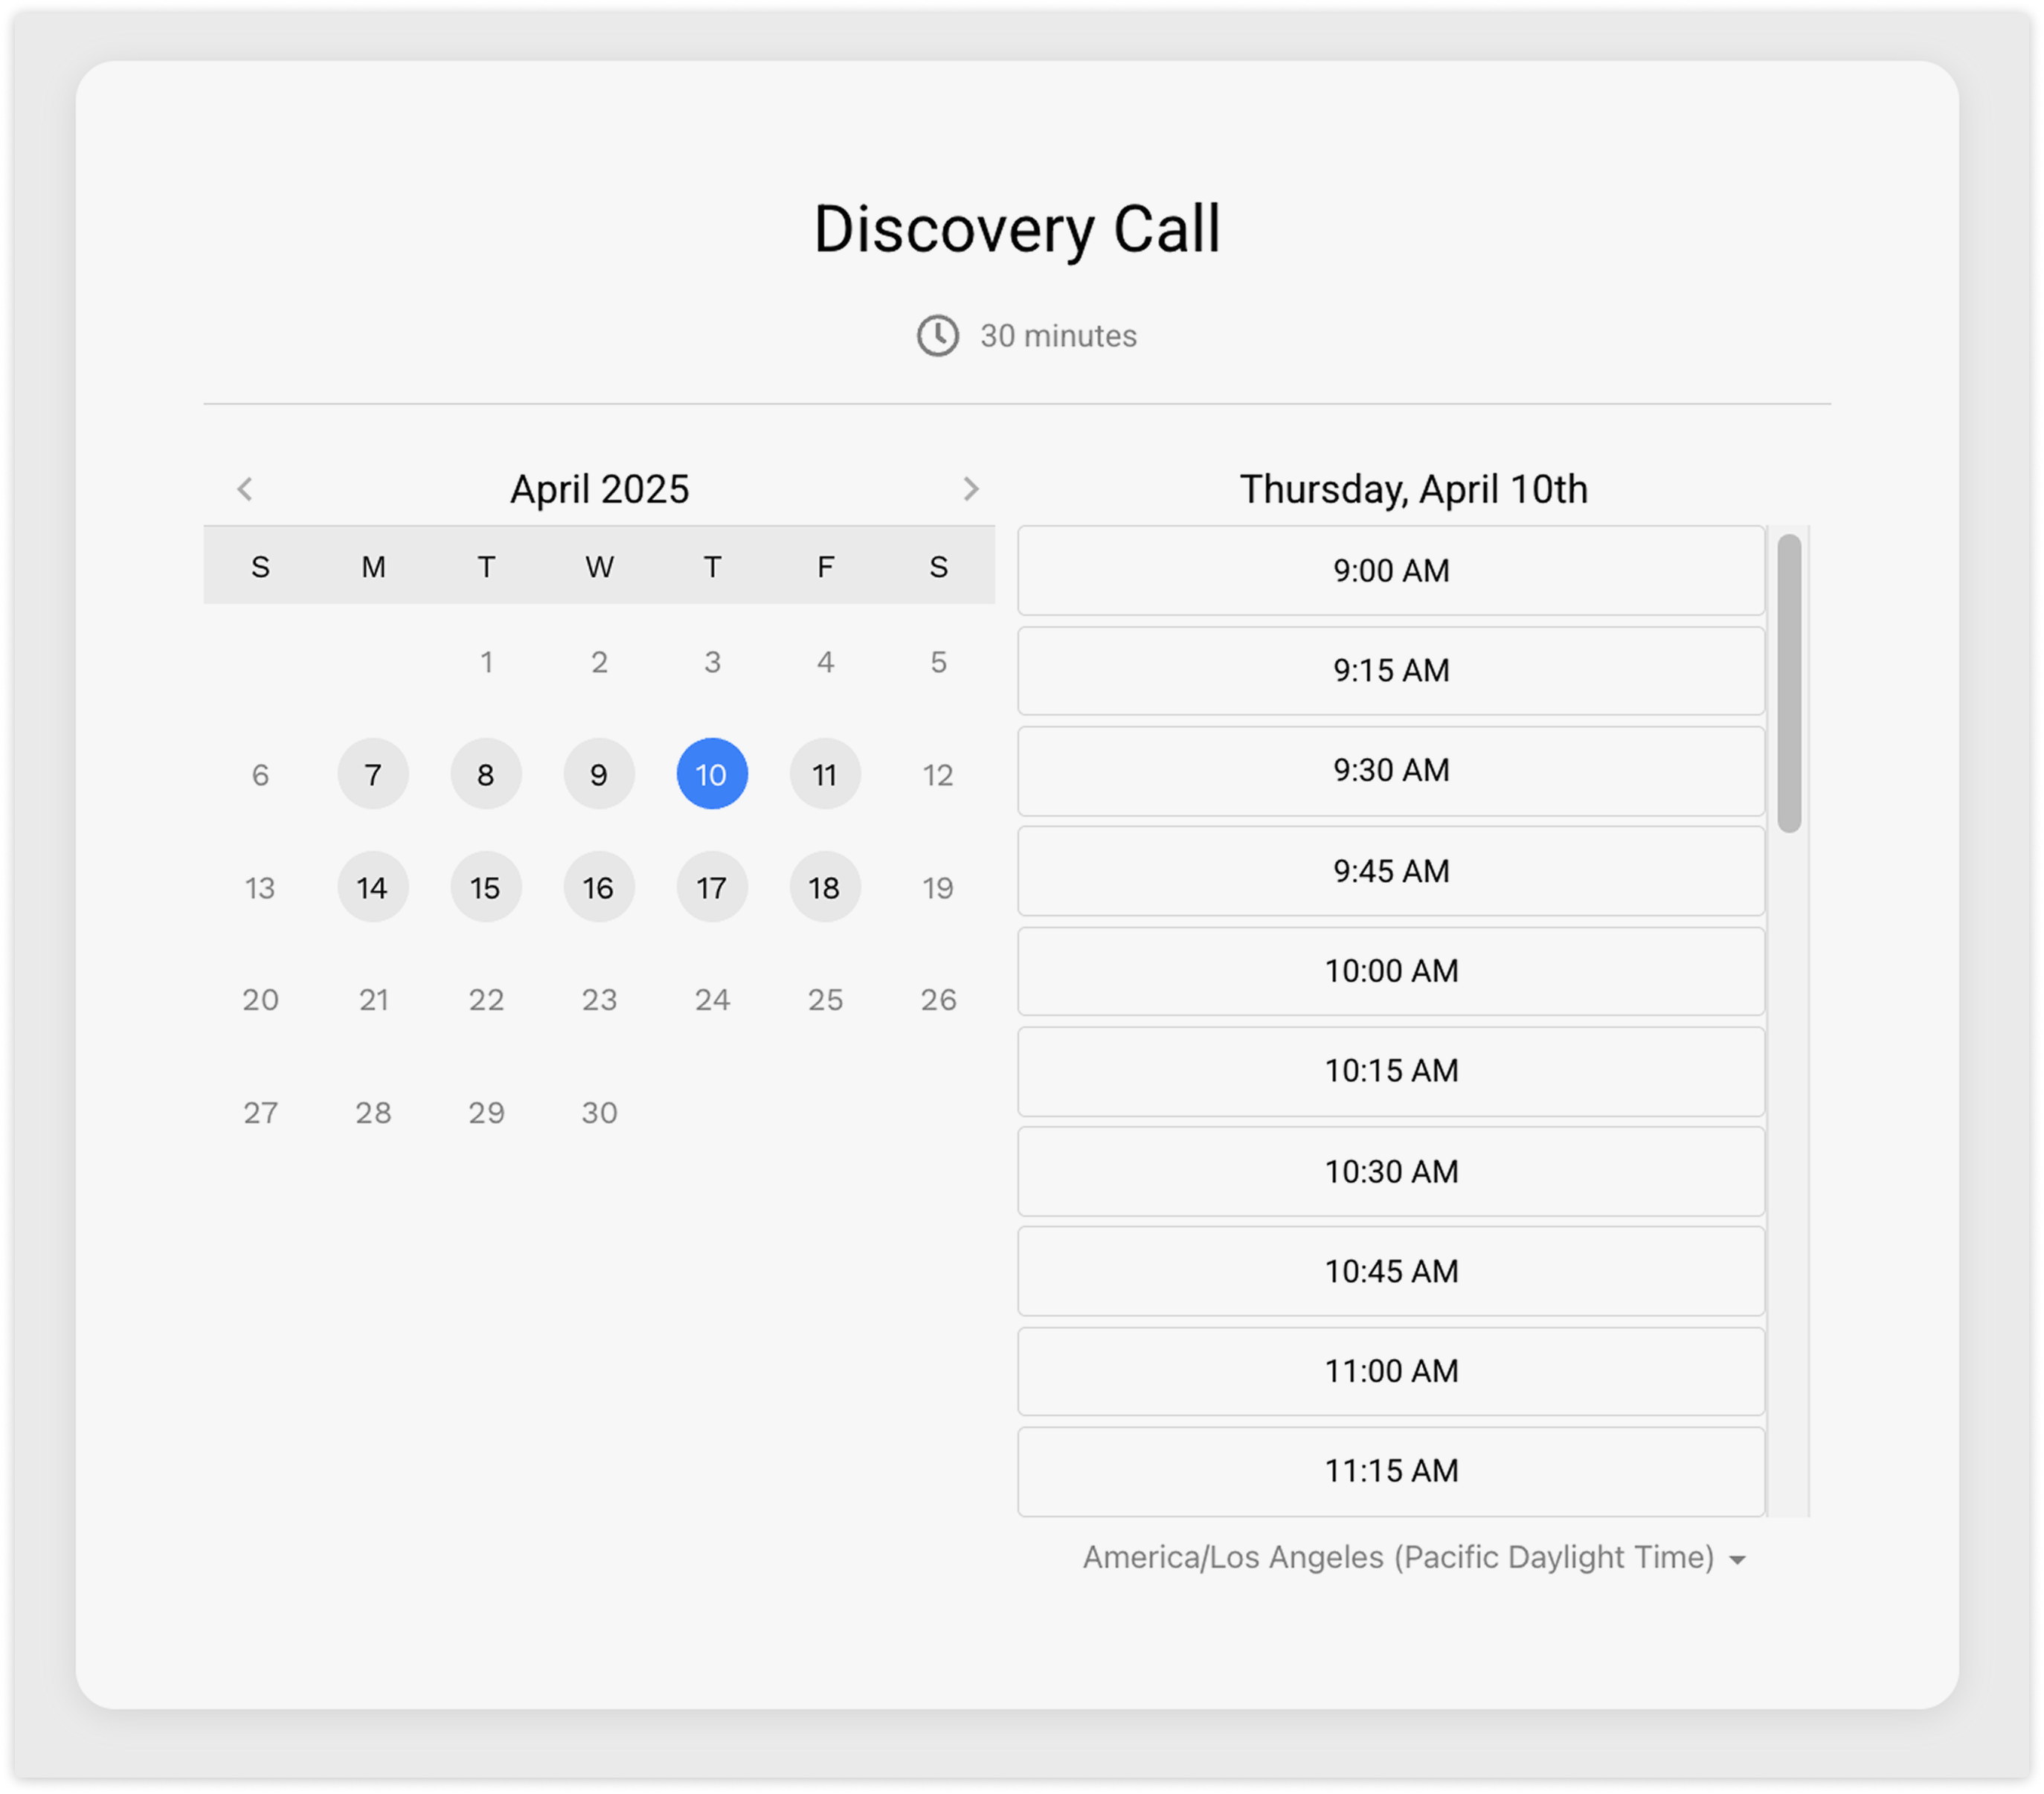
Part of your website is the ability to schedule a call with your team. You'll see this when you click any of the links to book a call while navigating your site.
If you click the Calendar tab on your main navigation, you'll see all the events booked with your team. We suggest you integrate your Google Calendar to add all your company events into your account via the 2-way sync integration.
Your booking page is also connected to an event template that sends a booking confirmation email when someone schedules with you and an appointment reminder a day before the call.
You can change any settings on your booking page or event template anytime.
Learn more about Ontraport Calendar and self scheduling here.
Steps to customize
Back to top
Ontraport's page builder is a drag-and-drop block-based builder, so customizing your page's layout and design elements requires no custom code. There is no limit to how you can customize the prebuilt assets in your account.
Here's how we recommend customizing your website:
- Add brand colors and fonts.
- The first step to customize your pages is adding your own branding to your fonts and colors.
- Learn more about the page builder in this Ontraport University lesson.
- Add your content.
- Each page has default text that you can replace with your content to tell visitors about your brand, services and products.
- The default text suggests the type of content to add. However, you are free to customize your content without any limitations.
- Create new pages.
- Build out your website by adding business-specific pages to it. You can copy your existing pages to create a new page with your brand's fonts and colors.
- We also offer a wide variety of prebuilt pages and blocks that you can use to build and customize pages quickly.
- You can easily add new pages to the navigation added to your site by default.
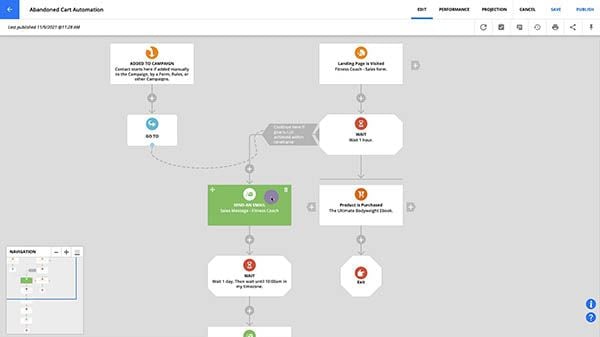
Automated actions
Your account also has some automation maps to perform specific actions when your contact does something. Below, you’ll see the actions visitors can take on your website and what happens when it happens. The link at the bottom of each section opens in your account, making it easy to find the correct asset.
If a website visitor fills out your contact us form…
- Then the visitor’s message is saved in the Notes section of the contact’s record.
- The visitor receives a confirmation email.
- The contact’s owner receives a notification.
- The contact’s card gets moved to the “Contact us” column.
The Contact us automation map performs these actions.
If a website visitor books a call with you…
- Then the visitor receives a confirmation email.
- The contact’s card gets moved to the “Prospect” column.
- One day before the event the visitor and host receive a reminder email.
The Discovery call event template performs these actions.
A new contact is added to your account…
- Then the account monitors their activity and updates a color field that shows you how active the contact is. This field makes it easy to spot hot leads in your pipeline.
The Time since last activity automation map performs this action.
A contact purchases from you…
- The date of the first purchase is saved in the contact’s record.
- The contact is moved to the “Active Client” column.
- If your client stops being active for over a week, they’ll be moved to the “Cold Client” column.
The Update first purchase date and Update sale stage automation maps perform these actions.
Example data
Back to top
Your account also comes with some sample records and data to help you see how information is stored in your account.
Example contact records
The example contacts were added to illustrate the contact pipeline created with the Card View. However, the example contact records are also a helpful way to get used to seeing where data is saved in records.
There are two ways to view your contact list:
Card View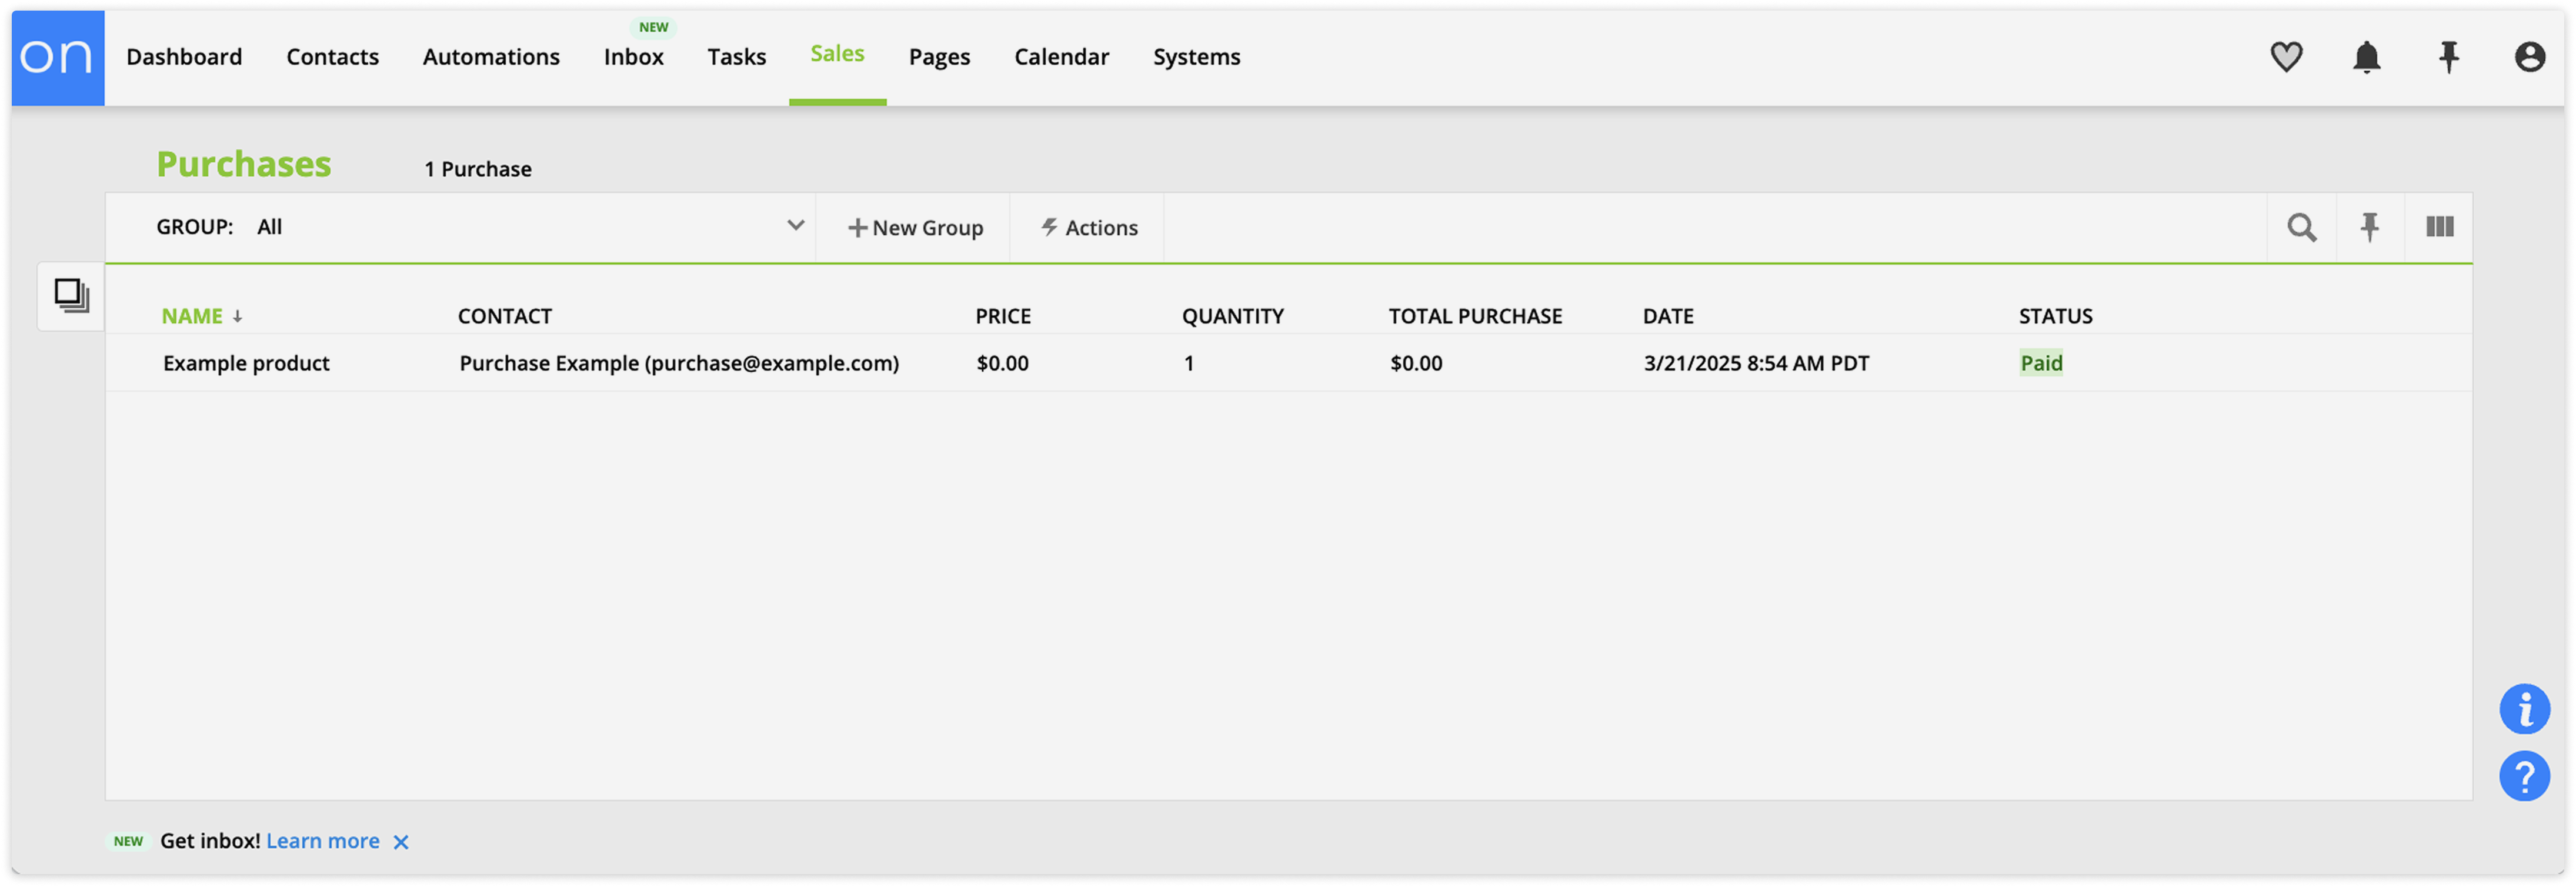
Your account comes with a Card View that makes it easy to see the stages of all your contacts within your sales pipeline. This pipeline makes it easy to see the stages of each of your contacts, and the automation maps described above keep it up to date.
Plus, you can drag the cards in your pipeline to update fields in your contact’s record. For example, if you drag the contact to the “prospect” column, the sales stage field in their record will equal “prospect.”
Learn more about Card View here.
List View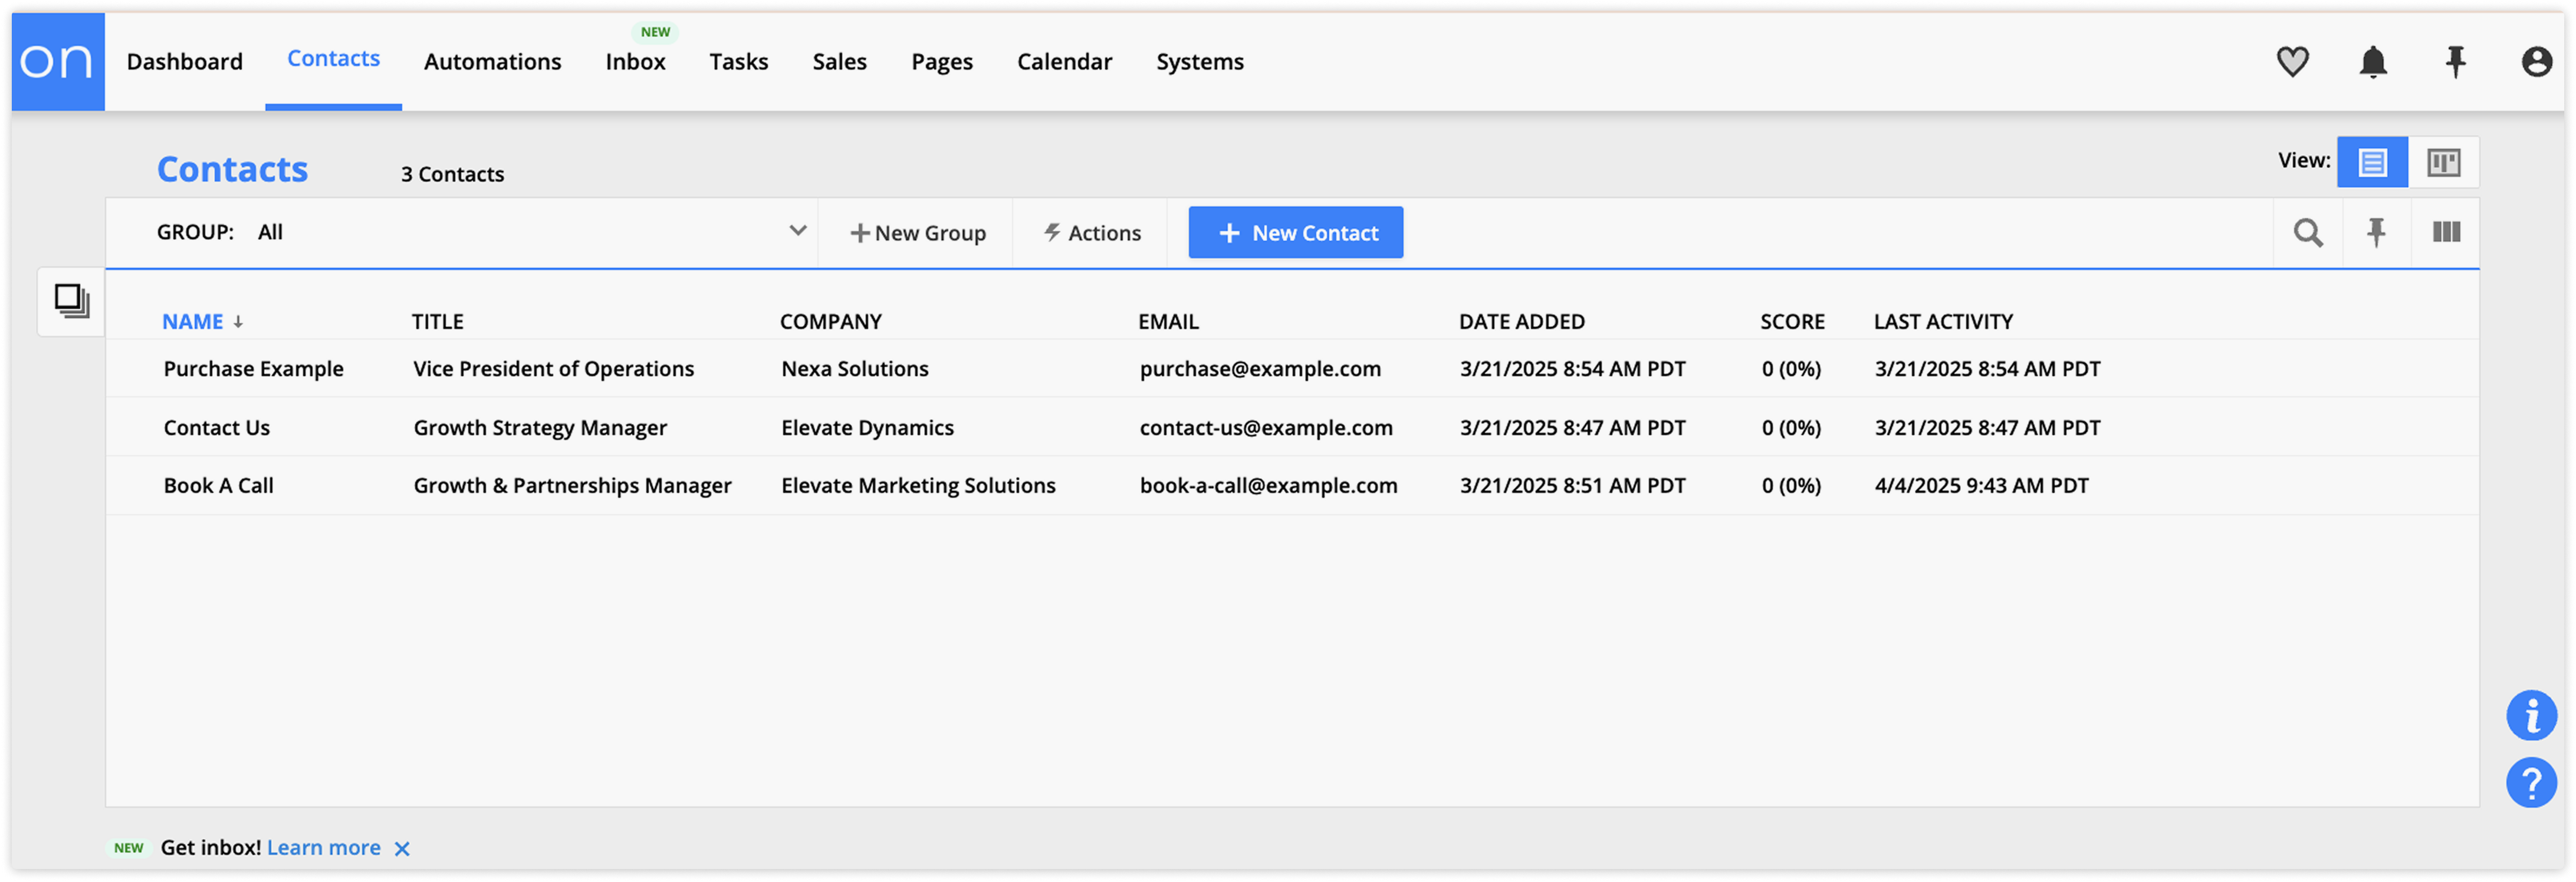
List view is like the standard table view. You’ll see all of your contacts in a list, and you get to choose the columns you’d like to view. By default, we show basic information like name, title, company, email, etc.
Learn more about List View here.
Purchase data and order form (Plus-level accounts and above)
Your account has a few assets and example data that help you understand and test purchase automation.
First, your account has an example order form and corresponding thank you page. This order form is set up with an example product, and it’s connected to a dummy gateway - an excellent tool for testing purchase automation.
If you go to the Sales tab in your record, you can see how your account stores purchase data. When your customers start purchasing from you, you’ll see each item as a line in the Purchases collection.
There are other great sales reports available in your account as well. Learn more about sales reports here.
Dummy gateway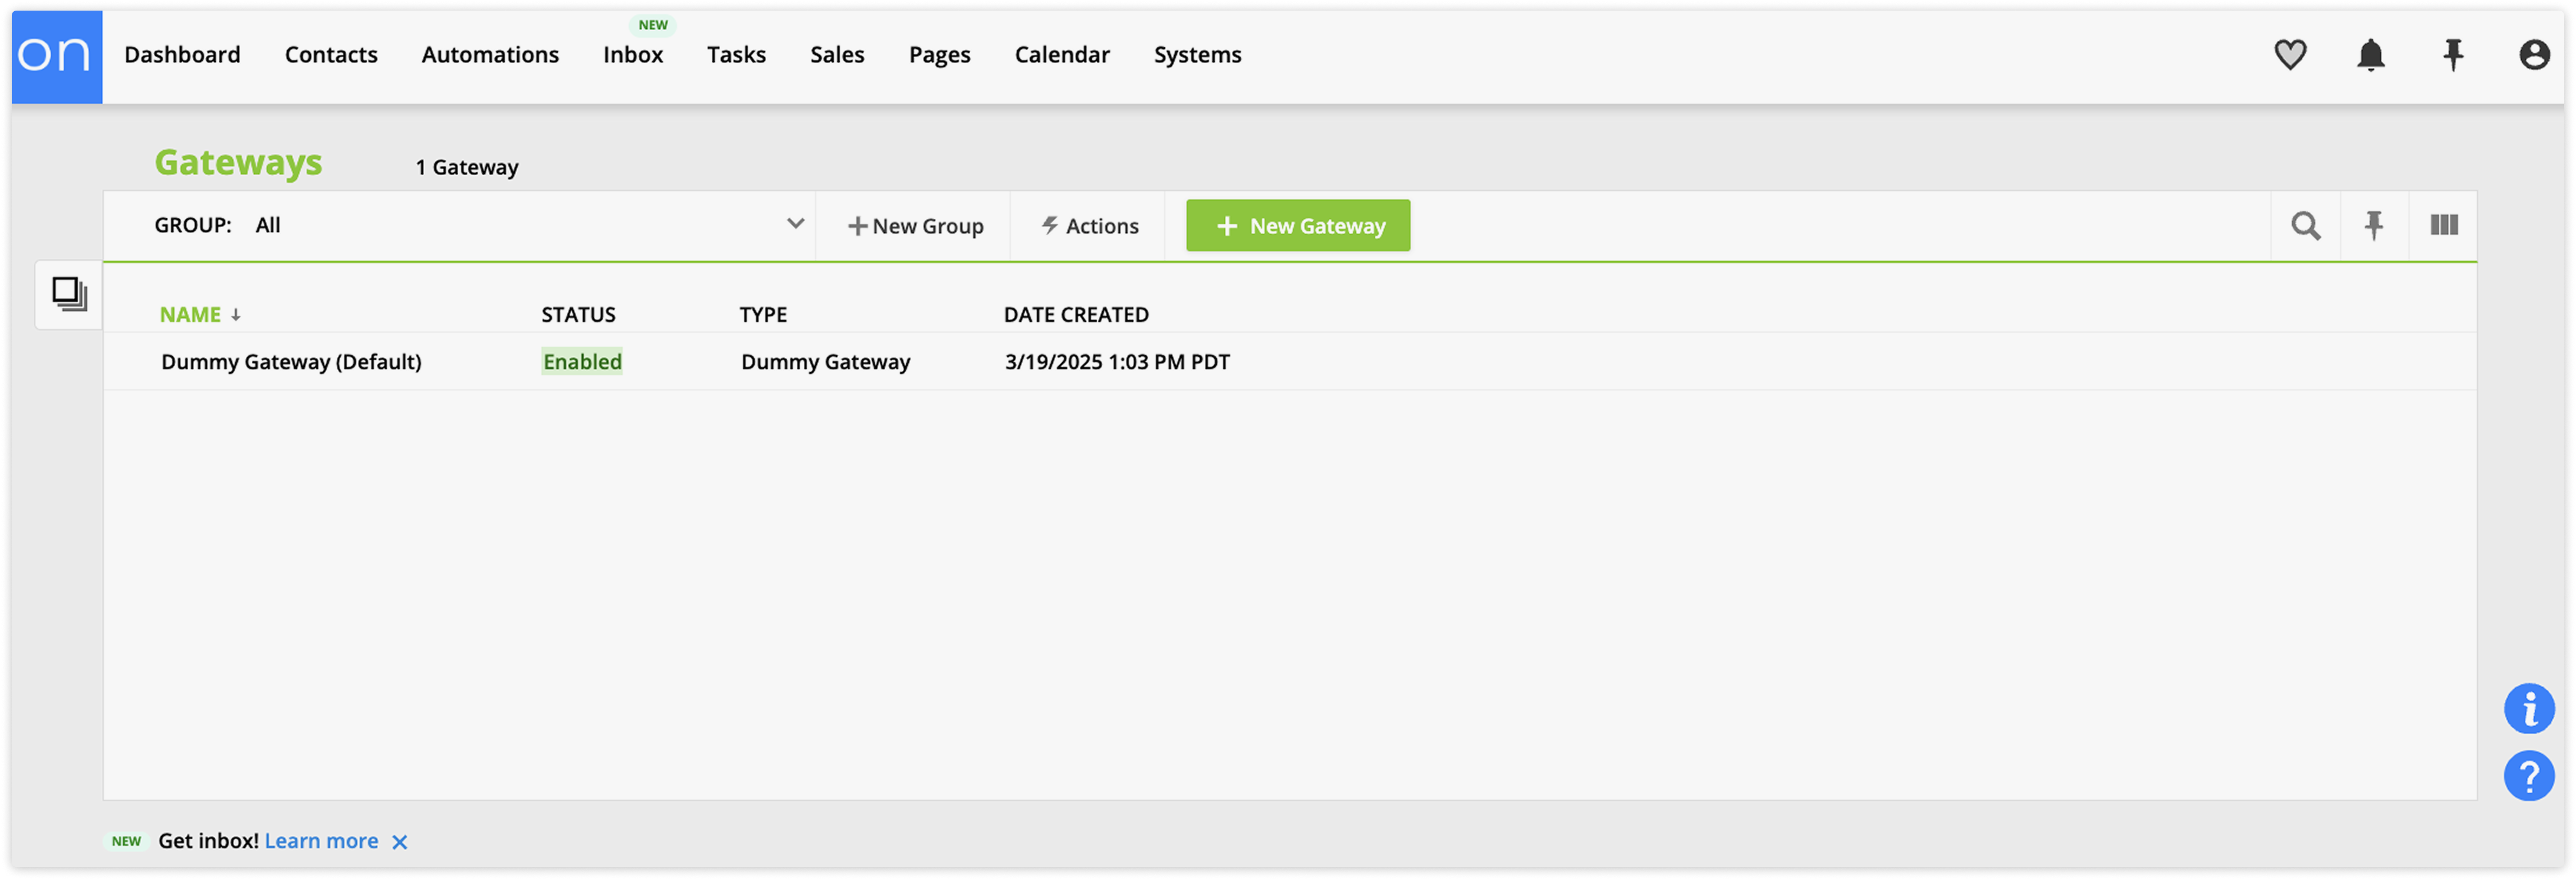
Your account comes with a dummy gateway. This gateway is an excellent tool for testing your order forms and automating your process after someone purchases.
When you test an order form that uses a dummy gateway, you can test your dummy gateway for both successful and failed payments using the following credit card numbers:
- For successful payments: 4111-1111-1111-1111 and any CVV and future expiration date you choose.
- For failed payments: 4111-1111-1111-1103.
Learn more about testing order forms here.