Goals in your automation are more than just business milestones you want your contacts to achieve, such as making a purchase or logging in to your membership site. Functionally, goals act as intelligent gateways. They allow specific segments of your audience to instantly access particular sections of your automation, the exact moment they perform an action or their data is updated.
For example, while a user sees "purchasing a product" as a business milestone, Ontraport sees a Product is Purchased goal as a functional gate. It ensures that the fulfillment or delivery steps of a digital product are strictly locked away, opening immediately and exclusively for the contacts who have completed that specific transaction.
Table of contents
Using goals in your automations
• Customer Relationship Management (CRM)
• External Events
• Sales
• Sites / Pages
Goal conditions
• Customer Relationship Management (CRM)
• Messages
• Sales
• Sites / Pages
Goal settings
• Wait settings
Using goals in your automations
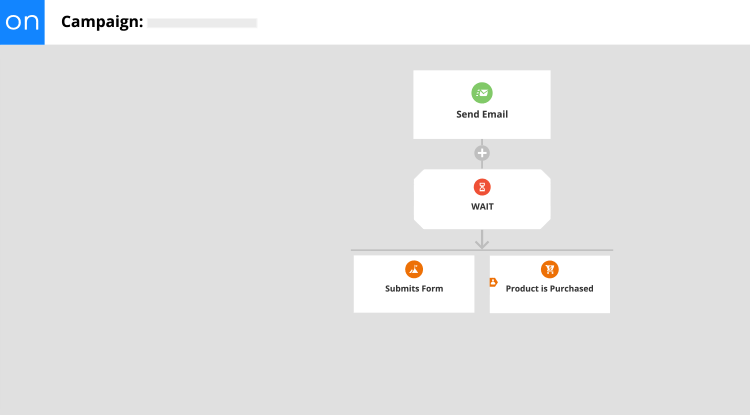
Goals can appear anywhere below a trigger on an automation map. You can add a goal by clicking the “What Happens Next?” element below any existing element or trigger, then selecting “Goal” from the filters tab. Once the goal element is on the automation map, click into it, click Add Goal and determine what you want the goal to be.
You have many options, broken into four categories:
You’ll notice that the list of goals is very similar to the list of triggers. You’ll use triggers when you want to start a completely new automation and add contacts to that automation based on qualifying actions. Goals allow you to create new automation paths based on the same qualifying actions but can be within a large automation, allowing you to easily track your efforts all in one map when in Performance Mode.
Customer Relationship Management (CRM)
Back to top
CRM goals allow your automation to react instantly to data changes, internal team actions, and timeline milestones within your account. These goals actively monitor your database. The moment a contact’s record is updated, a team member logs an activity, or a specific calendar date arrives, the goal pulls the qualifying contacts directly to this point in your automation.
A field is updated
Moves a contact here when a specific field updates.
- Add a condition to specify the value of the field.
Contact is Paused on Automation
Brings a contact to this goal when they are paused on another automation.
Contact is Unpaused on Automation
Pulls a contact in when they are unpaused in another automation.
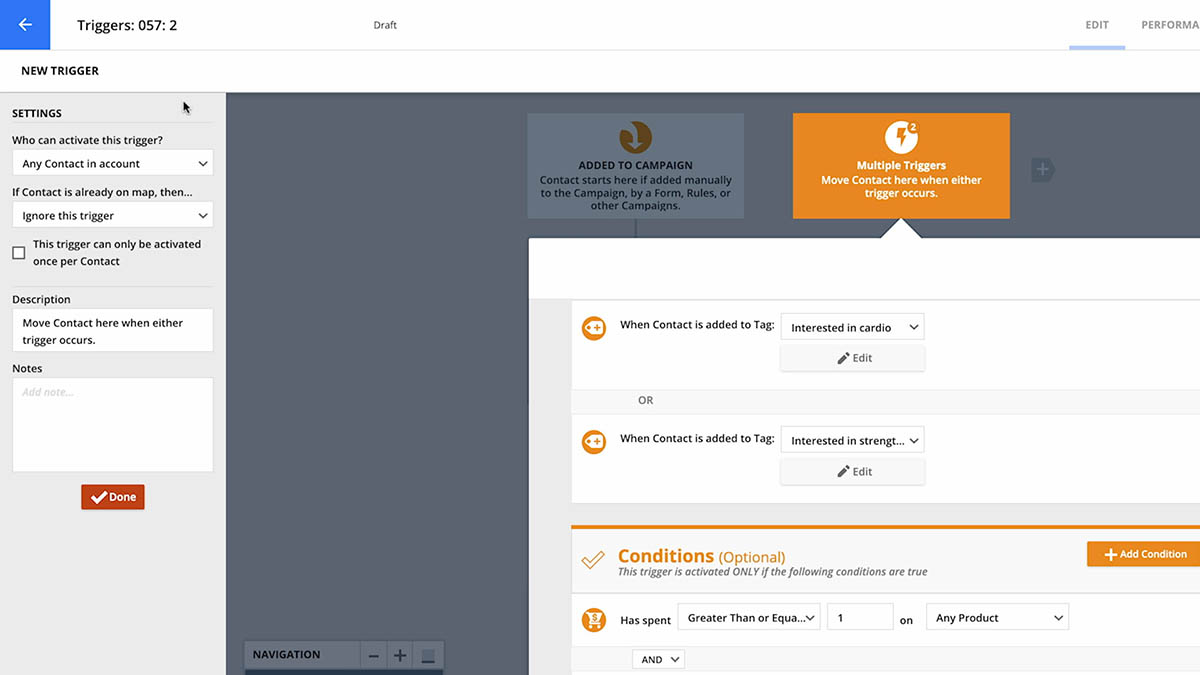
When Contact is added to Tag
Moves a contact here when a tag is added to their record.
When Contact is removed from Tag
Brings a contact to this step when a tag is removed from their record.
When Contact is added to Fulfillment List
Pulls a contact in when they join a fulfillment list via a shipping-enabled order form or the "Send to fulfillment list" action.
When Contact is removed from Fulfillment List
Moves a record here when a contact leaves a fulfillment list via auto-unsubscribe settings or the "Remove from fulfillment list" action.
Today matches Contact's date field
Brings contacts to this goal when the current date matches a field in their record, such as a birthday or card expiration.
- Select date or date and time fields in the trigger settings.
Today is relative to Contact's date field
Brings contacts to an automation path a set number of days before or after a date in their record; useful for following up after a subscription expires.
- Select date or date and time fields in the trigger settings.
Today is specific date
Moves contacts on the map on a chosen calendar day, such as the final day of a promotion.
- Select a date in the trigger settings.
Contact is added/removed from Automation
Pulls a contact in when they start or end a different automated journey.
Task is completed
Advances the contact the moment a team member logs a completed manual task, such as an automated email following a sales call.
- When tasks include outcomes, you can select specific outcomes from the trigger.
Contact submits a Form
Moves contacts when they fill out a specific form. For order forms, you can trigger specific paths based on whether the transaction succeeds or fails.
Call is logged
Brings contacts here when a user records a call in the contact's record. Use this to automate next steps like sending proposals or updating pipeline stages.
A relationship is added or removed
Pulls the contact in when you add or remove a many-to-many relationship with their record.
External Events
Back to top
External Events goals allow your automation to react instantly to direct communication and engagement from your contacts. These goals listen for real-time interactions happening outside of your account dashboard, such as a contact clicking a link in a message or sending an inbound email or text. The moment a contact reaches out or interacts with your content, the goal pulls them straight to this section of your automation so you can follow up automatically.
Clicks an Email link
Brings a contact here based on link clicks.
- Select link “0” to move contacts when they click any link in the email, or add a specific link number. Email links are numbered from left to right top to bottom.
Sends you an Email
Pulls contacts in when they send you an email.
- This trigger requires Email Sync setup.
SMS Received from Contact
Moves a contact when they send you a text.
- Use the condition “SMS contains text” to automate specific replies based on keywords.
Sales
Back to top
Sales goals allow your automation to react instantly to commercial milestones, transactional updates, and buying behavior. These goals monitor your sales, transactions, and page traffic. They listen for critical financial events, such as a completed purchase, a subscription update, a refund, or a missed checkout step. The moment a contact buys a product, manages a payment plan, or interacts with a sales asset, the goal pulls them to this exact point on your map, routing them into the appropriate delivery, billing, or recovery path.
Purchases product
Moves a contact here when they purchase the specified product, regardless of the purchase method (e.g., order form, manual entry, rule, or API). It also brings in customers on payment plans with the "add here" or "move here when triggered" setting.
- Won't pull them in multiple times if a contact buys more than one of the same product in a single transaction.
Gets a refund on a product
Brings a contact to this step when they receive a refund for a product they have previously purchased.
Abandons External Checkout for Product (PayPal, Stripe 3DS, Stripe Payment element)
Pulls a contact in when they initiate a purchase that requires external payment confirmation, such as Stripe 3DS or PayPal, but do not complete the external approval step and the incomplete purchase is automatically removed by the system.
- This goal works with the PayPal Standard element, and not the legacy element.
Visits a Page
Moves a contact here when they visit a page. You do not need to set up any tracking to use this step because visits to Ontraport pages are automatically tracked.
Visits a PURL
A PURL will show your contact’s name in the URL to personalize the experience. You can add a PURL to any of your Ontraport pages by using the correct merge field from the PURLs section. This step pulls contacts in when they visit a personalized URL.
Open order is created
Brings contacts to this goal when they purchase a subscription or a product with a payment plan.
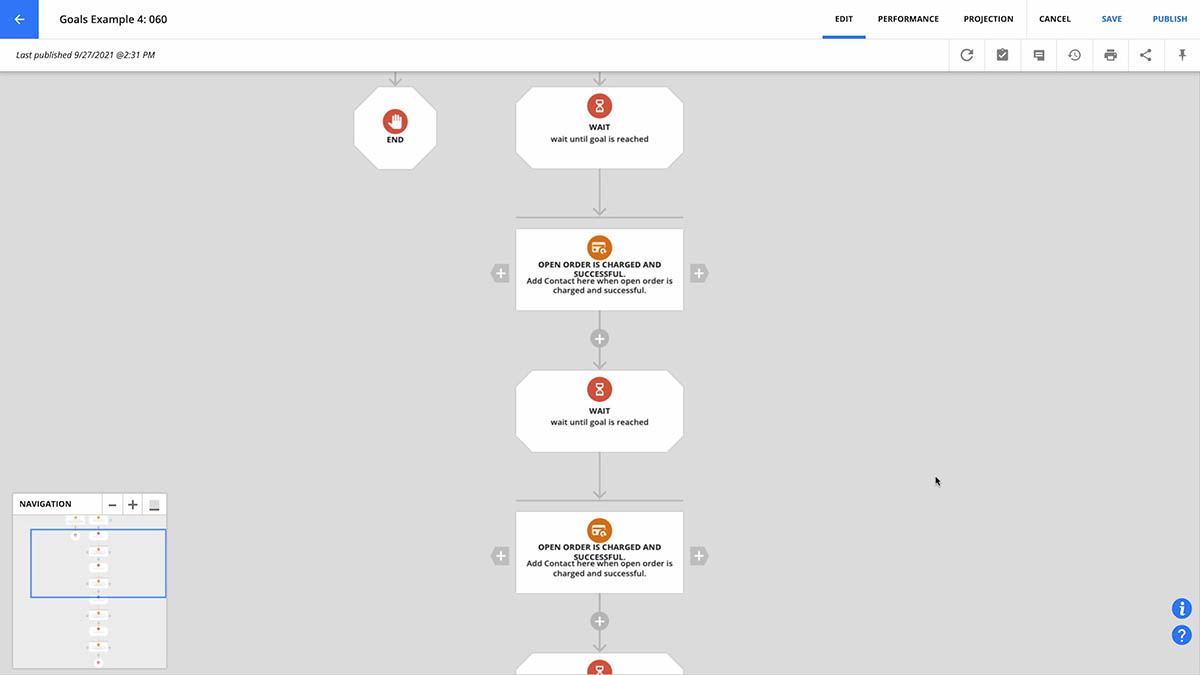
Open order is charged or updated
Pulls a contact in when a subscription or payment plan is updated, such as being completed or canceled. You can also move contacts based on successful or failed payments. When you select this option you’ll see a second dropdown that allows you to customize it:
- Charged and successful: Only moves contacts for subsequent payments after the initial transaction.
- Charged but declined: Brings a contact here when an attempt to charge an open order is made, but the payment is declined. Typically this is due to inaccurate credit card information or insufficient funds.
- Canceled: Pulls a contact in when an open order is canceled by a contact (such as canceling a membership or subscription) or manually by a user in the app.
- Completed: Moves a contact here when an open order transaction is successfully processed and marked as completed, such as a finalized payment plan.
Credit card is charged or declined
Brings a contact to this step when there is an attempt to charge a credit card.
- From the settings you can choose if you want to move contacts when the charge is successful (Charged) or fails (Declined).
Sites / Pages
Back to top
Sites / Pages goals allow your automation to react instantly to how contacts interact with your web properties and membership portals. These goals monitor traffic and access changes across your landing pages, third-party tracked sites, and connected membership platforms like Ontraport Membership or WordPress via PilotPress. The moment a contact clicks a specific link, visits an external URL, or has their portal access permissions updated, the goal pulls them to this point in your map to dynamically adjust their experience.
Contact visits URL
Pulls a contact in when a third-party page is visited.
- To enable tracking on a third-party site use the Ontraport tracking code.
Clicks tracked link
Moves a contact here when they click a tracked link.
Ontraport membership access is updated
Brings a contact to this goal when their Ontraport membership status field’s value changes.
Membership is created by open registration
Pulls a contact in when they are given access to an Ontraport membership site via open registration. For security purposes we recommend that you enable open registration with the status, suspended and use this step to move contacts to an update that changes the membership status to enabled.
Is given access to WordPress Membership Level
Moves a contact here when a WordPress member is given a specific PilotPress membership level.
Loses access to WordPress Membership Level
Brings a contact to this step when a WordPress member has a specific PilotPress membership level removed from their record.
Goal conditions
Back to top
Every goal in Ontraport allows you to add conditions to further refine how your automation reacts. While a goal specifies the action that moves a contact forward, conditions act as filters that limit who is allowed to achieve that goal based on their specific data or history.
By adding conditions, you ensure that contacts only progress past a goal if they meet your exact criteria, such as holding a specific tag, purchasing within a precise timeframe, or maintaining a certain account status.
Customer Relationship Management (CRM)
Back to top
Was subscribed to Automation before or after a certain date
Filters the goal to apply only to contacts who were subscribed to a specific automation map before or after a specific date.
Has been on an Automation for a certain amount of time
Restricts the goal's actions to contacts who have been on a specific automation map for a certain amount of time.
Contact is paused or active on Automation
Targets only contacts who are currently either paused or active on a specific automation map.
Field is this value
Isolates the goal's path to contacts who have a specific value stored in a field.
- This condition is commonly used with the “Field is updated” trigger to target specific value updates.
Now is before, during, or after a day, date, or time
Filters who moves forward based entirely on the current time.
Contact has Tag
Restricts the goal to contacts who hold a specific tag.
Contact doesn't have Tag
Targets the goal only to contacts who do not have a specific tag.
If Contact is subscribed to Fulfillment List
Isolates the goal to contacts who are currently subscribed to a specific fulfillment list.
If Contact is not subscribed to Fulfillment List
Filters the goal for contacts who are not subscribed to a specific fulfillment list. For example, this condition can help catch contacts who haven’t yet received a deliverable or onboarding item.
Relationship does or does not exist
Restricts the goal to contacts who do or do not have a specific record connected through a many-to-many relationship.
Messages
Back to top
The goal conditions available from the Messages section are all based on engagement metrics and the specific content of your outgoing or incoming communications. These conditions allow you to segment your automation by analyzing how often a contact interacts with your emails or by parsing the specific text and data found within their SMS replies.
Has opened an Email a certain number of times
Filters the goal to apply only to contacts who have opened a specific email a certain number of times.
Has clicked an Email link a certain number of times
Restricts the goal's focus to contacts who have clicked on a specific email’s link a certain number of times.
SMS contains an Email address
Targets only contacts whose last inbound SMS message contains an email address.
- This condition is most commonly used with the “SMS Received from contact” goal.
SMS does not contain an Email address
Isolates the goal to contacts whose last inbound SMS message does not contain an email address.
- This condition is most commonly used with the “SMS Received from contact” goal.
SMS Contains Text
Filters the path to include only contacts whose last inbound SMS message contains specific text.
- This condition is most commonly used with the “SMS Received from contact” goal.
SMS Does Not Contain Text
Restricts the goal to contacts whose last inbound SMS message does not contain specific text.
- This condition is most commonly used with the “SMS Received from contact” goal.
Sales
Back to top
The goal conditions available from the Sales section are all based on purchase history, spending thresholds, and subscription longevity. These conditions allow you to gate your automation by evaluating a contact’s financial commitment, ensuring you can differentiate between one-time buyers and long-term subscribers to deliver targeted loyalty rewards or upsell opportunities.
Has spent a certain amount on a product
Filters goals based on the total monetary value that a contact has spent on a specific product.
Has ordered a certain amount of a product
Targets goals based on how many times a contact has purchased a specific product, counting multiple one-off purchases as well as subscriptions.
Is subscribed to product
Isolates goals based on whether or not the contact holds an active subscription for a specific product.
Has been subscribed to a product for a certain amount of time
Restricts goals based purely on how long a contact has been subscribed to a product.
Sites / Pages
Back to top
The goal conditions available from the Sites / Pages section are all based on website engagement frequency and specific membership access levels. These conditions allow you to refine your automation by tracking how often a contact visits your pages or by verifying their current membership status, ensuring you can target your most active users or gate content based on their specific tier.
Has visited a Wordpress site a certain number of times
Filters goals based on whether the contact has visited a specific WordPress site a certain number of times.
Has visited a Page a certain number of times
Targets goals based on how many times a contact has viewed a specific Ontraport page.
Ontraport membership access is set to this status
Isolates the goal based entirely on the status of a contact on your Ontraport Membership site.
Has access to WordPress Membership Level
Restricts the goal based on the contact having a specific WordPress Membership level.
Does not have access to WordPress Membership Level
Filters the goal to include only contacts who do not have a specific WordPress membership level.
Goal settings
Back to top
Changing the settings on your goals allows you to further refine who can achieve the goal.
- Who can achieve this goal? This setting allows you to specify that the goal applies only to:
- Any contact on this map
- Only contacts on previous waits
- Contacts on any upstream element
- Any contact in account
- If contact is already on map, then...
- Move here when achieved: Move contacts to this goal and remove them from wherever else they were on the map. This setting for contacts already on the automation allows you to have them jump immediately to the goal and skip any intermediate steps.
- For example, you may have a goal of "Purchases Product X" and a nurturing automation of 10 email elements above the goal. Contacts who are on the fourth email and purchase "Product X" from your website can jump directly to the goal and won't be sent the remaining six emails encouraging them to buy something they already bought.
- Add here again when achieved: Add the contact again here and also leave wherever else they are on the map.
- Ignore this goal: Leave them where they are and ignore this goal.
- Move here when achieved: Move contacts to this goal and remove them from wherever else they were on the map. This setting for contacts already on the automation allows you to have them jump immediately to the goal and skip any intermediate steps.
- This goal can only be activated once per contact. Select the checkbox to prevent a contact from achieving the goal (and therefore receiving any follow-up automation) more than once. For example, you might send someone a personal coupon to encourage a second purchase but want to send that coupon only once.
Wait settings
Back to top
Every goal comes with customizable wait settings, and the default setting is “Continue immediately when the attached goal is achieved.” You can also edit the settings to account for contacts who don’t achieve your goal (For example, if they don’t purchase a product, open your emails, click on your email links, visit your landing pages, log in to your membership site, etc.). This is often called the “path of least action.”
Here’s how to update your settings for the path of least action:
- Load your campaign map, and click Edit.
- Click the Wait element above your goal.
- Click the “Wait here until” dropdown and select a setting that fits your needs, such as waiting one week, by selecting “Some time passes” and adding “7 days” in the “How much time?” field.
- Click Done.
- Once your settings are saved, you’ll see a new line of automation to the left of your wait.
- Click What happens next? to start building your path of least action.
- Complete your path with an end, exit or go to element.

 .
.