If your business offers subscription products or payment programs, the recurring payments should ideally run smoothly without your intervention, even when the customer’s credit card fails. To make this possible, Ontraport has a discrete built-in system for managing credit card collections and recharges. This makes it easy to manage the frequency and duration of retry attempts when a customer’s card fails.
In addition to automatically recharging transactions, you can manually rerun transactions or retry transactions in collections with another card. Learn more about manually managing transactions in this Support Center article.
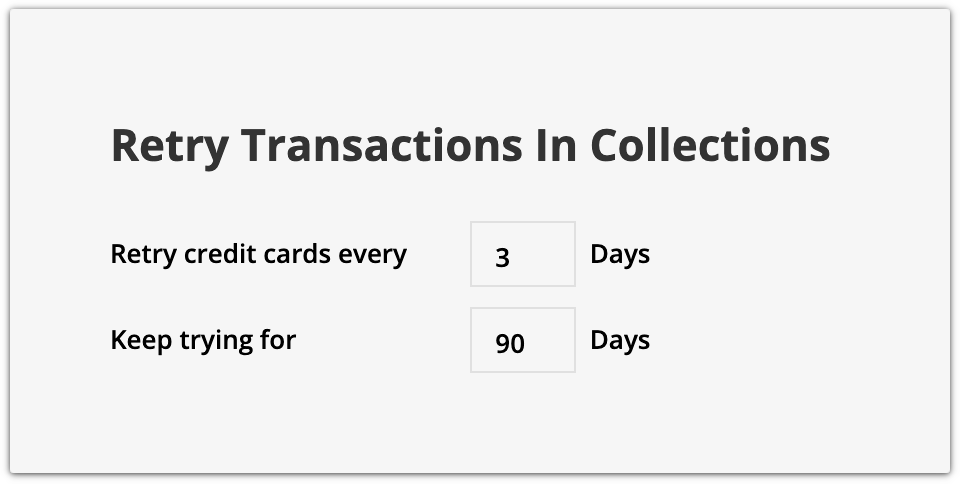
In Ontraport, the default duration for recharge attempts is once every three days for 90 days. This does not require any setup. If you want to adjust those values, read below.
Table of Contents
Customize your retry transaction settings
Create automation within your recharge settings
Use the Recharge Transactions automation element
Create a credit card update form
Create a credit card update membership page
Customize your retry transactions settings
- Go to Sales → Settings → Recharge Settings.
- Specify how often (in days) you’d like Ontraport to attempt recharging a card from a previously failed transaction.
- Specify the duration (in days) of your recharge cycle. At the end of this recharge cycle, Ontraport will automatically change the item's payment status to “write off” in accordance with standard accounting principles. This prevents you from processing the transaction. Establish a reasonable period of time for your customers to pay, such as the default 90 days.
- Click Save.

Note, these settings also determine the total number of times your account will retry your customers’ cards. For example, if you retry your customers’ cards every 3 days for 90 days, you’re allowing 30 retry attempts. If you retry your customers’ cards every 30 days for 30 days, then you will only retry your customers’ cards once. This is important to keep in mind if you also use the Recharge Transactions automation element.
Create automation within your recharge settings
Back to topYou can set up automation to manage your failed payments. For example, you can automatically remove membership access when your customers don't pay. Your build-in recharge settings have four triggers for the most common use cases:
- The first time the transaction fails, run these rules: This allows you to customize what your customers and team members experience immediately after a credit card transaction fails for the first time.
- After the first failure, run these rules every additional time the transaction fails: This allows you to create rules that run for every additional failed transaction beyond the first. With the default setting of retrying every three days, these rules would also run with each retry. An email to these customers should instruct them how to update their credit card details.
- After the last failed attempt, run these rules: This allows you to customize what happens after the last failed attempt to recharge a card. Note that these rules are run after the order is in write off status. Your customers can no longer pay for this order, but you can refer them to a new order form to purchase the item again if desired, or have them contact you to settle the issue manually. A rule in this section can also create a task for you to review the issue and file a court case to recover the amount, etc.
- If the transaction is successful, run these rules: This allows you to create rules that run if a previously failed transaction went through successfully. These rules can notify contact owners, restore their WordPress membership, etc.
For each of the four options above, you can add rules that trigger automation using the following steps:
- Name your rule.
- Click Add.
- Click Add Condition and select the condition you’d like to apply (Optional).
- Click Add Action and select the action you want in response to the condition.
- Click Save.
- After you’ve finished customizing your recharge settings, click Save in the top right.
Use the Recharge Transactions automation element
Back to top
You can also set up recharges on your automation maps. All you need is the Recharge Transactions automation element, which makes it easy to create your own custom recharge automation. When your contacts land on it, your account will retry their transactions.
Note, when your contact hits this element, it will count as one of your allotted retry attempts. This is true even if your contact hits this element before your next scheduled recharge attempt.
Create a credit card update form
Back to topCredit card update forms allow your customers to update their own payment information to stay current and settle any unpaid transactions in collections. These are simply order forms that “sell” a $0 product to validate the new card.
Here’s how to set one up:
Create a new landing page, and add an order form block to it.
Create a $0 product, and add it to your order form.
Click Form settings and scroll to the “Advanced” section.
Click the checkbox next to “If charge is successful, then use this card for all transactions in collections.”
You can also optionally click the checkbox for “If charge is successful, also update all open orders with this card.”
Click Save.
Save and publish your page.
Note, some cards do not allow validation with a $0 amount, so we issue a temporary $1 authorization for validation and then remove the charge. We recommend informing your clients about this on your credit card update page.
Create a credit card update membership page
Back to topYou can also allow your customers to update their credit cards from a credit card update page on a membership site. This option gives your customers the choice to update, edit, or delete their payment information and the option to select a default card.
/pages-customer_center_updated_cc_example.png)
Creating a membership site for a credit card update page is like creating any other Ontraport Membership Site, but simpler. The only content you’ll need to create is your credit card update page. Here’s how:
Follow these steps to create an Ontraport Membership site with these slight changes to the steps.
In “Step 2: Build your membership site pages,” you’re asked to build six types of pages. However, you’re not selling access to this site, so you only need to build a Credit Card Update Page.
In “Step 4: Grant members access to your site,” your automation begins with a trigger that adds contacts when they purchase your membership product. To give all of your customers access to their credit card update page, set your trigger to add contacts when they purchase any of your products.
