If your business hosts multiple events and webinars throughout the year, you can use Virtual Events to organize and automate your sign-up process and send event details and reminders to your registrants. Virtual Events is a prebuilt object you can toggle on from your account’s apps page.
Use the Ontraport Calendar for simple self-scheduling of one-on-one meetings, such as sales calls, demos or coaching sessions. Use the Advanced Calendar for unique configuration needs, such as sales teams or service providers. It enables you to create custom management systems for your stages and automate actions as your clients progress through them.
Virtual Events has three many-to-many relationships set up within your Contacts object: Registrants, Attendees and No-shows. Those relationships automatically update the lists in your records so you can see at a glance who signed up and who did and didn’t show up.
Add a dynamic content package to your account to use this feature. Here’s how:
- Click here to go to your account details page.
- Click Add plan or Start trial next to “Add Dynamic CMS to your account” and choose the plan that fits your needs.
How the Virtual Events object works in your Ontraport account
There are two ways to get started with Virtual Events.
- Using a Setup Wizard: This is the easiest option, and it will lead you through customizing your sign-up form, emails and automation.
- Manually: This an advanced option which requires you to set up your own automation to manage your virtual events using the prebuilt Virtual Events object.
Before we cover how to set up either of those options, let’s take a look at how the Virtual Events feature stores your data.
Once Virtual Events has been enabled in your account, click Virtual Events from your top navigation bar, then click on the record you want to look at.
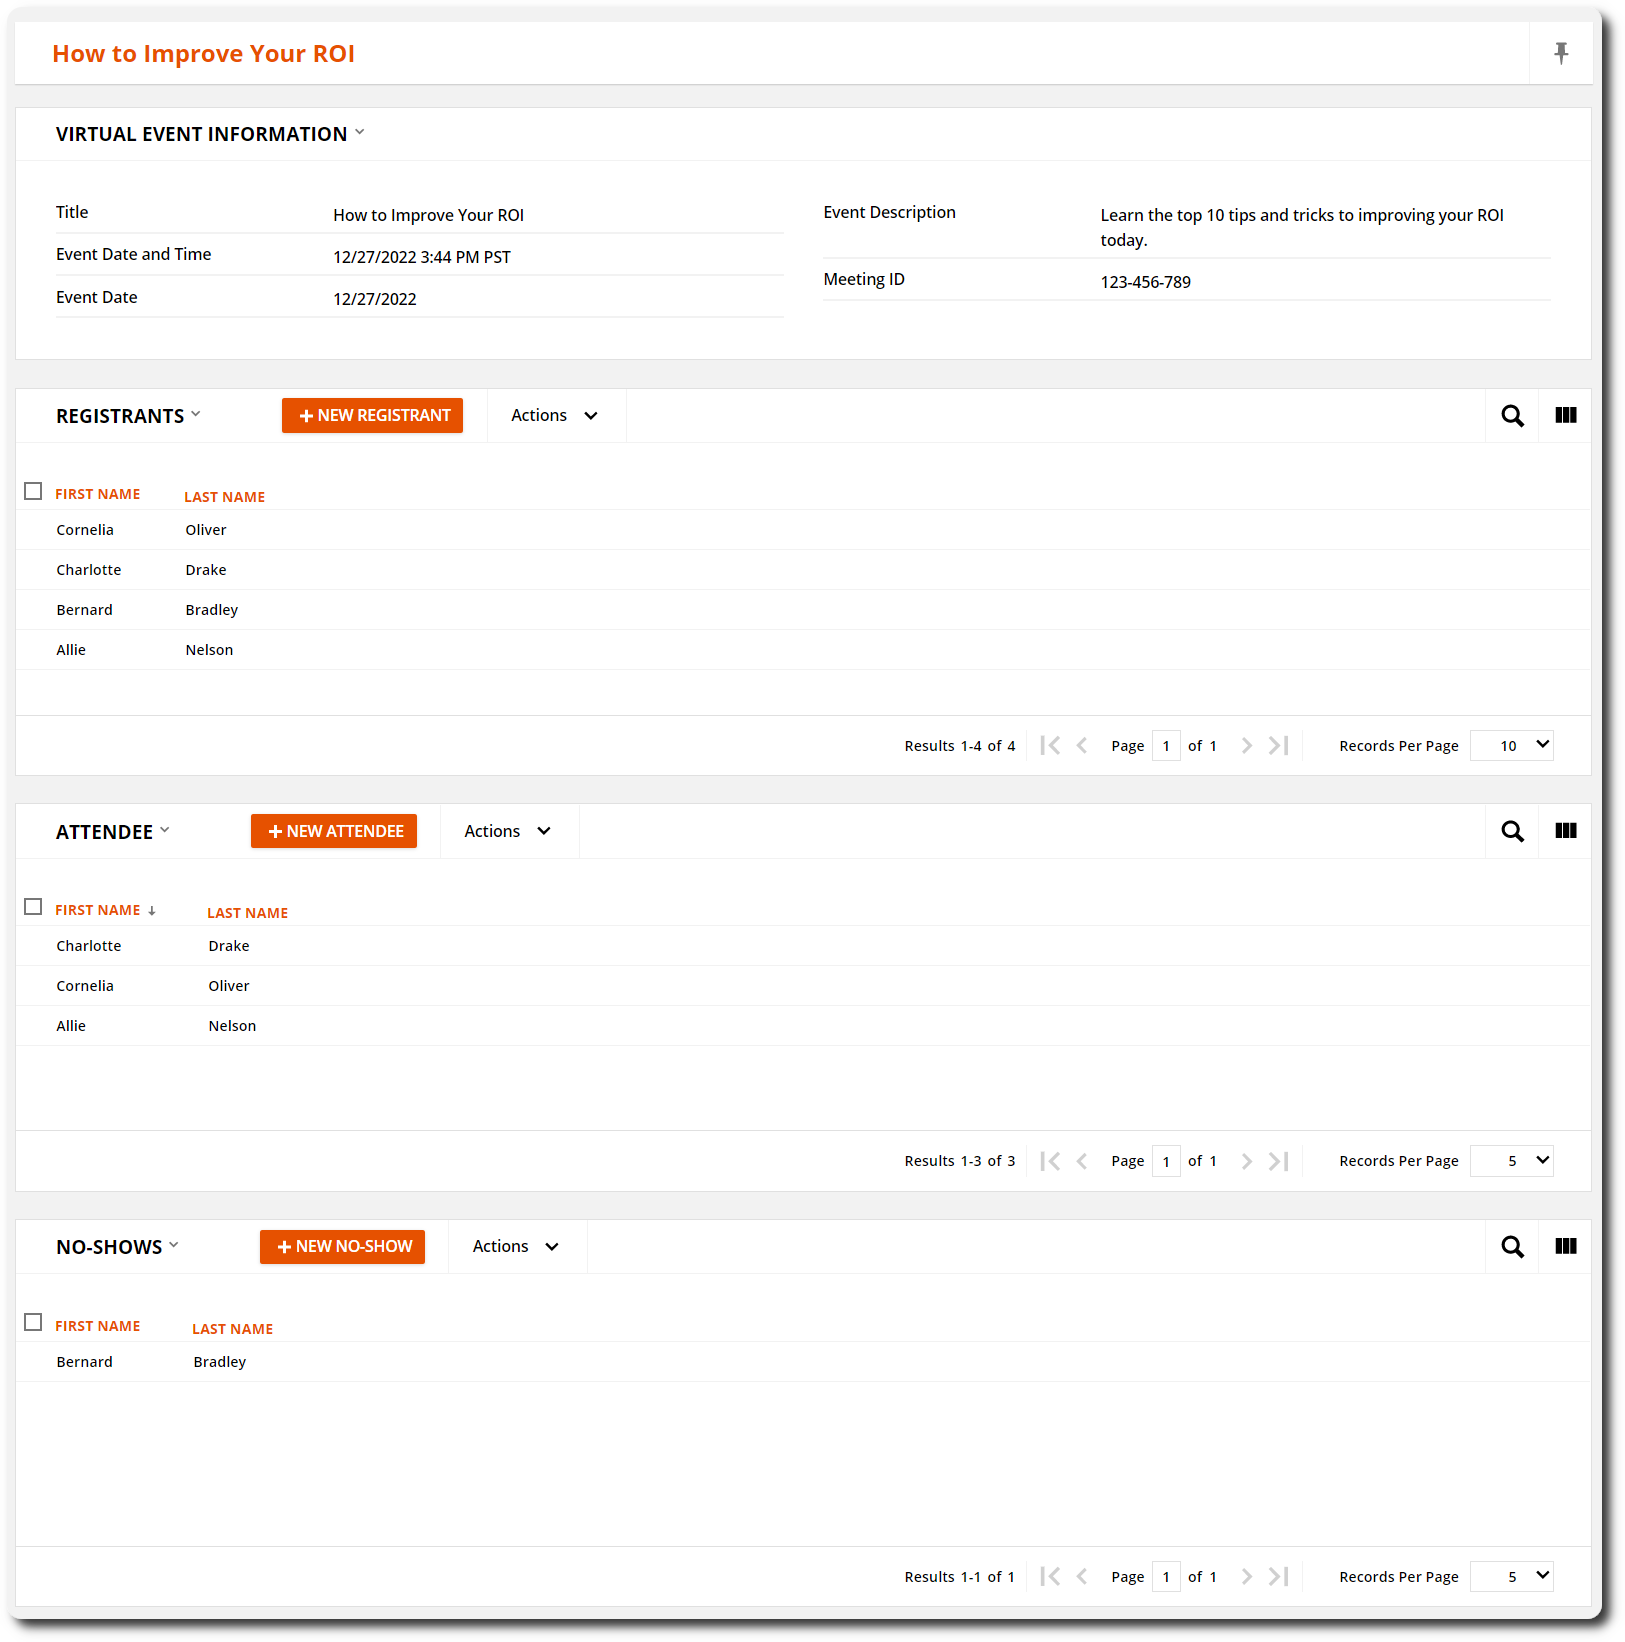
Your Virtual Event records are separated into four main sections that allow you keep track of your event’s attendance:
- Virtual Events Information is where you store your event’s details.
- Registrants shows you contacts who sign up for your event.
- Attendees shows you contacts who attend your event
- No-shows shows you contacts who registered but didn’t attend your event.
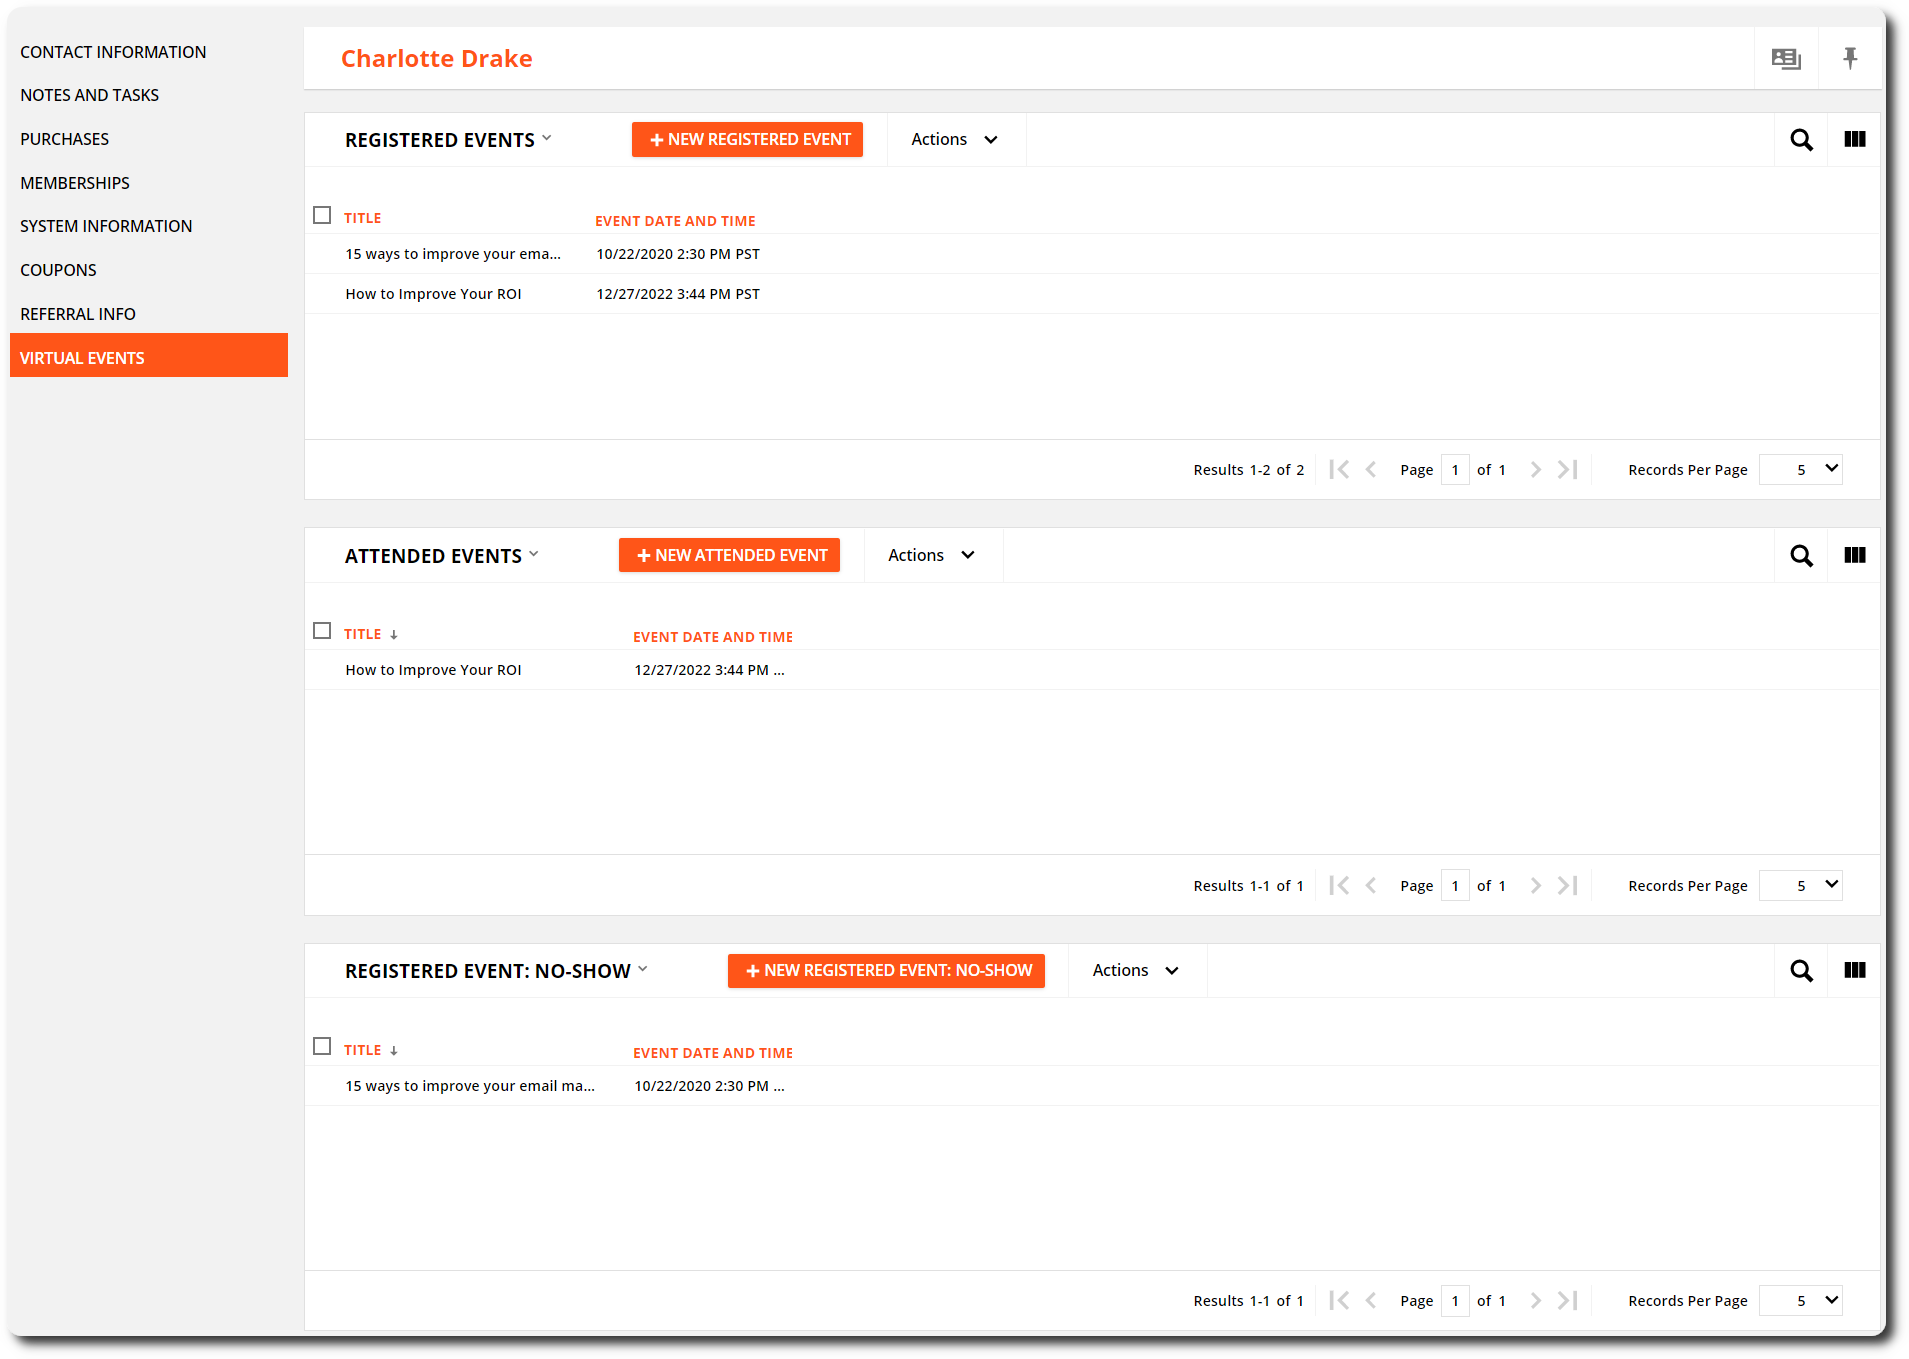
Every contact record also includes a Virtual Events tab to view the events your specific contacts are interested in:
- Registered events shows you each event the contact registered for.
- Attended Events shows you each event the contact attended.
- Registered Event: No-show shows you every event that this contact signed up for but didn’t attend.
Now, let’s get started. For the average user, we highly recommend using Method 1. If you’re an advanced user and are comfortable using advanced features such as webhooks, follow Method 2.
Method 1: To get started with a Setup Wizard (recommended)
The Webinar Promotion Funnel Setup Wizard uses the Virtual Events object. When you complete this wizard, your Virtual Events object will be set up for you. The system includes automation maps for inviting, reminding and segmenting your event invitees.
- Just click here to get started.
- Following the prompts on each step of the Setup Wizard will walk you through setting up everything you need to run Virtual Events.
Method 2: To get started manually (advanced)
This option is for users who are comfortable using advanced features like webhooks and who really want to be able to build their own custom automation.
To set up your Virtual Events records
There are four prerequisites that need to be set up before you are ready to start building your automation maps:
Prerequisite 1: Enable Virtual Events
- Go to
.png) → Apps.
→ Apps. - Toggle Virtual Events on.
Prerequisite 2: Create an event
Now, let’s add your event’s information into a Virtual Event record.
- Click Virtual Events → New Virtual Events.
- Add in your Virtual Event information.
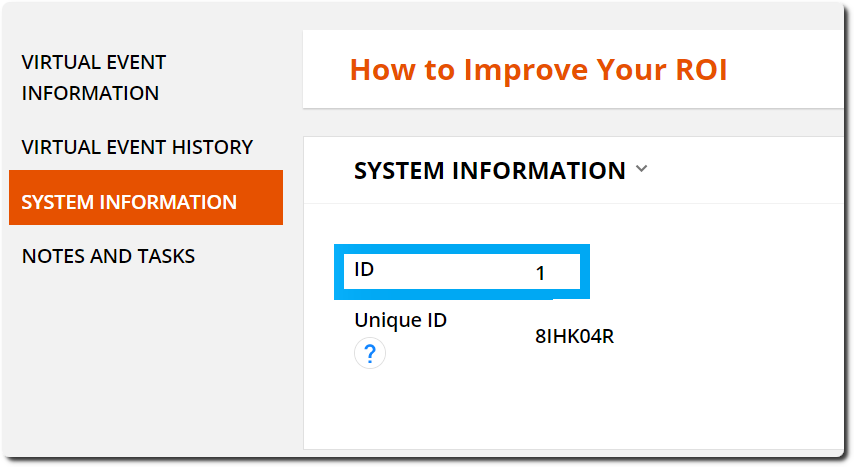
- Click System Information.
- Locate and write down your Virtual Event’s ID — we’ll use this in the automation instructions below.
Prerequisite 3: Create a signup form
Your contacts need a signup form in order to register for your event. Let’s set it up!
- Create a sign-up form either on a landing page or using an Ontraport Form.
- Make sure you add at least the “First Name” and “Email” fields to your form so you can send reminders to your registrants.
Prerequisite 4: Create a tracked link
Virtual Events makes it possible to see who registered, attended and no-showed for your event by turning your meeting’s join link into an Ontraport tracked link.
- Go to
.png) → Data → Tracked Links → New Tracked Link.
→ Data → Tracked Links → New Tracked Link. - Name your link and add your link to join your meeting as the destination URL.
- Click Save.
Now that we’ve completed these prerequisites, let’s start building your registration automation.
To create your registration automation
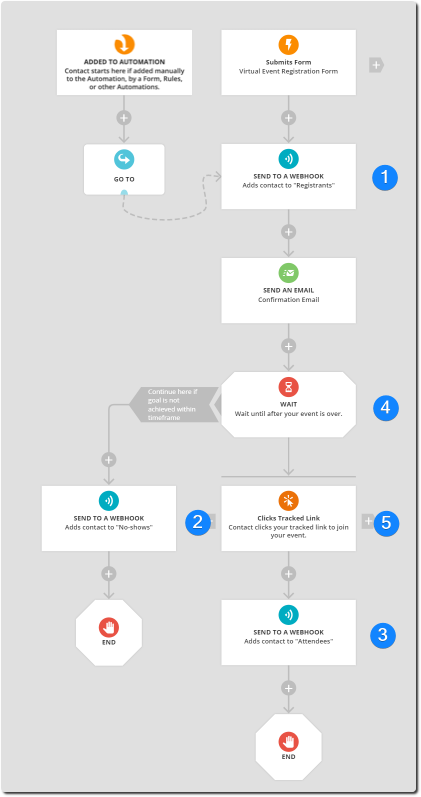
This registration automation map will be the first of two maps that you create for Virtual Events. Before we start building, let’s take a look at what your basic registration automation should look like.
At the very least, this automation map should include a way to add contacts to your lists of Registrants, Attendees, and No-shows.
We’ll cover all of these elements in more depth below, but here is a summary of what your automation should include:
- The automation starts with a trigger that adds contacts when they fill out your registration form (Prerequisite 1).
- Your registrants webhook (Element 1) will add those contacts to your Registrants list.
- Your contacts will get a confirmation email containing your tracked link (Prerequisite 4) which will track attendance to your event.
- Your goal (Element 5) is connected to your tracked link and will show you who clicked to join your event.
- When your registrants click your tracked link to join, your attendees webhook (Element 3) will add them to your Attendees list.
- Registrants who don’t click your join link by the end of the event (Element 4) will be added to your No-shows list with your no-shows webhook (Element 2).
Elements 1-3: Setting up your webhooks
Your webhook elements are the key to automatically adding your contacts to your Registants, Attendees and No-show lists. Since the relationship between Virtual Events and Contacts is a many-to-many relationship, you’ll need to set up the following three webhooks:
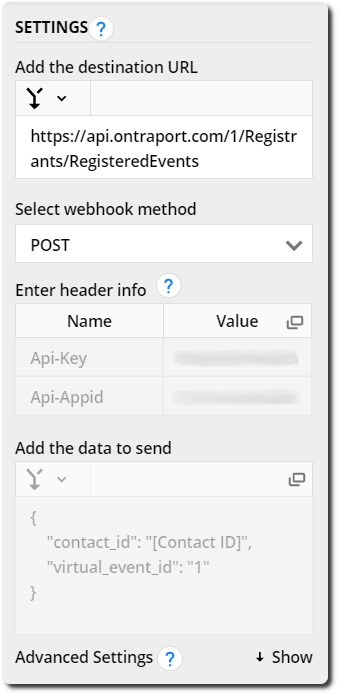
Element 1. Send to a webhook: Registrants
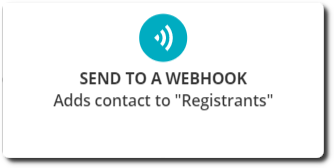
Within your automation map, click into your first webhook element and add the following information:
- Add the destination URL: https://api.ontraport.com/1/Registrants/RegisteredEvents
- Select webhook method: POST
- Enter header info: Follow these steps to create an API Key and App ID.
- Add your API Key with the name “Api-Key”.
- Add your App ID with the name “Api-Appid”.
- Add data to send: Copy and paste the data below into and replace “add your virtual event ID here” with the ID of the virtual event you wrote down when you created your event (Prerequisite 2):
"contact_id": "[Contact ID]",
"virtual_event_id": "add your virtual event ID here"
}
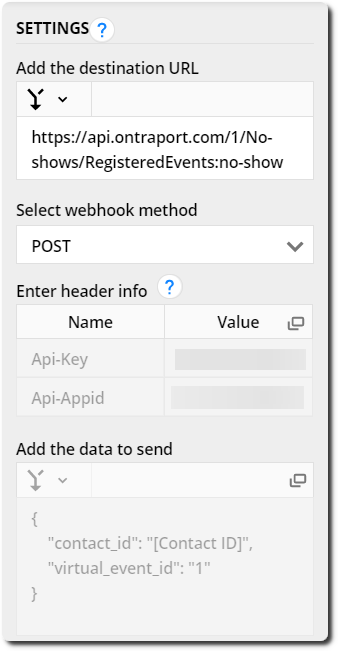
Element 2. Send to a Webhook: No-shows

The only difference between the three webhooks on your automation map is the destination URL. Once you’ve set up one webhook, you can simply copy the webhook element you’ve already set up and change the destination URL.
- Copy your webhook element.
- Add the destination URL:
- Click Done.
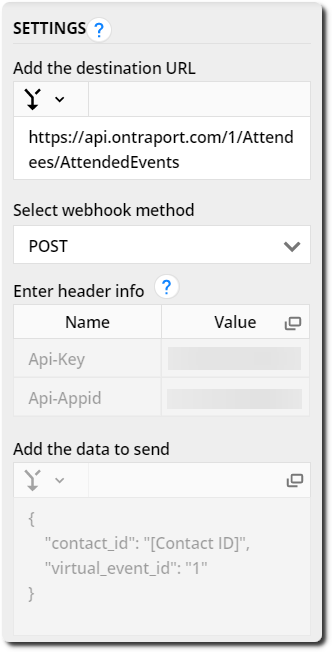
Element 3. Send to a Webhook: Attendees
- Copy your webhook element.
- Add the destination URL:
- Click Done.
Elements 4 and 5: Setting up your goal and wait
Your goal and wait make it possible for you to track who attends your event and who doesn’t.
The goal on your automation should be connected to the tracked link you set up in Prerequisite 4.
Your wait should be set to “Wait until your event is over,” so you can automatically segment your registrants into Attendees and No-shows.
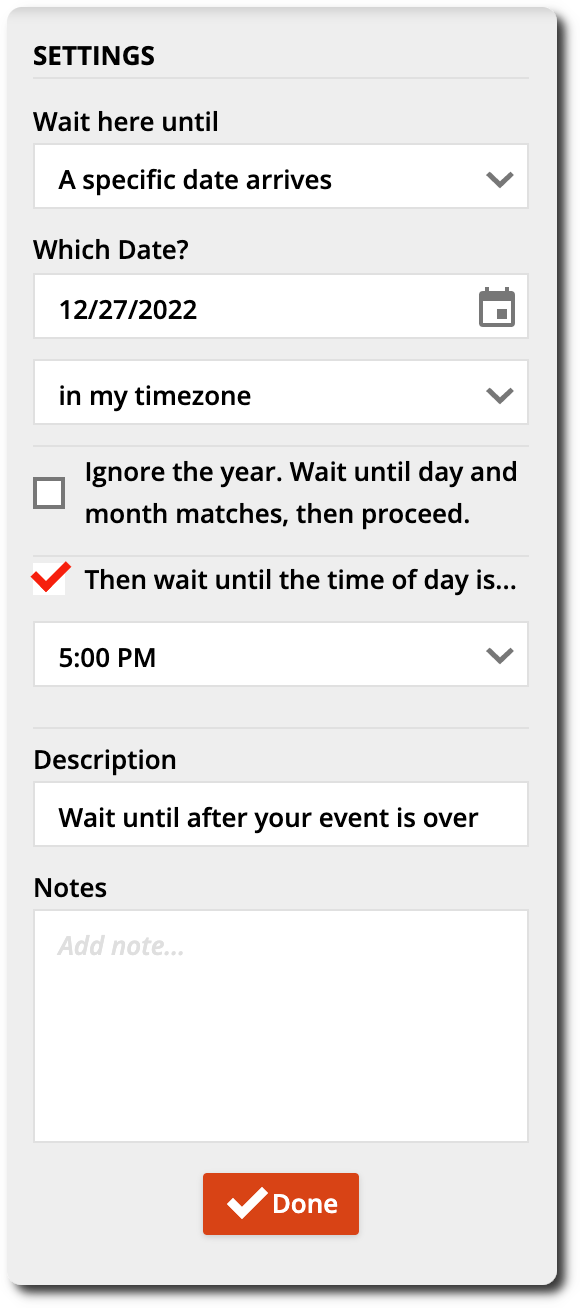
Element 4. Wait until your event is over
- In the “Wait here until” dropdown, select “A specific date arrives.”
- Add your event’s date.
.png) “Then wait until the time of day is…” and select your event’s end time.
“Then wait until the time of day is…” and select your event’s end time.- Click Done.
Element 5. “Clicks Tracked Link” goal
- Click Add Goal.
- Select “Contact clicks tracked link” and select the meeting link you set up as a tracked link in Prerequisite 4.
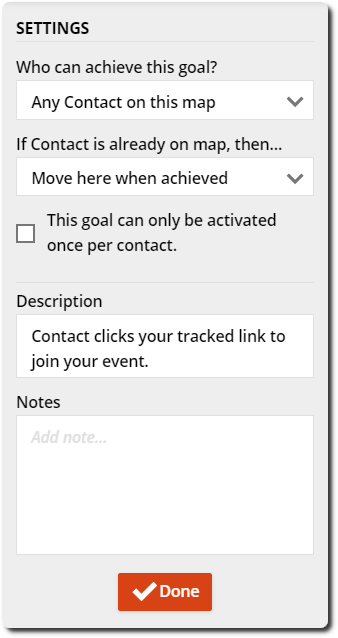
- Edit your goal settings:
- “Who can achieve this goal?”— select Any contact on this map.
- “If contact is already on map, then…” — select Move here when achieved.
- Click Done.
To create your reminder automation
This reminder automation map will be the second of two maps you create for Virtual Events. You’ll build your reminder automation in your Virtual Events object, and you’ll use it to send your registrants reminder emails leading up to your event.
We recommend creating your emails first so you can drop them into your automation map as you build.
Create email messages with event details
You can write as many reminder emails as you’d like for this system; however, each one should follow the steps below to ensure they go to the correct segments.
- Go to Virtual Events → Messages, then click New Message, and choose Simple Mail or OntraMail.
- Write and style your email and be sure to add your tracked link from Prerequisite 4:
- Highlight the text you want to link.
- Click
 → Tracked Link → Select the tracked link you created for your meeting.
 - Click Insert Link.
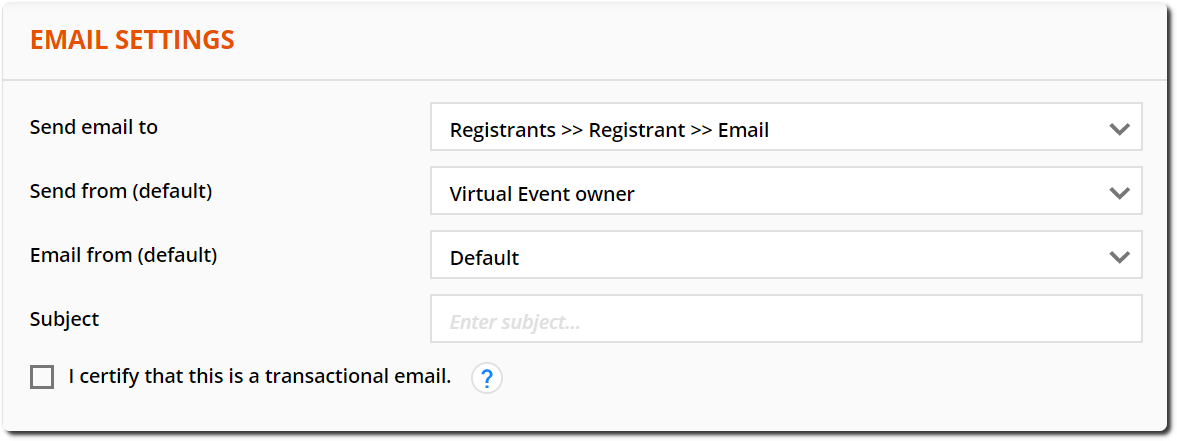
- Change your “Send email to” field to “Registrants >> Registrant >> Email.”
- If you’re creating an OntraMail message, click the settings tab to access your email settings.
- Click Save.
Create a separate automation map to send reminder emails
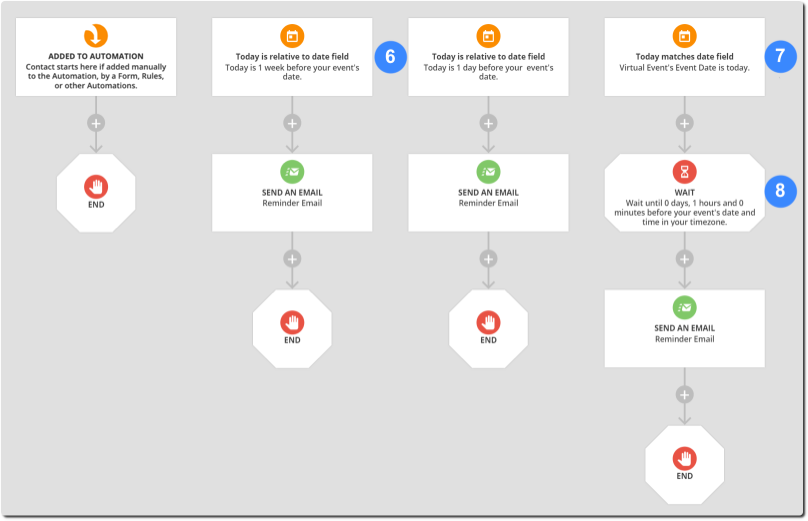
Before we start building, let’s take a look at what your basic reminder automation should look like.
This automation map should include a way to automatically send reminder emails based on your event’s date. We’ll cover all of these elements in more depth below, but here is a summary of what your map should include:
- Element 6: A trigger that fires reminders based on your event’s date
- Element 7: A trigger that fires on your event’s date
- Element 8: A wait that holds your final reminder until an hour before your event’s start time
Element 6. “Today is relative to Virtual Event’s date field” trigger
To send out reminders in the days leading up to your event, use the “Today is relative to Virtual Event’s date field” trigger.
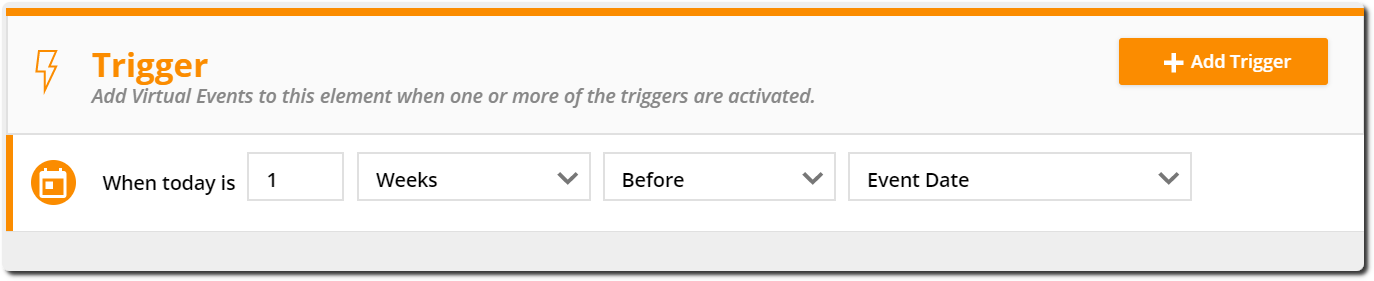
- Click Add Trigger → Today is relative to Virtual Event’s date field.
- Select how long before your event you’d like to send out your email.
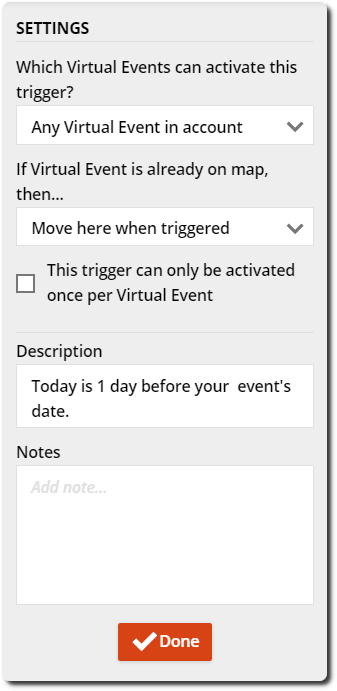
- Edit your trigger settings:
- For “Which Virtual Events can activate this trigger,”select Any Virtual Event in account.
- For “If Virtual Event is already on map, then..,” select Move here when achieved.
- Click Done.
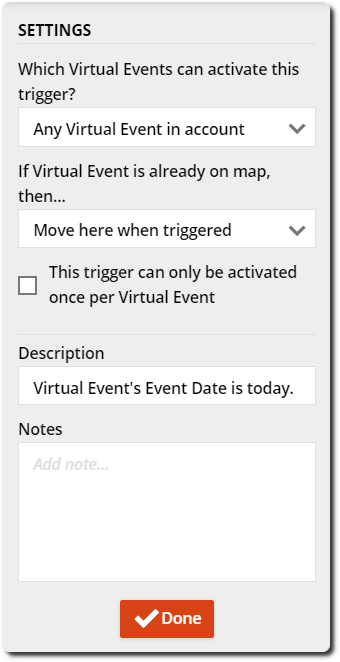
Element 7. “Today matches Virtual Event’s date field” trigger
When you want to send a reminder on the same day as your event, use the “Today matches Virtual Event’s date field” trigger. Follow the steps below to send reminders on the day of your event.

- Click Add Trigger → Today matches Virtual Event’s date field.
- Select Event Date from the dropdown.
- Edit your trigger settings:
- For “Which Virtual Events can activate this trigger,” select Any Virtual Event in account.
- For “If Virtual Event is already on map, then..,” select Move here when triggered.
- Click Done.
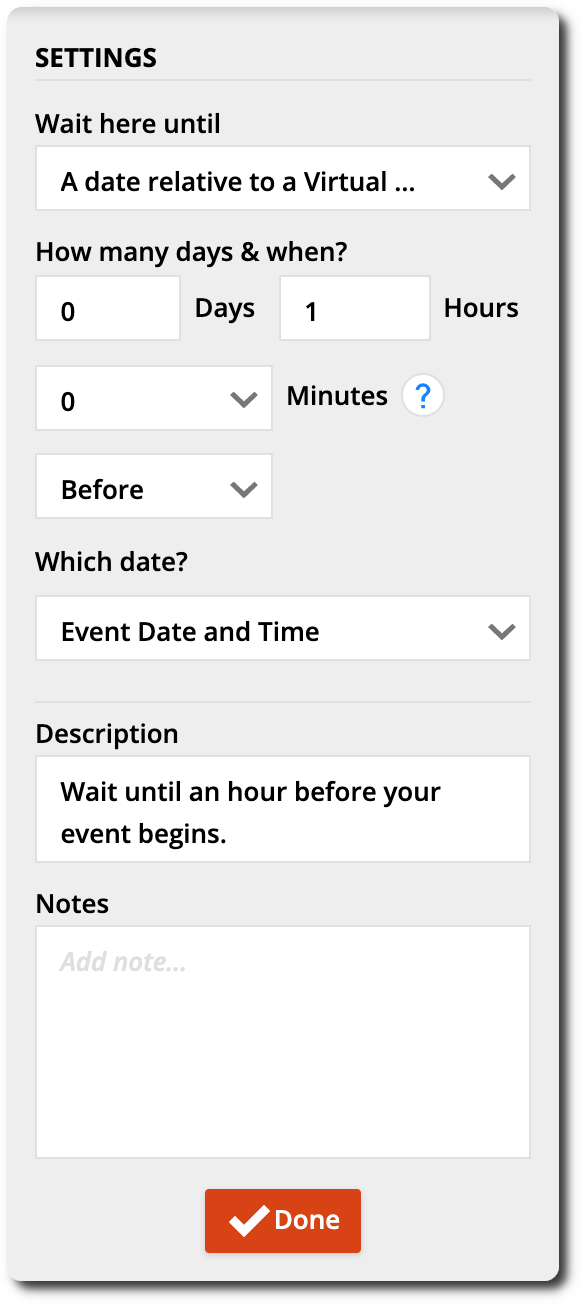
Element 8. “Wait until an hour before your event begins”
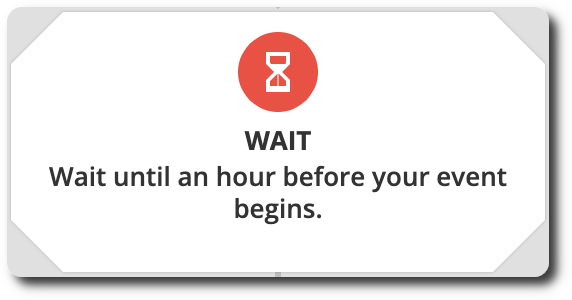
Use this wait under your Element 7 trigger to choose how many hours and minutes before your event you’d like to send your final reminder.
With this element, you can select the exact time of day you’d like to send your final reminder before your event starts.
- Select A date relative to a Virtual Event’s date field arrives from the “Wait here until” dropdown.
- Add how long you’d like to wait before your event.
- For “Which date?” select Event Date and Time.
- Click Done.
Download a prebuilt automation map This automation map simplifies and streamlines the process of gathering valuable feedback from your leads and customers. With just one click in the email, recipients can rate their experience and share more details through a quick follow-up form. It's an effortless way to collect insights that help you improve your offerings and build stronger relationships. Click here to download. |