Ontraport provides all the tools you need to sell your products and services online. In this article, you'll learn how to set up products and order forms. You'll also learn how to customize payment options so you can offer your customers free trials, subscriptions and more.
Order forms are available to some account levels. Check out our pricing page to learn more.
Table of contents
Order form setup
• Create a product
• Access your product settings
• Add your product
• Confirm your payment gateway
• Change currency
• Send an invoice receipt
• Collect tax (optional)
• Add tax conditions (optional)
Payment options
• Add a trial period
• Make this product a subscription
• Offer a payment plan
• Allow buyers to change quantity
• Insert coupon code
• Charge on a later date
• Remove an item
Selling physical products
• Set up your packing slips
• Add to shipping/packing slip
• View shipped packages
• View shipping fulfillment runs
Order form setup
Follow these steps to set up the basics of your order form, such as adding a product, confirming your payment gateway and selecting your receipt template. After that's set up, check out the "Payment options" section to learn how to offer subscriptions, payment plans, free trials and more.
Create a product
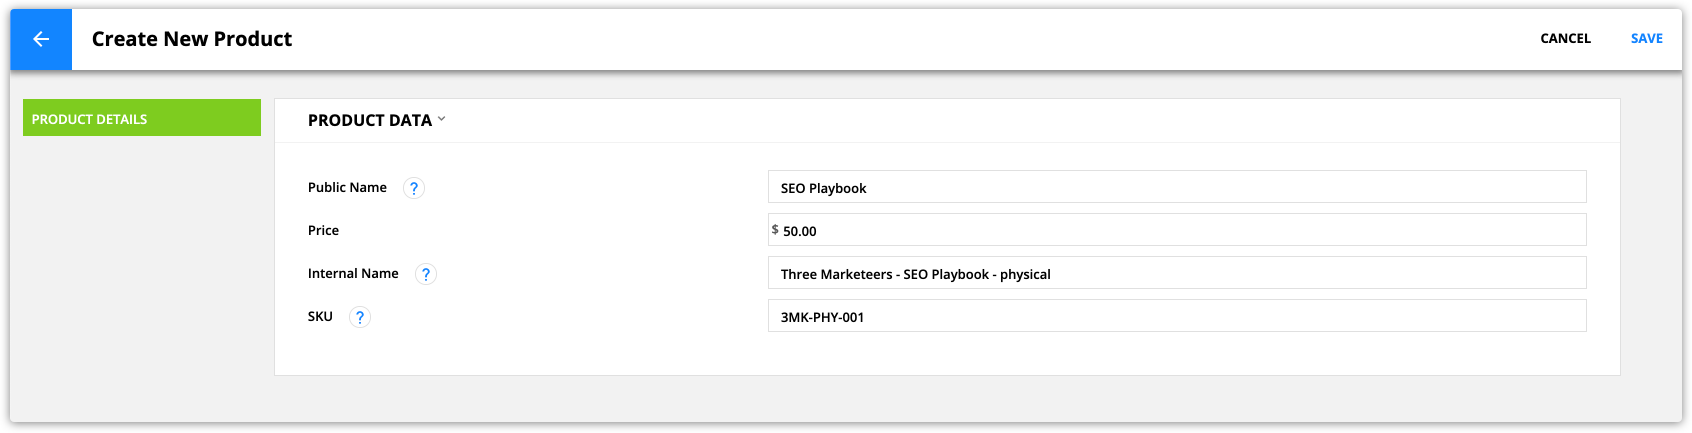
The first step of selling your products using Ontraport is to create a product in Ontraport. Once you create a product, you can add it to any of your order forms. The only input that’s required to create a product is to name it, but you can also add your price, internal name and SKU to help you stay organized.
- Go to Sales → Products → New product.
- Add the public-facing name of your product.
- This is what your customers will see on your order forms and on their receipts.
- (Optional) Add the price.
- You can change this price on your order forms. If you want to offer your product as a subscription or payment plan, you’ll set that up on your order form.
- (Optional) Add your product’s internal name.
- (Optional) Add your SKU.
- Click Save.
Access your product settings
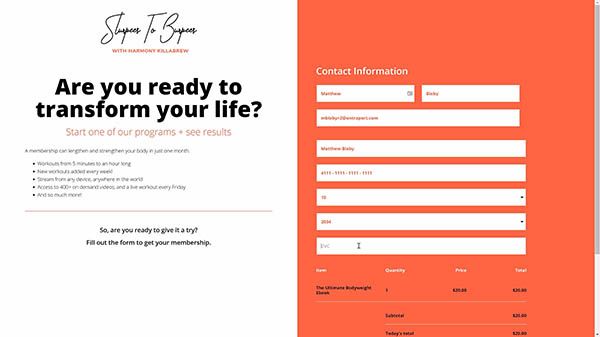
Once you've created your product in Ontraport, add it to an order form. There are two types of order forms to choose from:
- An order form on an Ontraport Page (recommended) — In most cases you’ll want this option. It lets you build an entire page around your order form.
- An order form on an Ontraform — Use this option if you need to embed an Ontraport order form into a third party site or if you require a pop-up form.
The two order forms are set up in the same way — the only difference is how you get to your product settings.
Here’s how:
Go to Ontraport Page product settings:
- From a page with order form elements on it, hover over the order form block then click
/ontraport+pages+-+builder+-+edit+block+(gear+icon).png) to edit the block.
to edit the block. - In the left menu, click Payment Settings.

Go to Ontraform product settings:
- Choose an existing or create a new form that you want to add a product to. If your Ontraport Form doesn’t have an order form block already, you can click Add block → Order form and select your template.
- From your “blocks on this form” list, click Order form → Payment settings.
/ontraform_payment_settings_example.gif)
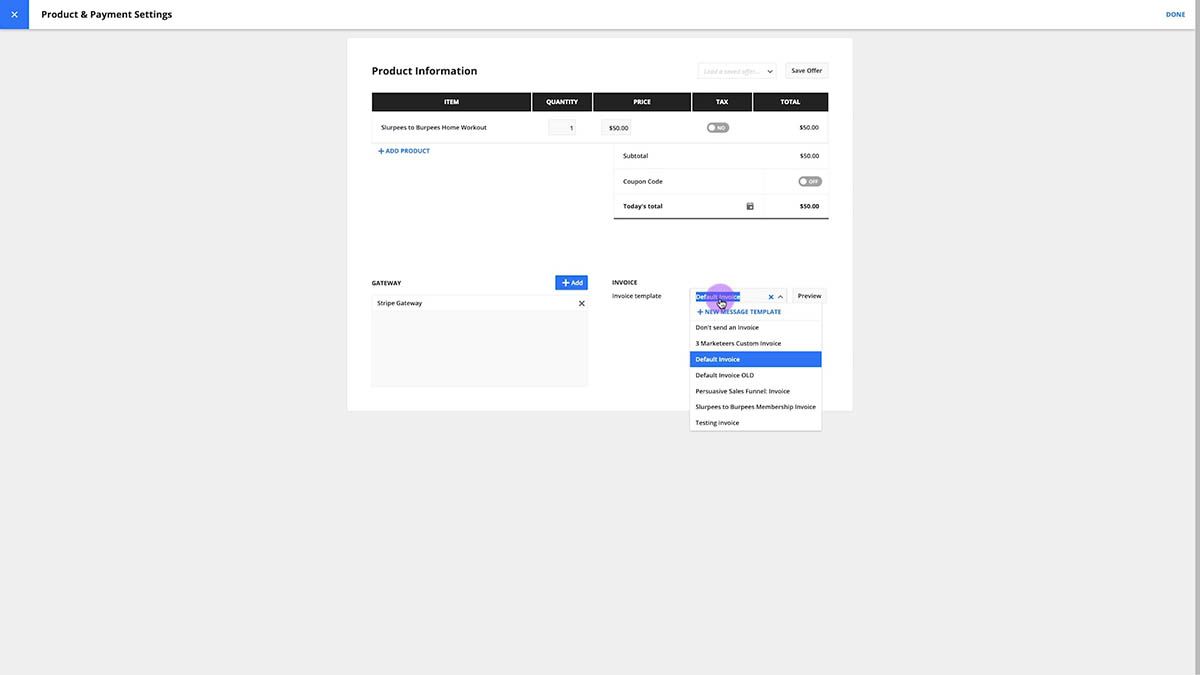
You’ll be brought to your product and payment settings.
/ontraport_pages-order_form-product_information(example).png)
Add your product
- Click Add product, and select your product from the dropdown list.
- Set a quantity for this product (the amount of the product being sold).
You can edit the price of your product on your order form.
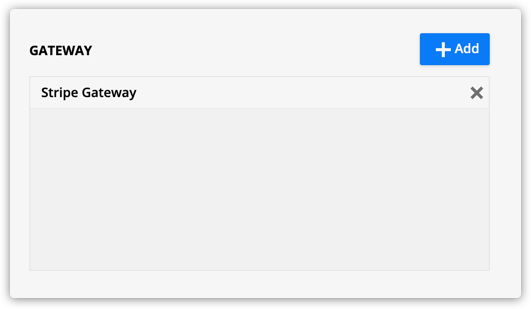
Confirm your payment gateway
- Your default payment gateway will be automatically added to your order form. If you’d like to change your gateway, click Add and select another gateway. If you haven’t set up a gateway before, follow these steps.
- You can only add one credit card payment gateway per order form. However, if you add a PayPal Standard gateway in addition to your credit card gateway, your customers can choose to pay with a card or with their PayPal account.
- To add a PayPal option to your order form, also add a PayPal page element.
- The PayPal Standard gateway has several limitations. Click here to learn more.
- You can only add one credit card payment gateway per order form. However, if you add a PayPal Standard gateway in addition to your credit card gateway, your customers can choose to pay with a card or with their PayPal account.
Change currency
Back to top
Every account has a default currency; however, with the multi-currency support feature, you can choose from 157 currencies when you log transactions using the Stripe gateway.
- Select the currency you want to use from the Currency dropdown.
- Check that the price on the order form matches what you want to charge in the selected currency. If you've already set the product's price, the numeric value will remain the same, and the currency symbol will change.
/ontraport_pages-order_form-currency_dropdown.png)
Send an invoice receipt
The invoice receipt template dropdown allows you to choose if you’d like to send a receipt to your customer and select which template you’d like to use.
- In the “Invoice receipt” section, click the dropdown and select a default invoice receipt, a custom template or choose to not send a receipt.
Collect tax (optional)
If your products are taxable, you can collect sales tax directly from your forms. When you collect taxes for your products, you have the option to set one tax rate or set up conditions to charge different rates based on your customer’s location.
You can also integrate with TaxJar to charge location-based taxes automatically. Learn more here.
- Toggle the tax option on.
- Your “Taxes” section will appear. Click Add.
- Select a tax rate from the dropdown list.
If you’ve never set up a tax type, click New tax type at the top of your dropdown or follow these steps:
- Go to Sales → Settings → Taxes.
- Click New tax type.
- Name your tax type — this name will show on your order form.
- Add a rate.
- Click Save.
.png)
Add tax conditions (optional)
Back to top
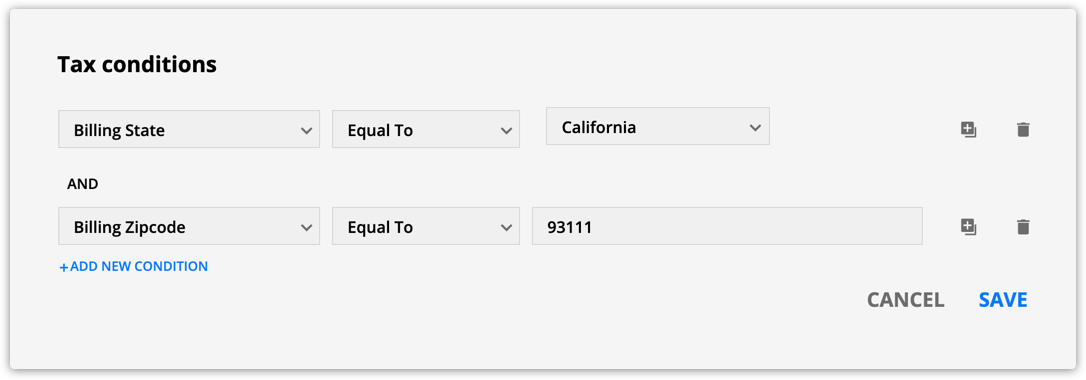
If you’d like to charge different tax rates based on your customer’s location, just add conditions to your tax rates. Add as many tax options as you need.
- You can only create conditions based on the fields on your order form.
- After you’ve added a tax type to your order form, click Add under “conditions.”
- Click Add new condition.
- Choose a contact field, condition, and value, such as “Billing State equal to California.”
- Click Add new condition again to make your condition more specific, such as “Billing State equal to California” AND “Billing Zip equal to 93111.”
- Click Save.
Payment options
Your order forms allow you to set up different payment options such as adding a payment plan or trial period, creating a subscription or allowing your customers to use a coupon code. To access those settings, hover over your product row and click  .
.
/ontraport_pages-order_form-product_information-product_settings(example).png)
Add a trial period
Offer a product with a trial period, such as one week for $0 and $100 after the trial ends.
/ontraport_pages-order_form-trial_period.png)
Make this product a subscription
Set up a product with recurring payments, such as $100 per month.
- Choose from:
- Per day
- Per week
- Per 2 weeks
- Per month
- Per quarter
- Per 6 months
- Per year
- Per day
- In the Invoice receipt section, you have the option to send a receipt for every recurring payment, or toggle the option off to only send one for the first purchase.
/ontraport_pages-order_form-subscription.png)
Offer a payment plan
Break up the total cost of your product or service into multiple payments, such as four payments of $25 to purchase a $100 product.
- Choose from:
- Per day
- Per week
- Per 2 weeks
- Per month
- Per quarter
- Per 6 months
- Per year
- Click Add payment option to add multiple payment options. This lets your customers choose which option they’d like to use when they purchase.
- Just like with subscriptions, you have the option to send receipts for every recurring payment.
/ontraport_pages-order_form-payment_plan.png)
Allow buyers to change quantity
Customers can change the amount of product they purchase from you on the form. Enter the default quantity and minimum/maximum allowed per order.
/ontraport+pages+-+order+form+-+change+quanitity.png)
Insert coupon code
This allows customers to enter a coupon code for a discount. Once complete, the product grid will show the amount discounted from the total and a new total price.
- If you do not see your coupon code on your order form, edit your order summary element settings, and make sure “Coupon code” is toggled on.
/ontraport_pages-order_form-coupon_code.png)
Charge on a later date
Enter the date you'd like all charges to process on. Click .png) next to “Today’s total” and pick the date you’d like to process the transaction.
next to “Today’s total” and pick the date you’d like to process the transaction.
/ontraport_pages-order_form-charge_on_later_date.png)
Remove an item
Remove a product from the order form.
/ontraport_pages-order_form-remove_this_item.png)
Selling physical products
If you sell physical products, your delivery process will include a few manual steps. Ontraport gives you the tools you need to manage your shipping and get your products into your customers' hands.
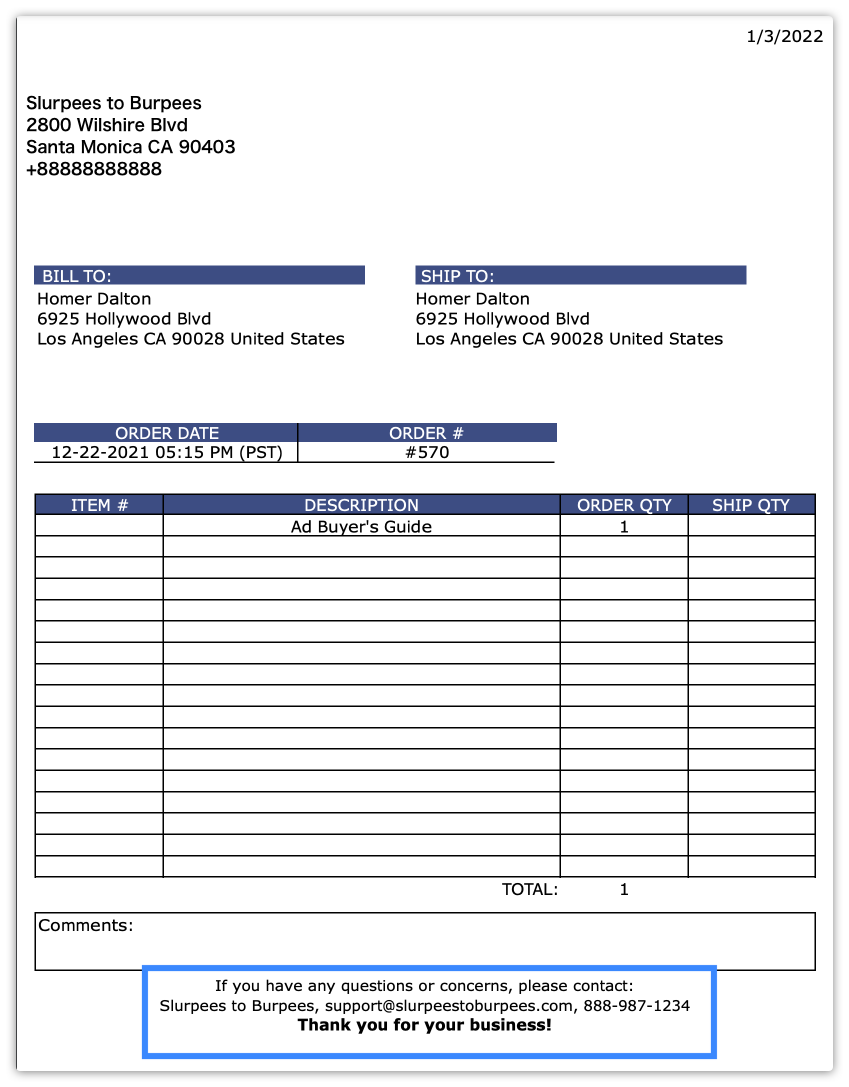
A packing slip is automatically generated for each physical product order, and your order will be added to your fulfillment list. You can use your fulfillment lists to print shipping labels and manage your shipping process.
Set up your packing slips
Packing slips are unique PDF files that list each item in each order. We recommend that you set up your packing slips and shipping settings before setting up your order forms. You only need to set up your packing slips once.
To get to your settings, go to Sales → Settings → Shipping settings/ Packing slips.
- Or click here.
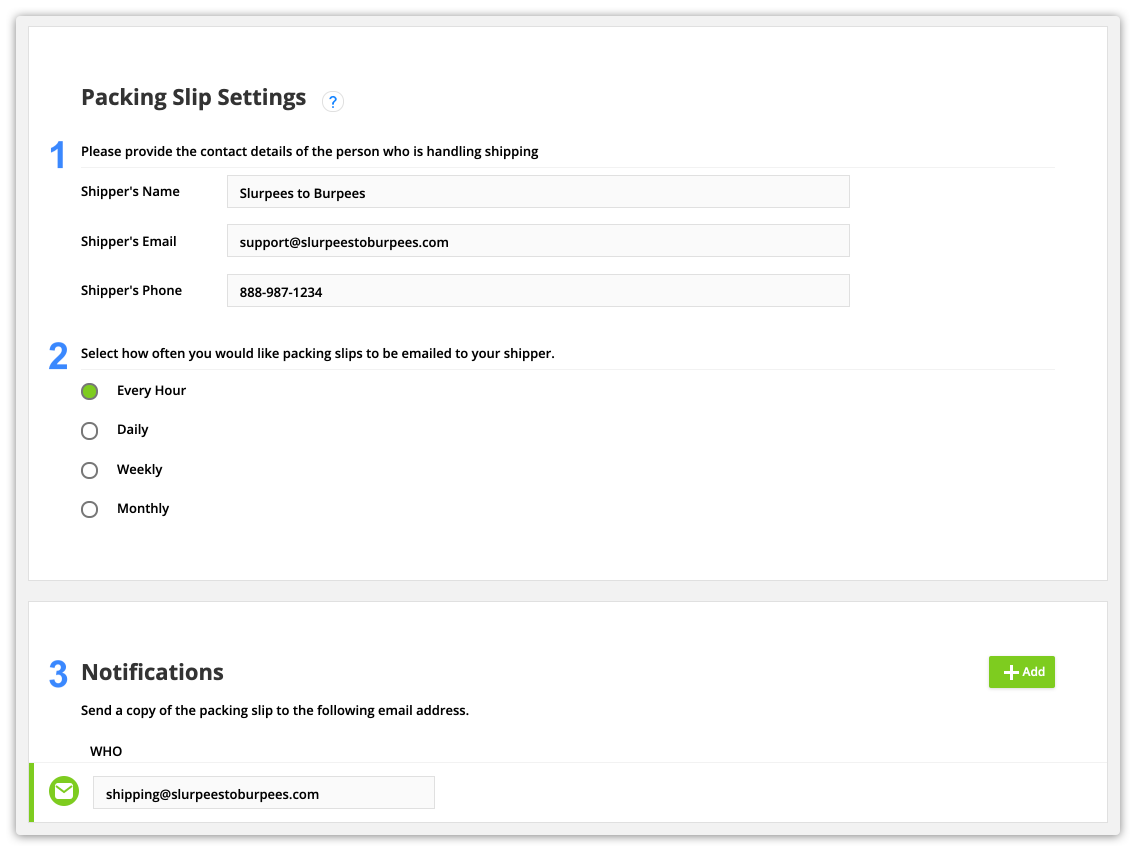
Your packing slip settings are made up of three sections:
- Shipper contact info
- This information will be printed on the bottom of your packing slips. Add the name, email and phone number you want your customers to reach out to if there are any issues with the order.
- The contact information printed at the top of your packing slip is pulled from your account’s business information.
- Fulfillment run frequency
- This determines how often you’ll send packing slips and fulfillment lists to the email address(s) you add to the notifications section.
- All the physical products your customers purchase in this timeframe will be added to the same fulfillment run.
- To see a complete history of your account’s fulfillment runs, go to Sales → Settings → Shipping Fulfillment Runs or click here.
- This determines how often you’ll send packing slips and fulfillment lists to the email address(s) you add to the notifications section.
- Notifications
- This is the email address that your account will send your packing slips and fulfillment lists to.
- Click Add in the “Notifications” section to add an email address to send your packing slips and fulfillment lists.
- Send your packing slips to anyone who handles your shipping, such as a fulfillment house or a team member, and you can add as many notifications as you’d like.
When you’ve filled your information on this page, click Save.
Add to shipping/packing slip
This setting generates a packing slip when your product is purchased. You should select this option for every physical product you sell.
/ontraport_pages-order_form-packing_slip.png)
Charge for shipping (optional)
Charge for shipping costs by setting up your shipping types and adding them on your order form. When you charge for shipping on your products, you can set one shipping rate or set up conditions to charge different rates based on your customer’s location.
If you haven’t set up a shipping method before, click New shipping type at the top of your dropdown or follow these steps:
- Go to Sales → Settings → Shipping methods.
- Click New shipping type.
- Name your shipping method — this name will show on your order form.
- Add a price.
- Click Save.
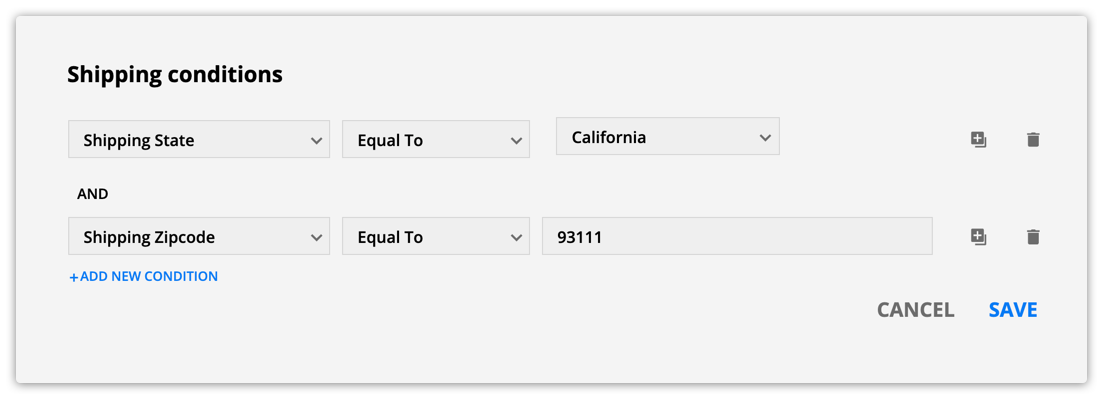
Add shipping conditions (optional)
If you’d like to charge different shipping rates based on your customer’s location, add conditions to your shipping methods. Add as many shipping options as you need.
- You can only create conditions based on the fields on your order form.
Here’s how:
- After you’ve added a tax type to your order form, click Add under “conditions.”
- Click Add new condition.
- Choose a contact field, condition, and value, such as “Shipping State equal to California.”
- Click Add new condition again to make your condition more specific, such as “Shipping State equal to California” AND “Shipping Zip equal to 93111.”
- Click Save.
View shipped packages
Back to top
View and download information about your shipped packages, such as packing slips for each customer and .CSV files for your shipping fulfillment lists.
- Go to Sales → Settings → Shipped packages.
- Select a contact and click:
- Download PDF to download the contact’s packing slip.
- Download CSV to download the shipping fulfillment list.
View shipping fulfillment runs
Back to top
View and download the packing slips of products purchased on a certain date.
- Go to Sales → Settings → Shipping fulfillment runs.
- Select a date and click Download.

.png) and
and  .
.