Partners can play a massive role in your business’s success. You can easily develop compelling partner experiences by creating your own Ontraport partner center. A partner center helps you and your team manage partnership initiatives and launches. And it gives your partners access to real time data that is critical for their engagement, motivation and success.
Partner centers built with Ontraport require a Dynamic CMS package. Check out our pricing page to see which package fits your needs.
Check out this video to learn more:
Table of contents
Building your partner center
• Required functionality
• Show referred contacts
• Show pending commissions
• Show commission history
• Create a product launch contest
• Create a leaderboard
Adding incentives for your partners
• Create a custom partner center for launches
• Automatically increase commissions based on performance
• Create a group of contacts who referred more than X amount
Migrating my partner center
• Situation 1: I want a partner center, and I’m starting from scratch
• Situation 2: I have an Ontraport membership site, and my partner center is on WordPress
• Situation 3: I have everything on WordPress
Create a partner center on WordPress
Building your partner center
Since you can build your partner center in either Ontraport pages or dynamic templates, you have a lot of flexibility.The layout and overall design is up to you. The information that you’ll find below is how to protect your membership site and how to add specific functionality to it. You simply add the options that work for you and your partners
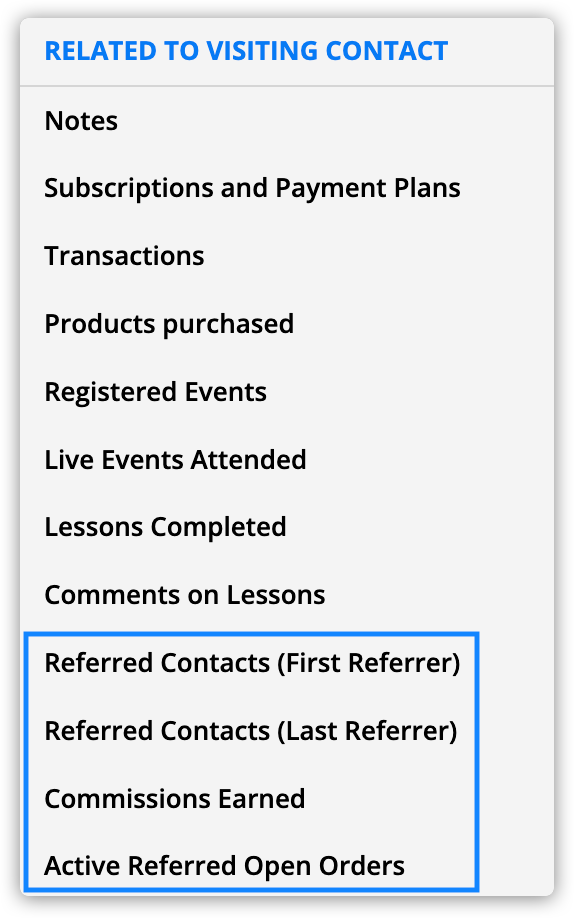
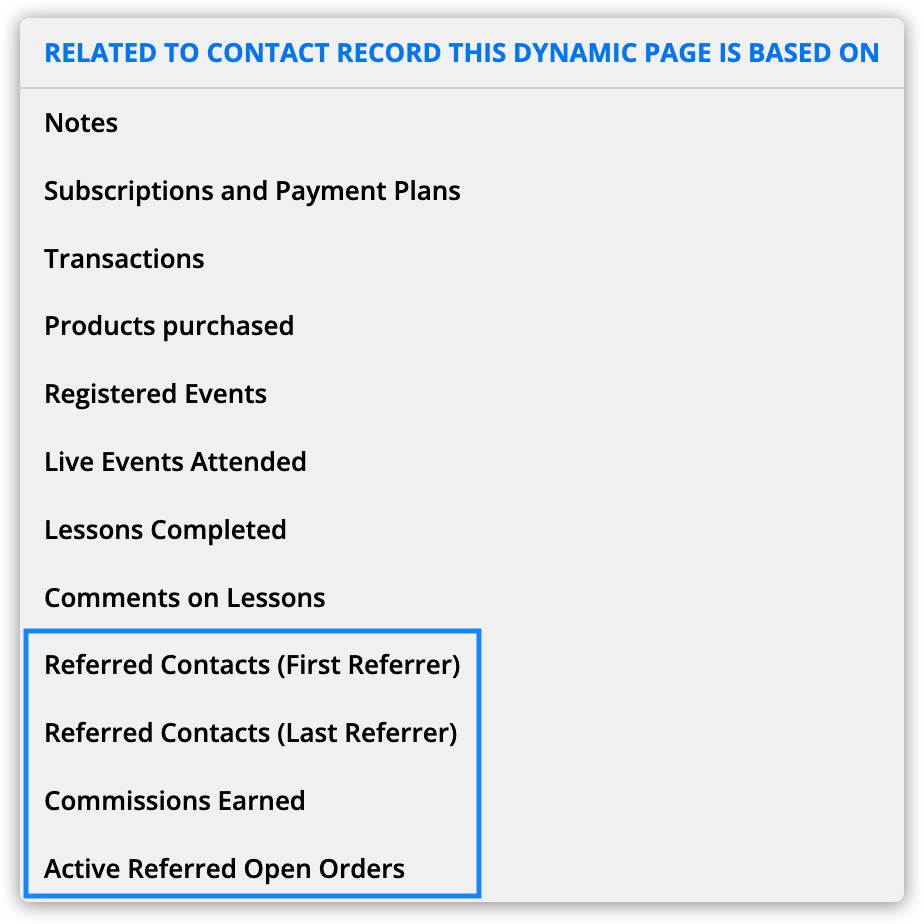
In the “Referral Info” tab, there are four subcollections for building your partner center:
- Referred Contacts (First Referrer)
- Shows all of the contacts that your partner is marked as their first referrer
- Referred Contacts (Last Referrer)
- Shows all of the contacts that your partner is marked as their last referrer
- Commissions Earned
- Displays all of the sales your partner has earned commissions on
- Active Referred Open Orders
- Displays all of the open orders your partner is earning commissions on
You’ll use these subcollections plus custom rollup fields to show your partners the data they want to see.
Required functionality
All sites need the following, regardless of how you customize your center:
Create a page or dynamic template
You can build your partner center on either an Ontraport page or a dynamic template. When you make an Ontraport page, all partners will visit the same URL.
- If you create a partner center on a page, you’ll find the sources described in the sections below in the “Related to visiting contact” section.
If you create a dynamic template, your partners will each visit a unique URL.
- A dynamic template provides extra security. You can add the page condition “Contact matches dynamic page record” to ensure each member sees only their own information.
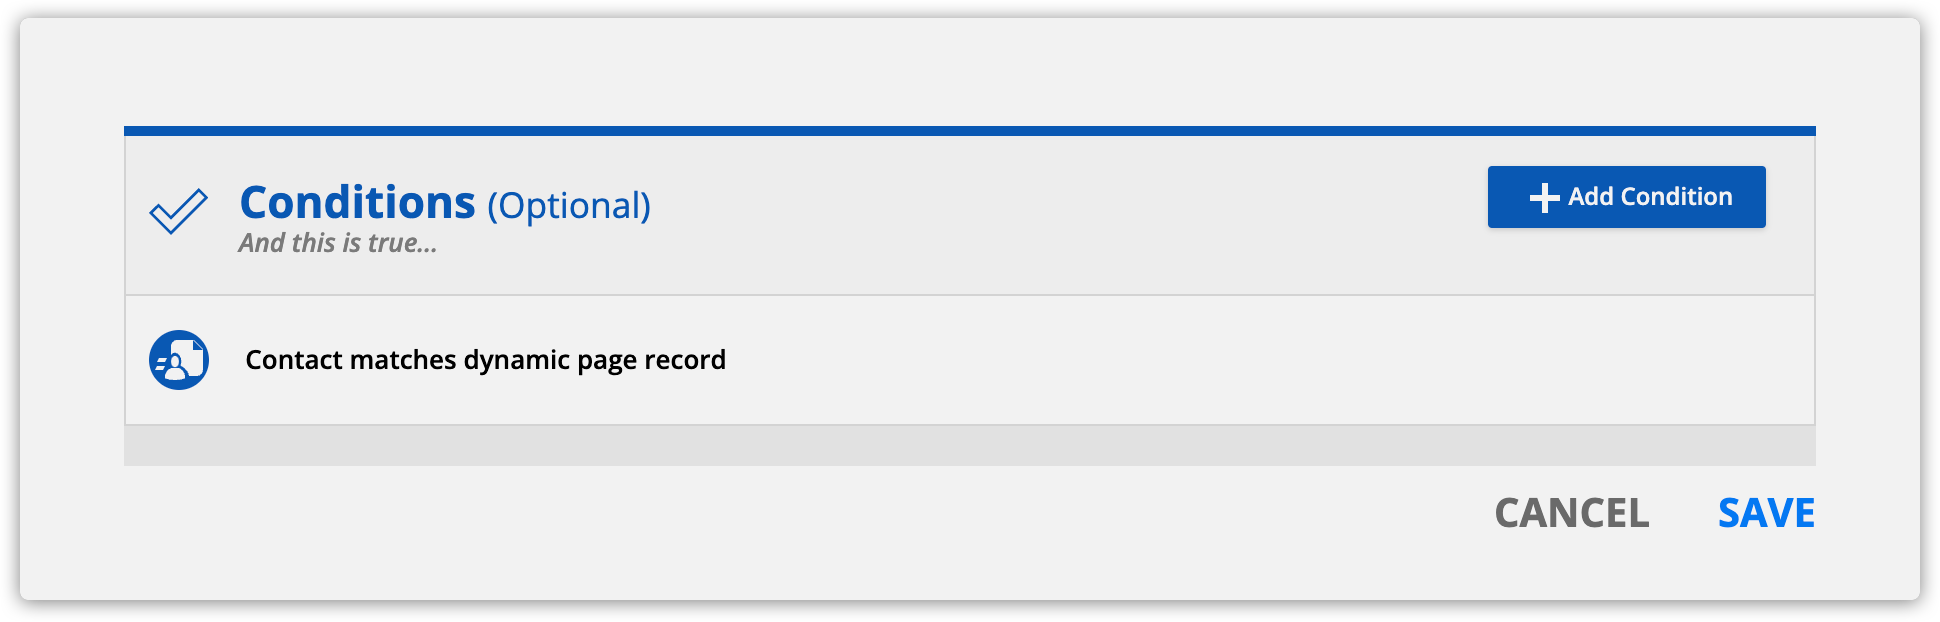
- If you make a partner center on a template, you’ll find the sources below in the “Related to contact record this dynamic page is based on” section.
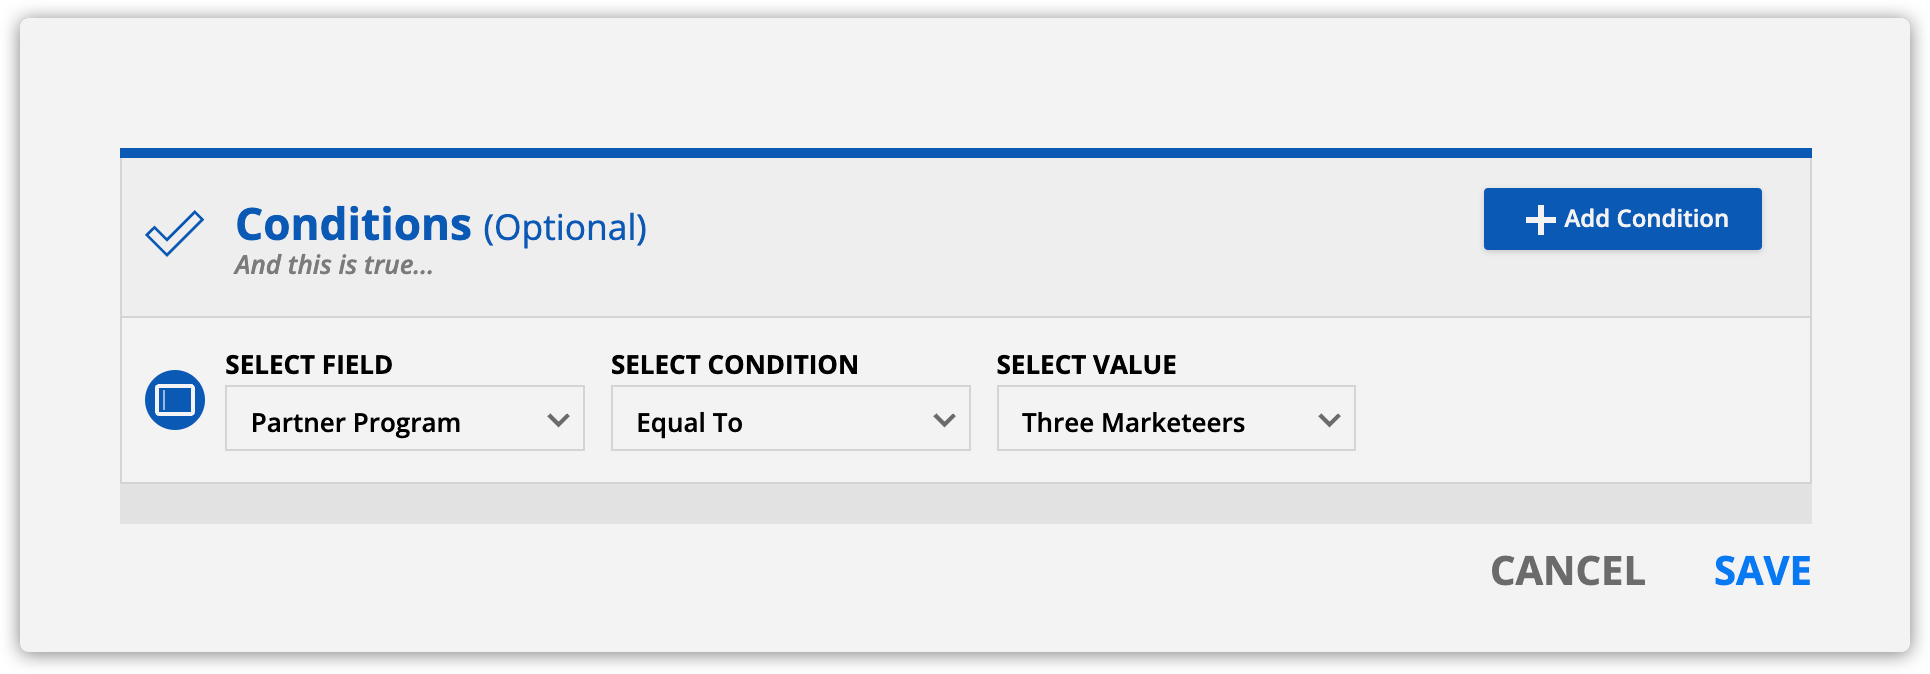
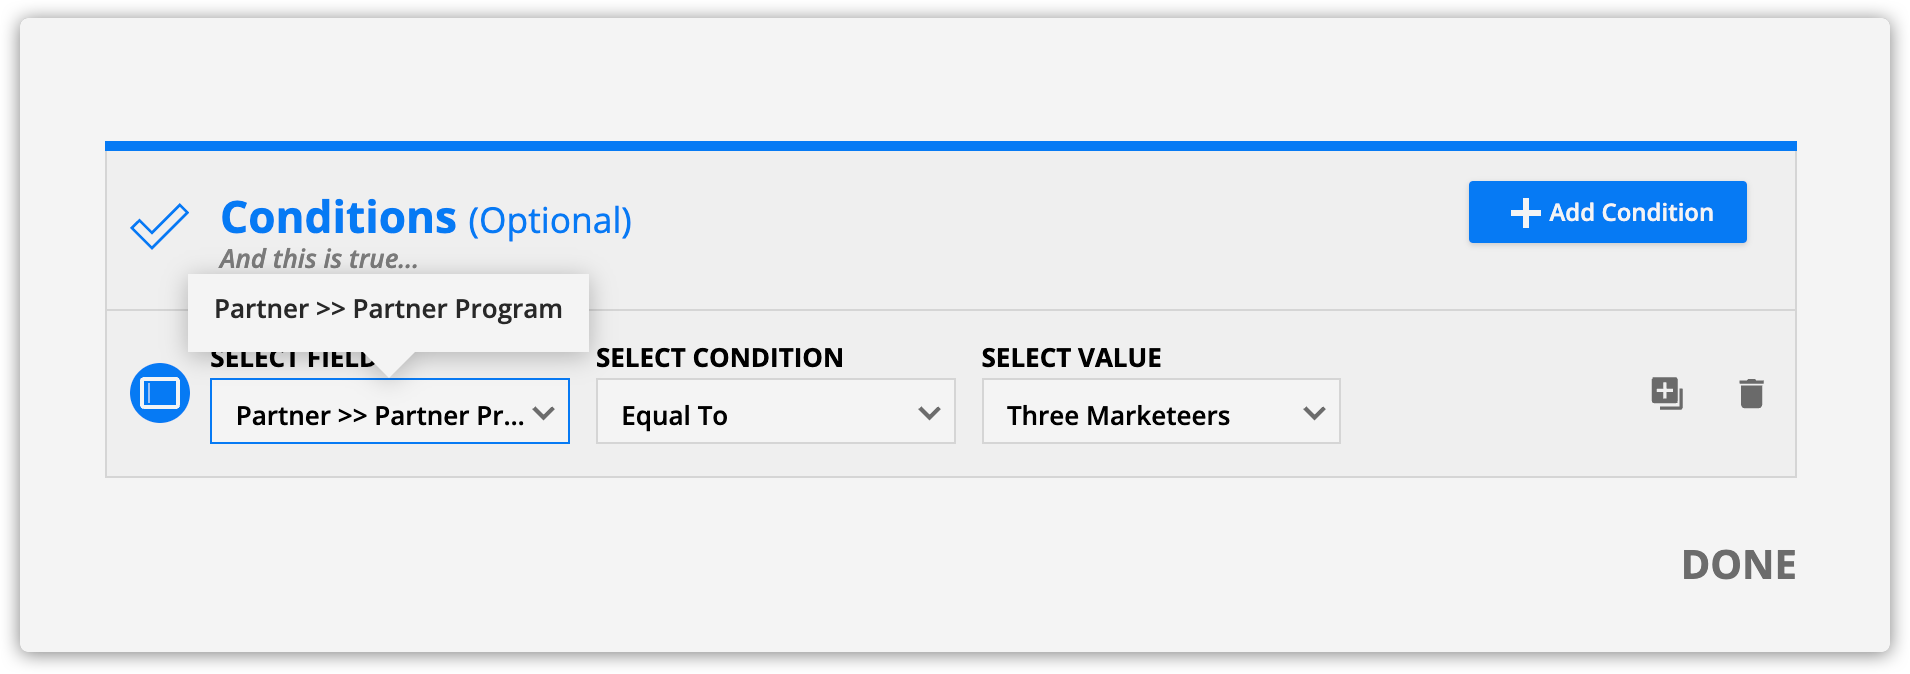
Protect your partner center
Add your partner center to your Ontraport membership site, and protect your page so that only logged in members can see it.
Add the page display condition “Partner Program >> Name equal to [Your program’s name]” or “Partner Program >> Name not equal to [leave field blank].”
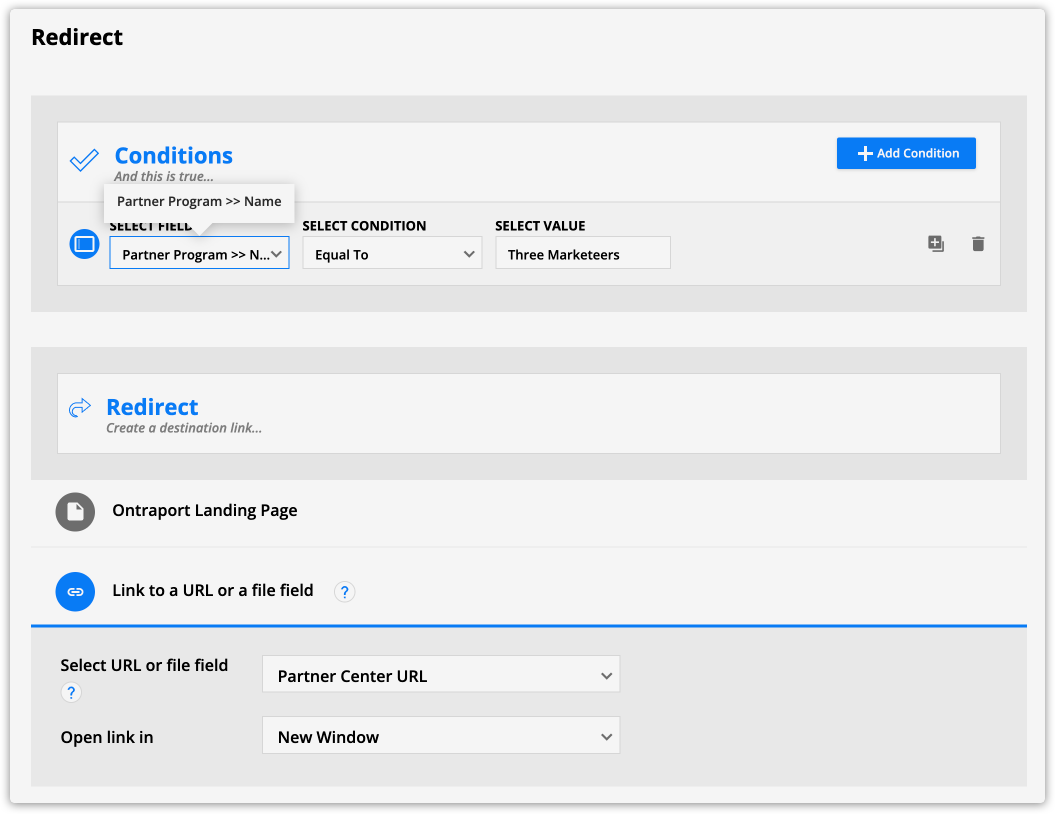
Add a redirect for partners
Make it easy for your partners to find their partner center by creating a redirect. This will take them directly to your partner center when they log in.
There are a couple of ways to do this:
- If you have only one partner program, use the condition “Partner Program >> Name equal to [Your program’s name].” If you have a separate partner center for each program, use the same condition for each of your programs.
- If you have one partner center and multiple partner programs, send all partners to the same page. Use the condition “Partner Program >> Name not equal to [leave field blank].”
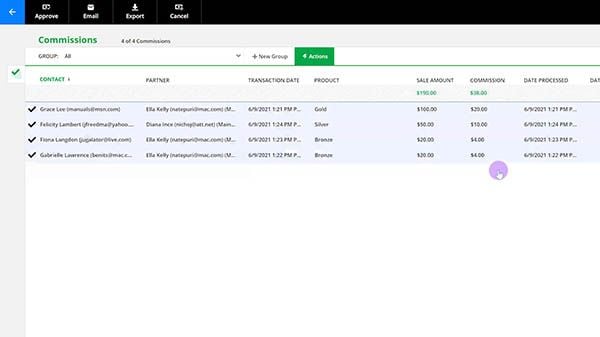
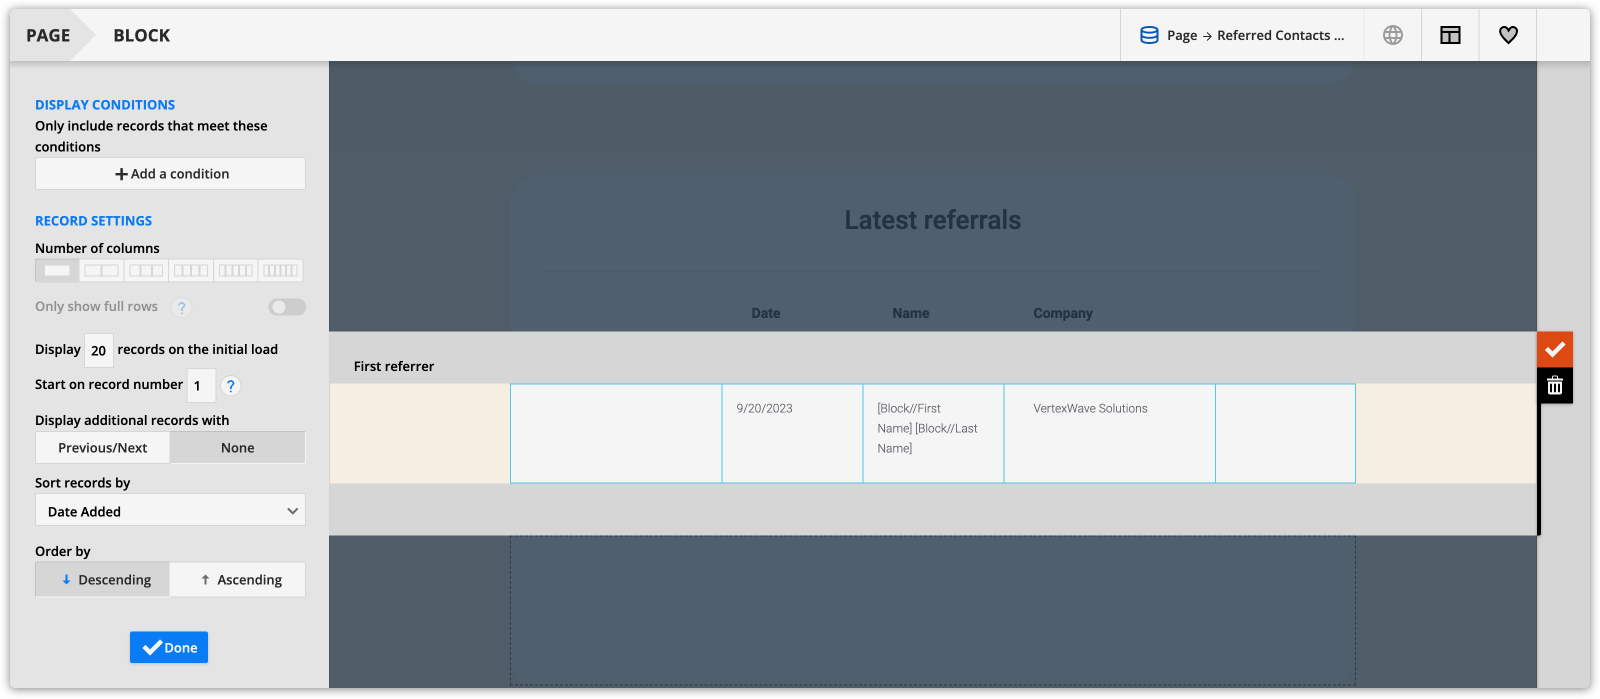
Show referred contacts
This will show a list of referred contacts from a partner sorted with the most recently referred contacts at the top.
- Add a dynamic block and select the source “Referred Contacts (First Referrer)” or “Referred Contacts (Last Referrer).”
- You can create two blocks to show the most recent first and last referrers.
- Add merge fields for the contact’s first name, date and any other information you want to show.
- Open your dynamic block’s settings and set the “Sort records by” field to “Date added” and select “Descending” in the “Sort by” option.
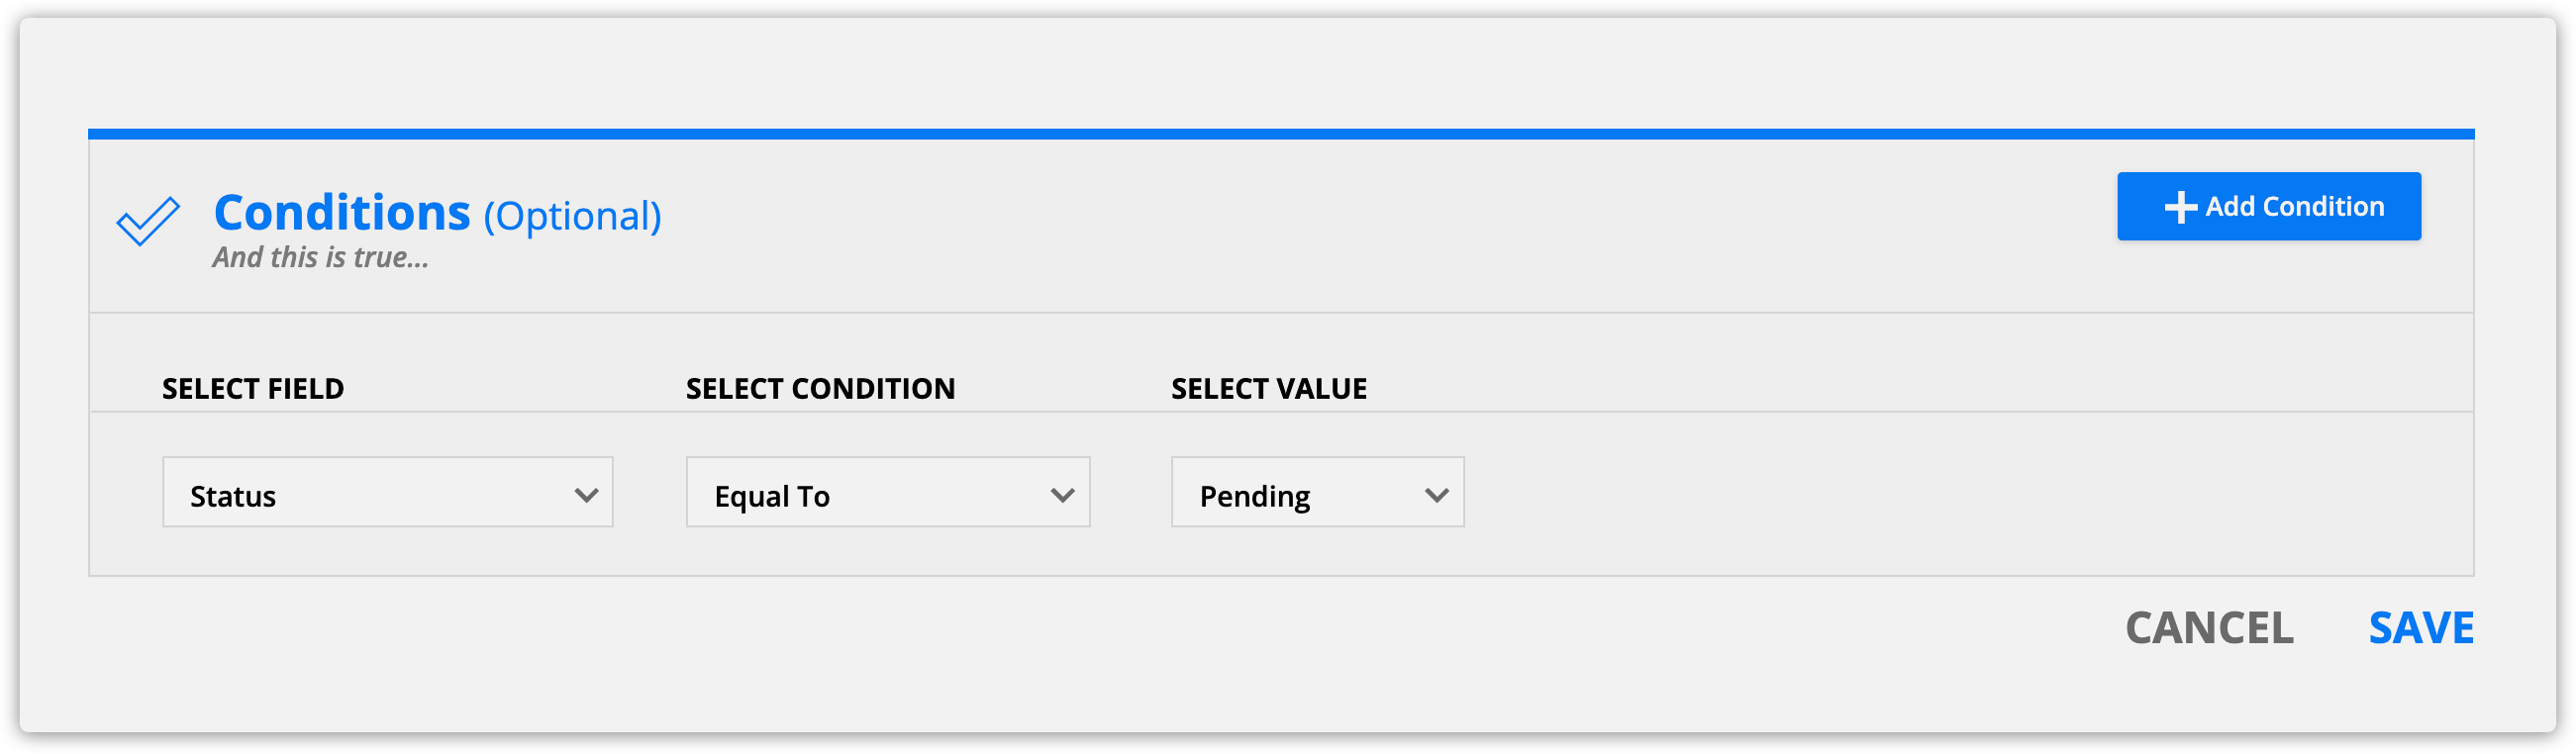
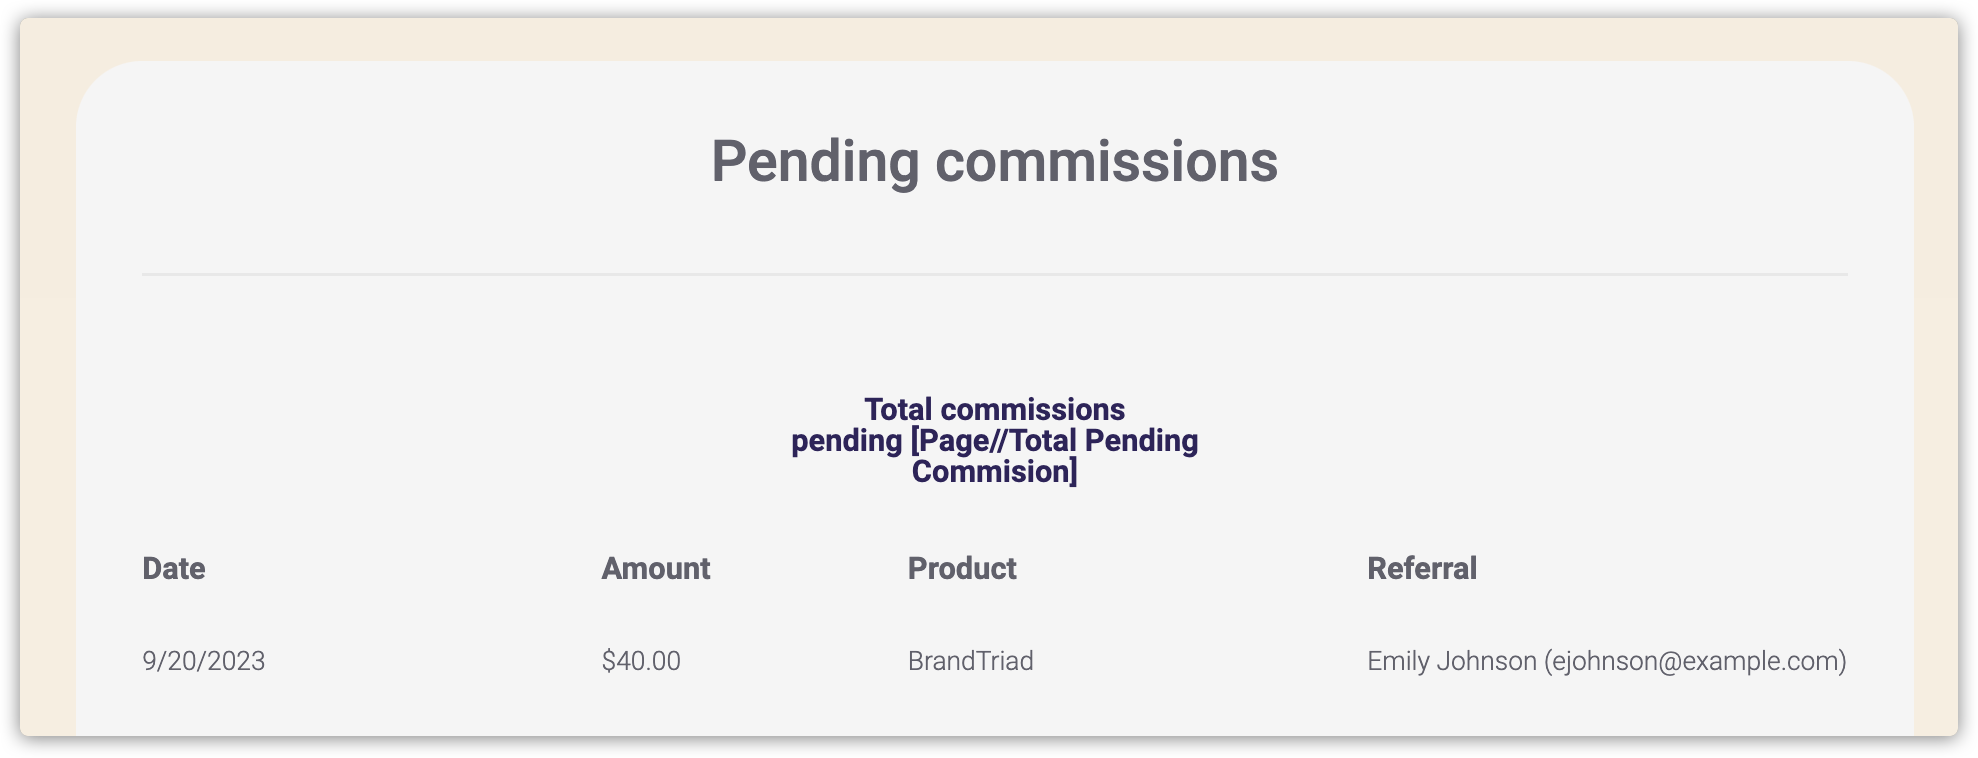
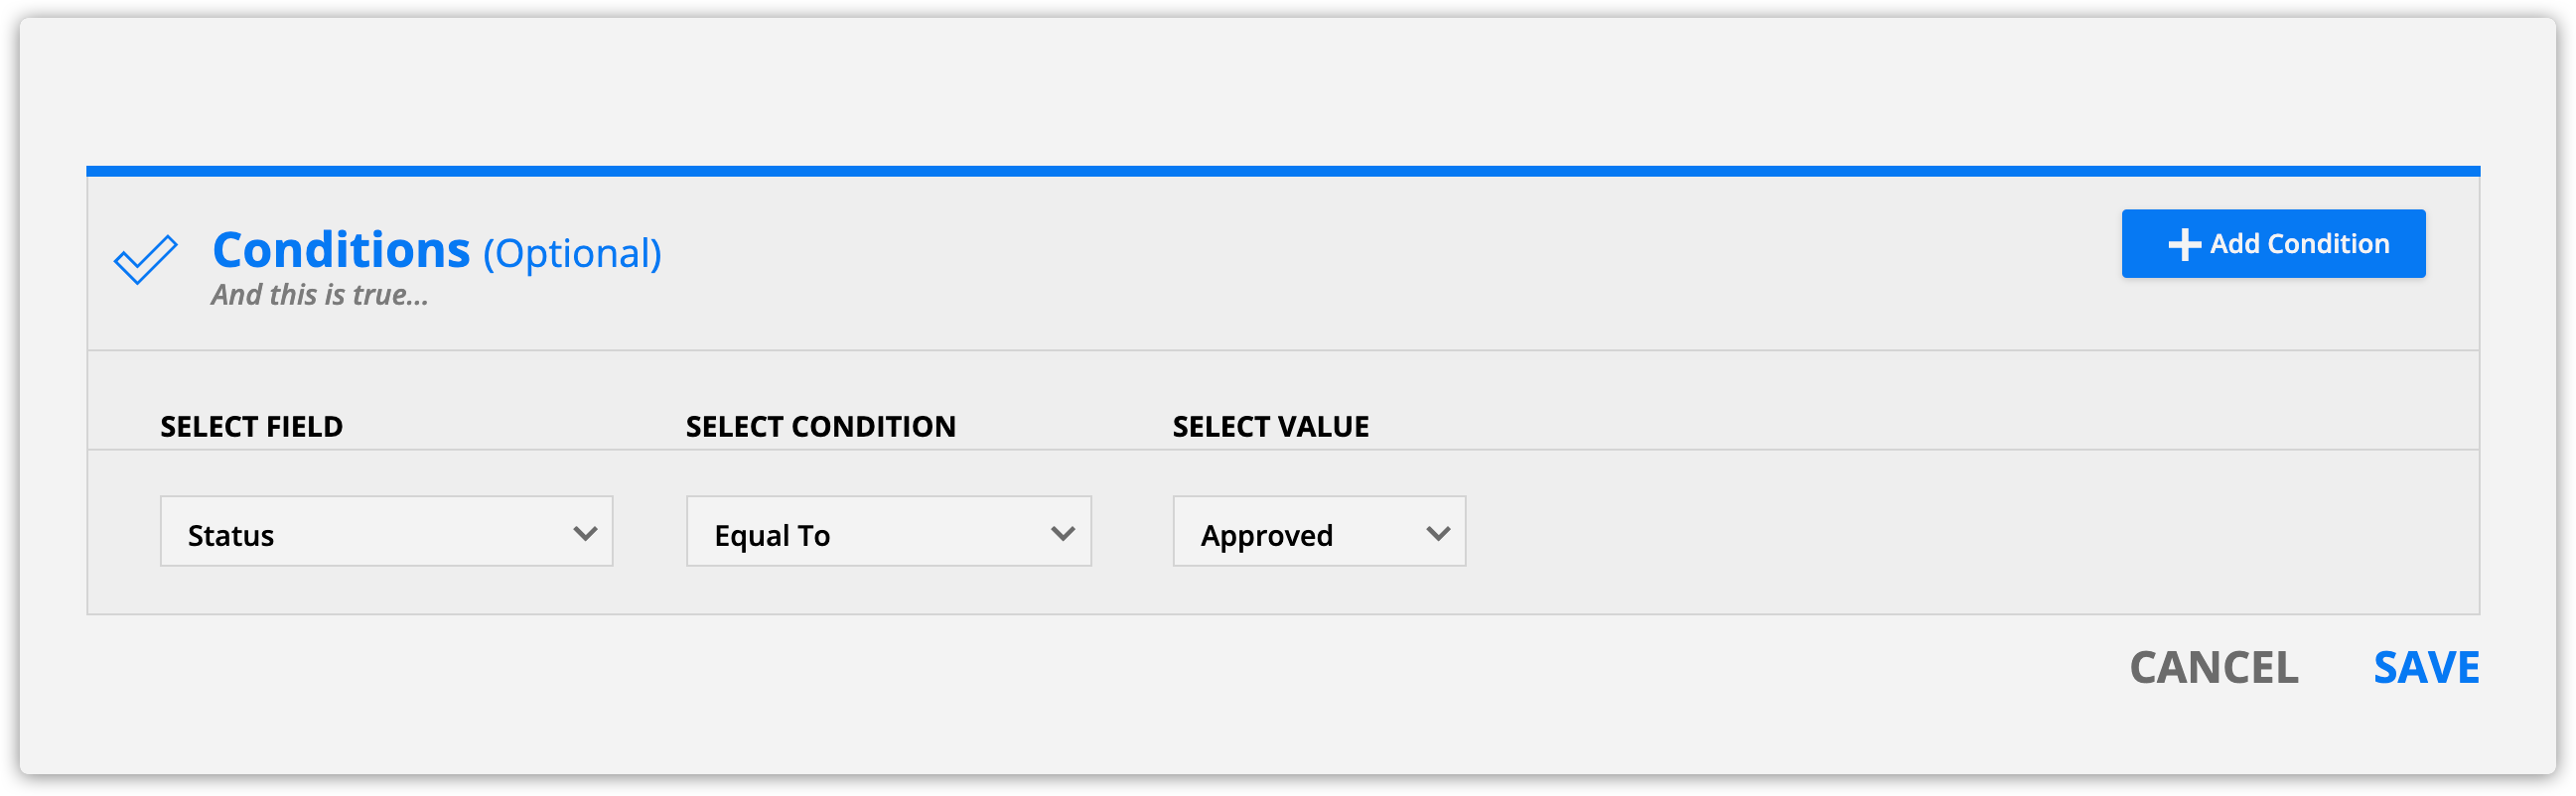
Show pending commissions
This will show your partners the pending commissions they’ve earned and the total amount of commissions you owe them.
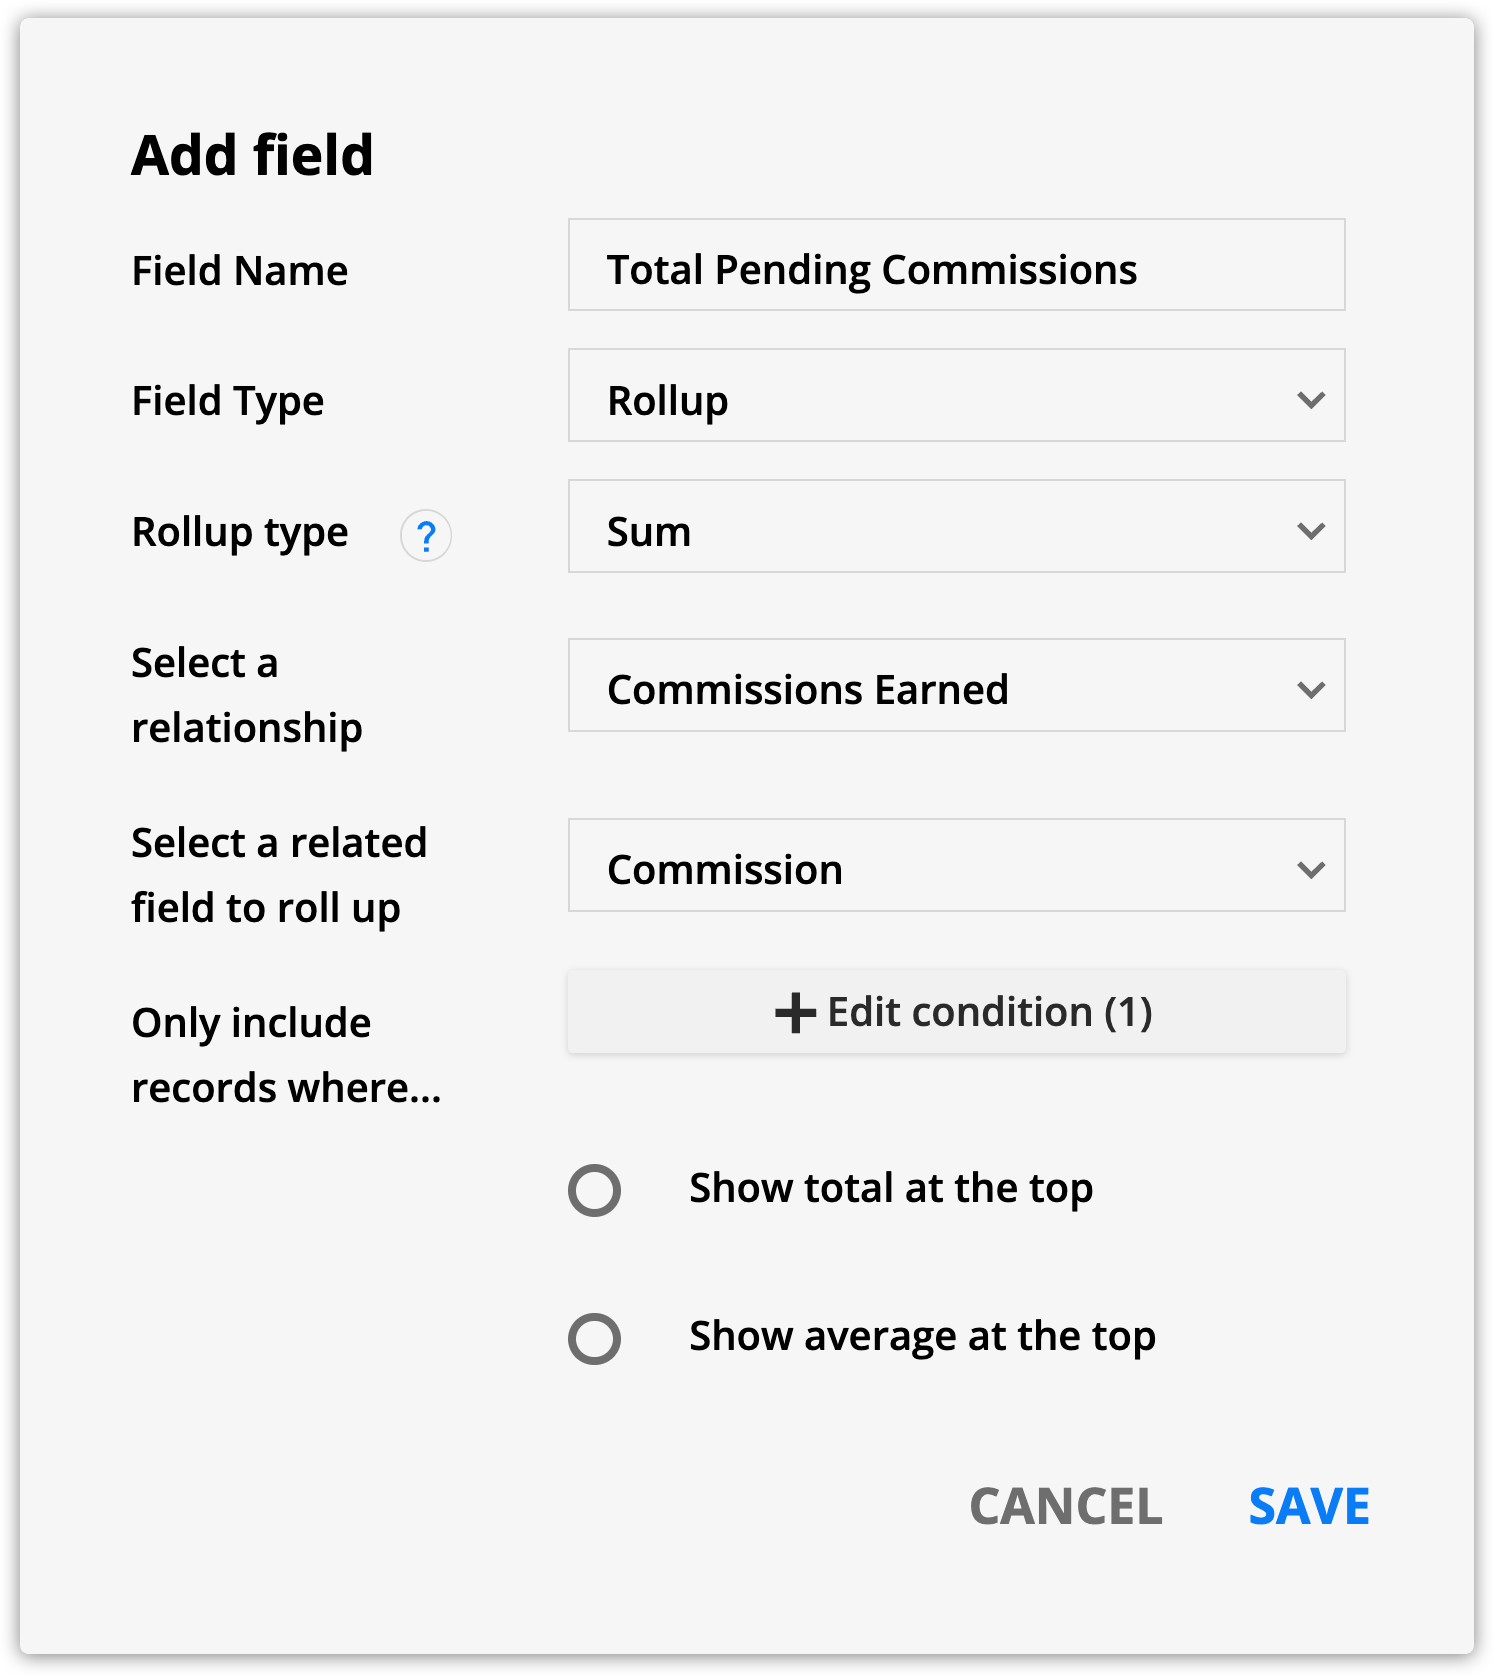
Create your rollup field
You’ll use this field to show the total amount of pending commissions your partner has earned.
- Create a new field in your Contacts object.
- Field name: Total pending commissions
- Field type: Rollup
- Rollup type: Sum
- Select a relationship: Commissions earned
- Select a related field to roll up: Commission
- Only include records where…: Status equal to pending
- Click Save.
Create your dynamic block
- Add a dynamic block and select the source “Commission Earned.”
- Add merge fields for transaction date, commission, contact name and product name.
- Open your dynamic block’s settings, and click Add a condition. Add the condition “Field is this value.”
- Then add the condition “Status equal to pending.”
- In the “Sort records by” field, select “Transaction Date.” Then set the “Order by” setting to “Descending.”
- Add a normal block above your dynamic block, and add your header labels and the “Total pending commissions rollup field.
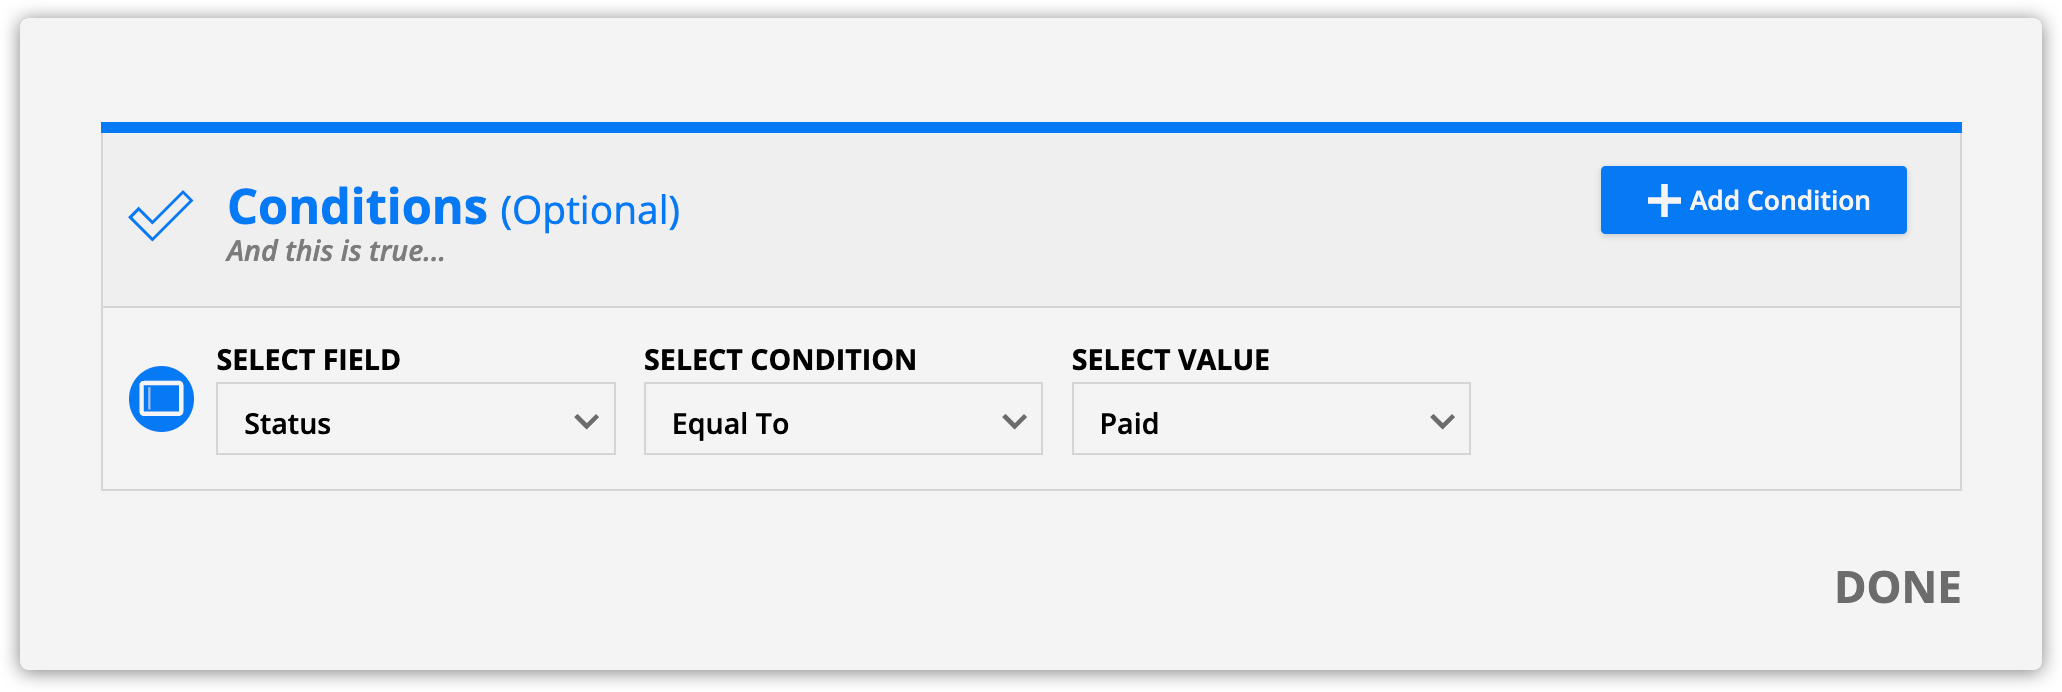
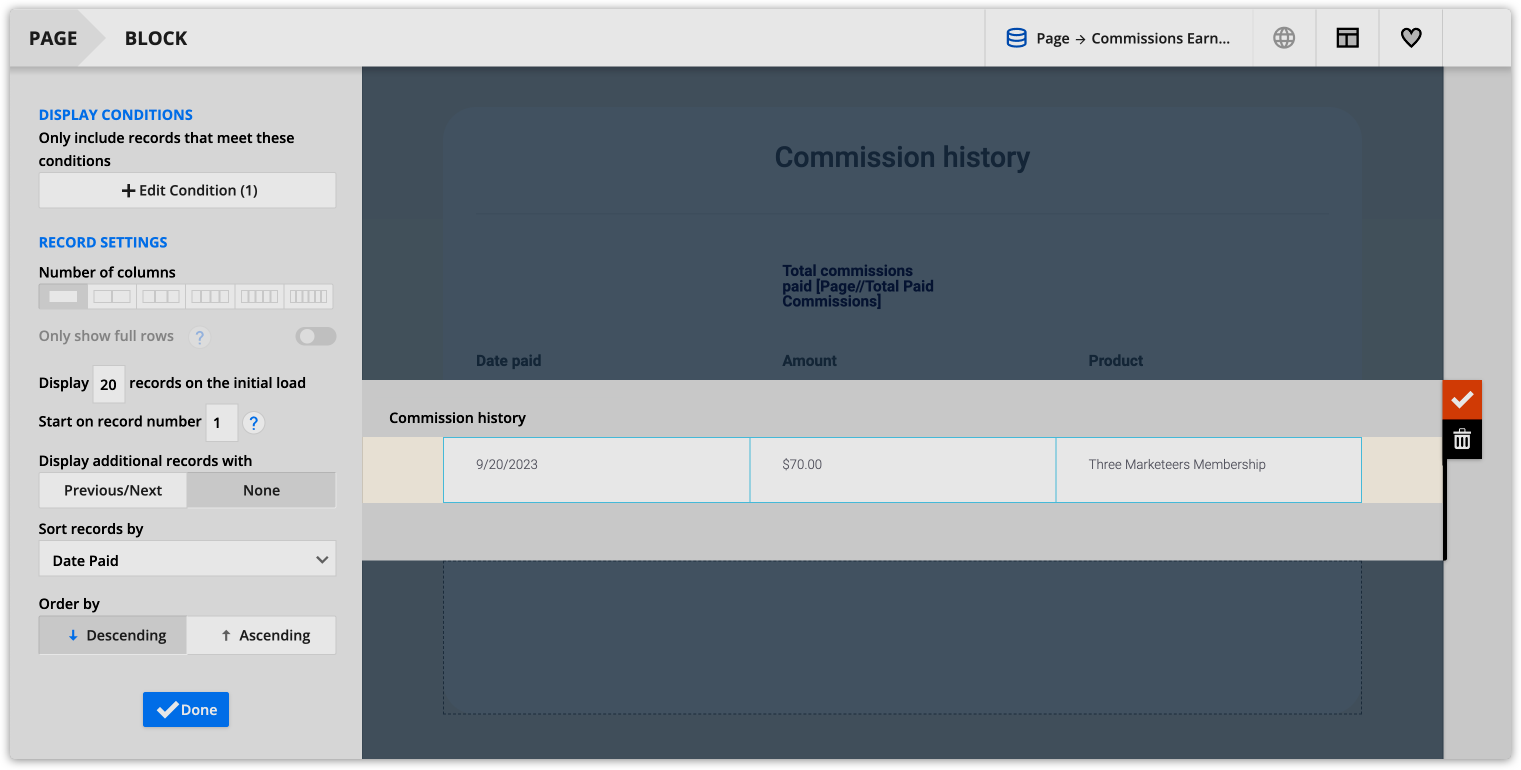
Show commission history
This will show your partners the complete history of all commissions earned.
- Add a dynamic block, and select the source “Commission Earned.”
- Open your dynamic block’s settings, and click Add a condition. Add the condition “Field is this value.”
- Then add the condition “Status equal to paid.”
- Add merge fields for transaction date, commission, contact name and product name.
- In the “Sort records by” field, select “Date Paid.” Then set the “Order by” setting to “Descending.”
Show commissions for a specific product
This will show your partners a list of contacts and commissions they’ve earned in the past month for a specific product.
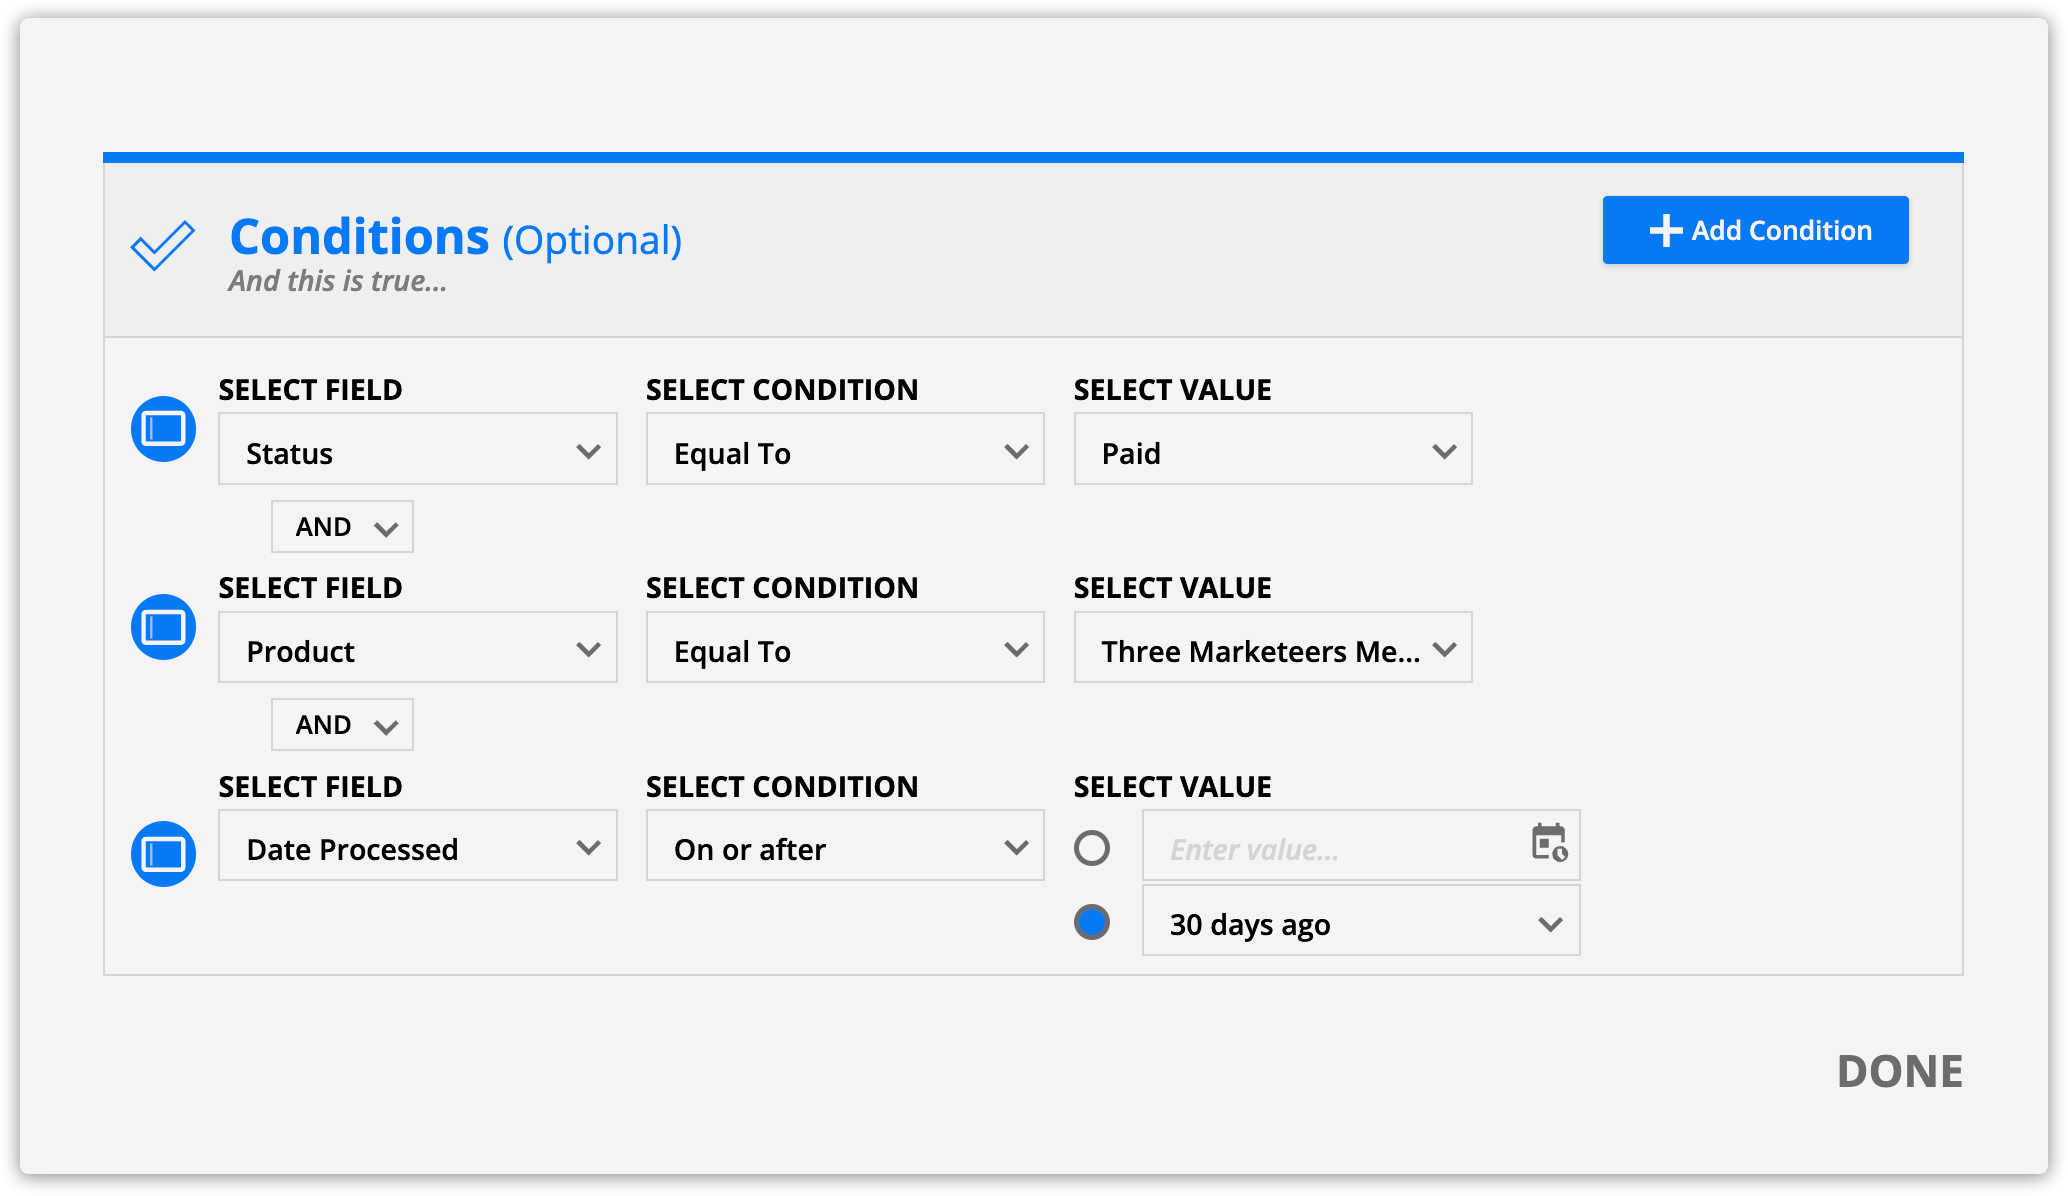
- Add a dynamic block and select the source “Commission earned.”
- Add merge fields for product, commission and date processed.
- Add the condition “Status equal to paid.”
- Add another “Field is the value” condition, and connect your conditions with an “AND” operator.
- Then add the condition “Product equal to [your product’s name].”
- Add a final “Field is the value” condition, and connect your conditions with an “AND” operator.
- Then add the condition “Date processed on or after 30 days before.”
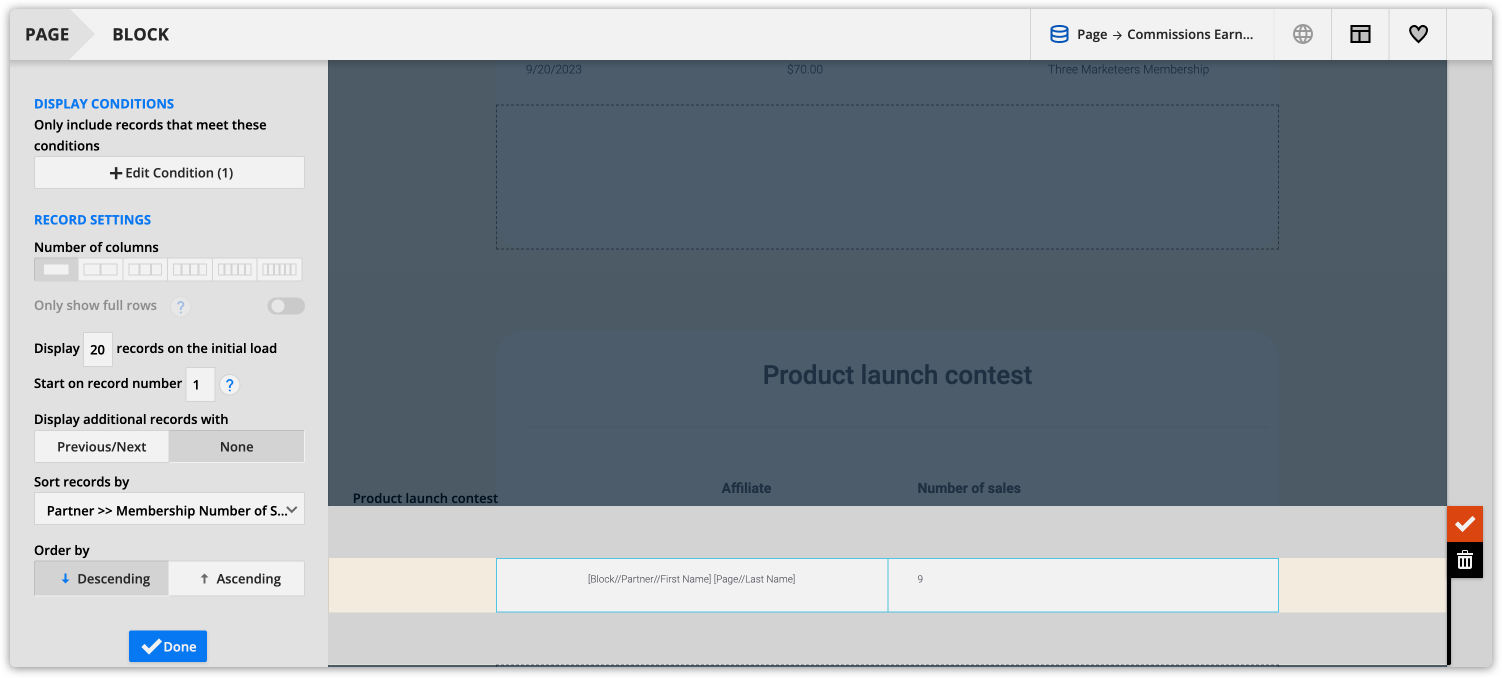
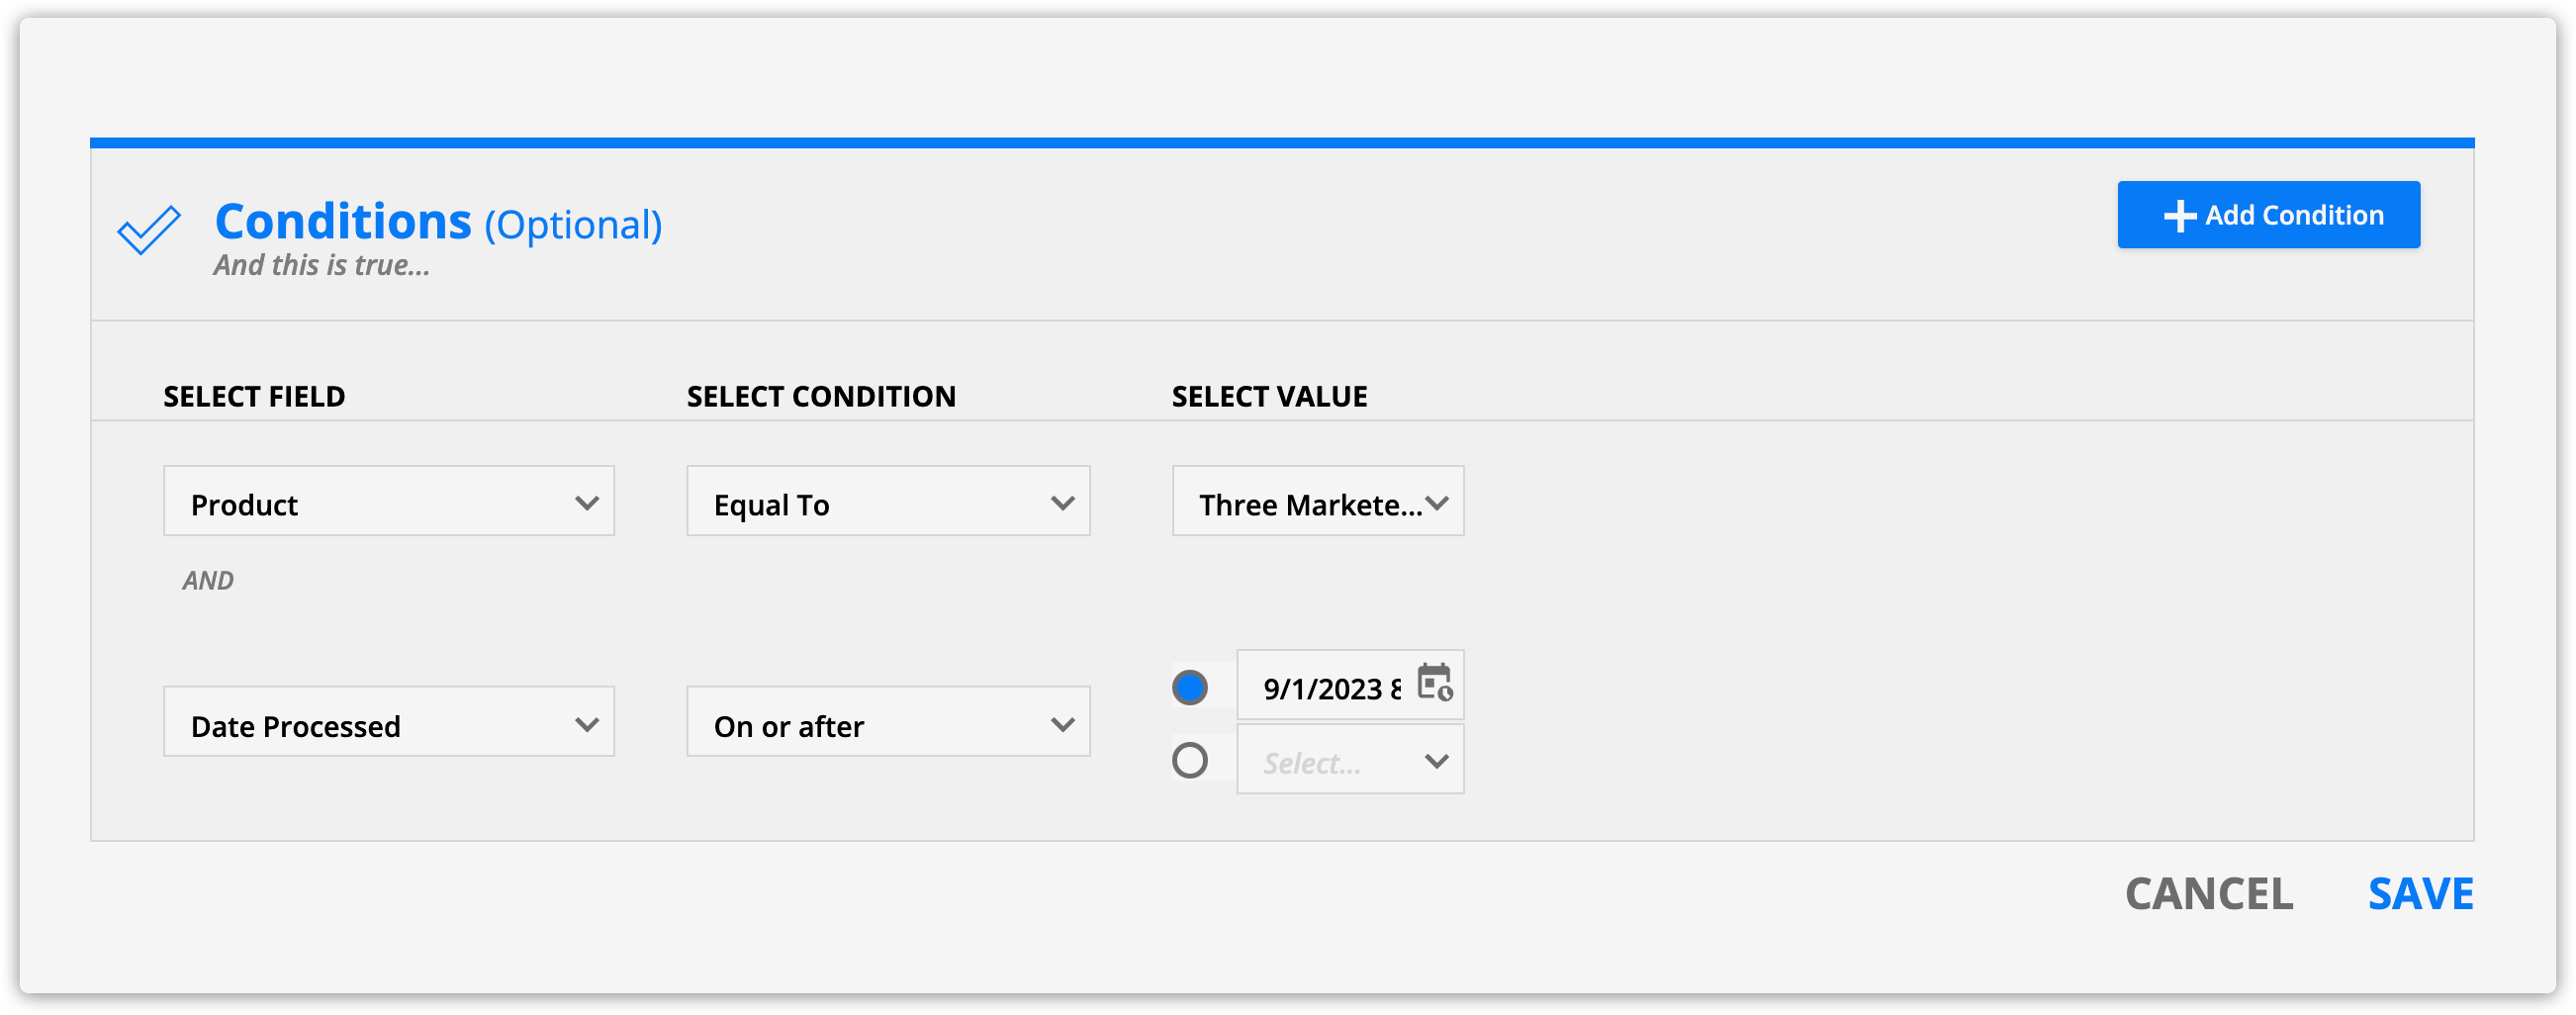
Create a product launch contest
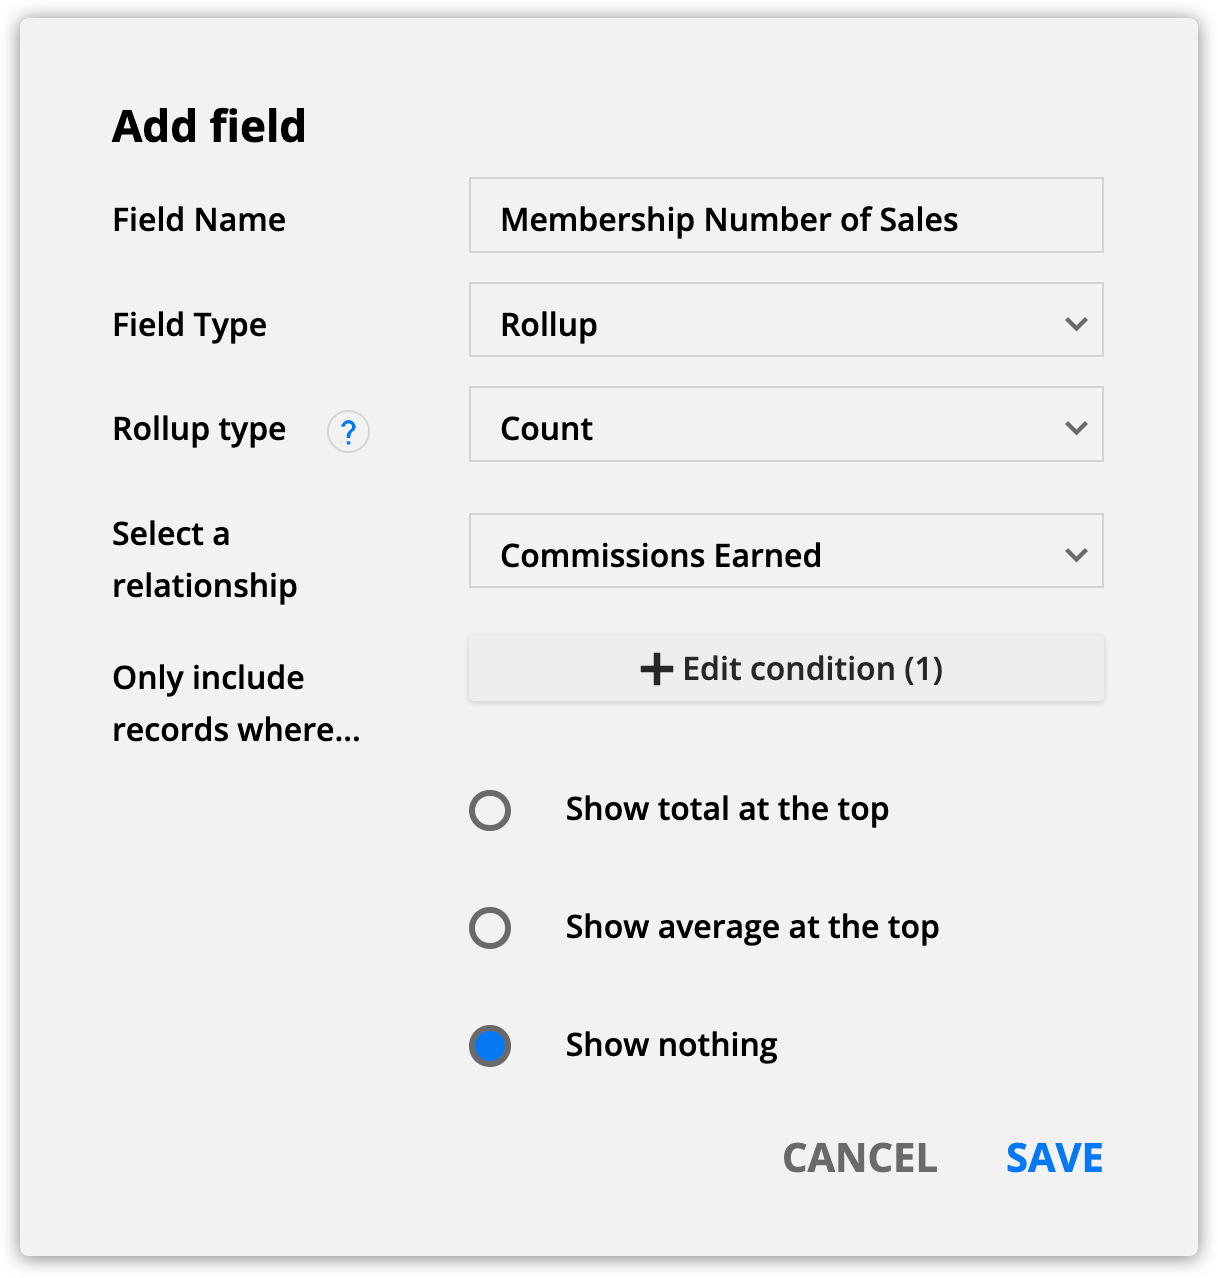
Create a rollup field
This will show you a list of partners and show them who has sold the greatest number of your promotional products.
- Create a new field in your Contacts object.
- Field name: [Your product’s name] Number of Sales
- Field type: Rollup
- Rollup type: Count
- Select a relationship: Commissions Earned
- Only include records where…: Product equal to [your product’s name]
- Click Save.
Add your rollup field to your page
Since your rollup field exists in your contact’s record, you don’t need to use a dynamic block to access it.
- Add a dynamic block to your page and add Contacts as the data source.
- Add merge fields for your name and the count rollup field you created above.
- Open your dynamic block’s settings and add a condition “Partner Program >> Name equal to [Your program’s name].”
- In the Sort record by field, select your rollup field.
- Select “Descending” from the Sort by setting.
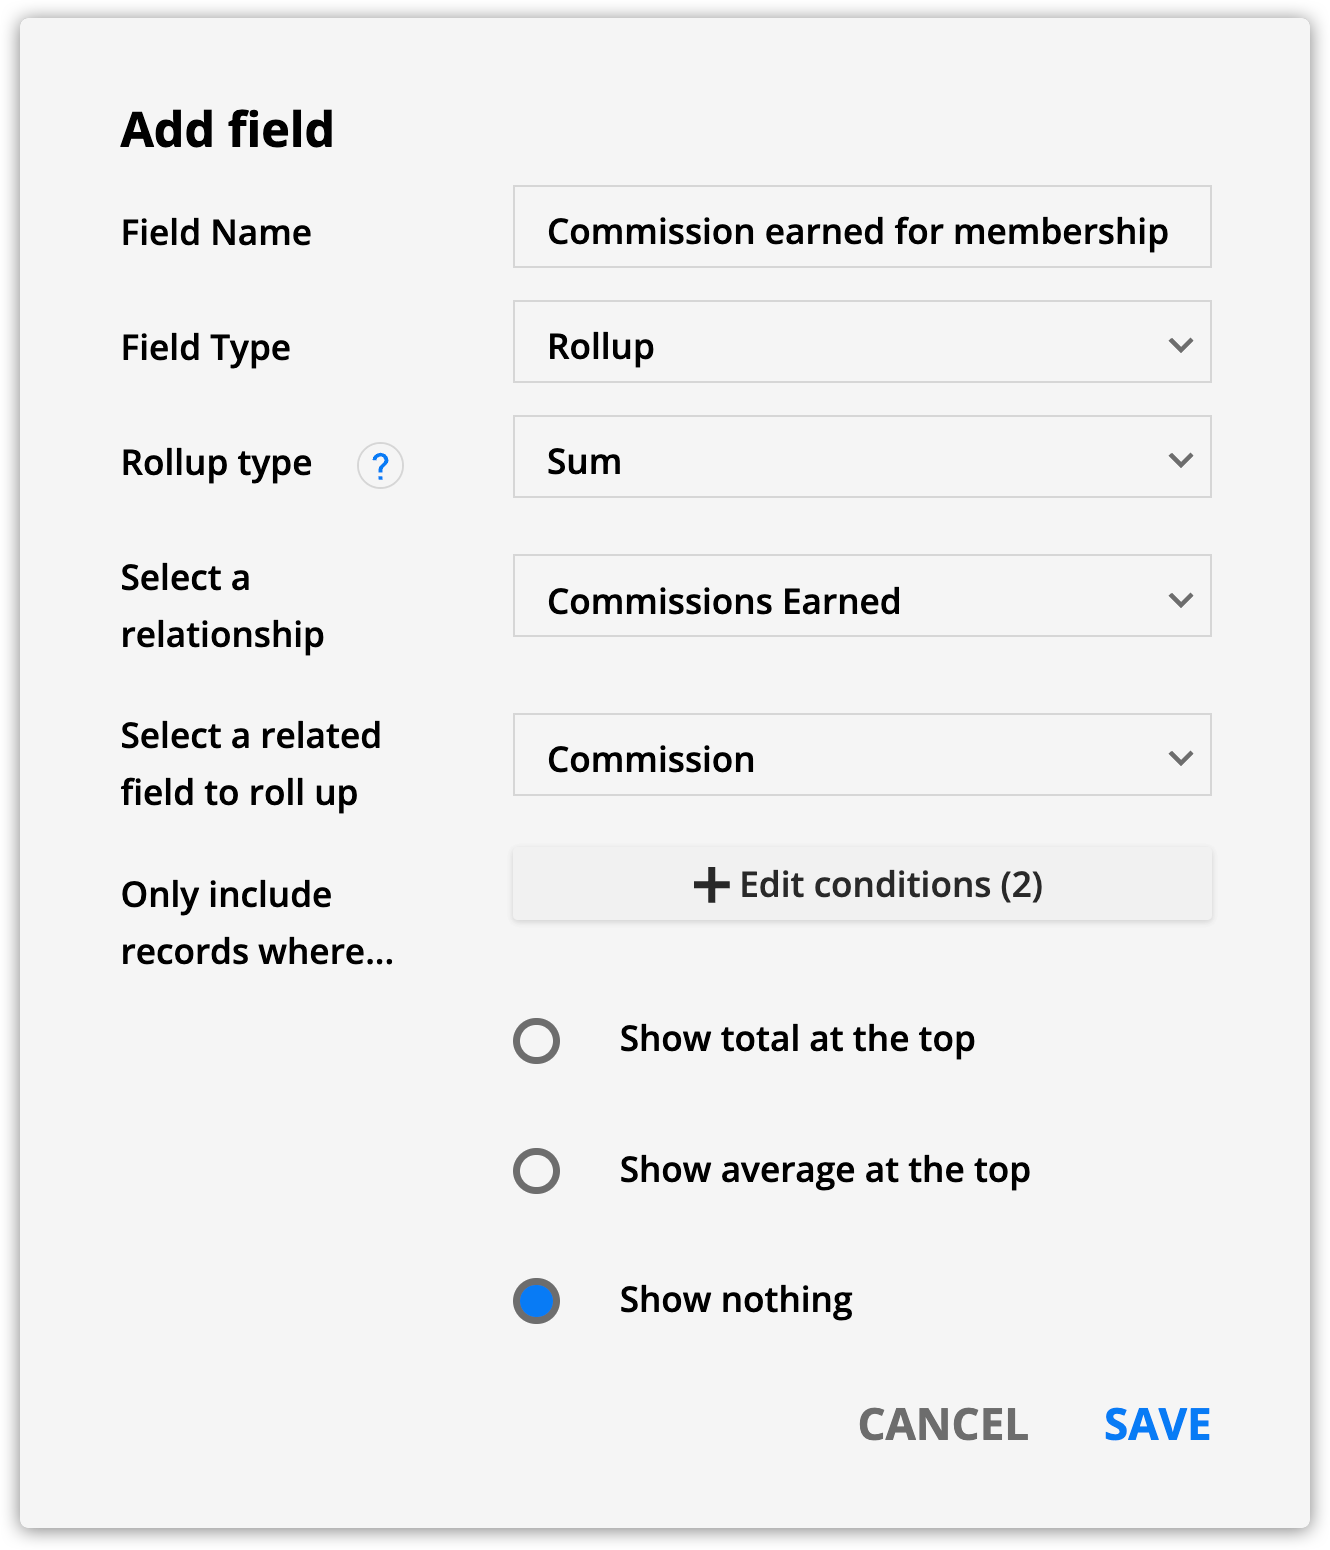
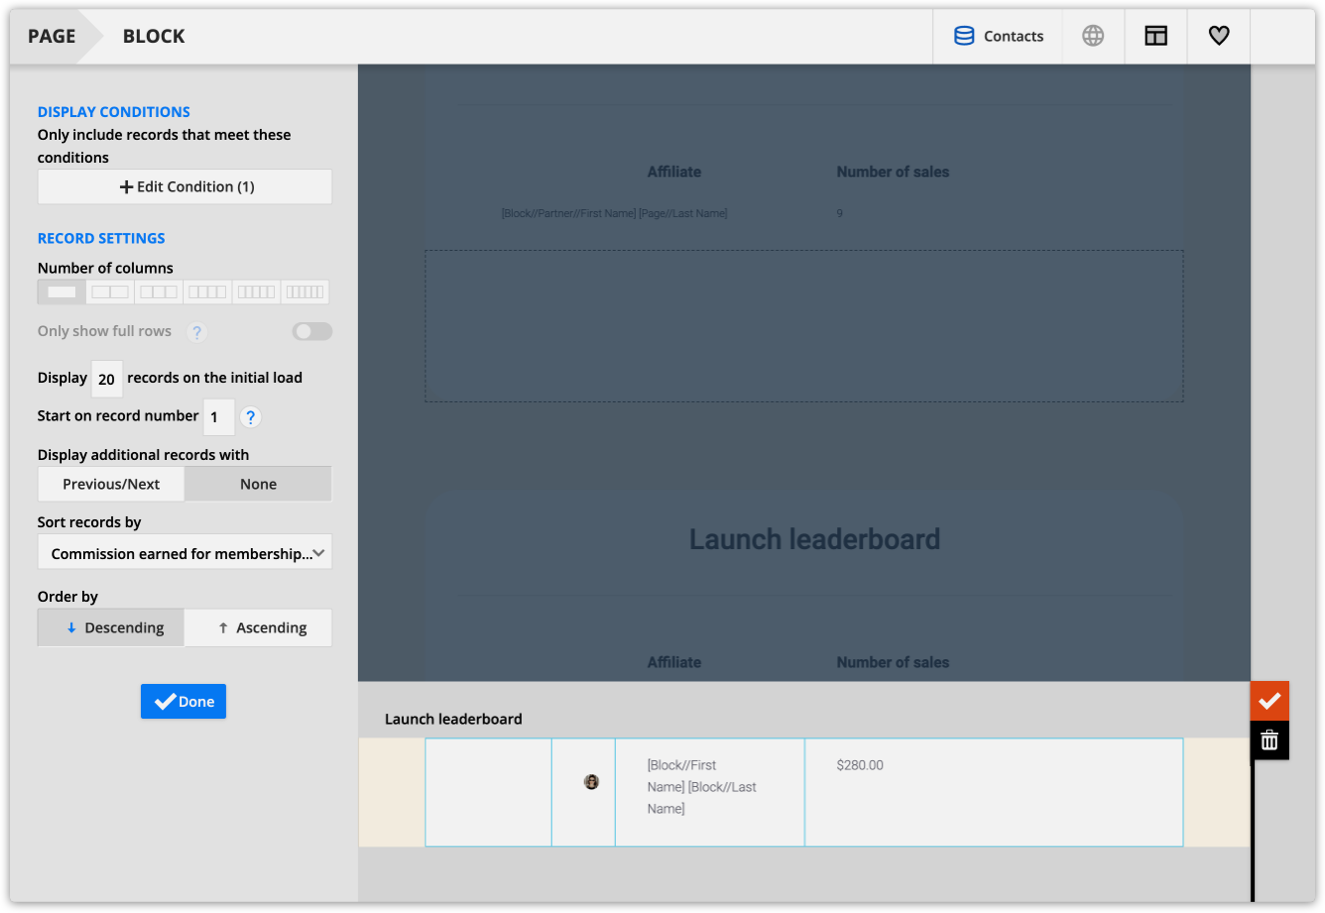
Create a leaderboard
This will show your partners who referred the most customers and how they compare to their competition.
Create your rollup field
- Create a new field in your Contacts object.
- Field name: Commission earned for [Contest name]
- Field type: Rollup
- Rollup type: Sum
- Select a relationship: Commissions Earned
- Select a related field to roll up: Commission
- Only include records where…: Product equal to [Your product’s name] AND Date processed on or after [Contest start date]
- Click Save.
Create your leaderboard
- Add a dynamic block and select Contacts as your source.
- Add merge fields for name, your rollup field and any other partner data you want to display.
- Open your dynamic block’s settings and add a condition “Partner Program >> Name equal to [Your program’s name].”
- Open your dynamic block’s settings, set the “Sort records by” field to your rollup field with “Descending” selected in the “Sort by” option.
Adding incentives for your partners
In this section, you’ll find instructions on how to create different incentives for your partners. Incentivizing your affiliates is a win-win because it can increase motivation and performance, which means more sales for you and more commission for your partners.
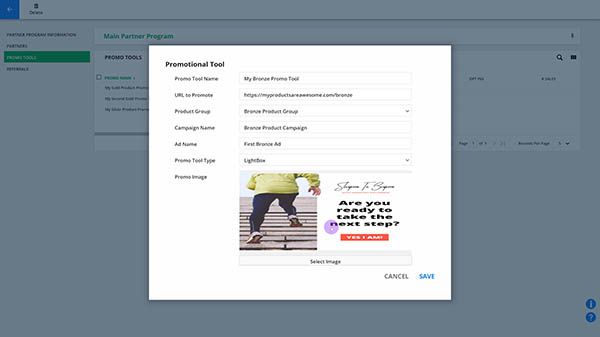
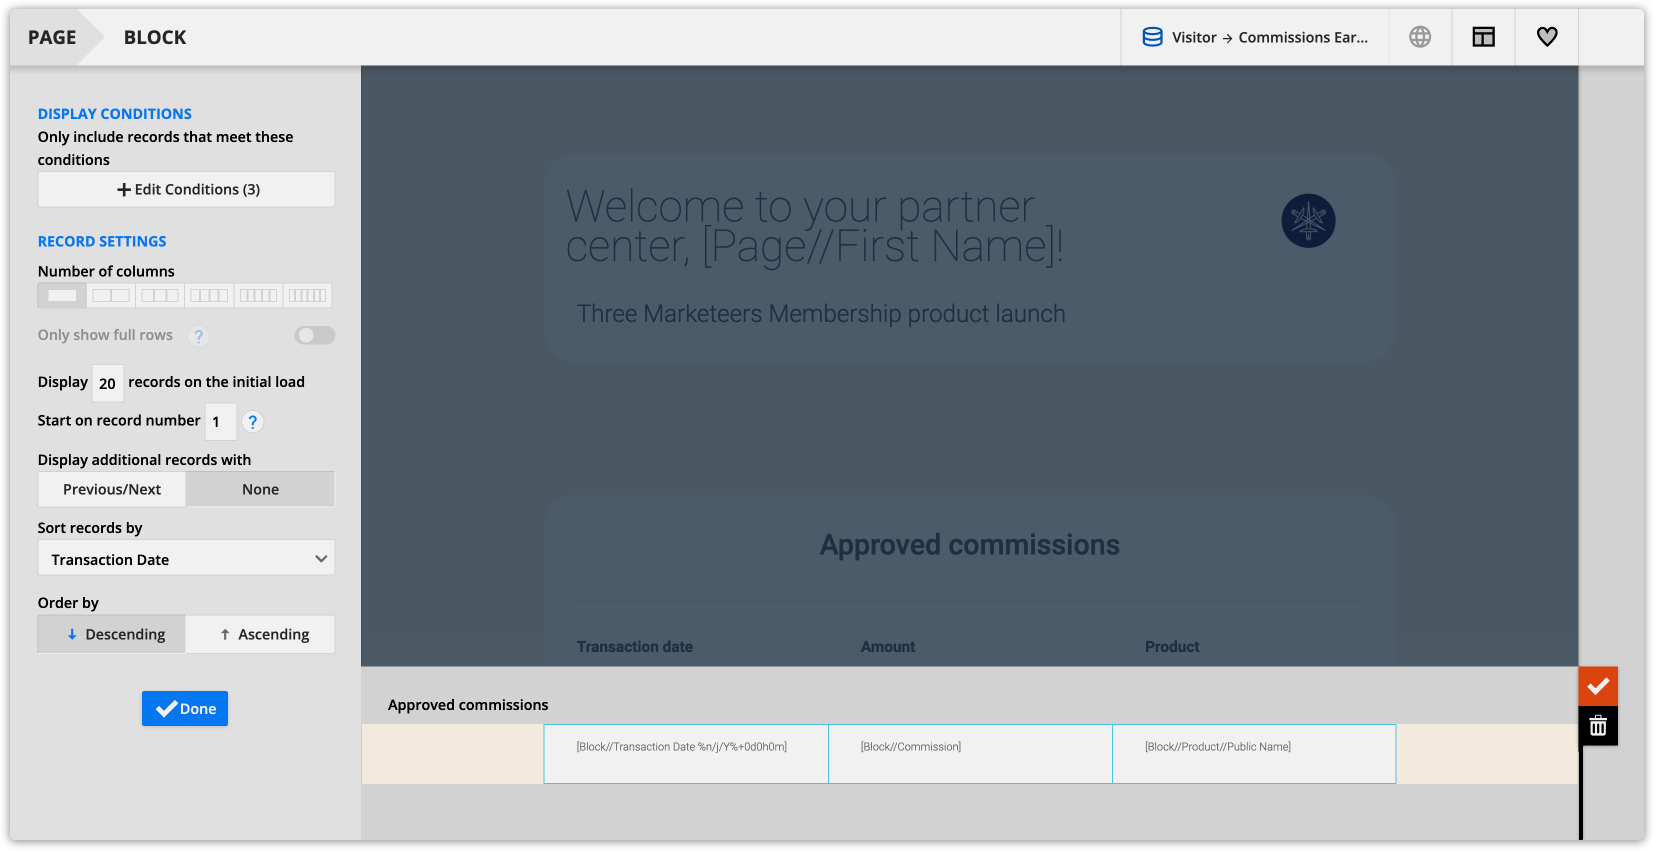
Create a custom partner center for launches
- Create a new Ontraport page.
- Add a dynamic block with the source “Commissions earned” from the “Related to visiting contact data source” section.
- Add merge fields for transaction date, commission, contact and product name.
- Open your dynamic block’s settings, and click Add a condition. Add the condition “Field is this value.”
- Then add the condition “Status equal to approved.”
- Add another “Field is the value” condition, and connect your conditions with an “AND” operator.
- Then add the condition “Transaction date on or after [Your contest start date].”
- Add another “Field is the value” condition and connect your conditions with an “AND” operator.
- Then add the condition “Product equal to [Your product’s name].”
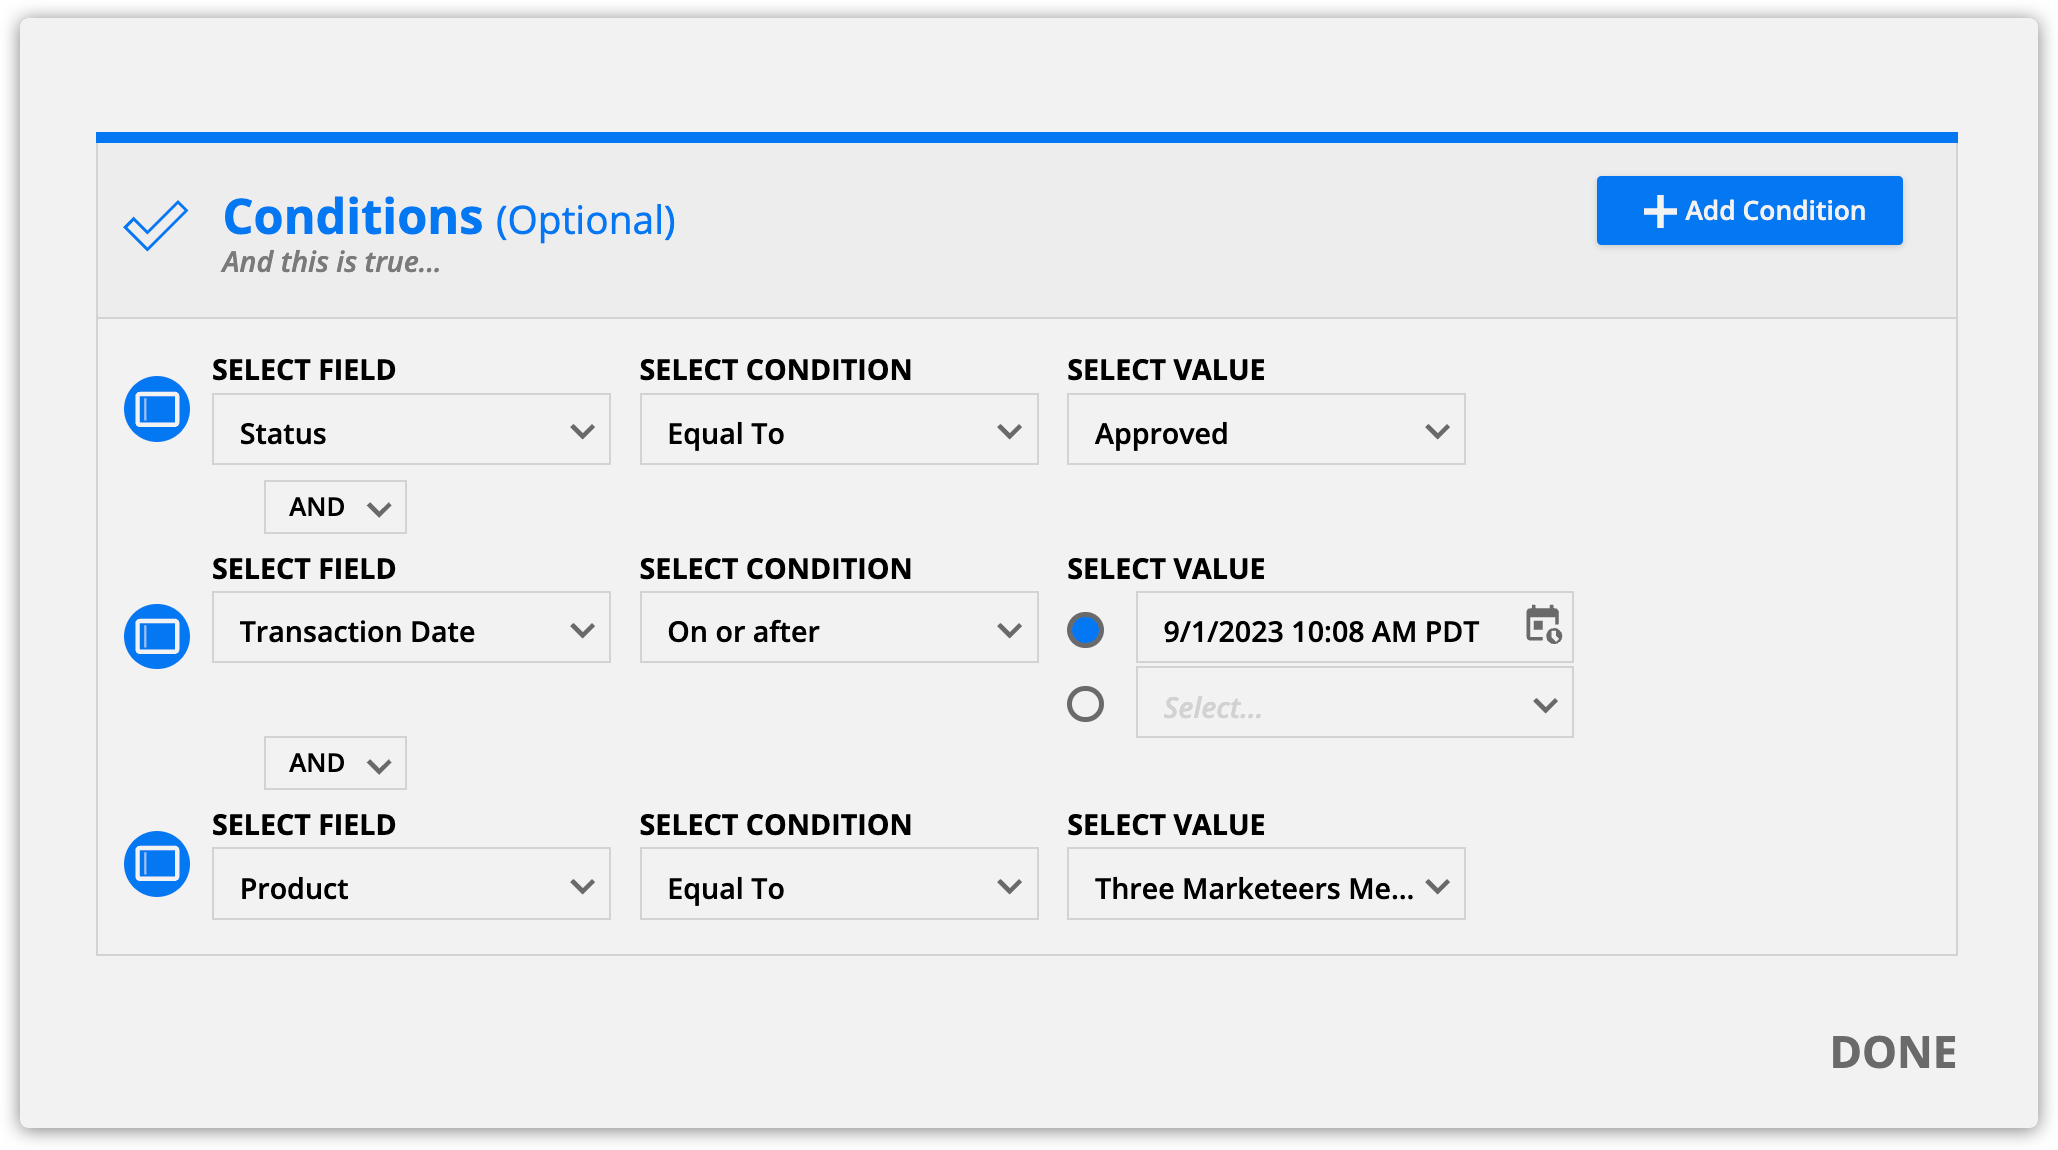
- Open your dynamic block’s settings, and set the “Sort records by” to “Transaction date” and select “Descending” in the “Sort by” option.
- Add another dynamic block and follow the steps above to add your partners’ commission history.
- Add another “Field is the value” condition, and connect your conditions with an “AND” operator.
- Then add the condition “Transaction date on or after [Your contest start date].”
- Add another “Field is the value” condition, and connect your conditions with an “AND” operator.
- Then add the condition “Product equal to [Your product’s name].”
- Add another “Field is the value” condition, and connect your conditions with an “AND” operator.
- Open your dynamic block’s settings, set the “Sort records by” to “Transaction date” and select “Descending” in the “Sort by” option.
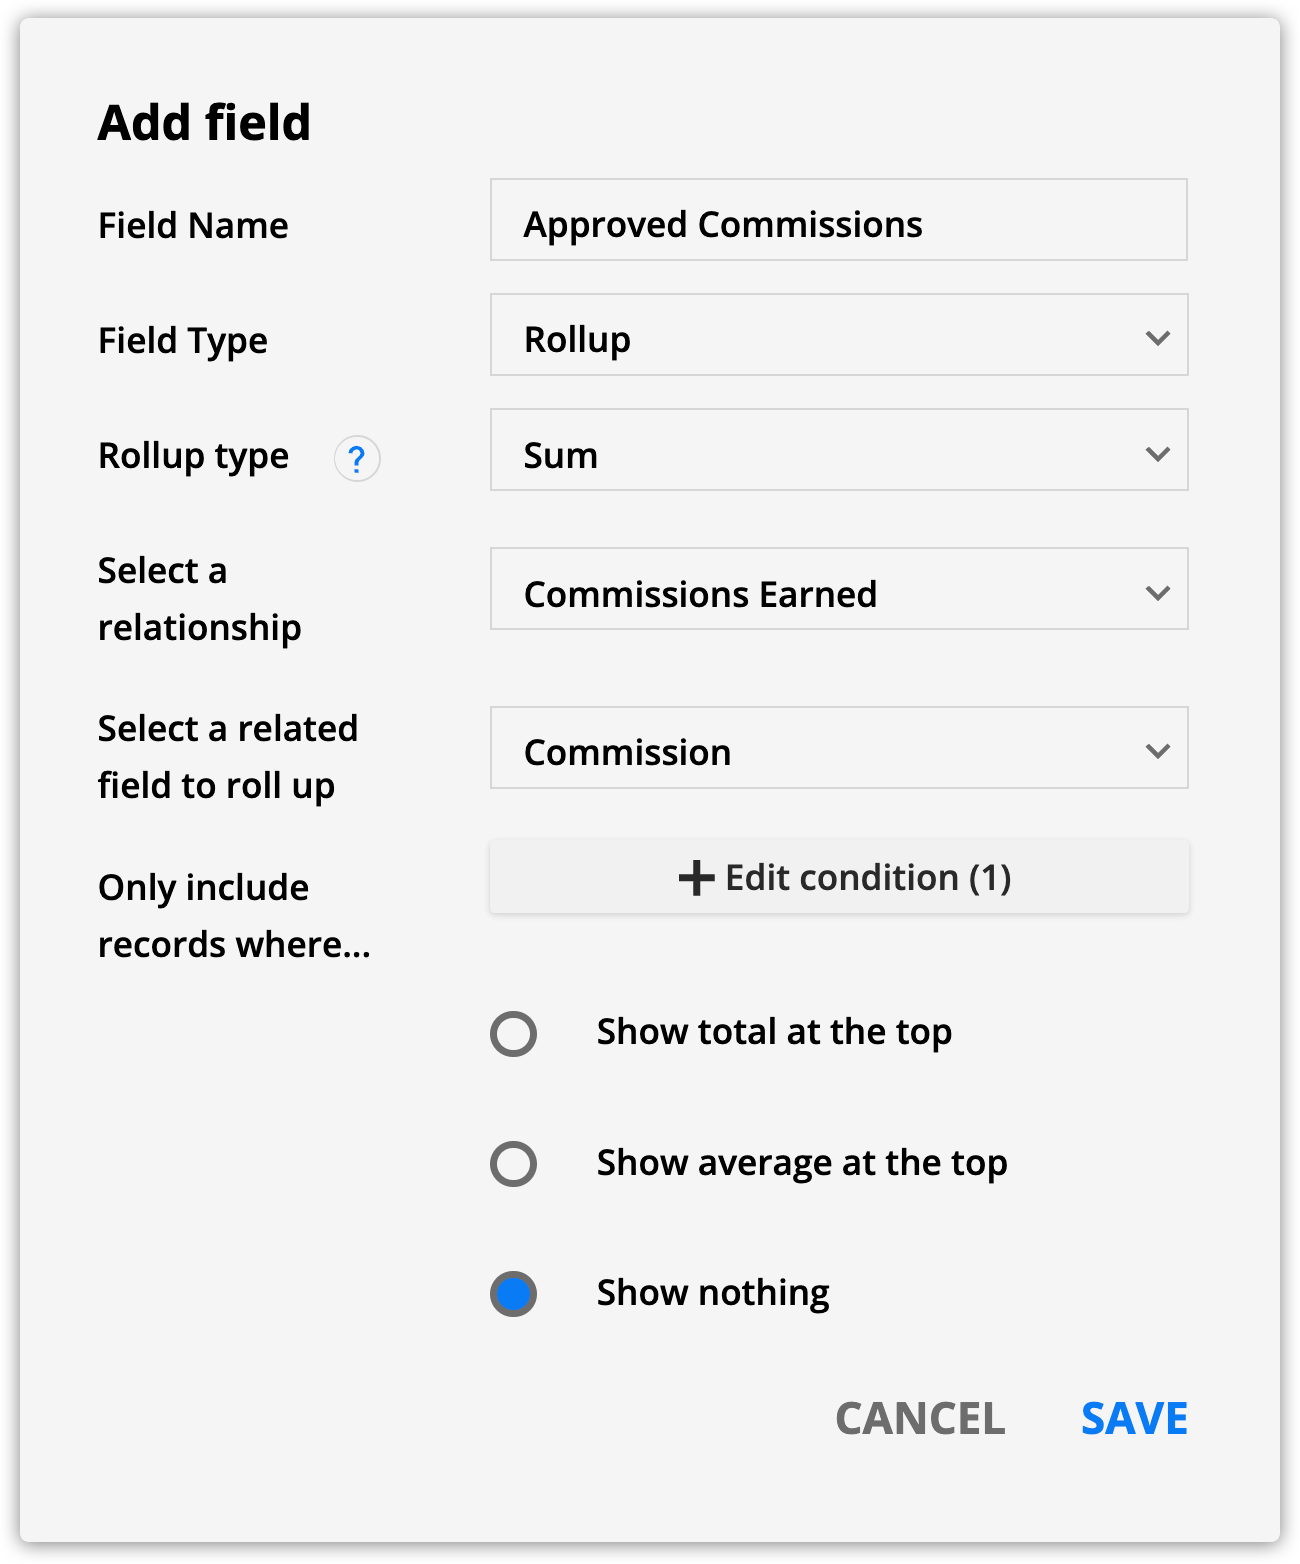
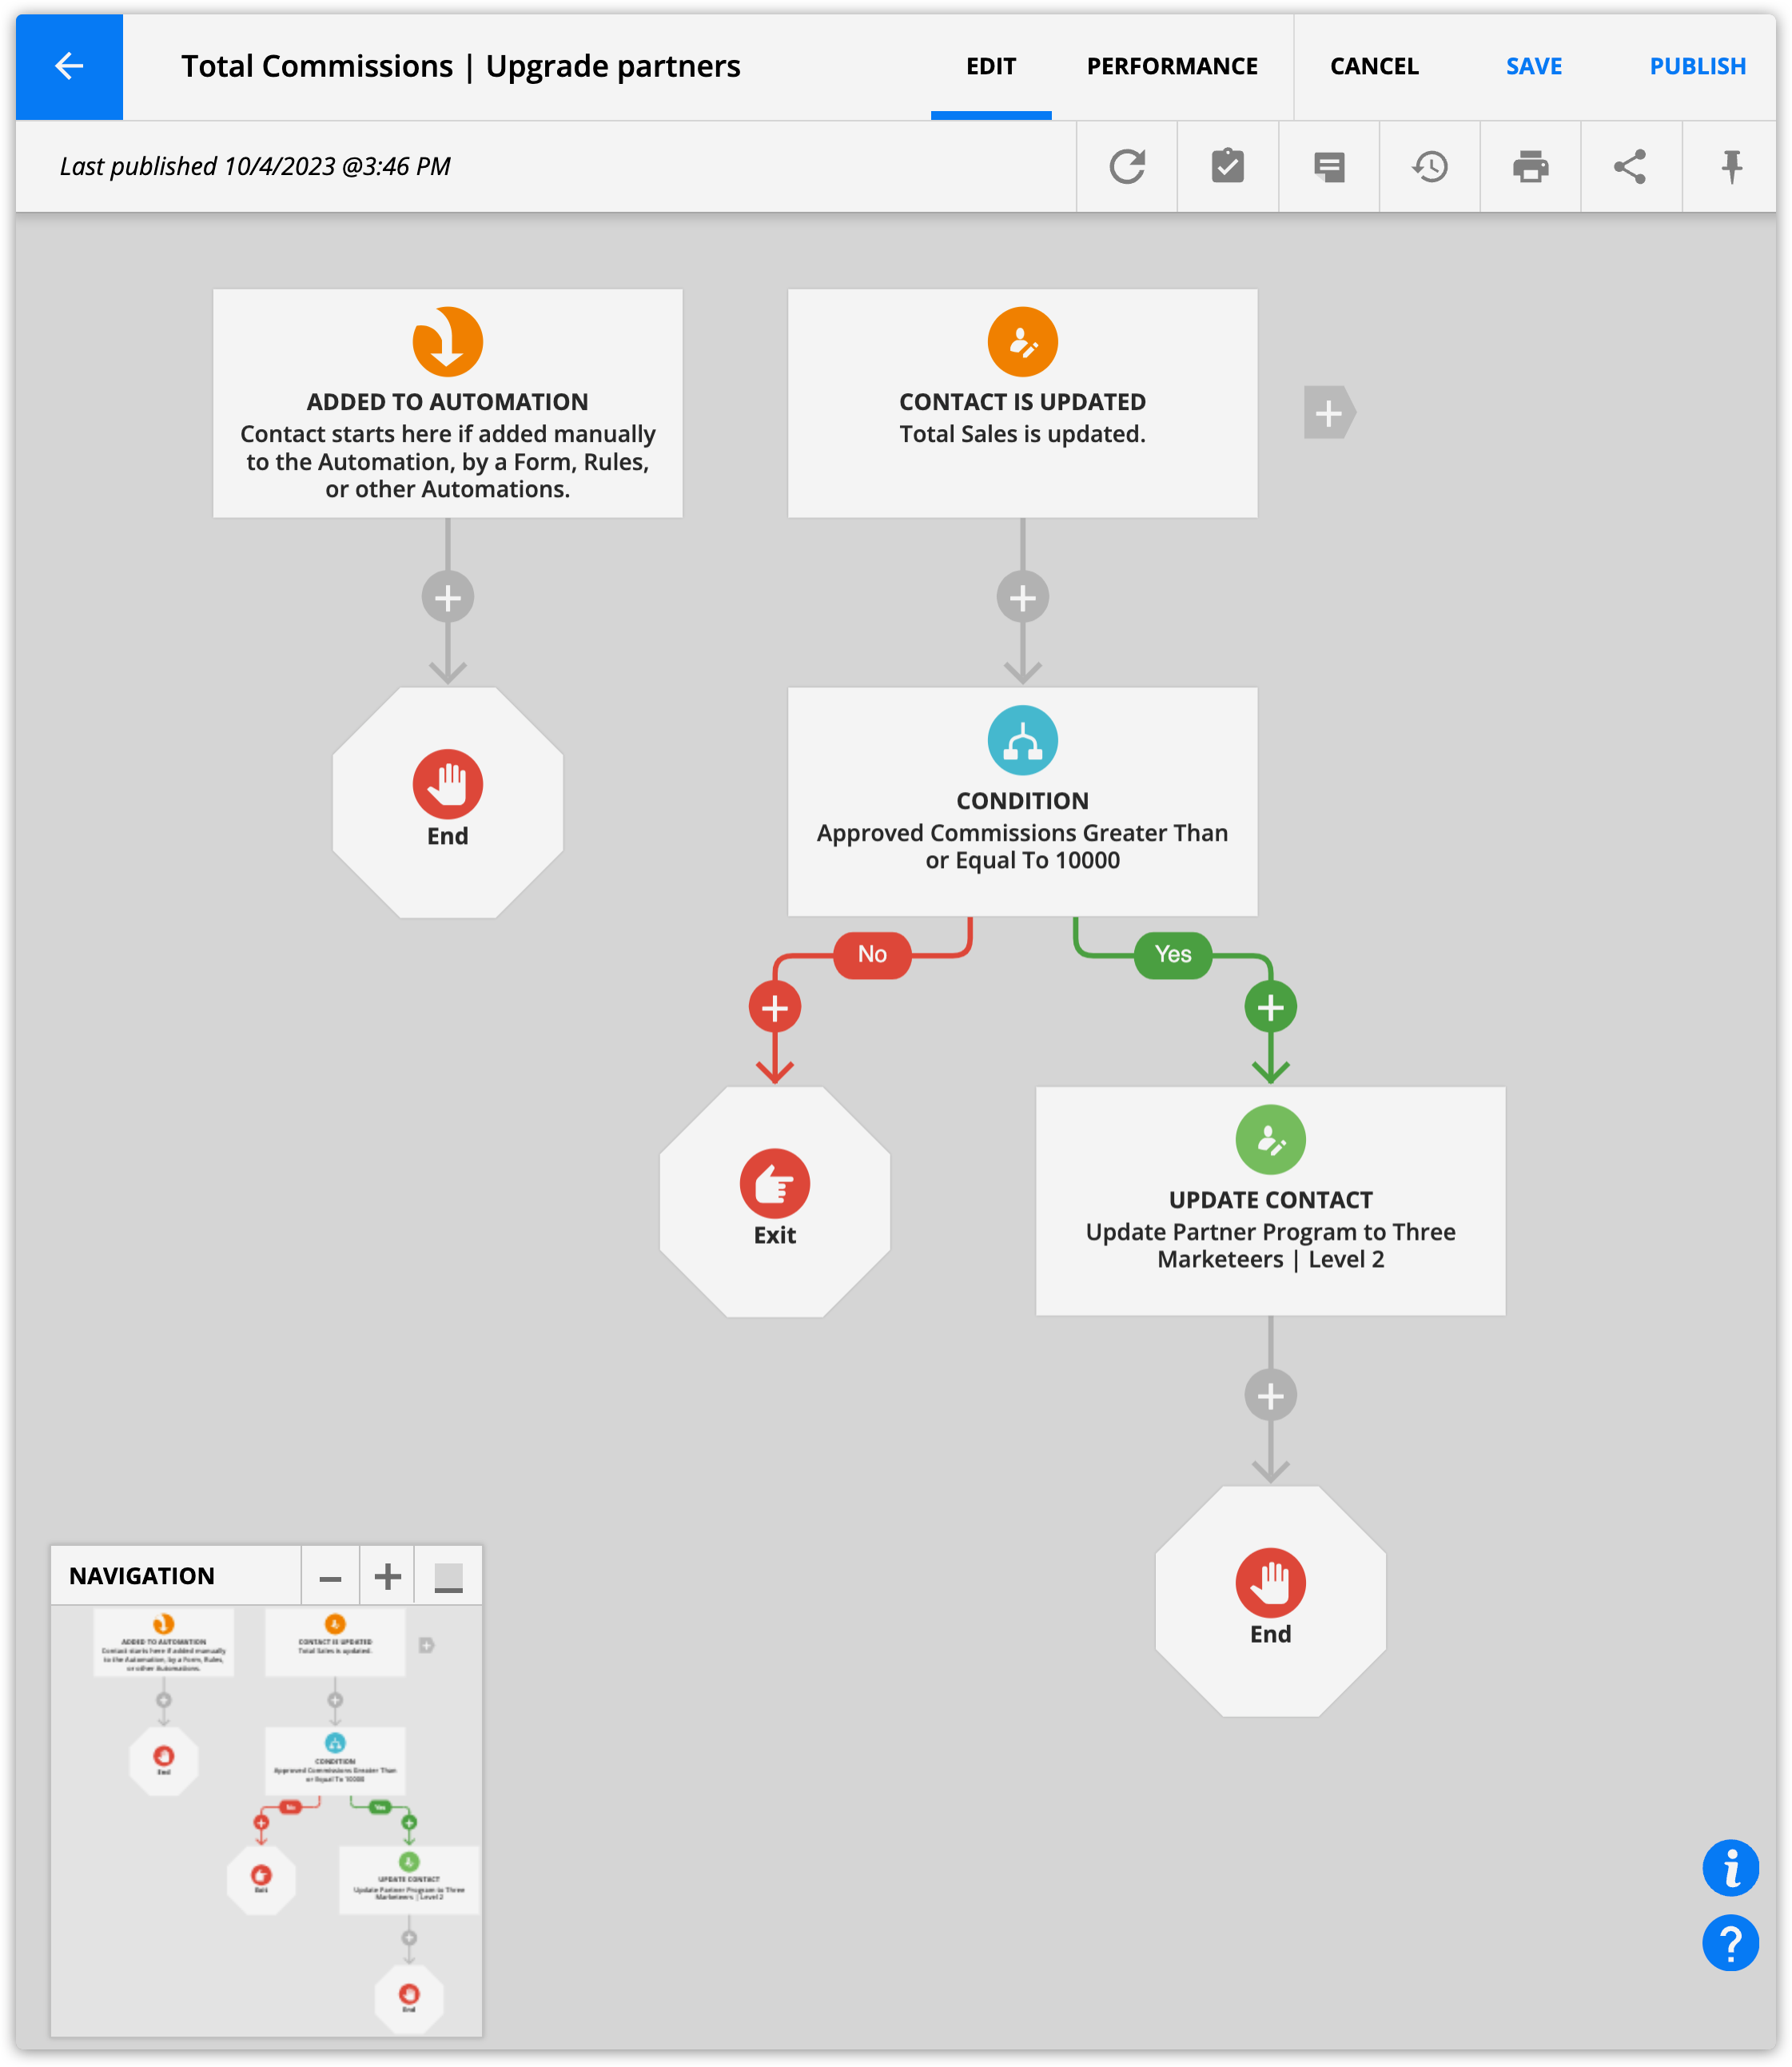
Automatically increase commissions based on performance
- Create a new field in your Contacts object.
- Field name: Approved commissions
- Field type: Rollup
- Rollup type: Sum
- Select a relationship: Commissions earned
- Select a related field to roll up: Commission
- Only include records where…: Status equal to approved
- Click Save
- Create a new automation map and add a condition that checks to see if your partner’s commissions add up to $10k (or any other threshold).
- When contacts go above your commission threshold, change their partner program to the next level.
Create a group of contacts who referred more than X amount
- Create a new field in your Contacts object.
- Field name: Approved and paid commissions
- Field type: Rollup
- Rollup type: Sum
- Select a relationship: Commissions earned
- Select a related field to roll up: Commission
- Only include records where…: Status equal to approved OR paid”

- Click Save.
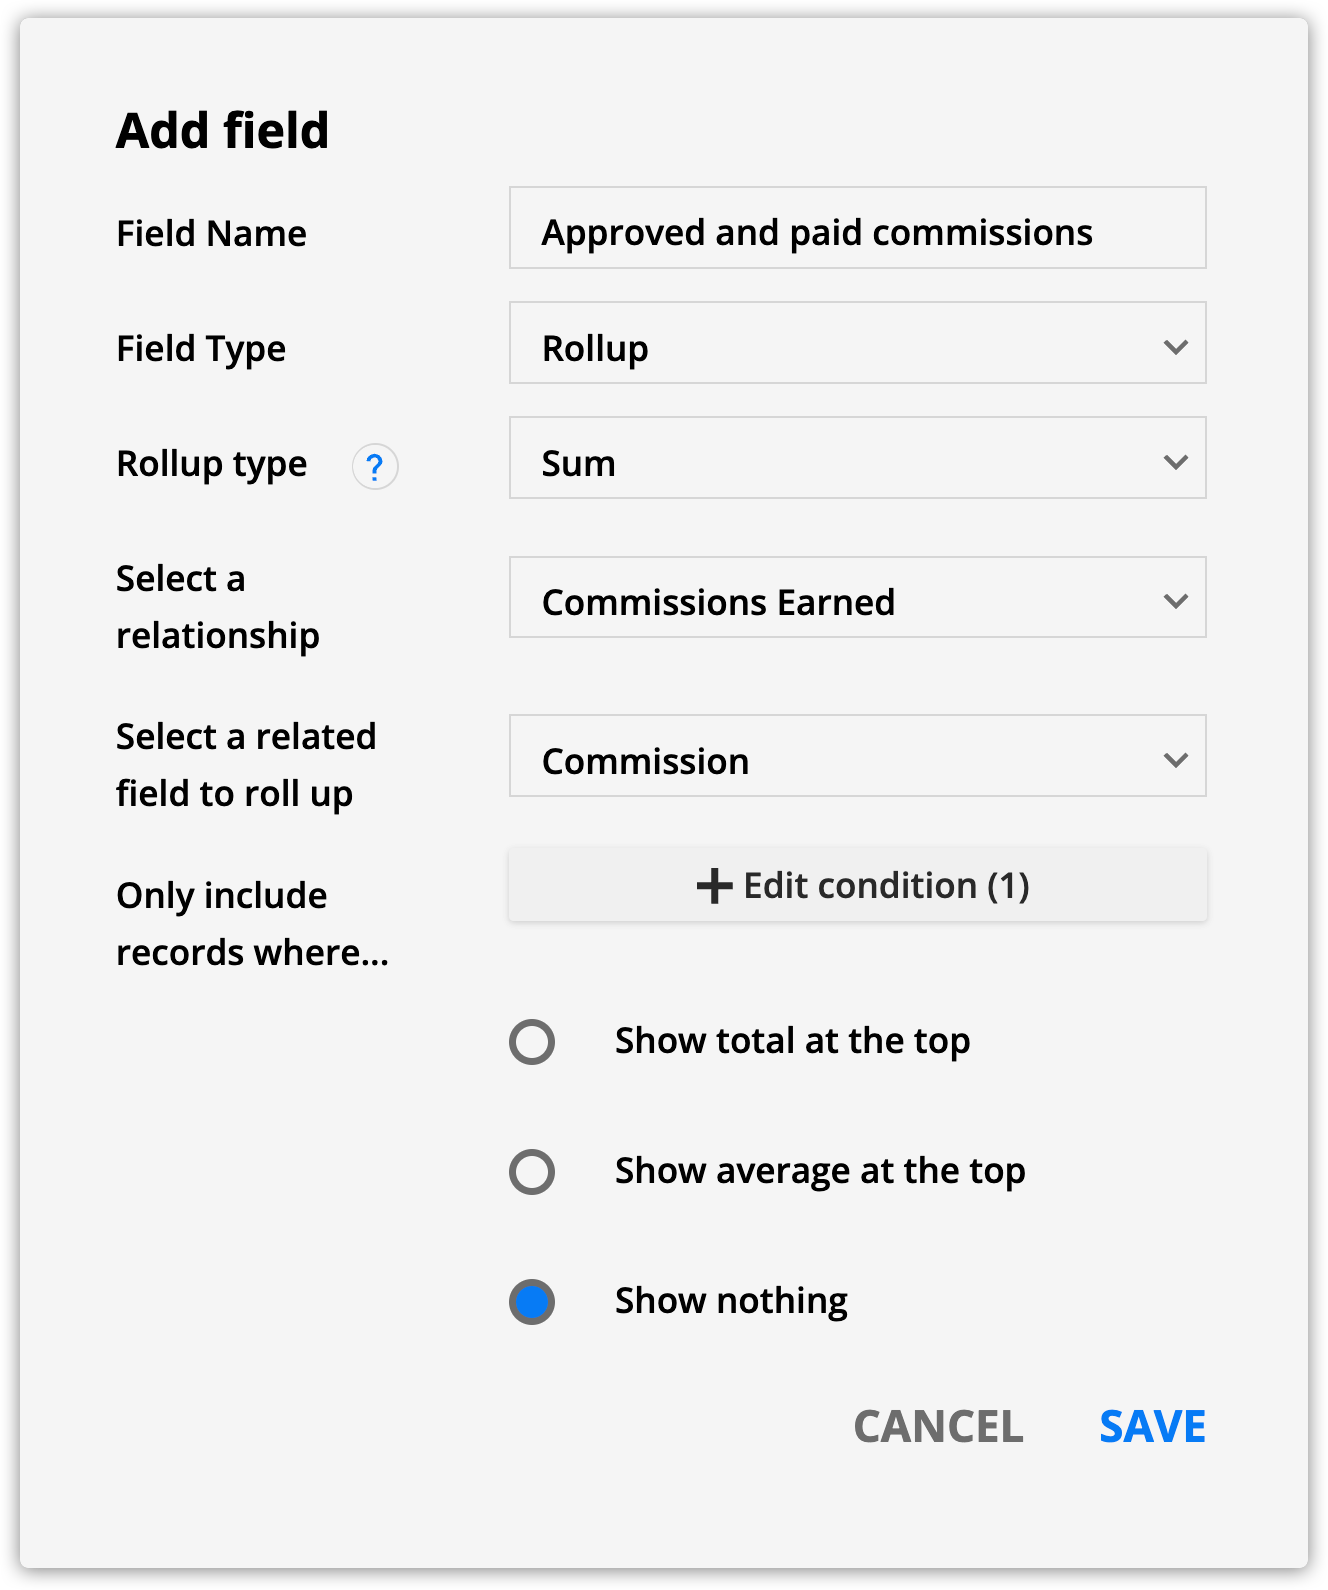
- In Contacts, create a sum rollup field.
- Select “Commissions earned” as the relationship.
- Add the conditions “Status equal to paid or approved” and the date processed within the last year.
- Create a group in Contacts with condition “Approved and paid commissions equal to or greater than X amount.”

Migrating my partner center
Since you can build your partner center using Ontraport’s drag-and-drop page builder, there are no limits on your customization. Each user will have different needs, so before following the steps, first identify which situation fits you best:
Situation 1: I want a partner center, and I’m starting from scratch
You’ll fit into this group if you’re wanting to build a new partner center, don’t have an Ontraport membership site and you don’t have a WordPress site integrated with Ontraport.
If you don’t have any partner center to migrate, you need to:
- Create an Ontraport membership site
- Create a partner center using the information above
- Give your partners access
Situation 2: I have an Ontraport membership site, and my partner center is on WordPress
You’ll fit into this group if you’ve only been using WordPress for your partner center.
If your membership site is built with Ontraport, but you’ve had a separate WordPress site just for your partner center, you need to:
- Create a partner center using the information above
- Write an email to your partners telling them they’ll receive new credentials to your updated partner center
- Give your partners access
Situation 3: I have everything on WordPress
You’ll fit into this group if your whole membership site is on WordPress, but you’d really like to create an Ontraport Partner Center using pages.
If your whole site is on WordPress, but you’d still like to create an Ontraport Partner Center, you need to:
- Create a partner center using the information above
- Create a subdomain or choose a new domain for your partner center
- It will be easiest for you to host your partner center on a subdomain or a new domain than to migrate your whole WordPress site
- Write an email to your partners telling them they’ll receive new credentials to your updated partner center
- Give your partners access
Create a partner center on WordPress
You can also add a partner center to WordPress. This type of partner center has less customization available than building a partner center with Ontraport. WordPress partner centers allow your partners to:
- View and export their earnings for commissions, refunds and payments
- View and export their affiliate reports based on date range
- Update their PayPal email address information
- Update their login information
- Access their promotional tools, links and SubID code
If you only want to give your partners affiliate links, and you have a partner program in Ontraport, you don’t need a partner center. However, if you want to use banner, lightbox or email promo tools or give your customers a place to check on their sales, you need a WordPress partner center. A partner center will also help your partners be more self-sufficient and organized, and it tends to reduce the number of support requests. Partner centers are available to those with Ontraport Plus accounts and above.

Prerequisites:
- You will need to create a partner program in your Ontraport account before creating a partner center if you haven’t yet
- You will also need a WordPress site that is integrated with Ontraport and has the PilotPress plugin.
Steps
- Enable the partner center in WordPress by logging in to your WordPress site and going to Settings → PilotPress → Ontraport Integration Settings.

- Check the box for Enable Partner Center.
- In the PilotPress Settings, you can set the page you’d like your partners to land on after they log in by going to the Post Login Redirect Settings. Select Partners Redirect to Partner Center, then click Save Changes.

Download a prebuilt automation map Partner sign up, welcome and thanks This automation is a great framework to launch your partner program. When visitors sign up to be a partner, they'll be added to this map. They'll receive the partner welcome email and get added to your membership site so they can access their partner center. Click here to download. |